|
Re: Adventures with a 1955 Clipper
|
||||
|---|---|---|---|---|
|
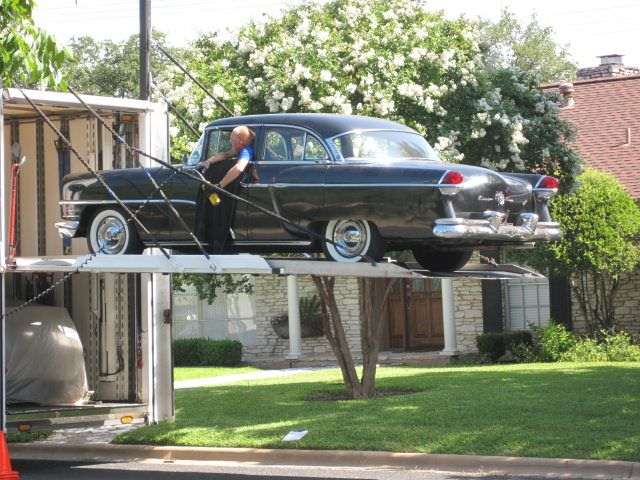
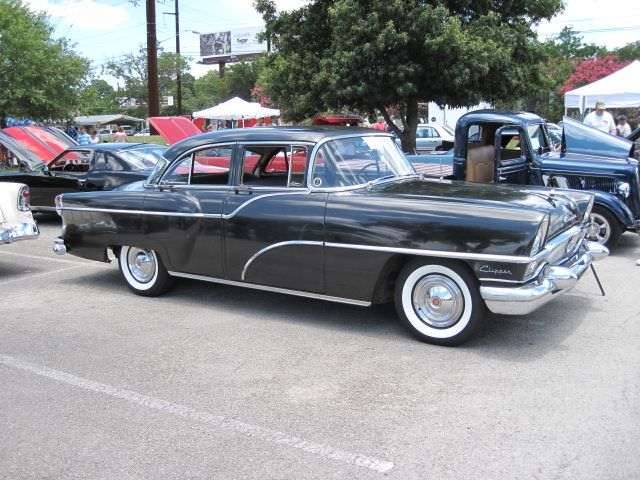
Home away from home

|
Hello All,
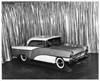
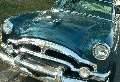
First, just to let you know, these blog entries are being made after the fact. I started an e-mail blog about this project and sent it to family and friends. Some have suggested I set-up a real blog here as they think many will be interested. These entries are based on those e-mails. This will be the first installment of work on the '55 Clipper. The goal is to have this part of the project finished in time to take the car to the 34th Texas Packard Meet in Salado at the end of March. This will be my fourth attendance at this meet. We took the 1937 Packard Six Convertible Coupe in previous years. It was well received, and it will be interesting to see how the Fifty-five does. As the photos from the first entry show, the car is attractive. The one color is unusual for these cars as they mostly came in two-tone color schemes. I think the Onyx Black (Paint Code V) works well with the lines of the car. The car is "a 20-footer", that is it looks good from 20 feet away. As you get closer more and more blemishes and defects can be noticed. My first chore was to thoroughly clean the car and deal with body and finish repairs later. I decided to start with the engine compartment. I attacked this area first as there were some mechanical improvements I needed to do. I wanted to install a battery cut-off switch for safety and security, and install a correct Auto-Lite generator to replace the Declo Remy unit installed. It quickly became apparent that the engine compartment was, well, filthy. To clean it there would be solvents, soap, and high pressure water and air needed. To protect the electrical equipment from being ruined by the cleaning process I started to remove these items (generator, starter, voltage regulator, etc.). Then I thought to do a better cleaning job, it would help if I could take off as much stuff from the engine and the compartment as could be easily removed. I think this is called mission creep. By the time I got through I had stripped the compartment of everything except the heater housing, and everything on the top of the engine except the cylinder heads, front cover and vibration damper, and exhaust manifolds. Of course everything I took off needed to be cleaned and painted, repaired and/or replaced. I did not take any photos of the disassembling, but have documented the reassembly. The first photo shows the engine and its compartment after I finished the cleaning. If you think this is bad, you should have seen it before. In the midst of the cleaning I was thinking that I might be creating a Super Fund site. The paint on the firewall and inner fender liners is badly stained and faded. Still, I decided not to try and paint the sheet metal parts. This, partly because it would be a horrendous job, and secondly to keep as much of the original character as possible. I would like to find some way to make these surfaces look better, maybe a cleaner-polish will help. The car is 56 years old and deserves to show its wear and tear. I believe the car was made in late March or April of 1955. Happy 56th Birthday! The Next installment will start the reassembly process. Take care. (o{I}o) Attach file:  (51.29 KB) (51.29 KB)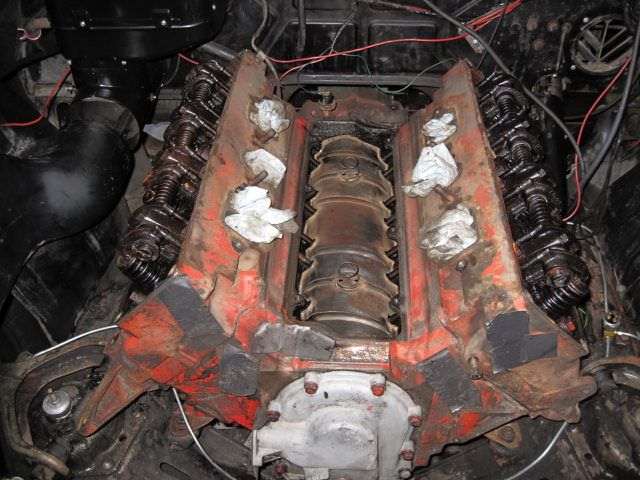
Posted on: 2011/5/30 15:34
|
|||
|
We move toward
And make happen What occupies our mind... (W. Scherer) |
||||
|
||||
|
Re: Adventures with a 1955 Clipper
|
||||
|---|---|---|---|---|
|
Home away from home
|
JW,
I'm glad you started your project blog. The 1955 Clipper Super (4dr) holds a special place in my heart because one was my Dad's car that I was privileged to drive during High School. I can understand why you bought one that was equipped with standard shift, standard suspension and converted to modern power brakes -- all the less to "go wrong" and it will show and drive just as well, if not better, than the T-U, T-L & BTV versions. I like your basic approach of not trying to do a concours restoration right out of the chute. However, "mission creep" does affect us all. Your engine & compartment are not so far apart. Good luck and keep on keepin' on. Craig
Posted on: 2011/5/30 15:59
|
|||
|
Nuke them from orbit, it's the only way to be sure! Ellen Ripley "Aliens"
Time flies like an arrow. Frui |
||||
|
||||
|
Re: Adventures with a 1955 Clipper
|
||||
|---|---|---|---|---|
|
Home away from home
|
Thanks for doing this blog. I have a '55 Clipper Super that needs quite a bit of work. I've just barely begun and your project gives me some hope!

Posted on: 2011/5/30 17:06
|
|||
|
||||
|
Re: Adventures with a 1955 Clipper
|
||||
|---|---|---|---|---|
|
Home away from home
|
Craig and 55clipperguy, thank you for the encouraging words. This blog will differ from others in that it will be retrospective. Regardless, comments are solicited and welcomed. My idea is to share experiences and hopefully generate some comments so others will have good and accurate information with which to base the decisions they make on their projects.
(o{I}o)
Posted on: 2011/5/30 21:48
|
|||
|
We move toward
And make happen What occupies our mind... (W. Scherer) |
||||
|
||||
|
Re: Adventures with a 1955 Clipper
|
||||
|---|---|---|---|---|
|
Home away from home
|
Hello All,
In this garage session I will start to reassemble the engine and compartment. I had been looking at the unattractive front engine cover and vibration damper. I thought it would be good to paint them before installing anything else on the front of the engine. The cover would need to be painted on the engine as removing it would be a major job as it would require removing the oil pan, and taking off the pan requires removing the cross over exhaust pipe and dropping the steering linkage. But, the damper could be removed to more easily paint the cover. However, I decided not to push reality too far and decided to leave both parts attached and paint them in place. I cleaned them as best I could and after an extensive masking off of the rest of the engine and compartment primered and painted them. I am pleased with the results. What do you think? Next task was to install all the parts and pieces for the water pump. The second photo shows all the parts and pieces associated with this spread out on the work bench. First the manifold went on, followed by the water pump, thermostat and housing, and finally the pulley and fan. The job moved quickly as I didn't have to stop to clean and paint things. I opted for a thermostat that stays open when it fails; thereby, allowing coolant to continue circulating. Other thermostats close when they fail which stops coolant flow and leads to almost immediate over heating, and if not caught quickly a ruined engine is quickly served up - well done. I also deviated from stock by using an after market 6-blade flex fan. I wanted a little more air flow at low speeds and less air restriction at higher speeds. The fan is an after market type with a steel center and aluminum blades. It was one that was on my '47 Clipper Custom. I installed a proper Packard 6-blade fan on the '47 and had this one left over. Fitting the fan did not involve too much difficulty. The center hole of the fan is smaller than the diameter of the water pump flange shaft, which protrudes beyond the flange by about 3/16". The four holes for the fan bolts fan out from the center and are self-centering. I used three 5/16" SAE flat washers to use as spacers to mount the fan to the flange. The spacer washers can be seen in the photo. It runs true and smooth. Plus, I think it looks cool (pardon the pun). Next issue: Spark plugs and other exciting things. Take care. (o{I}o) Attach file: (3.38 KB)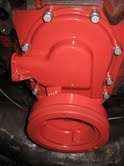 (5.09 KB) (5.09 KB)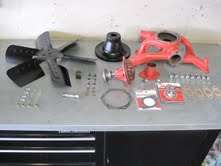 (6.33 KB) (6.33 KB)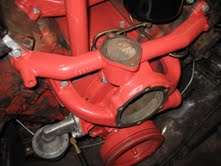 (5.51 KB) (5.51 KB)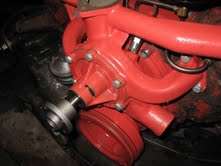 (3.72 KB) (3.72 KB)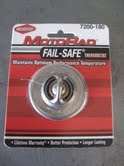 (5.59 KB) (5.59 KB)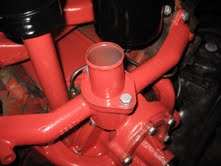 (5.84 KB) (5.84 KB)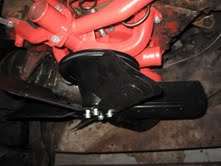
Posted on: 2011/5/31 13:32
|
|||
|
We move toward
And make happen What occupies our mind... (W. Scherer) |
||||
|
||||
|
Re: Adventures with a 1955 Clipper
|
||||
|---|---|---|---|---|
|
Home away from home
|
Hello All,
This garage session is about sparking and pumping. I removed, cleaned, and adjusted the gaps on the spark plugs. These are Champion N-16Y type. Note the long 3/4" threaded part and the projected electrode. This means my car is a later 1955 version as Packard changed the cylinder heads in mid-production from machined combustion chambers to cast ones and to the longer reach type spark plugs. I have not seen a set of N-type Champion spark plugs in probably 45 years. I have no idea how old these plugs are, but they appear to be in good operating shape. In the day, spark plug metal shells were black. Later the makers changed to a bright metal finish. Bright finished spark plugs are not considered to be authentic in some judging circles. This car is not up to that judging standard, but I did color the plugs so they would resemble those available in 1955. I did this by coloring the shell with a black Sharpie. Some people use gun bluing. The plugs take on a nice color after being heat cycled a few times. The color is permanent. I like the looks, how about you? Next I installed the fuel pump. It is an original equipment type Carter. I am so pleased to have a Carter carburetor and fuel pump as equipment on this engine. I also replaced the made up flex hose with a properly manufactured one sourced from Max Merritt. Packard V-8s have a single fuel pump. That is, the pump only serves one function - to pump fuel. These Packards also came with vacuum windshield wipers. Packard uses a vacuum booster pump driven off of the bottom of the oil pump to keep the wipers from stalling when the engine does not produce enough vacuum. Some car brands use a double fuel pump - one that pumps fuel and provides a vacuum boost. Many Packard straight-8s used this type of pump. I am not sure about the flex hose positioning. It may have to be changed to clear the v-belt that drives the water pump and generator. In the next shop session I will move to the top of the motor. Take care. (o{I}o) Attach file: (4.74 KB) (8.06 KB) (8.06 KB)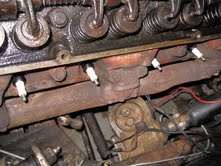 (7.17 KB) (7.17 KB)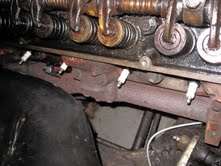 (4.97 KB) (4.97 KB)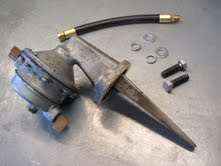 (3.92 KB) (3.92 KB)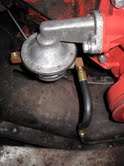
Posted on: 2011/6/1 17:06
|
|||
|
We move toward
And make happen What occupies our mind... (W. Scherer) |
||||
|
||||
|
Re: Adventures with a 1955 Clipper
|
||||
|---|---|---|---|---|
|
Home away from home
|
JW,
Thanks for the practical step-by-step blog. In answer to your questions so far: 1. I like the front cover just fine. 2. The flex fan is a great modification, unobtrusive and functional. Same goes for the "fail safe" thermostat. New to me. 3. The plug finish is a nice touch, and easy too! I like your practical approach and your eye for "what needs doing" very much. Your "mission creep" has not cost undue time and money, and those are just the things to keep an eye on! Looking forward to more installments, including some pics of the trans and brake conversions if you have them available.
Posted on: 2011/6/1 23:00
|
|||
|
Guy
Not an Expert |
||||
|
||||
|
Re: Adventures with a 1955 Clipper
|
||||
|---|---|---|---|---|
|
Home away from home
|
Guy, thanks for the encouraging words. I think the blog will get more interesting as I start to re-assemble the top of the engine.
I should have talked more about the water pump. I bought a rebuilt one from Max Merritt. The old one looked okay, but I decided to replace it now when it is so easy to do so. Also, more should have been said about the vacuum pump in the oil pump. Many of us know that the Packard engines Nash and Hudson used in some of their 1956 models used a single function oil pump and a double fuel & vacuum pump. This must have been a special build specification for the American Motors engines. I am not quite sure I understand why this change was made. This brings up another thought: I don't know which oil pump Studebaker used in their Packard-engined 1956 Golden Hawks. I was told by the previous owner that my engine has one of the Bob Aller modified oil pumps. The front cover looks like it had been off at some time and hopefully, the late style cam retainer was installed. Lifters are quiet and oil pressure comes up quickly. (o{I}o)
Posted on: 2011/6/2 15:44
|
|||
|
We move toward
And make happen What occupies our mind... (W. Scherer) |
||||
|
||||
|
Re: Adventures with a 1955 Clipper
|
||||
|---|---|---|---|---|
|
Home away from home

|
I can't recall exactly, but it goes somethiong like this:
The Nash or the Hudson did not have enuf oil pan room for the vacuum pump due to a different oil pan they used due to suspension clearence problems. I think it was the Golden hawk that had a shaft bushing in the pump cover at the BOTTOM of the pump. IF your current oil pump is not causing any problems and there is no lifter clatter then don;t worry about it.
Posted on: 2011/6/2 17:24
|
|||
|
VAPOR LOCK demystified: See paragraph SEVEN of PMCC documentaion as listed in post #11 of the following thread:f
packardinfo.com/xoops/html/modules/newbb/viewtopic.php?topic_id=7245 |
||||
|
||||


