|
Re: The Sergei Mikhailovich Prokudin-Gorskii Collection
|
||||
|---|---|---|---|---|
|
Webmaster

|
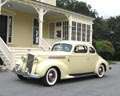
Here's a nice 3-Ton Packard Truck:

Posted on: 2009/9/3 20:09
|
|||
|
-BigKev
1954 Packard Clipper Deluxe Touring Sedan -> Registry | Project Blog 1937 Packard 115-C Convertible Coupe -> Registry | Project Blog |
||||
|
||||
|
Re: Continuing on the Overdrive
|
||||
|---|---|---|---|---|
|
Home away from home
|
Even easier-- Gov to toggle - toggle to relay
Put the ign interrupt on a simple momentary push button (dis to grnd)
Posted on: 2009/9/3 19:29
|
|||
|
||||
|
The Sergei Mikhailovich Prokudin-Gorskii Collection
|
||||
|---|---|---|---|---|
|
Webmaster
|
Gerd,
Thought you may enjoy these which were all digitally restored by the Library of Congress, the color is amazing. http://memory.loc.gov/pp/prokhtml/prokabt.html The Sergei Mikhailovich Prokudin-Gorskii Collection features color photographic surveys of the vast Russian Empire made between ca. 1905 and 1915. Frequent subjects among the 2,607 distinct images include people, religious architecture, historic sites, industry and agriculture, public works construction, scenes along water and railway transportation routes, and views of villages and cities. An active photographer and scientist, Prokudin-Gorskii (1863-1944) undertook most of his ambitious color documentary project from 1909 to 1915. The Library of Congress purchased the collection from the photographer's sons in 1948. Born in Murom, Vladimir Province, Russia (originally believed to be St. Petersburg) in 1863 and educated as a chemist, Prokudin-Gorskii devoted his career to the advancement of photography. He studied with renowned scientists in St. Petersburg, Berlin, and Paris. His own original research yielded patents for producing color film slides and for projecting color motion pictures. Around 1907 Prokudin-Gorskii envisioned and formulated a plan to use the emerging technological advancements that had been made in color photography to systematically document the Russian Empire. Through such an ambitious project, his ultimate goal was to educate the schoolchildren of Russia with his "optical color projections" of the vast and diverse history, culture, and modernization of the empire. Outfitted with a specially equipped railroad car darkroom provided by Tsar Nicholas II, and in possession of two permits that granted him access to restricted areas and cooperation from the empire's bureaucracy, Prokudin-Gorskii documented the Russian Empire around 1907 through 1915. He conducted many illustrated lectures of his work. Prokudin-Gorskii left Russia in 1918, after the Russian Revolution, and eventually settled in Paris, where he died in 1944.
Posted on: 2009/9/3 18:00
|
|||
|
-BigKev
1954 Packard Clipper Deluxe Touring Sedan -> Registry | Project Blog 1937 Packard 115-C Convertible Coupe -> Registry | Project Blog |
||||
|
||||
|
Re: Battery Cut-off Switch
|
||||
|---|---|---|---|---|
|
Home away from home

|
41ParPac, I mounted the switch in the engine compartment for quick access, just in case . . . The under the seat was hidden and difficult to get to.
I had a '39 Cadillac Sixty Special several years ago. If I recall correctly, the battery was mounted in the engine compartment on the passenger side down low next to the firewall. I may be mistaken about the specifics but it was in the engine compartment. It was positive grounded. That is a car that should have had a cut-off switch - original wiring!
Posted on: 2009/9/3 17:49
|
|||
|
We move toward
And make happen What occupies our mind... (W. Scherer) |
||||
|
||||
|
Re: Continuing on the Overdrive
|
||||
|---|---|---|---|---|
|
Home away from home
|
Yes, I had a momentary brain failure, thinking if I short the governor it activates the solenoid. Of course that works when the solenoid is hooked up.
I was trying to eliminate as much of the system as possible and determine if I have a mechanical issue. I think I need to wire 3 and 4 together and take a tap switch (I have one I used to use to tap my Chevy starter so I could adjust the solid lifters, I think it should be heavy enough)from coil and #3 and #4 tied together and perform my test. This should eliminate everything except the solenoid and the OD itself. I still would not actually complete the OD shift as the noise I am trying to track down stops upon the shift being made. I actually have the Bosch relay mentioned in the FAQ, for use in installing my plymouth OD (BW R10), but that is a four terminal relay. I see in the post war forum that this was used on an R11, but actual wiring sequence is not shown. Can it also be incorporated into an R9 and be functionally correct? Is there a wiring diagram for that? I don't know which terminals on the Bosch relay would correspond to the Packard terminals. But if it can be correctly wired in, I could use that as a substitute relay and test that portion of the system. Phils38cpe - Thank you for the suggestion. I am not sure I got 100% of where your wires are going. I think dist to toggle then to relay (power in), a second wire from interrupt on toggle to ground on relay, a third from relay (power out) to terminals 3 and 4 of the solenoid? It does seem like a good way to test around the relay. If I have this wrong (which is likely because I really don't get how relays work) could you send along a diagram? Thanks very much, this is so much more fun now that I am off the jack stands.
Posted on: 2009/9/3 16:01
|
|||
|
1941 Touring Sedan
1952 250 Convertible 1932 902 Rumble seat Coupe  Who is John Galt? Who is John Galt?
|
||||
|
||||
|
Re: Scored a 288
|
||||
|---|---|---|---|---|
|
Home away from home

|
The heads will interchange, and apparently the best head to have is the 288 AT head, it has the smallest chambers. What I would do if I were you and you wanted to hot rod it was find a 5 main 327 crank and stick it in there but use the 288 rods so you can use lighter modern aftermarket forged pistons. It depends on how far you want to take the engine on what you can do with it. Saying that, I have a few ideas on what to do with them.
Posted on: 2009/9/3 15:20
|
|||
|
||||
|
Re: Scored a 288
|
||||
|---|---|---|---|---|
|
Forum Ambassador

|
Quote:
jreeder41 wrote: I picked up a 51 288 for $50.........Will a thunderbolt head fit this? The guy had two but I didn't know if it would fit. From what I understand all the 288/327/359 heads will interchange. But compression ratios vary and I believe to boost CR the 288 head, because of it's smaller chamber area, is usually used on the 327.
Posted on: 2009/9/3 15:11
|
|||
|
Mal
/o[]o\ ====  Bowral, Southern Highlands of NSW, Australia "Out of chaos comes order" - Nietzsche. 1938 Eight Touring Sedan - SOLD 1941 One-Twenty Club Coupe - SOLD 1948 Super Eight Limo, chassis RHD - SOLD 1950 Eight Touring Sedan - SOLD What's this?  Put your Packard in the Packard Vehicle Registry! Here's how! Any questions - PM or email me at ozstatman@gmail.com |
||||
|
||||
|
Re: Wade's Workshop
|
||||
|---|---|---|---|---|
|
Forum Ambassador
|
Thursday 3rd September 2009
Well I was right. Wade had put Old Blue back together yesterday afternoon and then driven it home. Though at one point on the trip he thought it wouldn't make it as it was missing, running roughly and cutting out! So back at the workshop this morning Old Blue was back under the spotlight. Wade found the distributor cap was chipped, with a piece missing from the surface where one of the retaining clips fits. No problem, easy to fix, use the new distributor cap carried as a spare under the front seat! Except that cap too had the same piece missing from the clip surface and it's never been on a distributor! Fallback option, old cap sitting on shelf which didn't have any missing surfaces, just needed a good clean. Off for a test run but the same problems surfaced so back to the workshop. This time as a test Wade shorted each plug out in turn and when numbers 7 and 8 failed to affect engine running these were pulled to display a gap of about 0.035". Wade runs 0.028" so it was decided to pull all the plugs and replace them with the set kept under the front seat. Only trouble with this idea was that Wade and Brian had used that set in my '41 when we were on the National Rally back in March. So I cleaned up the National Rally set in the blasting cabinet, Wade re-gapped them and put them into Old Blue. Also cleaned up the set that came out of Old Blue and re-gapped them and put them under the front seat as ready spares. Then, off for the test drive. It was deja-vu, all over again, no improvement at all. Back at the workshop a test to determine whether there might be a intake/exhaust manifold leak by spraying WD40 onto the visible top edge of the gasket surface for 7/8 inlet. Voila! A noticeable change in the engines running characteristics immediately, loosing the roughness, not missing and running smoother. Test repeated a number of times with the same outcome. Then tightening of the manifold retaining nuts, first by Wade, then again by John. Similar to how it had been done yesterday but under hot conditions this time, it was surprising how much each nut could be further taken up! Test drive time and success! No roughness, missing or cutting out. And on the drive back to the workshop Wade explained his fear in finding 7/8 were involved was that it might be a blown head gasket in that area. Fortunately it doesn't appear so and Wade will be taking Old Blue home again overnight to give her a longer run in traffic, should be a good test. All that done then turned to the '34. The other day Wade had started on the body by adding the door latch striker plates to the door pillars. Today it was various rubber item. Started with the rubber door straps which prevent the doors opening too far. Yesterday part of the POR-15'ing involved the retaining piece, which have little "claws" on their undersurfaces to hold onto the rubber strap. There are also wood screws for the rear doors and metal screws for the front doors which pass through the retaining piece and the rubber. So first was using the end of an old strap as a template to make the screw hole locations. Then the strap was slid through the slot in the door frame, the slot in the door pillar and the retaining pieces were then screwed to the pillar. Next were the rubber rubbing blocks, for want of a better term, on the B pillar, two for each door, top and bottom of the pillar. Then the round rubber bumps stops near the bottom of each door and located on the A and C pillars. Finally, each front door has another roughly rectangular bump stop at the top of the A pillar. Because all this needs to be done carefully and right it's surprising the amount of time this all took, my first real hands on experience with a ground up restoration. Also installed the spring and cover on the '34 for the hot-box valve now that the cover has been painted. Attach file:  (14.13 KB) (14.13 KB)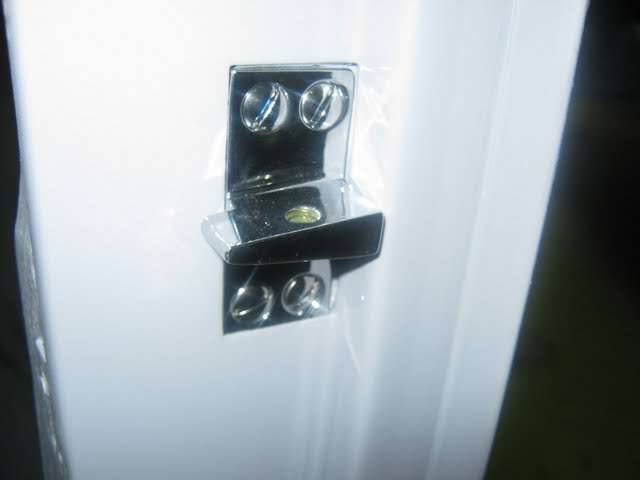 (31.28 KB) (31.28 KB)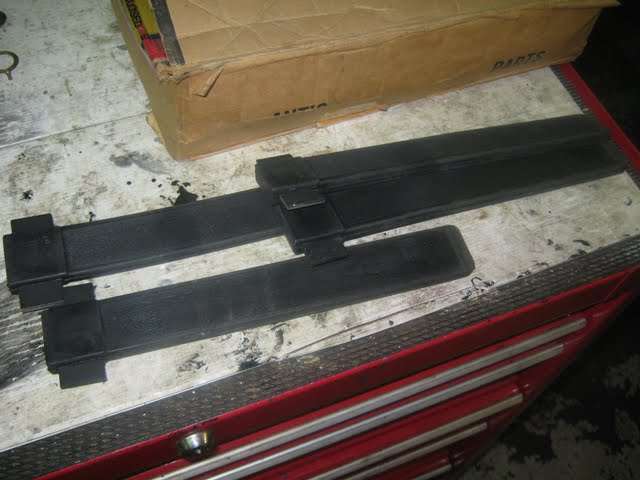 (34.29 KB) (34.29 KB)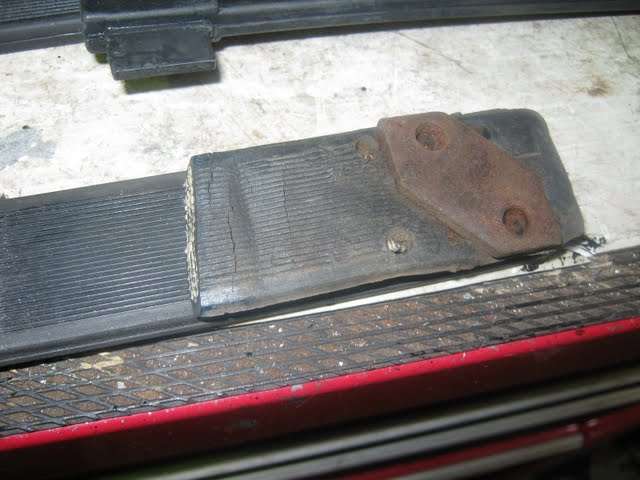 (14.50 KB) (14.50 KB)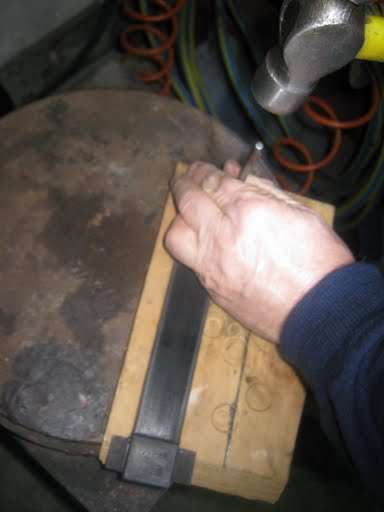 (18.85 KB) (18.85 KB)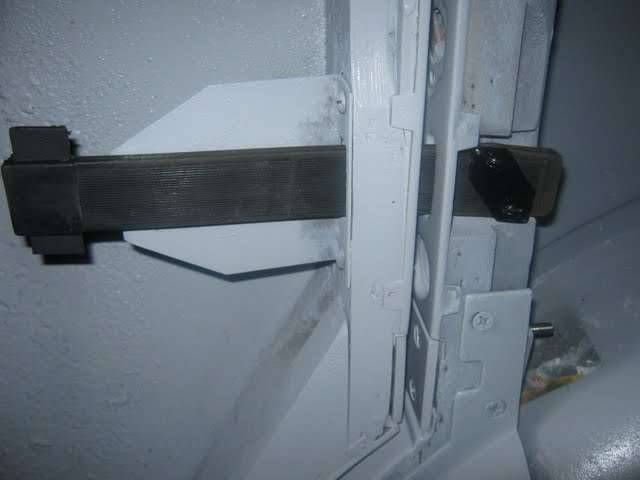 (18.29 KB) (18.29 KB)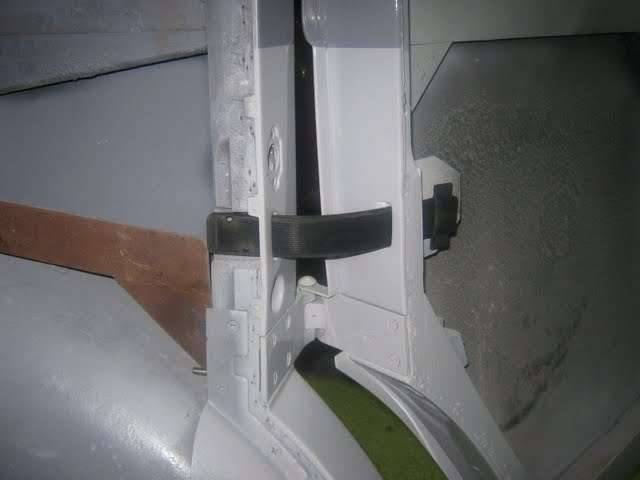 (20.71 KB) (20.71 KB)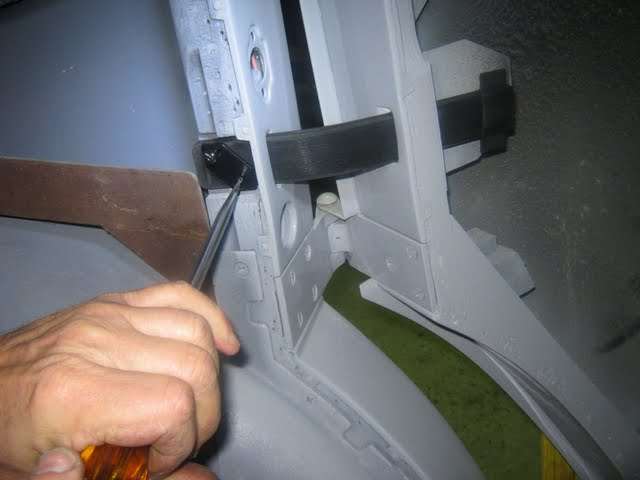 (16.55 KB) (16.55 KB)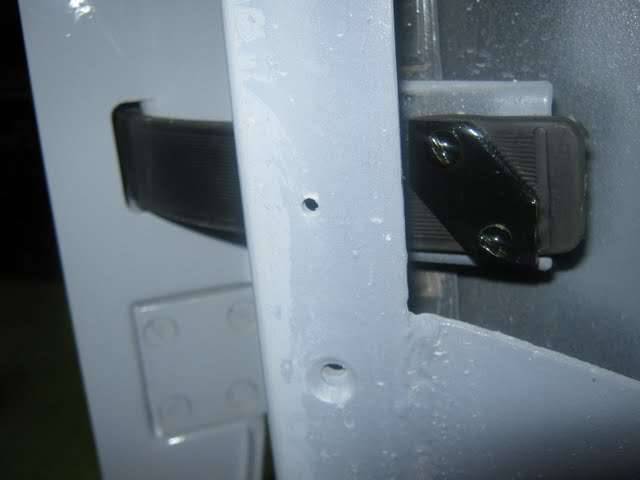 (25.92 KB) (25.92 KB)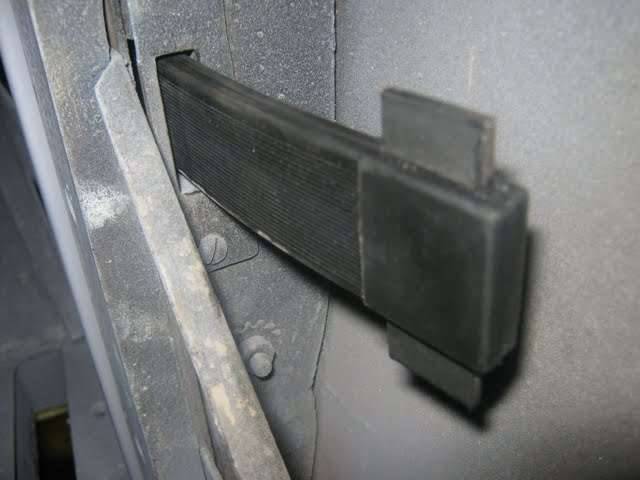 (24.26 KB) (24.26 KB)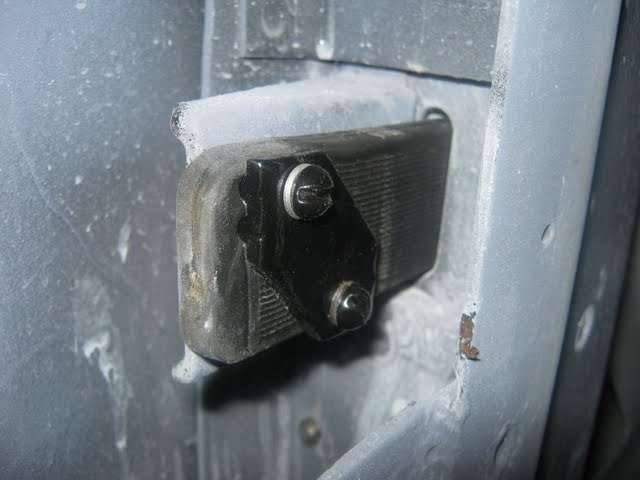 (20.35 KB) (20.35 KB)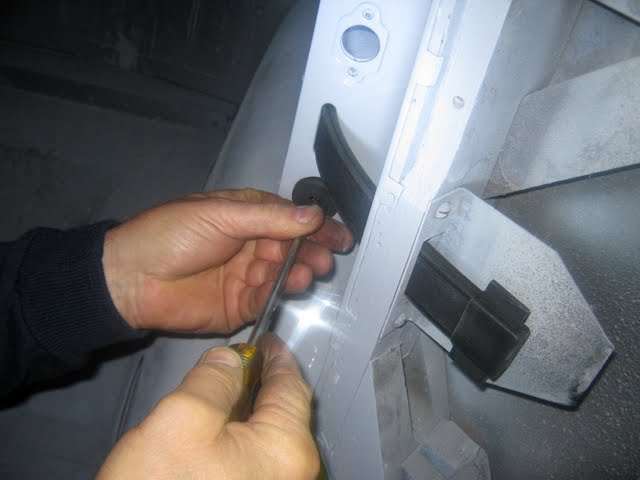 (17.76 KB) (17.76 KB)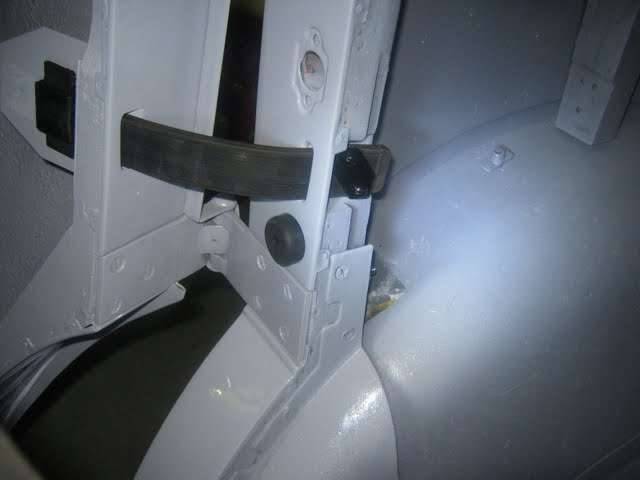 (15.29 KB) (15.29 KB)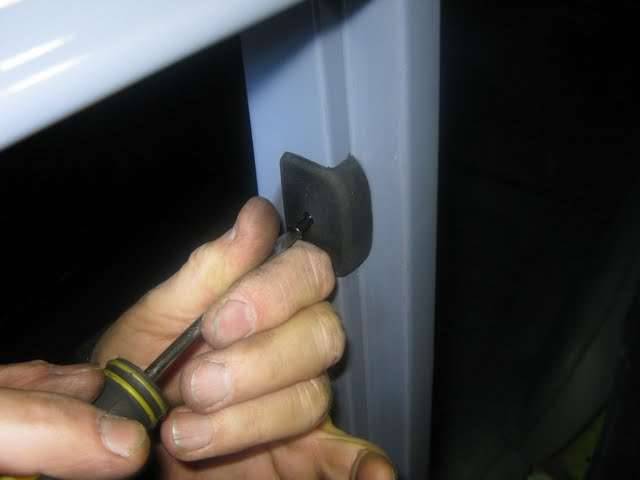 (11.67 KB) (11.67 KB)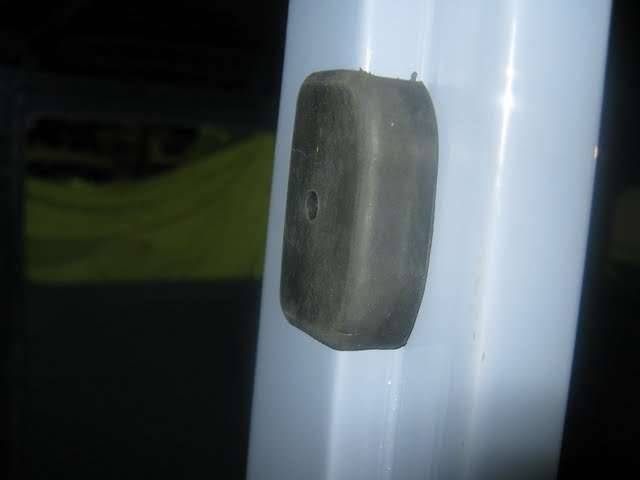 (17.65 KB) (17.65 KB) (30.57 KB) (30.57 KB) (25.06 KB) (25.06 KB) (24.29 KB) (24.29 KB) (24.25 KB) (24.25 KB)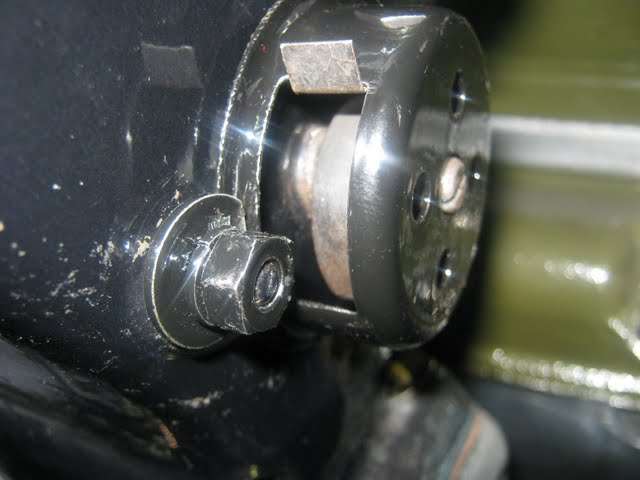 (17.72 KB) (17.72 KB)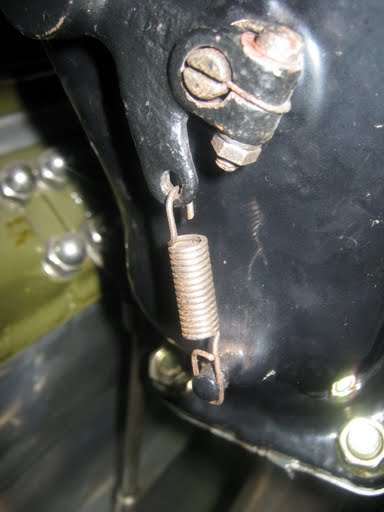
Posted on: 2009/9/3 15:04
|
|||
|
Mal
/o[]o\ ==== Bowral, Southern Highlands of NSW, Australia "Out of chaos comes order" - Nietzsche. 1938 Eight Touring Sedan - SOLD 1941 One-Twenty Club Coupe - SOLD 1948 Super Eight Limo, chassis RHD - SOLD 1950 Eight Touring Sedan - SOLD What's this? Put your Packard in the Packard Vehicle Registry! Here's how! Any questions - PM or email me at ozstatman@gmail.com |
||||
|
||||
|
Re: Packards on TV
|
||||
|---|---|---|---|---|
|
Not too shy to talk

|
Thanks for the info guys! Wish I had caught the earlier episode....but I'm looking forward to the one about the Packard Proving Grounds!
-Roman
Posted on: 2009/9/3 15:02
|
|||
|
||||
|
Re: 6 volt Tach
|
||||
|---|---|---|---|---|
|
Home away from home
|
Have you tried one?
Posted on: 2009/9/3 14:40
|
|||
|
||||


