|
Re: Wade's Workshop
|
||||
|---|---|---|---|---|
|
Webmaster

|
Mal, it appears that '54 came from near here based on the license plate frame. "Villa Park" is right near Orange, CA where the PI Meet is held. If the car has two matching "black" CA plates, he could resell those to someone in Calif looking for a set of matching YOM plates. There is an entire market place for those on EBay.
Posted on: 2010/11/30 1:42
|
|||
|
-BigKev
1954 Packard Clipper Deluxe Touring Sedan -> Registry | Project Blog 1937 Packard 115-C Convertible Coupe -> Registry | Project Blog |
||||
|
||||
|
Re: Wade's Workshop
|
||||
|---|---|---|---|---|
|
Forum Ambassador

|
Kev,
Here's an excerpt from an article from our club magazine, The Packardian, from earlier this year about Chris and his Packards. "About September 2009, Chris bought 2 Packards in the US off eBay. First a '48 Club Sedan from Illinois which was described as being in very poor condition. The '48 was, and maybe still is, going to be built into a "woodie" because when Chris saw it on arrival it was in much better condition than expected, so now Chris is in two minds as to whether to build the "woodie" or not. The '48 is presently parked at a hot rod shop at Camden, about 45 miles south-west of Sydney, so was not viewable on the day Wade and I visited Chris. All Chris has managed to do is clean out all the filth and vermin debris from inside the '48 and the engine has been running since it arrived so that's a start. The other Packard purchased at that time is a '54 Clipper Super Club Sedan from California with 327 5 main solid lifter engine, ultramatic and upper cylinder lubrication system, alternator and converted to 12V. Chris is currently working on it and has rebuilt the suspension and brakes including the BTV, the motor runs well and when the body work is done will be registered for daily road use. Since buying these two Packards, Chris also bought another Packard off eBay in the US, this time a '53 Mayfair Hardtop from Chicago Illinois, 327 5 main hydraulic lifter engine with 4bbl, ultramatic and power steering, with a boot full of various "pullers" included by the seller, and which only arrived a week before our visit!.....Chris has also had the '53 running since hitting Aussie soil and it appeared to run well. Well, as well as a dirty carb and such will allow, but no expensive noises could be discerned. Not much has been done to the '53 besides taking off the carb for a clean or rebuild." You're right Kev, it's a cliche, a California car! Didn't see a rear number plate on the car but that doesn't mean there isn't one. Attach file:  (33.61 KB) (33.61 KB)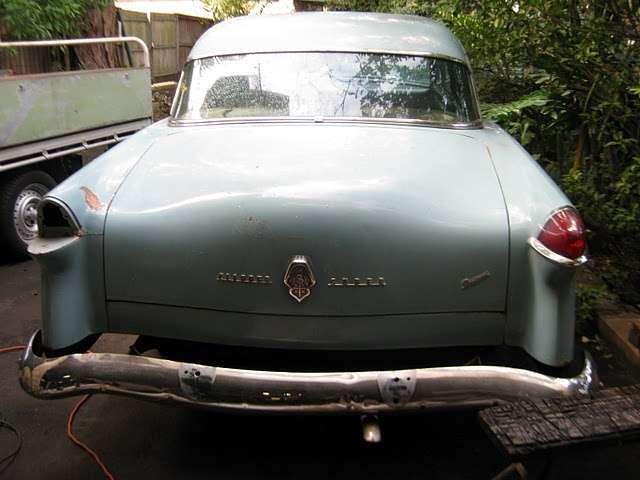
Posted on: 2010/11/30 2:55
|
|||
|
Mal
/o[]o\ ====  Bowral, Southern Highlands of NSW, Australia "Out of chaos comes order" - Nietzsche. 1938 Eight Touring Sedan - SOLD 1941 One-Twenty Club Coupe - SOLD 1948 Super Eight Limo, chassis RHD - SOLD 1950 Eight Touring Sedan - SOLD What's this?  Put your Packard in the Packard Vehicle Registry! Here's how! Any questions - PM or email me at ozstatman@gmail.com |
||||
|
||||
|
Re: Wade's Workshop
|
||||
|---|---|---|---|---|
|
Forum Ambassador
|
Wednesday 1st December 2010
Today's the first day of Summer here in Oz and in Sydney it was the wettest 1st December for 70 years. So much for Summer days! Be that as it may, in the workshop it's dry so Packard life goes on. Started by cleaning up the wooden frames that fit behind the lower section of the C pillar to hold and host the rear ash trays. Cleaned up the woodwork to remove 76 years of dirt and also cleaned and painted metal hardware and screws from these fittings. Meanwhile, while I was POR-15'ing, Wade was casting around for other rear interior pieces which could be painted as well. Came up with the upper mounts for the rear seat back. After Wade had cleaned and panel-bashed these back into shape they too were POR-15'd. What next? Started on the right rear window glass. Wade had painted the metal window carrier after it had been re-glassed some time ago but ended up with some POR-15 over-paint on the bottom of the glass. Not my fault for a change! After carefully removing the over-paint next was fitting a piece of weather stripping to a small channel in the metal window carrier. Next was installing the window in The Fossil, but before doing that two pieces of bailey channel had to be measured and cut for the lower front and rear sections of the door. To complicate the installation prodecure, the window has to be in the up position before the two pieces of bailey channel can be installed in the lower part of the door. Rather than struggle to hold the window up manually a Special Packard Tool was employed for that purpose, see pic. With the "tool" holding the window in place the lower pieces of bailey channel were screwed into place. Then the wooden panel holding the window winding mechanism was installed in the door. After that there was a lot of fiddling to get the bailey channels properly aligned using packing to adjust the fit. Wade said when he was disassembling The Fossill, as well as the replacement body later, he was amazed at the amount of packing he found in areas such as this. I imagine it would have been a lot easier doing this on EGB by skilled assemblers knowing what they were doing rather than a couple of Aussies following their noses. Finally got everything there squared away and went onto installing the door lock and mechanism then topped it off with the outside door handle being fitted. Doesn't seem like much was achieved in installing a window, 2 pieces of bailey channel, window winding mechanism, door lock and the outside handle taking the better part of the day to do so. I'd think though that installing the windows in the other doors should take much less time after this pioneering effort. Attach file: (35.45 KB)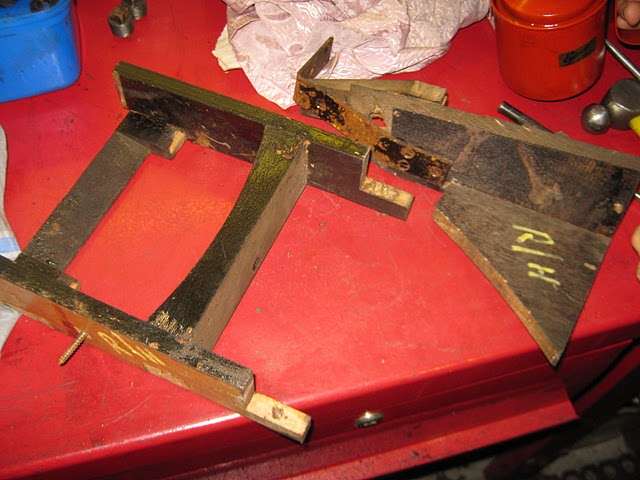 (17.37 KB) (17.37 KB)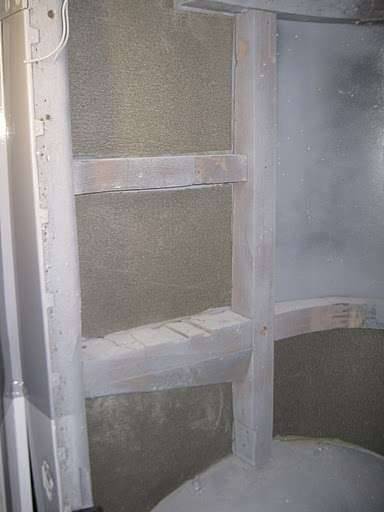 (24.18 KB) (24.18 KB)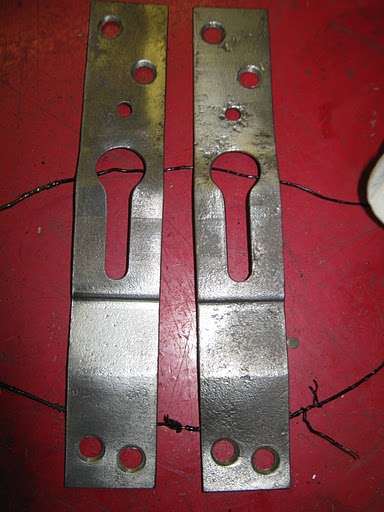 (20.64 KB) (20.64 KB) (26.85 KB) (26.85 KB) (21.02 KB) (21.02 KB)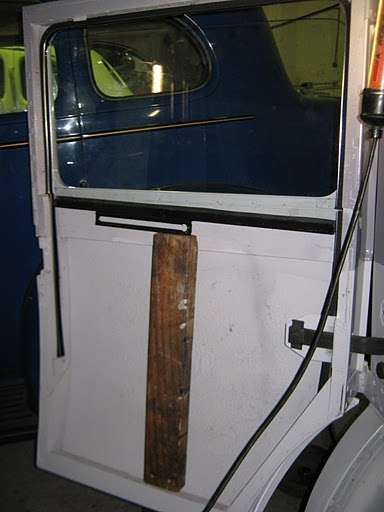 (24.67 KB) (24.67 KB)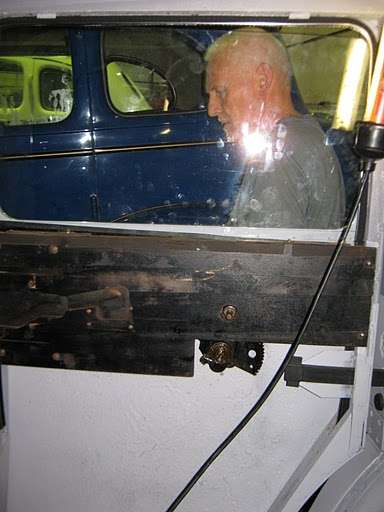 (26.05 KB) (26.05 KB)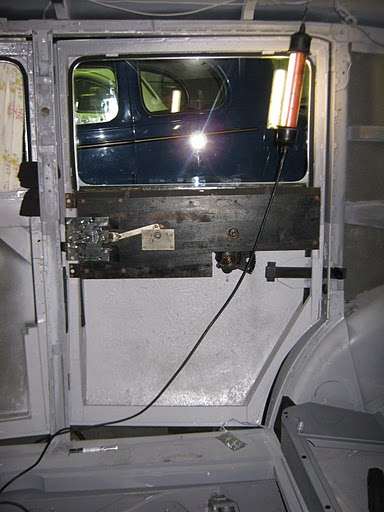 (13.28 KB) (13.28 KB)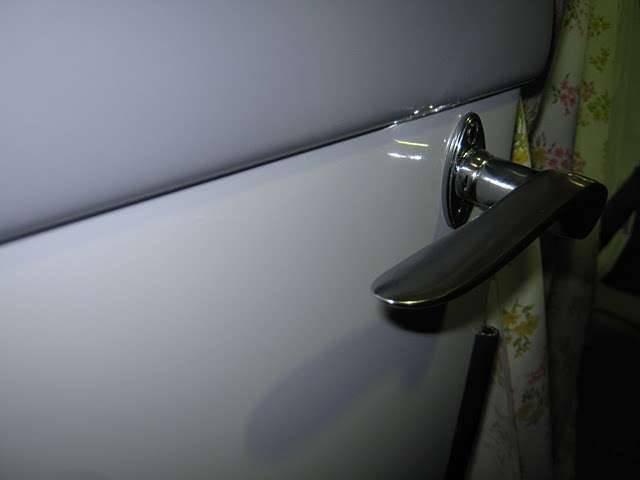 (21.43 KB) (21.43 KB)
Posted on: 2010/12/1 5:17
|
|||
|
Mal
/o[]o\ ==== Bowral, Southern Highlands of NSW, Australia "Out of chaos comes order" - Nietzsche. 1938 Eight Touring Sedan - SOLD 1941 One-Twenty Club Coupe - SOLD 1948 Super Eight Limo, chassis RHD - SOLD 1950 Eight Touring Sedan - SOLD What's this? Put your Packard in the Packard Vehicle Registry! Here's how! Any questions - PM or email me at ozstatman@gmail.com |
||||
|
||||
|
Re: Wade's Workshop
|
||||
|---|---|---|---|---|
|
Forum Ambassador
|
Thursday 2nd December 2010
More rear interior work today on The Fossil. First was re-assembling the brackets that hold the rear seat side arm rests. Their metal parts along with other pieces and fasteners had been POR-15'd yesterday. Once together started on the right rear side. The ashtray holder, which goes into the middle space behind the C pillar, slid in and screwed in place. Next was the arm rest holder which mounts in the bottom space behind the C pillar, but this didn't go back in as easily. Now it's the exact same piece that came out some years ago but because of partial re-wooding and some rust repairs to the inner mudguard(fender) it now didn't want to "assume the position". For one thing, the captive "nut" in that segment of the inner mudguard(fender) now didn't align with the factory hole in the woodwork! For another a piece of wood about 1" x 1" x 2", which the front end of the arm rest mount sits on and screwed to, was missing. It had been "lost", probably during the re-wooding process. And lastly a small section of wood had to be removed from the front because the lower door hinges, after the re-wooding, now screw through the timber into a metal plate. This meant a lot of in and out of the rear of The Fossil, especially for Wade, as each of this problems areas were encountered and then addressed. Sometimes more than once because of difficulties encountered and trying to keep to a minimum "modifications" to 76 year old Packard parts. Next it was the left sides turn for the same treatment but there were additional problems to overcome. Least of which was measuring, cutting and contact adhesiving in place the sound proofing to the three small panels on that side. That done the ash tray holder was more difficult to remount. There's a slot cut into the wooden crossbar which runs between the C pillar and the next rearmost wooden upright into which the rear upright of the ashtray holder slides. But it wouldn't slide in, so a little clearance work with a thin wood chisel and problem solved. Then it was onto the rear arm rest mount but before it could be even trial fitted a fabricated metal brace/bracket made by the panelbeater had to be removed. But to remove this meant unscrewing the lower door hinge which penetrated the bottom of the C pillar and bolted into a plate forming part of this apparatus. Wade was loath to do this but with no other options, you could almost imagine tears in his eyes as he broke the paint seal on the screws as he removed each of them. For this exercise another "Special Packard Tool" was pressed into service. Apparatus out, the plate section to which the hinge screws bolted was cut out with an angle grinder, edges smoothed and the screw holes re-tapped, just to be sure. Another hole was drilled in the centre of the plate so a retaining screw could be added before the arm rest mount went back in. After all, if some reason you needed to remove a rear door, you don't want the hinge screw retaining plate to drop down requiring a lot of the interior of the car including upholstery to be removed to fix that. The 4 door hinge screws were also shortened by about 1/2" each to provide clearance for the arm rest mount. Only thing we didn't have to do for this side was provide extra clearance for the captive mudguard(fender) nut, this one was perfect. Other things done, were 1) remounting of the upper rear seat mounts, 2) installing more sound proofing in the large rear corner panels and the small panels below the rear window, 3) Wade positioned the rear window glass in it's new Steele's gasket, rounded up the trim piece for the inside of the window and 14 new screws to affix it in place, and 4) "robbing" an old TV set of its speakers. Wade is going to install these in the vacant upper spaces behind the C pillar. They'll be well hidden, being behind the upholstery! Attach file: (40.30 KB)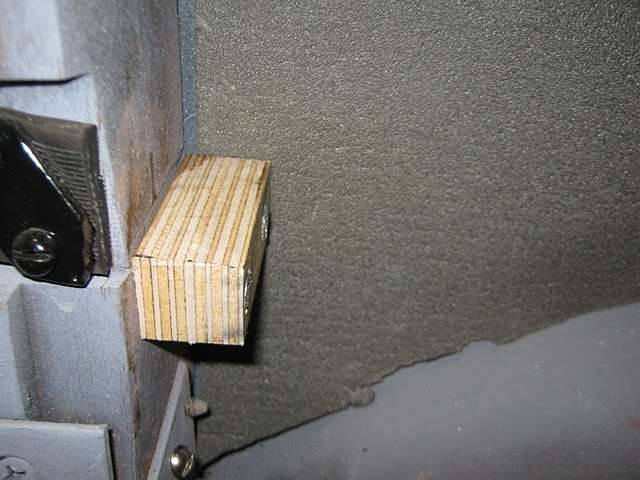 (41.42 KB) (41.42 KB) (21.15 KB) (21.15 KB)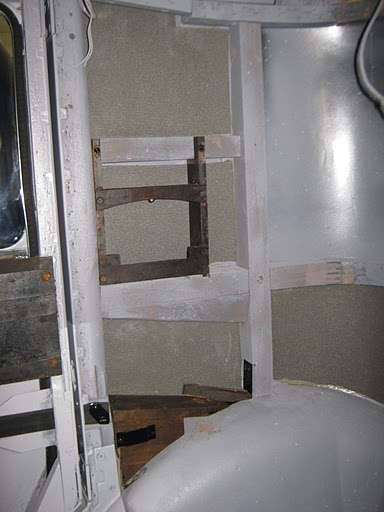 (20.05 KB) (20.05 KB)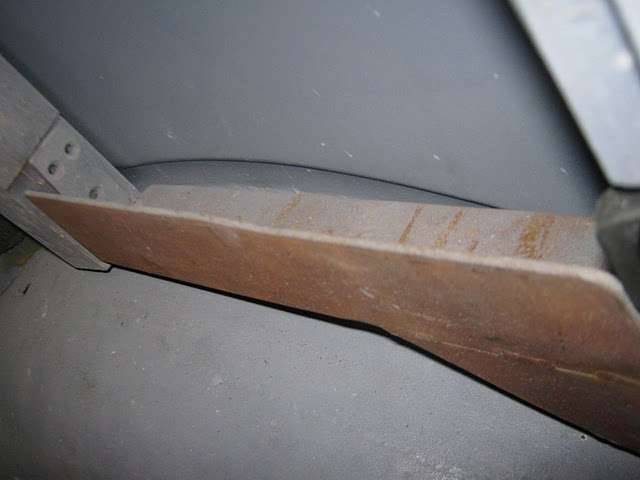 (32.46 KB) (32.46 KB)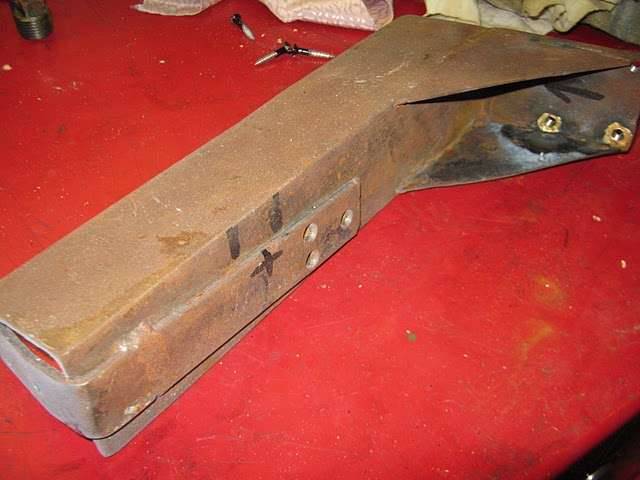 (29.66 KB) (29.66 KB) (23.47 KB) (23.47 KB)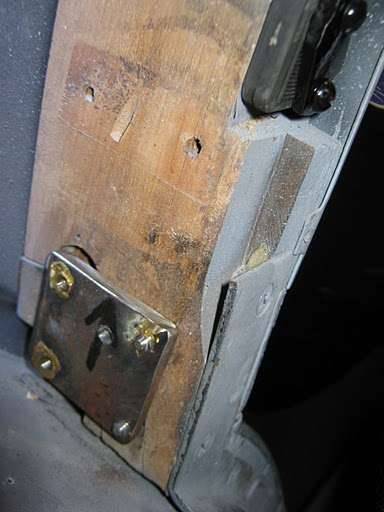 (20.86 KB) (20.86 KB)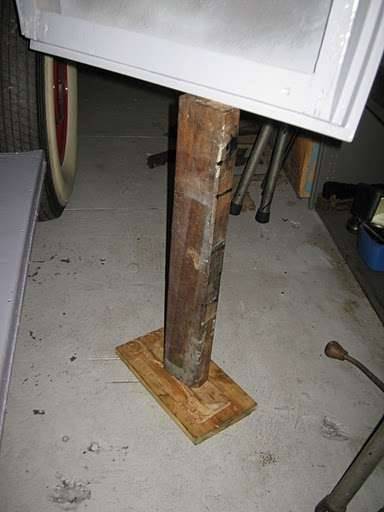 (30.87 KB) (30.87 KB)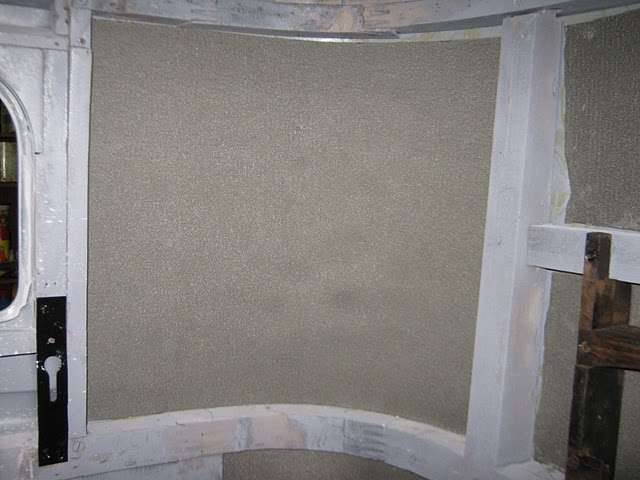 (34.49 KB) (34.49 KB)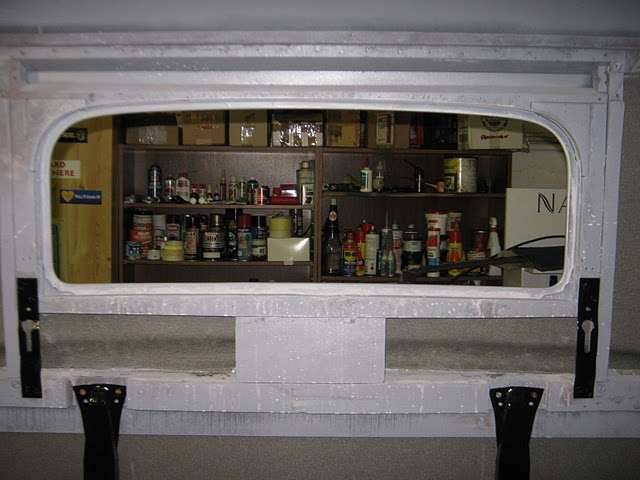 (23.33 KB) (23.33 KB)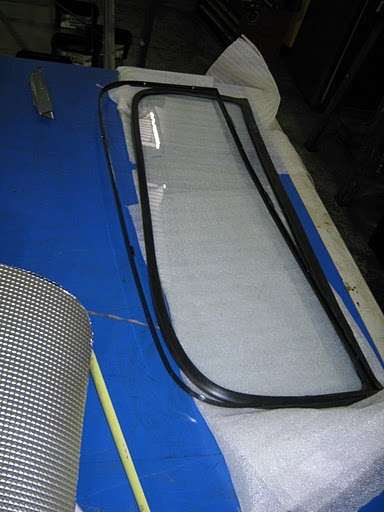
Posted on: 2010/12/2 5:34
|
|||
|
Mal
/o[]o\ ==== Bowral, Southern Highlands of NSW, Australia "Out of chaos comes order" - Nietzsche. 1938 Eight Touring Sedan - SOLD 1941 One-Twenty Club Coupe - SOLD 1948 Super Eight Limo, chassis RHD - SOLD 1950 Eight Touring Sedan - SOLD What's this? Put your Packard in the Packard Vehicle Registry! Here's how! Any questions - PM or email me at ozstatman@gmail.com |
||||
|
||||
|
Re: Wade's Workshop
|
||||
|---|---|---|---|---|
|
Forum Ambassador
|
Saturday 4th December 2010
Quote: Ozstatman wrote:Tuesday 30th November 2010.....And on my way out of the workshop had a call from starliner, Chris.....about his '48 Standard Eight Club Sedan. The '48 is at a hot rod shop on the outskirts of Sydney and Chris is going out on Saturday morning to do some work on it. Because I'd previously expressed an interest in seeing it if I could, Chris was kind enough to call and arrange for my "viewing" of the '48 on Saturday. Should be interesting as I don't know of any other of these Club Sedans in Australia. Warning! Warning! Warning!All true Packard believers avert yea gaze now, lest yea be struck deaf, dumb, blind and with the pox for what yea will now witness! A while ago I posted this - Quote: Ozstatman wrote:Friday 28th May 2010......recently, well September 2009, Chris bought 2 Packards in the US off eBay. A '48 Club Sedan and a '54 Clipper Super Club Sedan. The '48 was, and maybe still is, going to be built into a "woodie" but when he saw it after arrival he's now in two minds whether to do that or not because it's in much better condition than expected. The '48 is presently parked at a hot rod shop at Camden, about 45 miles south-west, so was not viewable today but when I do see it I'll post pic's...... But there was a huge surprise when I arrived. TJ's Hot Rod shop is in an industrial complex and I saw a '60's T'bird parked in one of the other units further up as well as what I thought was a very, very shiny '46 Ford Coupe(turned out to be a '47!). Pulled up, saw Chris out the front of TJ's and he said do I want to see a '40 Packard 160 Club Coupe? Did I what? Turns out the guy with the T-bird and '47 Ford also has the '40 Packard! And here's where it becomes interesting, I understand that prior to today Chris didn't know of the existence of the '40 Coupe OR the collection of FoMoCo products until TJ took him over there prior to my arrival. And it turns out the Guy who owns the '40 Coupe bought it from an auction I attended earlier this year so I had seen the car previously but only from behind a rope. After the auction I followed up with the auctioners who put the buyer, AndrewB, in contact with me and eventually with PACA and of which he's now a member. I was pleased to meet Andrew and see some of his FoMoCo collection close up(he has other cars in storage and at home in the garage) and to hear about him and them. Noel you'll be pleased to know that Andrew took your advice and bought that correct air cleaner for the Coupe off eBay! To view all the pic's I took today, see this Picasa Album. Attach file: (28.43 KB)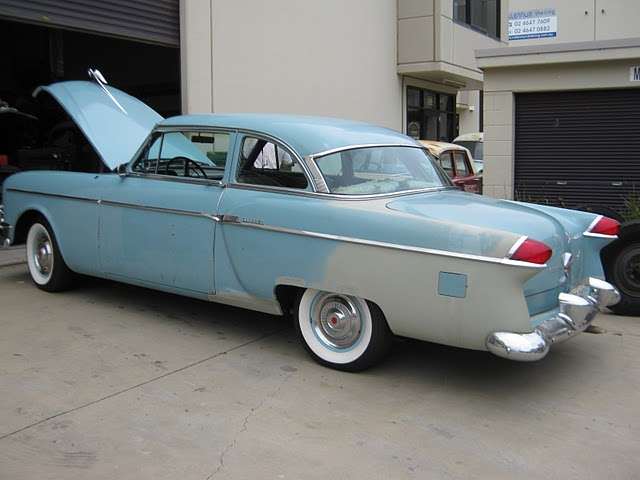 (36.51 KB) (36.51 KB) (43.62 KB) (43.62 KB) (46.10 KB) (46.10 KB) (35.32 KB) (35.32 KB)
Posted on: 2010/12/4 1:59
|
|||
|
Mal
/o[]o\ ==== Bowral, Southern Highlands of NSW, Australia "Out of chaos comes order" - Nietzsche. 1938 Eight Touring Sedan - SOLD 1941 One-Twenty Club Coupe - SOLD 1948 Super Eight Limo, chassis RHD - SOLD 1950 Eight Touring Sedan - SOLD What's this? Put your Packard in the Packard Vehicle Registry! Here's how! Any questions - PM or email me at ozstatman@gmail.com |
||||
|
||||
|
Re: Wade's Workshop
|
||||
|---|---|---|---|---|
|
Forum Ambassador
|
December 5th 2010
Received a couple of pic's from the film shoot last Sunday, taken using a mobile(cell) phone. The best one is shown below. Off shortly to PACA's Christmas lunch, Kath and I will be in the '41, Chris is bringing his '54 Clipper Super Club Sedan and Wade will be in Big Red. Weather is a little threatening so others may not afford themselves the luxury of Packard transportation to the event. Attach file: (33.81 KB)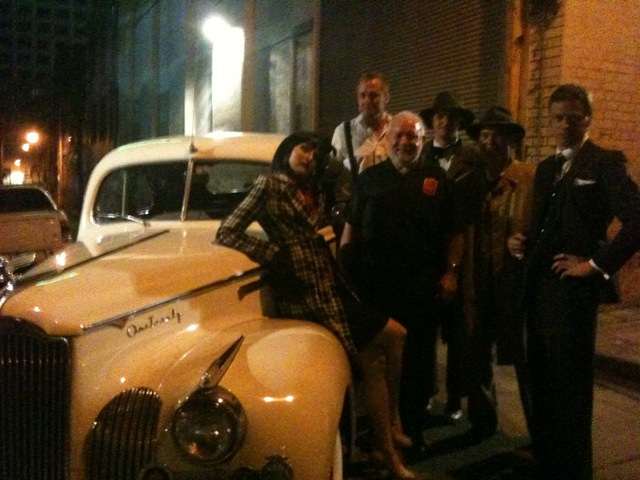
Posted on: 2010/12/4 18:07
|
|||
|
Mal
/o[]o\ ==== Bowral, Southern Highlands of NSW, Australia "Out of chaos comes order" - Nietzsche. 1938 Eight Touring Sedan - SOLD 1941 One-Twenty Club Coupe - SOLD 1948 Super Eight Limo, chassis RHD - SOLD 1950 Eight Touring Sedan - SOLD What's this? Put your Packard in the Packard Vehicle Registry! Here's how! Any questions - PM or email me at ozstatman@gmail.com |
||||
|
||||
|
Re: Wade's Workshop
|
||||
|---|---|---|---|---|
|
Forum Ambassador
|
Monday 6th December 2010
At the Christmas lunch mentioned in yesterdays post there were 8 Packards in attendance, that's the reason for the gratuitous Packard pic's below! Today started off by prepping and POR-15'ing the fittings and fasteners for the three window winding mechanism boards remaining to be fitted to The Fossil. While I was doing that Wade was attempting to install the remaining body bolts. Three had been "dropped in" when the body was united with the frame a month ago, left front and both rear bolts, for alignment and temporary retaining purposes. Wade had a couple more in place but wasn't having too much luck in getting any of the other remaining 5 to fit. Then started a series of incremental movements of the body, forwards, backwards, sideways, any which way to align holes for bolt fitment. This was made harder by some holes being almost indistinguishable between body and frame and certainly complicated by the weight of the body. Use was made of rollers, in the form of socket extensions, between the body(the lower wood skeleton that sits on the frame) and the frame rails. Also, because the body bolts and nuts had been POR-15'd by someone(moi!), each bolt and nut's threads had to be cleaned. Finally, after many hours of a bit this way, a bit that way, all body bolts, washers and nuts were in place. But, at this time, not all are tightened up in case adjustments are required for door/body fit, etc. Then turned to the valance panels. After removing the fabric cocoon encompassing it, the left side panel was carefully manouvered into place. But it didn't fit!!!!! Where there should be a cut out in the lower edge of the panel to accommodate the sidemount stanchion there wasn't one! So it didn't fit! Reference was made to Mat's '34, which does have the cut outs, but even though that gave confirmation of what should be, it didn't help. But there is an explanation as to why and what happened. Because Wade's original '34 body, mudguards(fenders) and all other panels were lost in a bushfire a replacement '34 Club Sedan was located in the US, imported and all body work commenced afresh. It turns out, and I didn't know this until today, the replacement '34 wasn't sidemount equipped. The replacement front mudguards(fenders) were modified into sidemount mudguards(fenders) courtesy of the loan of a pair of sidemount mudguards(fenders) from a guy in Canberra to use as templates. So what got missed in the conversion were the cut outs in the valance panels so they fitted round the stanchions. What we did do though was remove the stanchion so the valance panel fit could be checked without that impediment in the way. And just as well we had to take the stanchion off, because the large rubber grommet(gasket) needed to seal the intersecting sheetmetal around the stanchion needed to be fitted. Looking at the grommet/gasket, at first sight, it appeared there was no way it could be fitted to the stanchion. But it is possible in being slightly stretched, squeezed and manouevered over the base of the stanchion. Also learned that this wasn't the first time the stanchion had been off either. Wade had previously removed and refitted both in doing the wiring/tubing on the frame with one line running behind the stanchion. With the stanchion off the valance panel does fit nicely, albeit without the requisite cut out required. Edit - Oops, don't know how I managed to get the "straight up" '54 Clipper in there instead of the intended one. But not to worry, the intended pic has been added at the bottom. Attach file: (42.80 KB) (38.36 KB) (38.36 KB) (39.83 KB) (39.83 KB) (20.93 KB) (20.93 KB) (54.39 KB) (54.39 KB)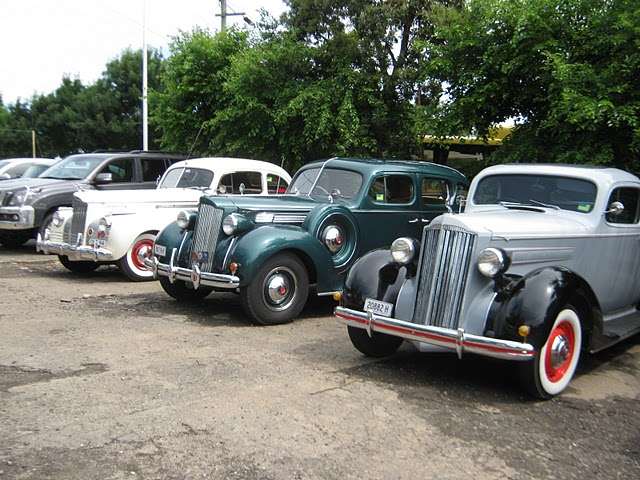 (47.39 KB) (47.39 KB)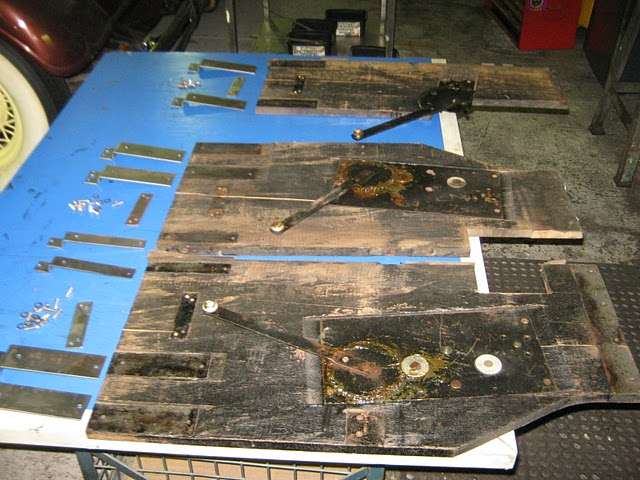 (19.88 KB) (19.88 KB)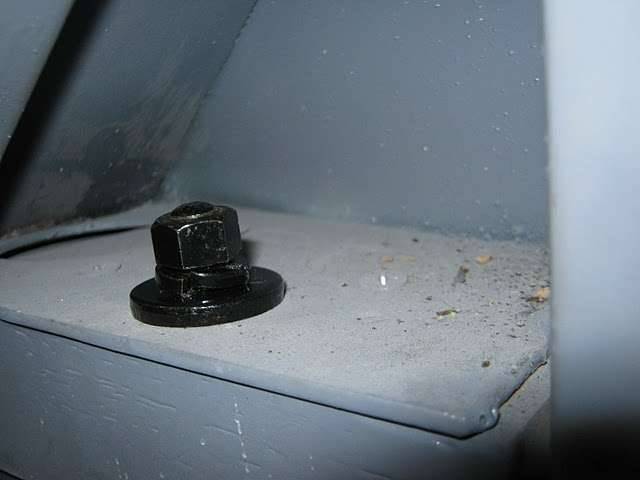 (24.09 KB) (24.09 KB)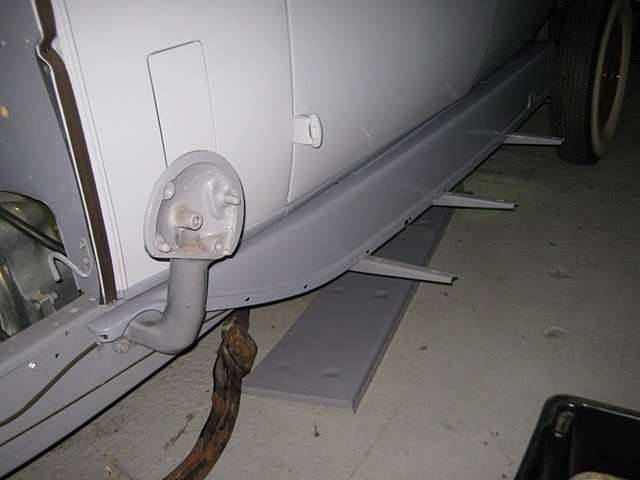 (25.24 KB) (25.24 KB)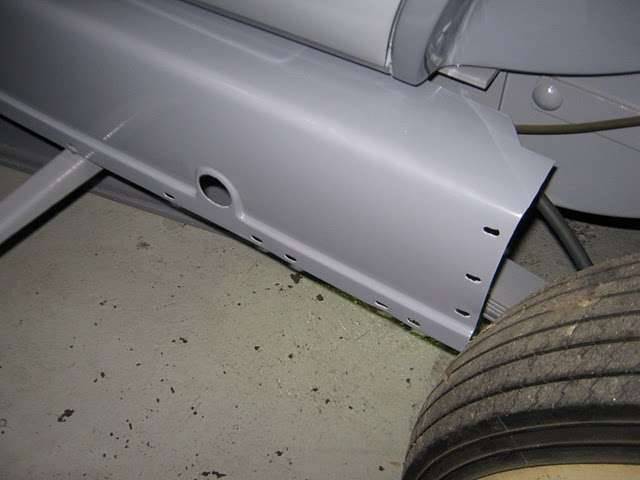 (22.81 KB) (22.81 KB)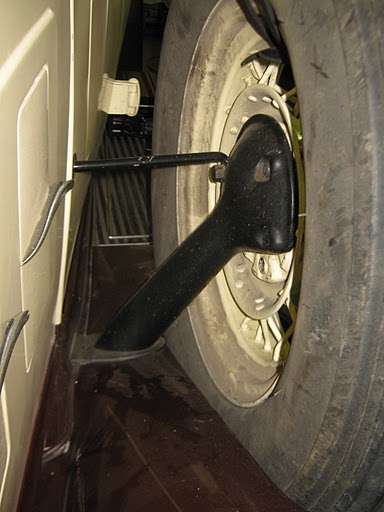 (19.11 KB) (19.11 KB) (18.73 KB) (18.73 KB) (20.82 KB) (20.82 KB) (22.11 KB) (22.11 KB)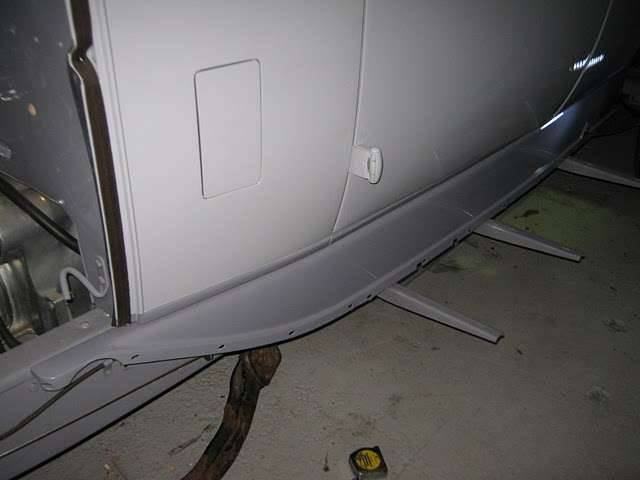 (41.39 KB) (41.39 KB)
Posted on: 2010/12/6 5:24
|
|||
|
Mal
/o[]o\ ==== Bowral, Southern Highlands of NSW, Australia "Out of chaos comes order" - Nietzsche. 1938 Eight Touring Sedan - SOLD 1941 One-Twenty Club Coupe - SOLD 1948 Super Eight Limo, chassis RHD - SOLD 1950 Eight Touring Sedan - SOLD What's this? Put your Packard in the Packard Vehicle Registry! Here's how! Any questions - PM or email me at ozstatman@gmail.com |
||||
|
||||
|
Re: Wade's Workshop
|
||||
|---|---|---|---|---|
|
Forum Ambassador
|
Wednesday 8th December 2010
#$%^&*@#%$%^@#$&^%$# -  Did it again! "Lost" a post when I'd almost finished it. Should take my own advice and save as I go, or do it in Word or another program then plug it into PackardInfo when finished! Just like the chorus in this song, when will I ever learn? Did it again! "Lost" a post when I'd almost finished it. Should take my own advice and save as I go, or do it in Word or another program then plug it into PackardInfo when finished! Just like the chorus in this song, when will I ever learn?So starting over - Yesterday Wade went on the Morris Minor Picnic Club Run and Christmas Lunch which had a starting point at Blacktown. Because the start was close to the toolmaking business we'd visited last week Wade took the opportunity to call in. He was able to give the go ahead for Mat's water pump but before they could start needed some precise measurements regarding the seal to be used. So when I arrived at the workshop Wade was chasing Dennis at ABC Bearings about that. Dennis faxed through a document with the relevant info which Wade in turn re-faxed to David, the toolmaker. Mat, looks like your '34 will get some work done on it soon! While Wade was fixated on faxing I was preparing the POR-15'd hardware from Monday so it could be reassembled to the three window winding board mechanisms. Finished getting it all organised but needed to run a tap through the POR-15'd nuts, just managing to stay ahead of Wade as he reassembled the boards, phew. Then it was the turn of the valance panels. Started with the left side by Wade on his back on a creeper while I handed him the stanchion so it could be marked for cutting. Once marked valance removed from The Fossil, then the scary part, the first cut! For this Wade had borrowed two pairs of snips from Rick. Because the snips weren't great it took a number of "bites" to remove the metal required. Then the cut was cleaned up using a grinding stone in an electric drill, That was the theory, but the first stone selected didn't like the job it was selected for. Better luck with the next stone, it removed metal but also shed stone in the process wearing a groove around the stone. Worked though, that was the main thing. The now cut out valance was re-fitted to The Fossil and the stanchion trial fitted again. Back to the bench for more grinding at the fore and aft surfaces of the cut out. Then back to The Fossil for another trial fit and back to the bench again. Think this happened five times in all. Then turned to the right side. Removed the stanchion, fitted the valance, re-situated the stanchion and Wade marked for the cut required. Valance onto the bench but this time the snips were very ineffective. Not to worry I had an old pair at home. Brought those down along with what I'll call a rotary rasp for an electric drill because the effective stone was wearing so much, even with Wade using different areas of the stone to spread the wear. In fact the stone ended up looking like a minature Christmas tree, appropriate seeing it's fast approaching. However my pair of snips were no more effective than the others. Turned to "Plan B", using an angle grinder with a metal cutting blade. Dangerous yes, but worked extremely well. Just as well Wade has a steady hand. Some finishing with the rotary rasp and a trial fit which showed more needed to be removed from the front of the cut out. Judicious use of the angler grinder followed by the rotary rasp and then another trial fit. And you know what? It fitted, only one touch up required, so we did learn something from the left side to-and-froing. Next was a trial fit of the left side front frame rail cover. Just a quick check for assurance that the valance panel positioning was OK, which it was. Turned to the rear of the body, specifically the rear fuel tank and frame cover, the trunk rack and the boot(trunk). All these were stored on the roof of the office, AKA "The Mezanine level". First down was the frame cover which slides under the metal floor of the boot(trunk) and is fastened to the frame by six bolts. Two bolts each side bolt through the trunk rack brackets into the block which also serves as the rear bumper mounting points. The other bolts, one each side, also bolt through the truck rack brackets through the upper skin of the frame cover and through the upper rear frame rails. Only trouble was, there weren't any holes to accommodate these upper bolts! As previously mentioned, the replacement body was from a non sidemount car with a rear mounted spare and no trunk rack. Consequently the need for holes in the frame cover had been missed as were the valance cut outs. Needing to identify and mark the holes required the trunk rack then came down from on high and was mounted by the two end bolts at each side on the end of the frame rails being pulled down good and tight. Plan was to mark, remove and drill but instead it was decided to drill the holes in situ. Easily accomplished, then came the hard part, actually installing these upper trunk rack bolts. Right side was difficult, although it did require some filing of the hole, also doing the same for the left side in anticipation. Wade was able to manouever the bolt up through the hole, just. Nut and washer applied and tightened down. Left side was much more difficult because the fuel filler tube is a major access killer. Wade couldn't get his hand holding the bolt anywhere near the hole but did have a flash of inspiration, using the telescoping magnet as an aid! With Mal fishing the telescopic magnet down the hole Wade was able to manouever the bolt so I able to "catch" the threaded end and pull it up through the hole! And it's the biggest, yes the biggest, catch I've ever made. That left the boot(trunk). Unfortunatley, much of the woodwork in the boot(trunk) fell apart when it was removed from the body because the replacement body car had spent many years out in the weather, The ply panel though which bolts to the back of the body and to which the boot()trunk hinges bolt did survive in a very degraded condition but good enough for a pattern so that's a positive. All the other wood is missing and although there is a new wood frame now in the boot(trunk) it is obvious that it's not right at all. Seems it was probably installed as being as close as the joiner and panelbeater could do at the time but for now all that it serves as is as a stiffener. So if anyone has pic's, plans, drawings of the woodwork that should be there, these will be gratefully accepted. Wade thinks this is the only '34 Club Sedan, or '33 for that matter, in Australia so there is no chance of a local reference point. Wade tells me that the NLA rear axle bearings for Old Blue have arrived and Noel will be bringing them over tomorrow. Hope the pinion shaft seal for Old Blue also turns up soon because without that the diff rebuild will be held up anyway. And for once I took my advice and saved the text, because I was timed out again when I reviewed this post! Attach file: (22.01 KB)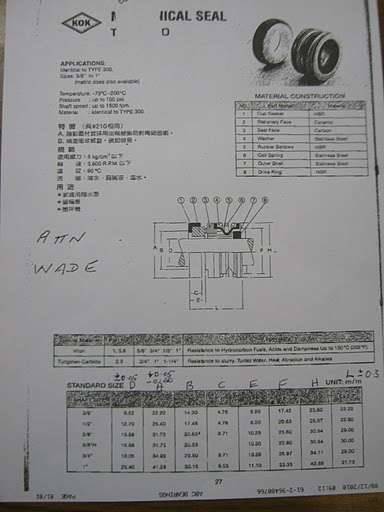 (27.86 KB) (27.86 KB)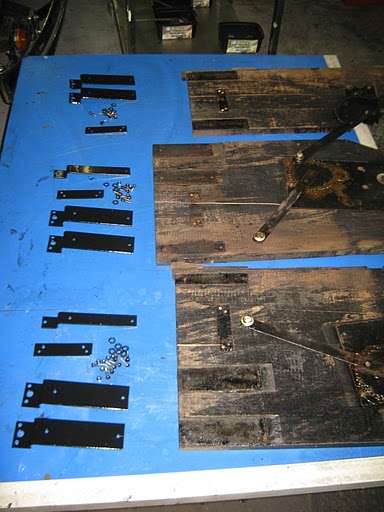 (26.41 KB) (26.41 KB)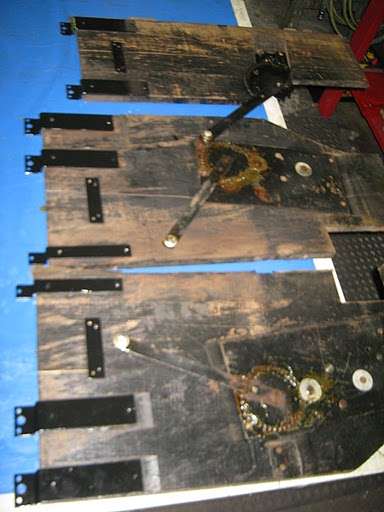 (19.33 KB) (19.33 KB)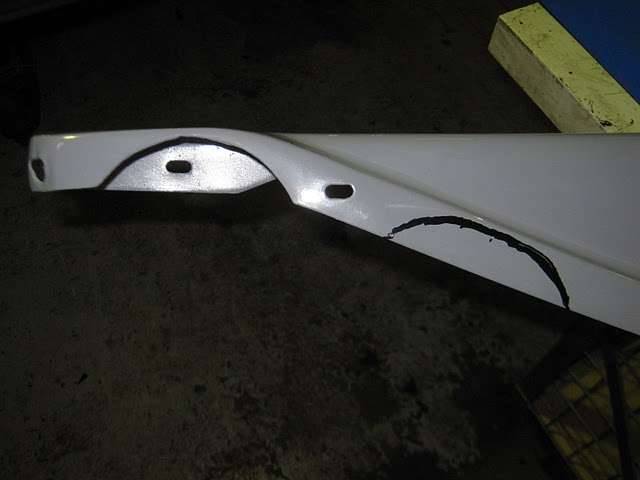 (25.45 KB) (25.45 KB)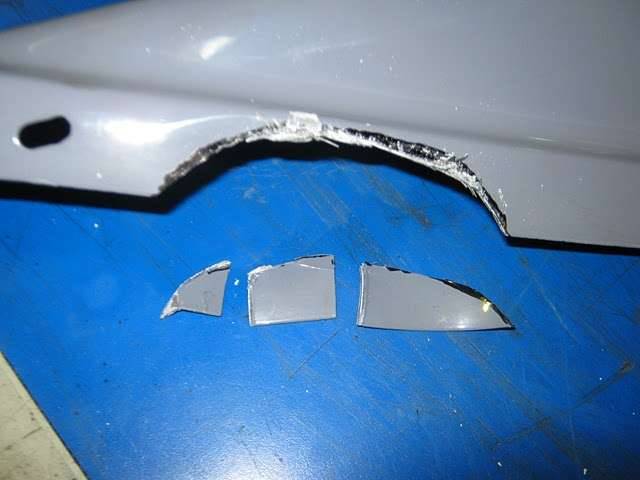 (20.71 KB) (20.71 KB) (31.88 KB) (31.88 KB) (27.17 KB) (27.17 KB)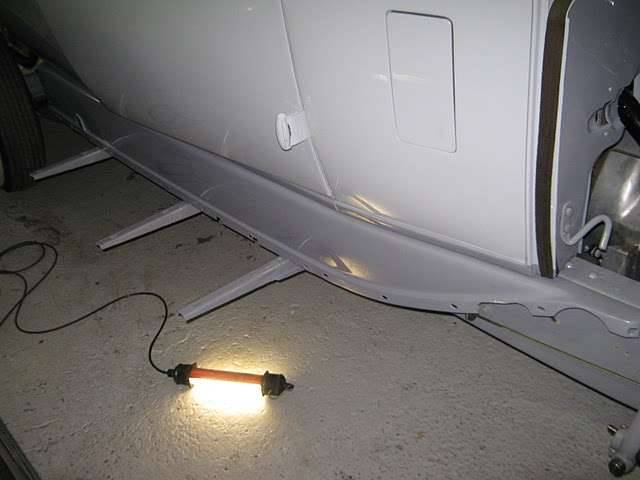 (30.48 KB) (30.48 KB)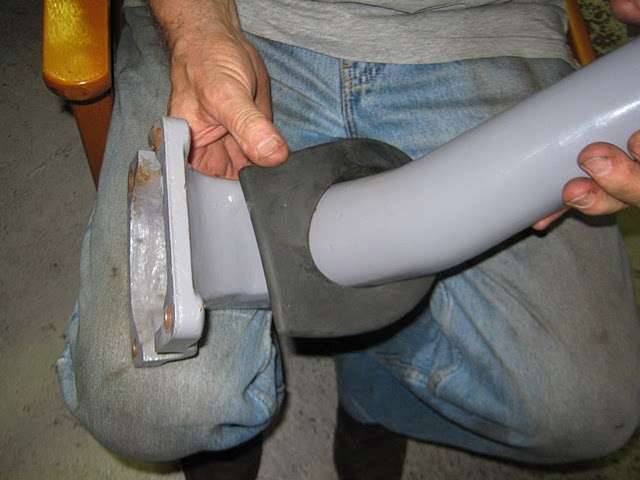 (21.72 KB) (21.72 KB)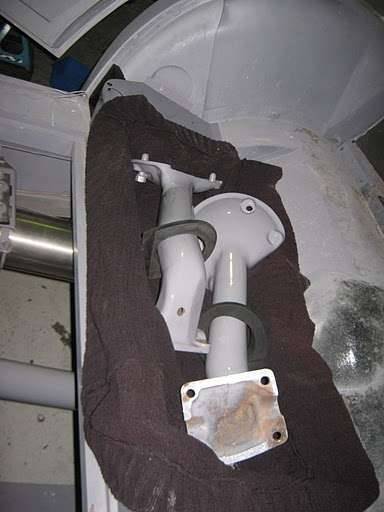 (31.39 KB) (31.39 KB)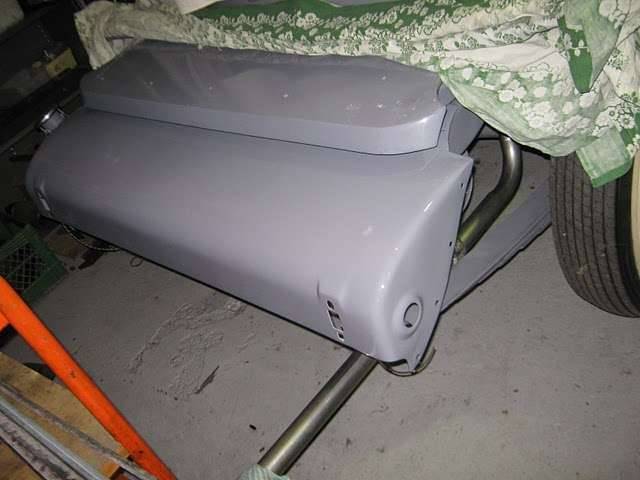 (34.42 KB) (34.42 KB) (14.83 KB) (14.83 KB)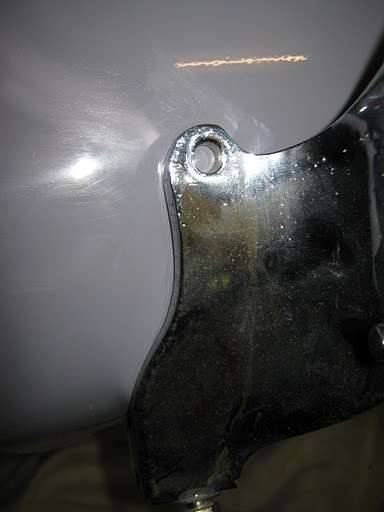 (14.19 KB) (14.19 KB)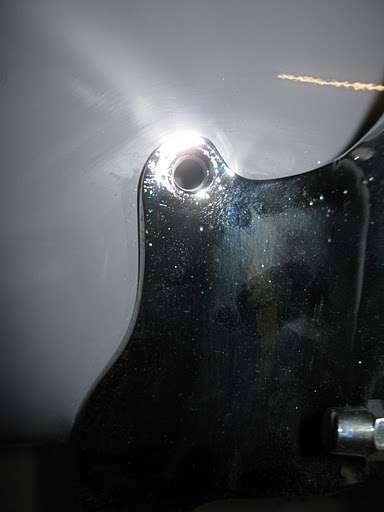 (33.97 KB) (33.97 KB)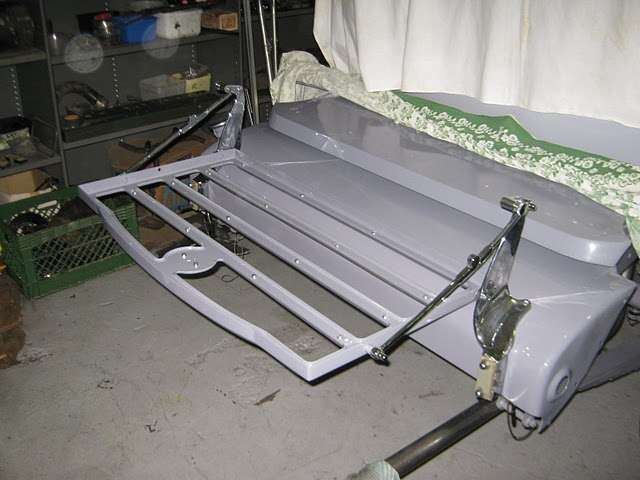 (20.90 KB) (20.90 KB)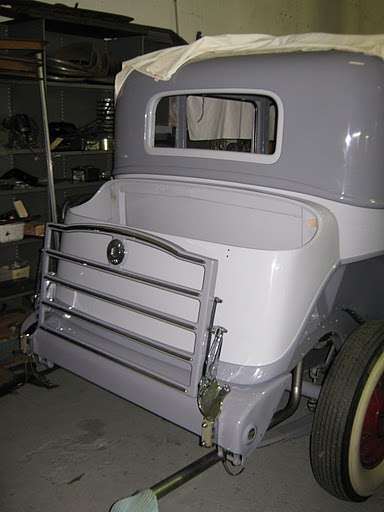 (13.47 KB) (13.47 KB)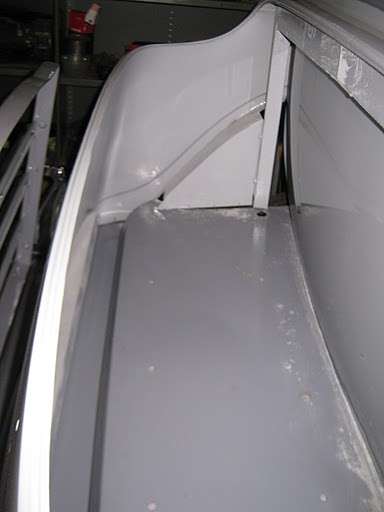 (22.44 KB) (22.44 KB)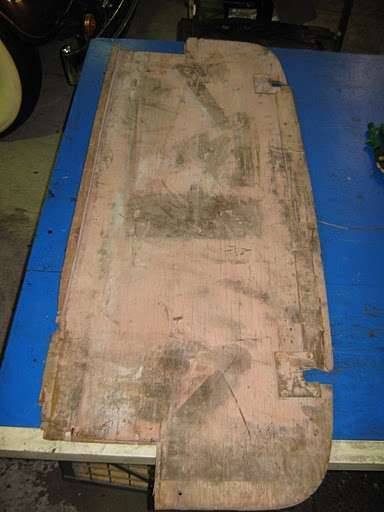
Posted on: 2010/12/8 5:37
|
|||
|
Mal
/o[]o\ ==== Bowral, Southern Highlands of NSW, Australia "Out of chaos comes order" - Nietzsche. 1938 Eight Touring Sedan - SOLD 1941 One-Twenty Club Coupe - SOLD 1948 Super Eight Limo, chassis RHD - SOLD 1950 Eight Touring Sedan - SOLD What's this? Put your Packard in the Packard Vehicle Registry! Here's how! Any questions - PM or email me at ozstatman@gmail.com |
||||
|
||||
|
Re: Wade's Workshop
|
||||
|---|---|---|---|---|
|
Forum Ambassador
|
Thursday 9th December 2010
Not a lot directly accomplished today but nevertheless progress was made. Overnight Wade had received the new pinion seal for Old Blue so now the diff can be set up and lapped in. And it turns out on the weekend Wade had been advised Big Red's brake lights weren't working so that was the next task up for attention. Tested and, sure enough, no brake lights. First thought was that it was probably the hydraulic switch which seem to be allergic to Silicon brake fluid. However I noticed the taillights also weren't working so the obvious explanation was put aside while Wade was in, around and under Big Red on a quest to put that right. Wade took out the tail light bulbs checked the filaments, all OK, and after ensuring the bulbs were seating properly in their sockets there were now tail lights. During the course of all this Wade was under the car, under the rear of the car, under the dash in the car complete with jacking up the car twice for access. Finally after rechecking fuses and dashboard wiring returned to the original diagnosis which a simple under car test confirmed. Wade replaced the switch and had to replace the connectors too, the new switch had spade types in lieu of the plug types on the old one. Near the end of this Noel arrived with a comfort parcel from The Flackmaster for Wade, a pair of NLA rear axle bearings for old blue. The Packard Parts Hound came through again! So, as well as the diff, we'll be able to put the axles back in Old Blue. Noel was also able to advise his mate Tony is well into the repair of RobT's '40 steering wheel and it's looking good. After Noel went on his way Wade pressed the new bearings onto Old Blue's axles while I cleaned up the axle housing, the ends of which had been sealed with a silicone sealer. With the new bearings on the axles they were "parked" in the axle housing for safekeeping. Wade had also been trying to catch up with the joiner from the business next door about the possibility of making up replacement woodwork for The Fossil's boot(trunk). When he came in Wade was able to explain what was needed and when the joiner obtains the wood, deeper more meaningful conversations will be had. Still, any pic's or details of the interior of a '34 Club Sedans boot(trunk) woodwork would really help with this task. That done, turned to making a gasket for Old Blue's diff in a co-operative effort with Wade, so it's a MBM&W gasket! Then it was off on a road trip. First stop was dropping off the diff for setup and lapping in and all going well should be ready mid next week. Next was Hare and Forbes, a machinery and equipment supplier, for some air hose fittings. Couldn't find the fittings required because they weren't on the shelf but turned out there was a box full of them "out the back"! Next stop was Grippy Rubber for a 1.5m length of VW Boot and Bonnet rubber gasket. Fits '34 Packard windows very nicely, thankyou! Last stop was Altronics where Wade was scoping out a desoldering iron. The element on his present one has expired and he can't source a replacement so a new desoldering iron looks to be needed. But not at the price wanted, so Wade's going to keep looking! And co-incidences being what they are Wade had a call from RobT while we were out on the road, pulled over to take it of course, so was able to update him on the progress on his steering wheel. Attach file: (31.15 KB)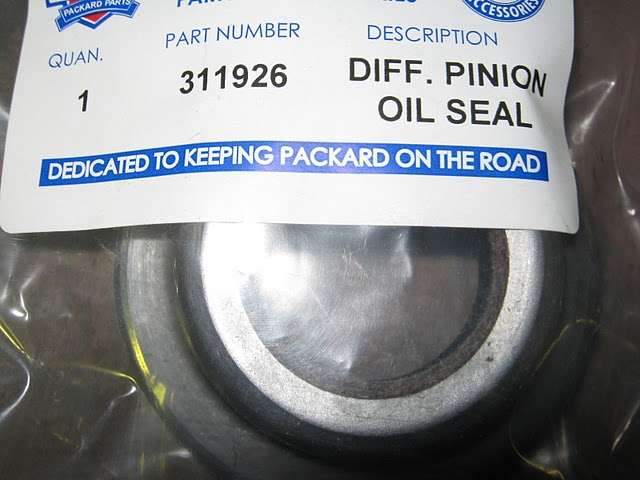 (33.61 KB) (33.61 KB) (35.22 KB) (35.22 KB)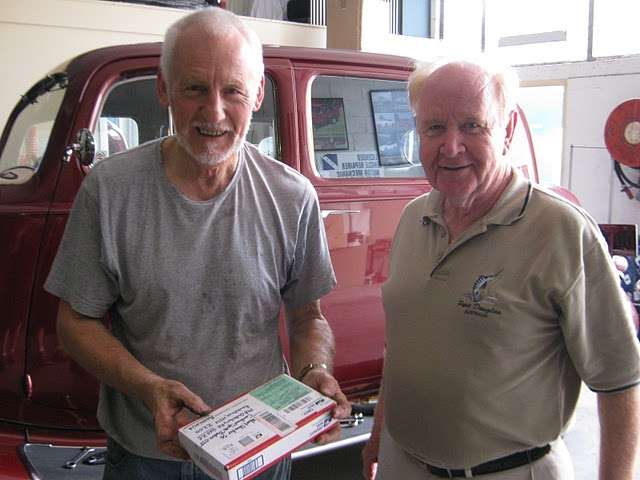 (43.47 KB) (43.47 KB) (39.61 KB) (39.61 KB)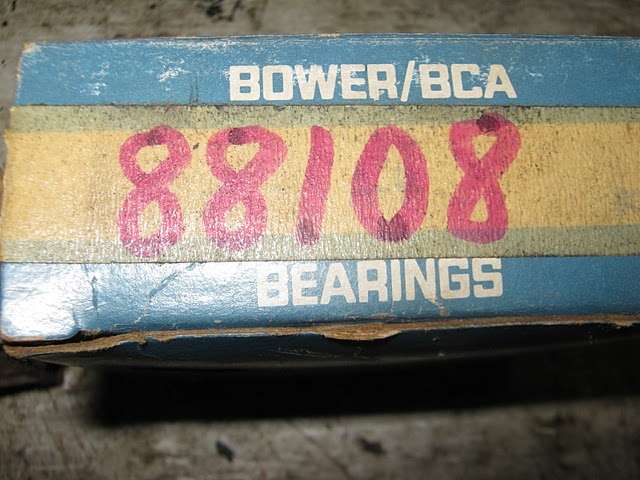 (32.79 KB) (32.79 KB)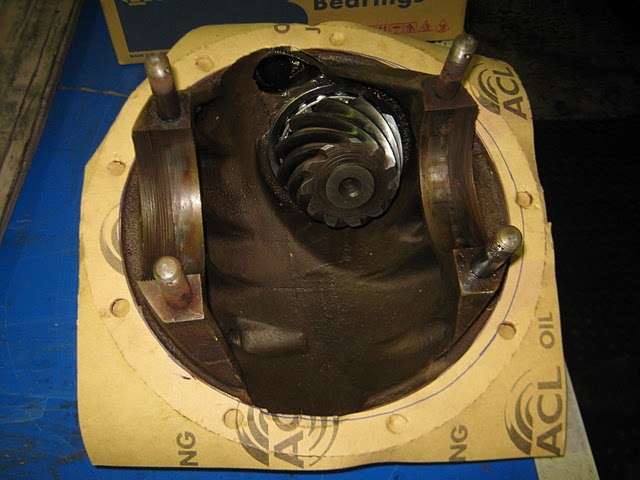 (27.26 KB) (27.26 KB)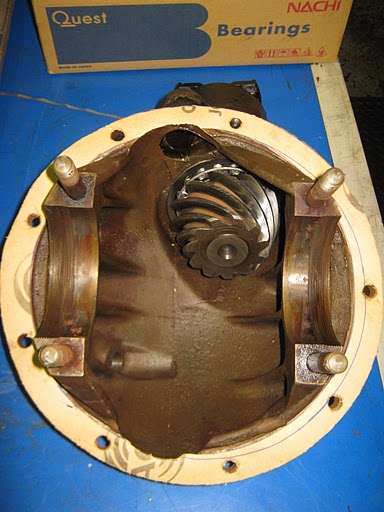
Posted on: 2010/12/9 1:34
|
|||
|
Mal
/o[]o\ ==== Bowral, Southern Highlands of NSW, Australia "Out of chaos comes order" - Nietzsche. 1938 Eight Touring Sedan - SOLD 1941 One-Twenty Club Coupe - SOLD 1948 Super Eight Limo, chassis RHD - SOLD 1950 Eight Touring Sedan - SOLD What's this? Put your Packard in the Packard Vehicle Registry! Here's how! Any questions - PM or email me at ozstatman@gmail.com |
||||
|
||||
|
Re: Wade's Workshop
|
||||
|---|---|---|---|---|
|
Forum Ambassador
|
Monday 13th December 2010
Quick update only. Right front window installed on The Fossil. Cleaned window then trial fit because it has to be fitted together with the quarter window, the "leg" of which holds the front bailey channel in which the window rides. Then fitted with window winding mechanism board, front door lock, outside door handle and a pair of "old" interior handles which will be replaced at a later stage. Over to machine shop to pick up Mat's '34 water pump and John's '39 gear linkages. Dropped off the Twelve and '36 120 water pumps for their turn at rejuvenation. On the way back picked up some Bellville washers from Lee Bros to go with the gear linkages. Back at the workshop pressed in the sleeve for the ceramic seal into Mat's water pump housing. Pressed the new bearings onto the impeller shaft and assembled the water pump. Problem arose with the ceramic seal not having any "room to move" after assembly, a sure recipe for disaster. Didn't get the "blueprints" back so unsure where the fault might lie. Looks like some extra clearance is required though, so more machine work. Attach file: (34.42 KB)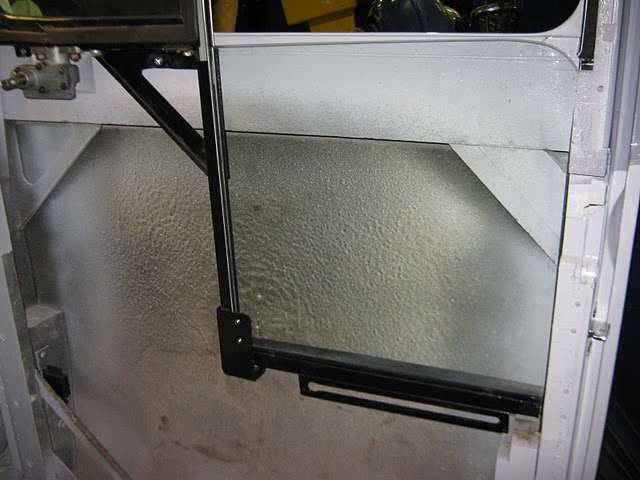 (27.53 KB) (27.53 KB)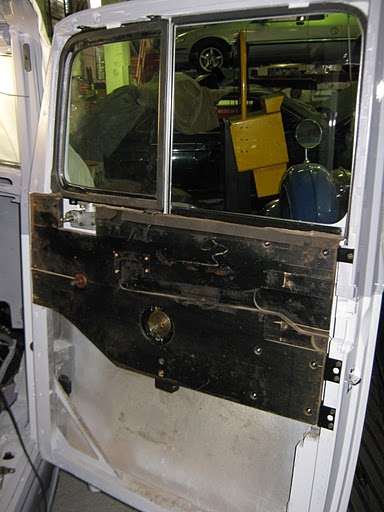 (27.58 KB) (27.58 KB)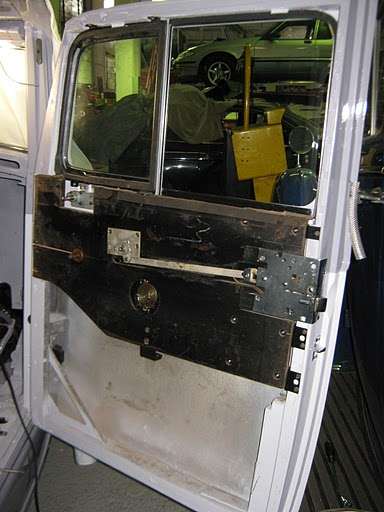 (28.77 KB) (28.77 KB)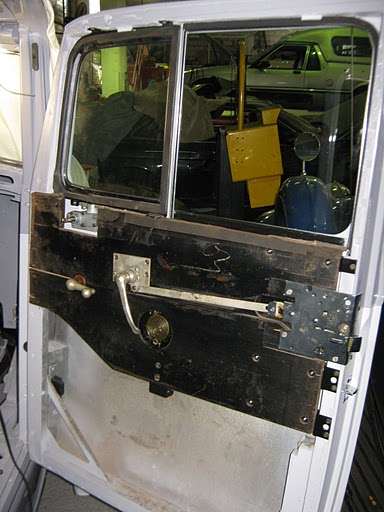 (11.02 KB) (11.02 KB)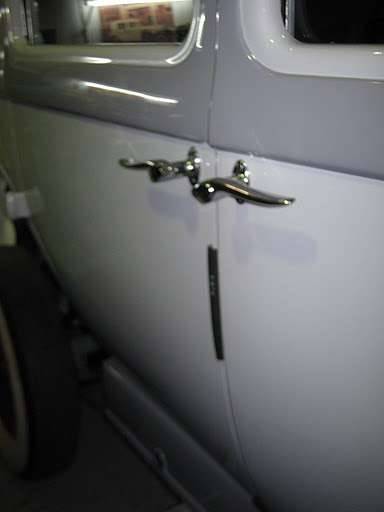 (23.23 KB) (23.23 KB) (24.64 KB) (24.64 KB) (18.34 KB) (18.34 KB) (24.76 KB) (24.76 KB)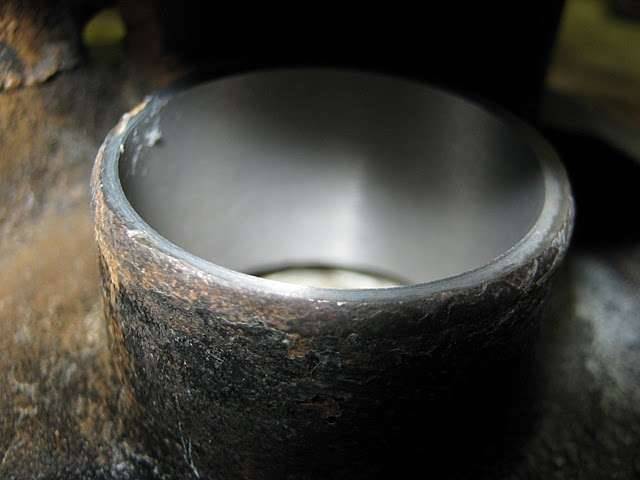 (39.74 KB) (39.74 KB) (42.49 KB) (42.49 KB) (33.54 KB) (33.54 KB)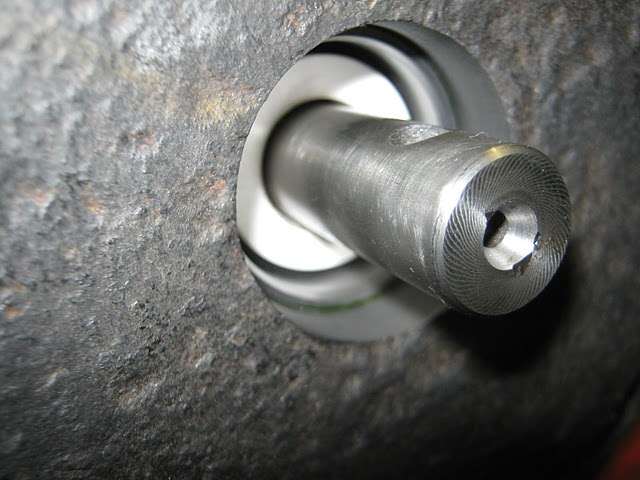 (36.61 KB) (36.61 KB) (36.47 KB) (36.47 KB)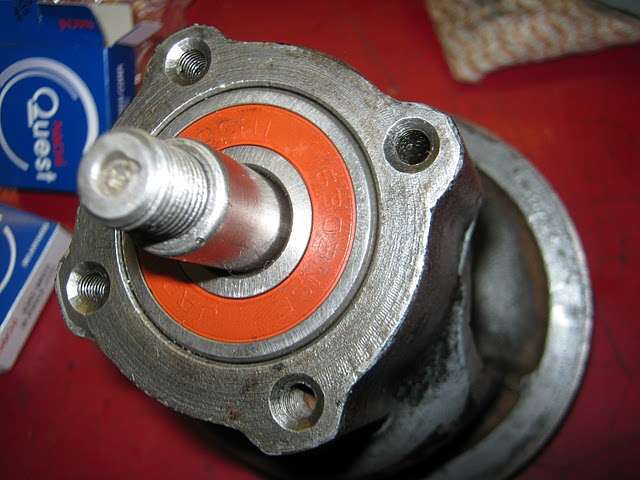
Posted on: 2010/12/13 16:55
|
|||
|
Mal
/o[]o\ ==== Bowral, Southern Highlands of NSW, Australia "Out of chaos comes order" - Nietzsche. 1938 Eight Touring Sedan - SOLD 1941 One-Twenty Club Coupe - SOLD 1948 Super Eight Limo, chassis RHD - SOLD 1950 Eight Touring Sedan - SOLD What's this? Put your Packard in the Packard Vehicle Registry! Here's how! Any questions - PM or email me at ozstatman@gmail.com |
||||
|
||||
Register To PostTopic is Locked


