|
Re: 51Packard's....51 Packard
|
||||
|---|---|---|---|---|
|
Home away from home

|
6-21-13
Managed to cut/grind out the body mount bolt on the drivers side front frame bracket closest to the fender. Not much left of the mount so I was not too careful removing it. Cut a little more rotten floor out from that area too. I was surprised how little of the bracket was left! Dug out my replacement frame brackets and found the correct ones for this side. Good news and bad news. The frame bracket mid front door is also riveted to the frame on the replacement brackets I expected this to have been welded so that was a nice surprise. It will be definitely easier to do as BH suggested and remove the rivets to be replaced with bolts and shakeproof nuts. Bad news is the furthest forward bracket is welded to the bottom of the frame. I see some rivets on the top that attach it to the top of the frame. This will require me to remove more floor than I wanted too or that would have been necessary. The rivets will be replaced with bolts and shakeproof nuts as well as some additional welding on the sides. That is what the replacement bracket appears to have. I hope my welding skills and welder are up to the task. Attach file:  (105.95 KB) (105.95 KB) (105.33 KB) (105.33 KB)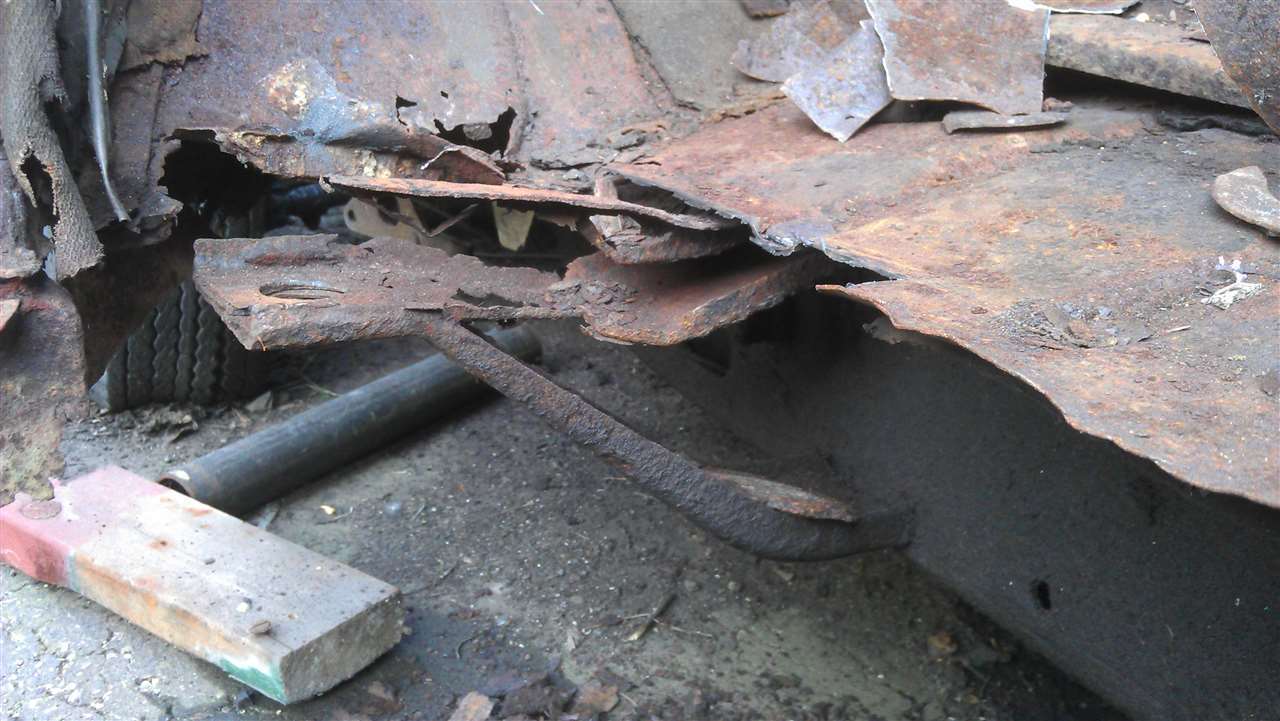 (113.98 KB) (113.98 KB) (89.54 KB) (89.54 KB) (122.12 KB) (122.12 KB)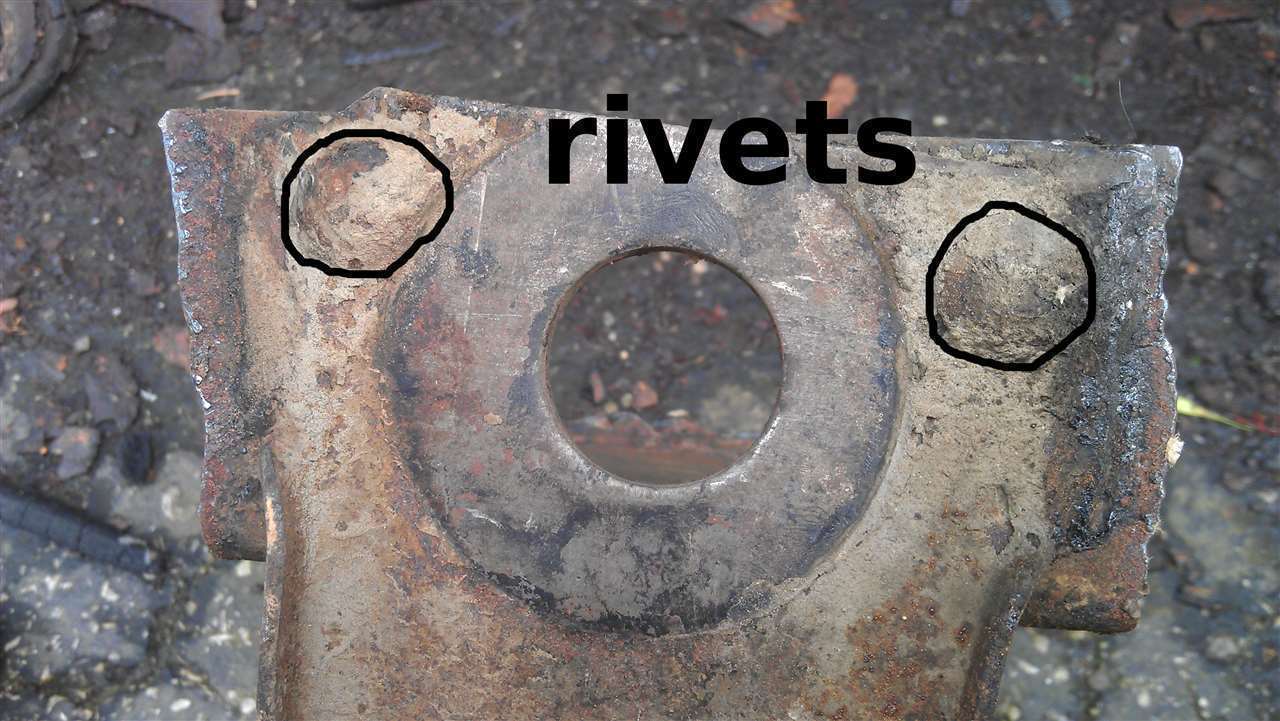 (88.39 KB) (88.39 KB)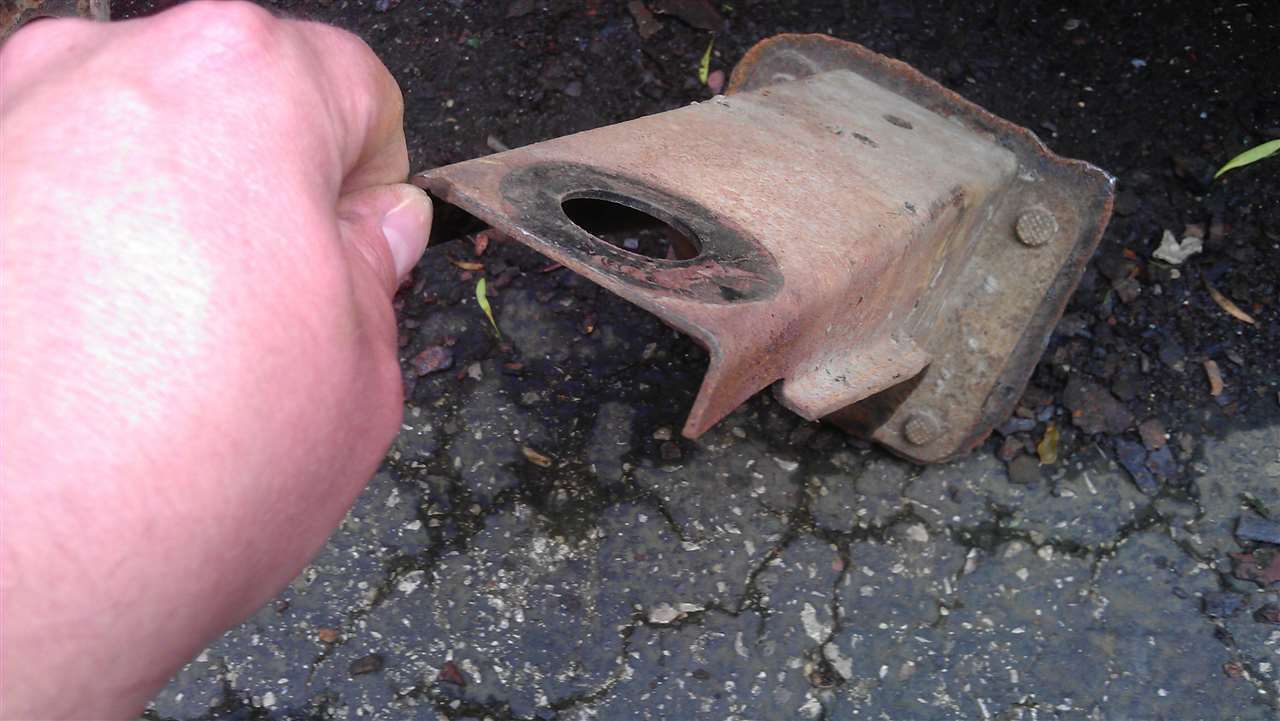
Posted on: 2013/6/21 18:37
|
|||
|
[url=h
|
||||
|
||||
|
Re: 51Packard's....51 Packard
|
||||
|---|---|---|---|---|
|
Home away from home
|
On my '54, the rust on the floor boards over the body mounts came from, and this I know from personal observation: leakage from the wing windows. The seals get bad on these windows, the water leaks down along the door and soaks through the floor covering, coming to rest right where you see the worst damage to the floor/mount.
I have had my car out in rain and snow (prior to discovering the floor/mount rot), and only this spring noticed that the fabric on the door panels was damp after a rain. Looked under the floor mat and padding, and there was the damage. If the car has rubber mats rather than carpeting, you don't even notice any dampness until pulling the mat back because the water leaks throug and the mat dries on top. My only clue was the door upholsteyr that stayed wet long enough to notice, then I investigated under the mat and cushion. As I only have outdoor storage, I now have rags placed to catch the moisture until I can get the gaskets around the windows fixed. This ALSO happens around the rear wing windows, and on 4-doors, it may be responsible for the "dog leg" rust found on so many of these cars. My advice is for all owners to check those gaskets, especially if the car sits outdoors very much. The worst culprit for leaks, I believe, is on the gasket material behind the latches. For now, I'm depending on rags and am planning to graduate from those to clear silicone caulk (when the rain finally stops long enough) to seal the gaps temporarily until I get enough dough to replace the rubber. 51Packard, sealing those windows will, I believe, preserve your repairs after you get them done. And to the experts: If my opinion sucks, feel free as always to pick it apart. I only know what I've observed personally. Regards,
Posted on: 2013/6/21 21:42
|
|||
|
Guy
[b]Not an Expert[/ |
||||
|
||||
|
Re: 51Packard's....51 Packard
|
||||
|---|---|---|---|---|
|
Home away from home
|
55PackardGuy, your theory is sound. I do not believe that it is the sole issue creating the rot, but I have no doubt it was involved in the early stages. We just had a few storms go through last night so this is the perfect time to check for leaks.
On the drivers door, the door panel is off the car. Sure enough, I see a 3/8" wide strip of wetness going from the pivot on the wing window. Goes all the way down to the bottom of the door. On my car, I also have issues with (I assume) the door seals. I left my replacement floor piece in the car overnight. The front of the piece that goes behind the front fender is shaped like a cup. It was positioned right where the front body mount was. I see that the "cup" is pretty damp with moisture. Also my windlace around the top and side of the door feels damp. I felt around the windshield and did not feel dampness so I guess it is not coming from there. On passenger side, entire upper portion of the door panel is damp and rotting away. Now that I'm moving along with repairs, I should start covering the car with tarps.
Posted on: 2013/6/22 9:06
|
|||
|
[url=h
|
||||
|
||||
|
Re: 51Packard's....51 Packard
|
||||
|---|---|---|---|---|
|
Home away from home
|
Just spent 45 sweaty minutes of pure frustration trying to get the rivets out of the new frame bracket. Ground down the flat waffle side (facing outward of the car) until I could see the circle of the rivet shaft. I then pounded on it with a center punch with no movement at all. I tried one of the other rivets, this time grinding down the flat waffle side as well as the dome shaped side. Again, pounded in both directions and nothing. Maybe the heat of the rivet "welds" itself in place. Looks like my last resort is drilling them out. Not looking forward to that!
Posted on: 2013/6/22 12:15
|
|||
|
[url=h
|
||||
|
||||
|
Re: 51Packard's....51 Packard
|
||||
|---|---|---|---|---|
|
Forum Ambassador

|
A center punch could actually swell the shank of the rivet tighter against the hole. You should be using a pin punch - the kind with a flat end (tip) - that's close to the same diameter as the rivet. Heck, an old bolt might work, in a pinch, but be sure to keep your fingers out of the way as you strike it with hammer.
Whether siezed from original installation, use of the center punch, or decades of rust, you may need to drill a small hole through the center of the rivet to help relieve the tension. I wouldn't be surprised if you needed to employ this technique with knocking some of the rivets on-car. However, you should only have to grind/chisel from one side. Hope this helps. P.S. - Dunno what to make of the welded bracket in your previous post. Manuals indicate nothing about that one being welded, and it's been years since I looked under any of my V8s, which are all presently stored offsite. Perhaps others will chime in with their experience.
Posted on: 2013/6/22 18:57
|
|||
|
||||
|
Re: 51Packard's....51 Packard
|
||||
|---|---|---|---|---|
|
Home away from home

|
Regarding the rust - my '51 Club Sedan had plenty, and I suspect that most '51's suffered badly with water ingress. The Club Sedan had a problem of water entering through rear windows and it was severe enough for Packard to retro-fit a special cover internally that was sealed off to prevent water dripping down and making its way into the cabin. Service Manual mentions this . . . .
Water entering there could and I suspect did run forward and wet the floor in front of the car also. I've adopted the attitude that water will get in somewhere unless some special treatment of areas (like window seals) is undertaken. Co-incidence that today I fitted a newly re-rubbered quarter window to my car and noticed there is a gap that might let water in. This is using new rubbers. When you've finished the resto work, liberally apply rust-proofing to floor, internal of rockers (sills) and doors etc, plus as suggested by 55Packardguy, some silicone under rubber seals etc (out of sight) will probably be necessary! In modern cars I've had I always used fish oil (deodorized) mixed 2:1 with new engine oil, and got that into internal places everywhere. The slight (emphasize slight) odour goes after a few days and no rust will happen there whatsoever. I'll have a look at my outriggers soon and see if the very front ones had some welding as 'standard'.
Posted on: 2013/6/22 21:19
|
|||
|
1951 Packard Club Sedan | [url=ht
|
||||
|
||||
|
Re: 51Packard's....51 Packard
|
||||
|---|---|---|---|---|
|
Home away from home
|
I checked the outriggers on my car and the front and second from front ones are welded on top and bottom to the C-section frame. The second one also has one rivet through it. This welding is original, not something done later as part of a repair. The other outriggers all appear to be just riveted.
Posted on: 2013/6/23 6:23
|
|||
|
1951 Packard Club Sedan | [url=ht
|
||||
|
||||
|
Re: 51Packard's....51 Packard
|
||||
|---|---|---|---|---|
|
Home away from home
|
6-25-13
Thanks guys! Larry51, you are saying the second from the front bracket is welded on yours? That is the one that is only attached on mine with 4 rivets. I plan on getting some POR-15 to cover the top and bottom of the floors when they are done. Maybe paint inside the doors with it too. Some kind of oil concoction sounds good for the concealed areas. I finally got the replacement bracket removed from the cut out frame section. My first two drilling attempts were off center. I found that if I drilled right through the waffle pattern on the rivet, it will center my drill bit pretty good. The rivet shank is larger than any available bits I have that fit my drill. Ended up using a 1/4" when I think a 7/16" would take care of the shank. May have to buy a new bit with a smaller shank to fit my drill. After using the smaller bit to drill through, I used an old broken screwdriver that I ground the end flat to hit against the rivet. Still no go. Ended up using a cold chisel in a gap between the bracket and frame. This broke through the remaining rivet pieces and separated them. Had to hammer the bracket ends flat again, but no big deal. The rivets on the car will be harder. Plan on drilling through the waffle section to center bit with a larger bit and hope it will pop through this time. If not, maybe use the cold chisel to remove bad bracket. They may leave enough rivet sticking out to hit with a hammer and push it in if it does not collapse on itself. We will see. Still not looking forward to it.
Posted on: 2013/6/25 17:46
|
|||
|
[url=h
|
||||
|
||||
|
Re: 51Packard's....51 Packard
|
||||
|---|---|---|---|---|
|
Home away from home

|
I have a graduated drill bit that goes from 1/8" to 3/4" in 1/8" steps and uses a 3/8" shank to fit into the drill chuck. It is great for making holes in sheet metal. Generally available at Lowe's and Home Depot and probably Sears too.
(o{}o)
Posted on: 2013/6/25 22:18
|
|||
|
We move toward
And make happen What occupies our mind... (W. Scherer) |
||||
|
||||


