|
Re: Mal's '41 120 Coupe
|
||||
|---|---|---|---|---|
|
Forum Ambassador

|
Thursday 19th June 2008
Wade wasn't getting in till later in the morning so I started on making some retaining clamps for the Optima battery which will sit on top of the frame in the engine compartment over the steering box. A few days ago I picked up a length of aluminium bar from my Dad's place to use as the raw material for the clamps. He'd brought about a dozen of the bars home about 40 years ago, when he worked for a wood working machinery importer, and since then they'd been used as shelving for a pot plant stand! Now they'll do sterling duty as "custom" Packard battery hold down clamps. Each bar is about 30" long by 1&7/8" wide and 3/8" thick. I only needed 2 small pieces, each about 1" long, so there's plenty left for other purposes if required. Although from trial fittings we knew the battery would fit, first up was measuring the distance, centre to centre, of the rods welded to the top of the frame which is 11". Then measuring the length of the Optima battery. Initially the length from hold down flange to hold down flange, 10", then the case length, 9 & 3/4" and the width of the flange, 1 & 3/4". I then found a round container, a small plastic fast food container which was almost the same diameter as the end of the Optima. Then drawing up a template of the clamp using the measurements obtained on a piece of paper and transferring that to the bar. So far so good. Next, because the end of the bar had a hole drilled in it, the end was hacksawed off. More hacksaw cuts followed until there were 2 approximately equal blanks. Using a half round file then followed roughing out of the radiused ends of the clamp from their initial angled hacksaw cut shape. And at this stage I'm glad I used aluminium as it was very easy to file but with my lack of skills and general inepitude I was always worried I could take too much off in the process. But taking it easy, and with many trial fittings against the Optima, managed to end up with 2 reasonable battery hold down clamps, even if I do say so myself. At this point I found that the Optima has different width flanges at either end of the battery. Fortunately the end I measured was the wider one so both clamps fitted the flanges. Then drilled a hole in the clamp being used at the rear of the battery, no problems. But in another trial fitting I found I'd miscalculated the positioning of the holes for each clamp. Not to fear though, there was enough meat in the clamp remaining to be drilled to position the hole probably another 3/16"" from where I'd initially marked it to closer to the end of the clamp. And another fitting immediately after drilling bringing relief to me as it worked! Then I decided to get fancy, as the Optima flanges have a face at a 45 degree angle which leads up to the flat face on the flange. So out with the hacksaw again to cut a square section on the bottom inside of the clamps and then wielding a big flat file to obtain the 45 degree chamfers leading to the flange hold down lip. Note, a piece of thick rubber will be used under the Optima as a base and will be located by holes through which the battery clamp threaded rods will pass. By this time Wade had arrived and I showed him my handiwork. Hope he was suitably impressed, because I am, although there were a few small slips along the way I've actually made something for the '41! Although they are not finished requiring clean up and polishing so they present well. Oh, and overnight Wade had found me some nuts and washers to use so once again he's looking after me! Because Kath and I were off to see the grand-daughters this afternoon, thats where I left things and will finish up the clamps tomorrow. And Dave, discussed your latest advice with Wade and he advises that he saw your post but his setup for the cooling is a bit different. It incorporates a cooling tube where water is directed to the bottoms of the valve seats and apparently this is covered in a Packard Service Bulletin. Didn't fully understand what he was saying but I'm sure you will. Attach file:  (20.32 KB) (20.32 KB)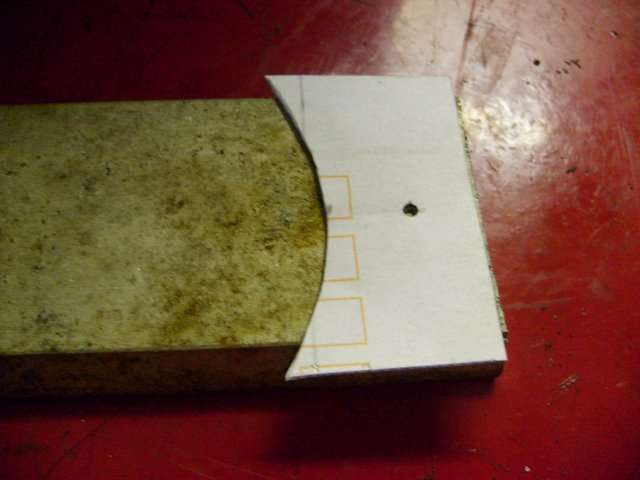 (26.96 KB) (26.96 KB)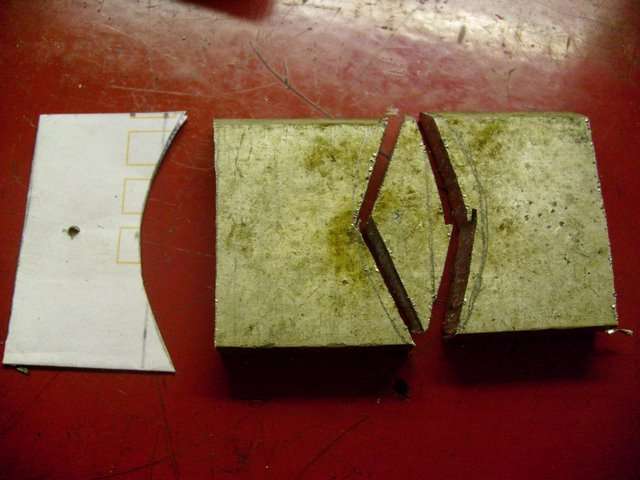 (23.02 KB) (23.02 KB)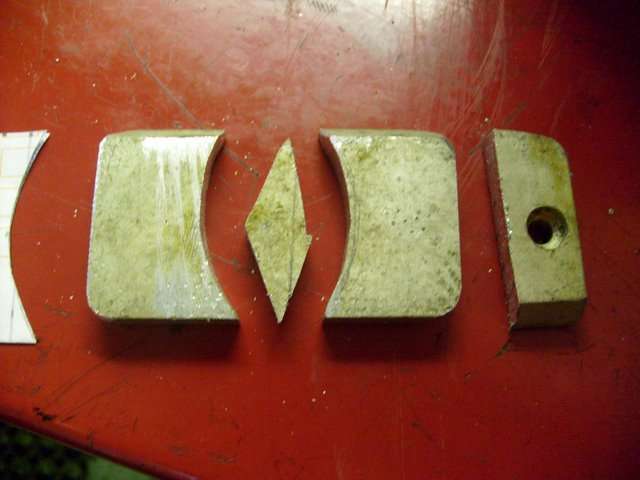 (27.81 KB) (27.81 KB)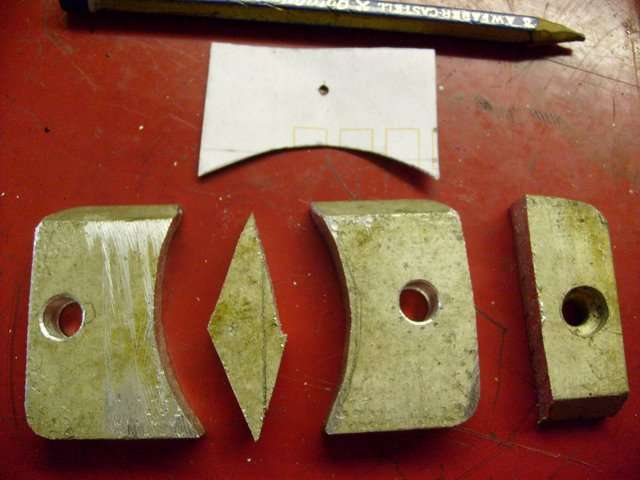 (20.46 KB) (20.46 KB)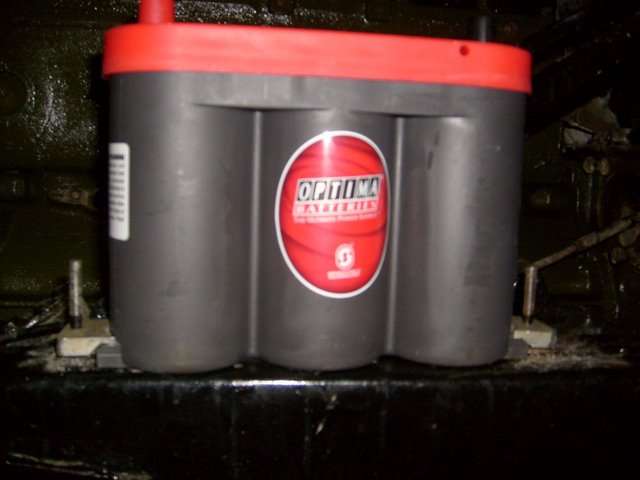 (20.93 KB) (20.93 KB)
Posted on: 2008/6/19 3:30
|
|||
|
Mal
/o[]o\ ====  Bowral, Southern Highlands of NSW, Australia "Out of chaos comes order" - Nietzsche. 1938 Eight Touring Sedan - SOLD 1941 One-Twenty Club Coupe - SOLD 1948 Super Eight Limo, chassis RHD - SOLD 1950 Eight Touring Sedan - SOLD What's this?  Put your Packard in the Packard Vehicle Registry! Here's how! Any questions - PM or email me at ozstatman@gmail.com |
||||
|
||||
|
Re: Mal's '41 120 Club Coupe
|
||||
|---|---|---|---|---|
|
Forum Ambassador
|
Friday 20th June 2008
Didn't get to finish up the battery hold down clamps. Instead started by cleaning off the POR-15 overpaint on the surfaces on the front cross-member to mount the steering crank arm. Next was lubricating the bolt, sleeve, washers, including the belleville washer with grease then inserting the sleeve and washers on the crank. The engine was then jacked up to give clearance for the next part of the procedure. While I lay under the car Wade inserted the steering crank and sleeve through the slot in the back of the front cross-member and I then inserted the bolt through the sleeved crank and Wade installed, tightened and split-pinned the castellated nut up top. Finally out with the grease gun again and a good initial charge of lubricant was forced in with a wiping off of the excess, and the steering crank is now firm and ready for action. Next up was installation of the new front oil seal so I spent some time gasket cementing, with Loctite No3 Non Hardening Gasket Cement the front block surfaces, the gaskets, and the timing cover. What a sticky, messy part of the process and now I know why Wade was so keen for me to learn all about this! I thought the next part would be relatively easy, the installation of the timing cover, but it was not to be. Wade installed the new oil seal on the crank snout and with the gaskets stuck to the block and pan by the gasket cement the timing cover was carefully positioned and slid into place, or so I thought. I wasn't careful enough and managed to push the portion of new sump gasket out of alignment. So I left it to the expert and Wade had a go with much better results. Then, as I lay under the engine trying to align and install the front sump bolts into the bottom of the timing cover, Wade tackled the bolts around the front of the cover. Lot of struggling to get the right alignment as it probably depends on the tides, moon, planets and stars being in their correct cycles to be able to get it to all come together. And as Wade said, it's easy to do all this when the engine is on the bench! Did have some particular difficulty installing one of the bolts which also retains the timing pointer and after some struggle Wade finally got it to go. I then tightened up all the bolts only for Wade to then tell me the timing pointer wasn't right. So after a look at the pointer on Wade's '37 120 which was different so didn't help I took it off and reinstalled it turning it around and, voila it fitted. Also, didn't require the Wade touch to do up the previously troublesome bolt this time round. With the harmonic balancer, after being lightly lubed for the new seal, I was able to then push it on to the crank snout and using the rattle gun tightened it up. The radiator was re-installed next and required some manoeuvering before it was nicely in place. This included taking it out after the initial attempt because a new drain spigot had been installed even though I had sent it out without one, told you Dave was a good guy, because we'd taken the original off in order to remove it from the '41. Only two bolts are holding the radiator in place at present but this will be rectified in the near future. Next was the re-installation of the front engine mount. I'd bought the new rubber half pieces for it some time back and Wade must have spent a good half hour searching for them before they were found in one of our parts recepticals of choice, an empty plastic ice-cream container! Now we had all the parts, so the mount and half rubber were pushed over the nose piece on the front of the block with the retaining cup and other half rubber following suite. Then, because of the uncompressed depth of the new rubbers the 2 retaining bolts couldn't meet with their respective threads in the block. After a longer bolt of the same thread was found this was used initially to compress the rubbers so that the shorter bolts could be then installed. So far so good. Then Wade suggested we check that the fan belt could be installed and the engine was lowered on the jack so that the flanges on the bottom of the engine mount were contacting the front cross-member. Just as well, because the fan belt wouldn't or couldn't be installed past the lower pulley. Then out with some 1/4" thick rubber sheeting I'd bought, primarily for the battery mount and to fill the heelrest areas of the front floorpan in lieu of the deteriorated composite originals, and a couple of about 2" x 2" rubber spacers/mounts were quickly produced by Wade, a man of many talents. He said he also did this in his '37 120 when he rebuilt the engine in it some years ago. With one engine mount on a flat surface, the right side one, we started on the left side because it was on the sloping front cross-member surface. It took a bit of nudging, jiggling, pushing and raising of the engine on the jack to align it and insert the bolt. Same with the right side before it too had the bolt inserted and both nuts were then pulled up tight. A note here, I see there are 2 lots of mounting holes for the engine mounts and also for the large bottom bolt for the radiator mounting. I suspect these are for the Senior cars with their longer engines, am I correct? And Dave, had another discussion with Wade about water flow on the Super 8's. Much more educational this time as Wade was able to use Kevin's '35 engine sitting on the bench for instructional purposes as it's almost a bare block at the moment. He's quite confident that he won't experience any flow problems or deprivation. Also he was quite taken with the replacement of the heat exchanger core with a length of flexible finned high pressure tubing shown in your pic!  Attach file: (34.99 KB)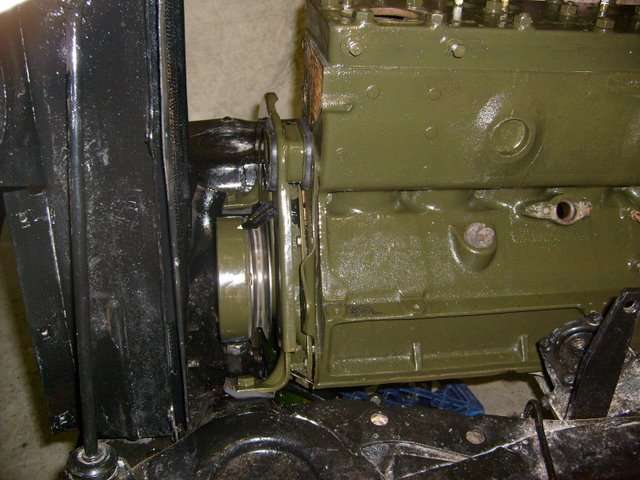
Posted on: 2008/6/20 0:38
|
|||
|
Mal
/o[]o\ ==== Bowral, Southern Highlands of NSW, Australia "Out of chaos comes order" - Nietzsche. 1938 Eight Touring Sedan - SOLD 1941 One-Twenty Club Coupe - SOLD 1948 Super Eight Limo, chassis RHD - SOLD 1950 Eight Touring Sedan - SOLD What's this? Put your Packard in the Packard Vehicle Registry! Here's how! Any questions - PM or email me at ozstatman@gmail.com |
||||
|
||||
|
Re: Mal's '41 120 Club Coupe
|
||||
|---|---|---|---|---|
|
Forum Ambassador
|
Monday 23rd June 2008
Arrived at the workshop before Wade and cleaned up the aluminium hold down clamps for the battery. But forgot to take a pic and will do so tomorrow if I remember! Then started on removal of the intake and exhaust manifolds, loosened all the stud nuts easily except one snapped. On examination of the snapped stud it's apparent it had already been stretched and was literally hanging by a thread, so I didn't feel too bad about it, and it had been the "victim" of a previous repair of some sort so that was a contributing factor. After loosening the studs I unbolted and removed the carburettor and undid the exhaust clamp nuts and one of these had a nut and bolt instead of a stud and nut. Because of all that was going on I missed out on the Transmission Locating Rod that Eric had spotted for me on eBay. The auction was ending at 11:30am Sydney time and so before I left for the workshop entered a number of bids until I was the high bidder at US$22.72 and left an automatic bid of US$31.73 in the system. At about 11:05am I thought I'd give the work another 10/15 minutes then jump on Rick's PC. But it was not to be as I realised about 11:29:59 that I wasn't on line. So by the time I got on so all I could do was accept it stoically, as another opportunity missed. Sorry, Eric, you tried. I'll just have to find another one now. After scraping and cleaning the side of the head where it had been previously screened by the manifolds scaped and cleaned the gasket surfaces. Then took off the tappet covers to be met by a sludge buildup. After a short discussion with Wade then plugged the oil return holes and proceeded to scrape, wipe and finally spray with brake cleaner and wipe off most of the sludge. During the course of this managed, or so I thought, to push one and then another of the paper towel plugs through into the sump. So off comes the sump, and just as well, as it too naturally had a sludge buildup of about 1/4" - 3/8" in it's bottom. That's right sludge, but no wads of paper towel! I must have dislodged the wads into the can under the tappets I was using for the spoiled towels! After cleaning out the vast majority of the sludge manually have left the sump and the oil pickup to soak overnight in kerosene. While most of the above was going on, Wade was finishing up his '34 engine and at one stage again cranked it over on the starter only and this time raised oil pressure. Not much, about 4lbs, but enough to show the oil is circulating and to lubricate the engine internals. Next step is to fire it up as it's now ready to go. But to do that Wade has promised Gina, his wife, that she will witness the momentous occasion so until Gina next comes to the workshop we'll all be waiting expectantly and excitedly until then. Attach file: (36.40 KB)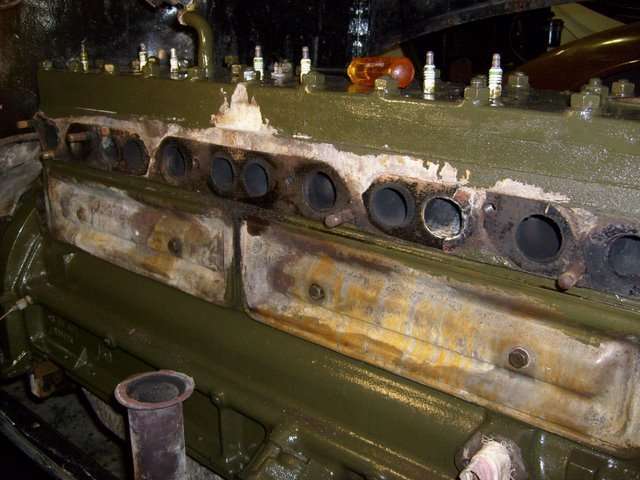 (37.78 KB) (37.78 KB)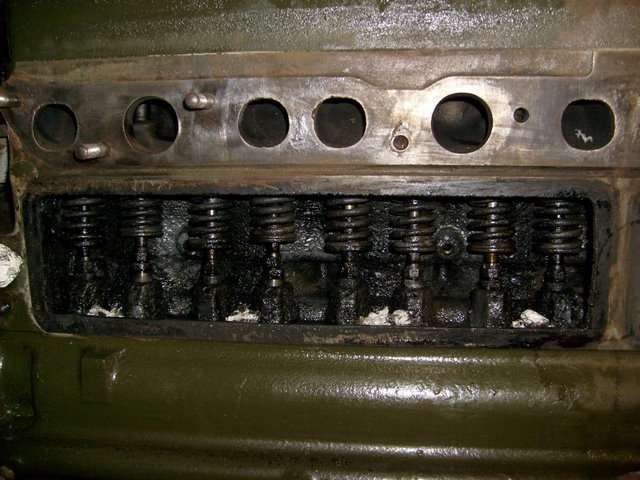 (28.78 KB) (28.78 KB)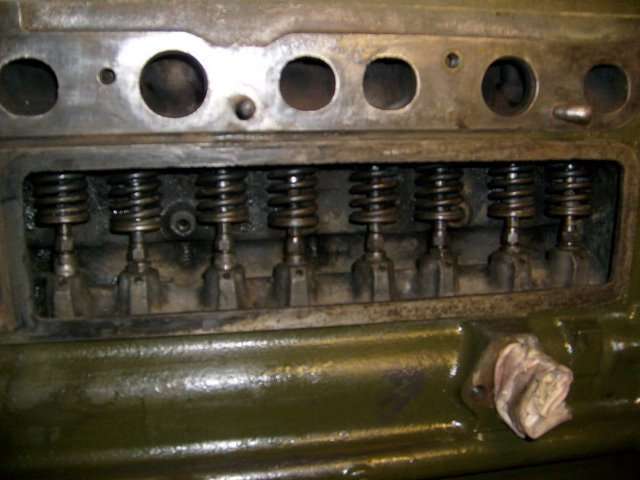 (33.43 KB) (33.43 KB)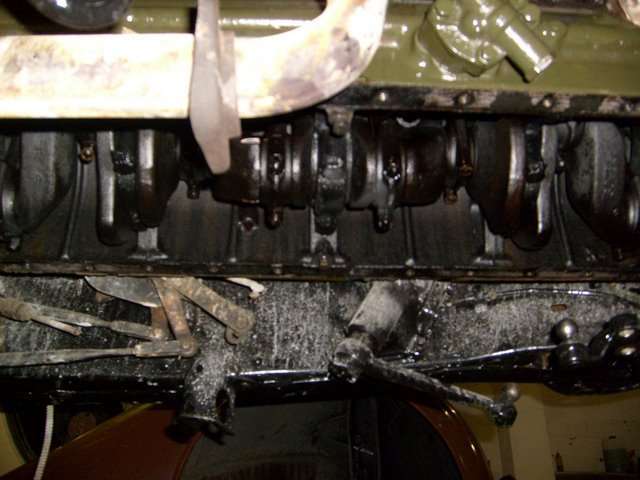 (39.27 KB) (39.27 KB)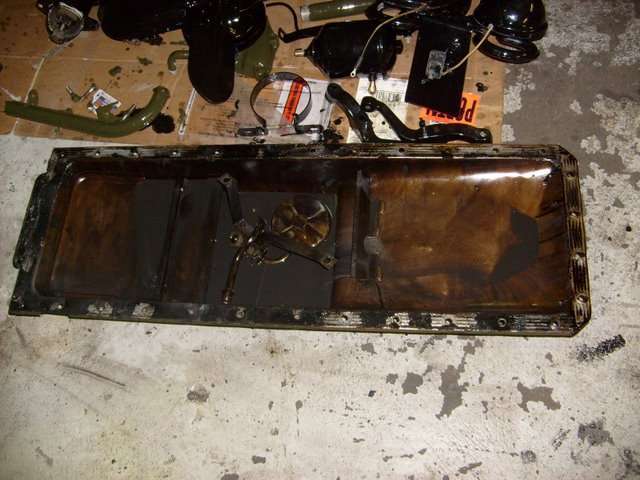 (26.18 KB) (26.18 KB)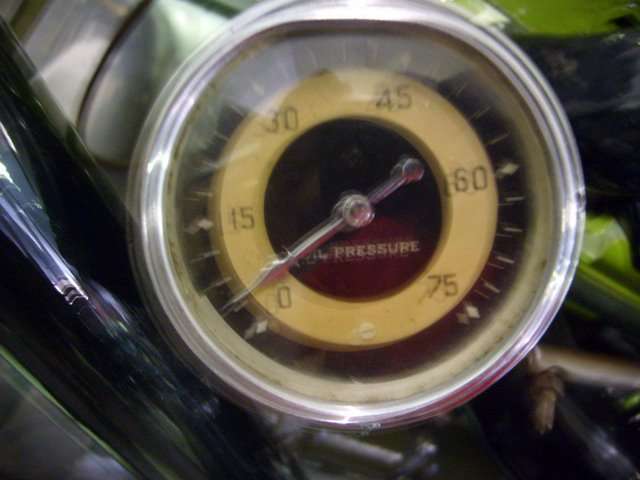
Posted on: 2008/6/23 4:29
|
|||
|
Mal
/o[]o\ ==== Bowral, Southern Highlands of NSW, Australia "Out of chaos comes order" - Nietzsche. 1938 Eight Touring Sedan - SOLD 1941 One-Twenty Club Coupe - SOLD 1948 Super Eight Limo, chassis RHD - SOLD 1950 Eight Touring Sedan - SOLD What's this? Put your Packard in the Packard Vehicle Registry! Here's how! Any questions - PM or email me at ozstatman@gmail.com |
||||
|
||||
|
Re: Mal's '41 120 Coupe
|
||||
|---|---|---|---|---|
|
Home away from home
|
G'day Mal and AfricaPackard, I would suggest that whilst the sump is off that you check each big end and Main nut to ensure that the Palnut or split pin is still intact. I have found a lot missing over the years and a retorque is better than a leg out of bed. best regards PT
Posted on: 2008/6/24 3:05
|
|||
|
I like people, Packards and old motorbikes
|
||||
|
||||
|
Re: Mal's '41 120 Coupe
|
||||
|---|---|---|---|---|
|
Forum Ambassador
|
Tuesday 24th June 2008
Arrived late at the workshop this morning, the queue in the bank was something to behold and not just that as every customer seemed to have a long involved transaction with the tellers. Anyway once there started cleaning up the sump, side plates, oil pump pickup and the million and one sump bolts. Scraped, cleaned and wire brushed off, in no particular order, old gasket, gasket cement, sludge and general dirt and grime. Then into the parts washer and stand back. It's nice to then pull the pieces out with clean hands and not have any dirt or grease on them, luxury. A little earlier Wade had pointed out a minor blooper relating to the re-assembly of the front engine mount. We'd forgot to install the generator adjusting bracket, which bolts to the front of the engine, before installing the engine mount to the block. Once the engine mount is installed it's impossible to get the bolt, bracket, spacer and washer past the frame of the engine mount. Because it had been a bit of a struggle to get the 2 top engine mount bolts to tighten up Wade was loath to slack them off too far. So the next phase was done in increments with Wade loosening the bolts a turn or two each time, before I attempted to insert the bolt and bracket with Wade on the end of a long bar to lever a little extra clearance. This was repeated a number of times until, at what must have been near the limit of thread travel and Wade at the end of an even longer bar, I just managed to get the bolt into position and started, phew! Next started re-installing the accessories on the engine beginning with the waterpump and began that by cleaning up the gasket mating surfaces of my overpaint. Then ensuring the 4 bolts were likewise clean and with new washers. Onto gasket cementing the gasket surface of the pump while on the bench, then the mating surface of the gasket for the pump. Stuck the gasket onto the pump and, with the pump leaning back on the 2 lower bolts, gasket cemented the back surface of the gasket while Wade cemented the block itself. Then with all 4 bolts/washers in place mounted the pump on the engine. A word of advice, Wade tells me he's experienced instances where on putting new front engine mount rubbers in it can interfere with the bottom of the waterpump, so check this early in your installation. And some further advice - Wade had run a tap through the fan blade retaining holes before we installed the waterpump to ensure that installation of the fan, being fairly tight and awkward, was not inconvenienced by baulky threads. Pump pulley then slid on after ensuring any overpaint was removed, and after I cleaned up the fan retaining bolts and overpaint on the back of the fan, the pulley and fan were relatively easily installed. But with the use of a little device, 2 short golf tees, these have points which taper to just less than the size of the holes the bolts are being inserted into and makes it so much simpler. Then installing the generator should be easy right? Probably is, but not for yours truely. After struggling to position the generator and insert the rear bottom bolt Wade took over and, with the use of a screwdriver to line up one set of holes, aligned and inserted the other bolt easily. Then fumblefingers was allowed back on the job to finish it off. Next I tried to install the new fanbelt purchased 6 months ago but it was too short! Again Wade to the rescue as he produced a new fanbelt from his shelf "stock" and it fits, problem solved! The oil filter bracket was then easily installed by yours truely, at least one task accomplished without help! Before installing the oil filter though, the head water outlet needs to be installed. Wade took out the thermostat from the outlet to test it and found it opens slowly and not very much. It is marked 180, degrees I presume, so the question is: Is this the correct thermostat for the '41? See pic's of it below. At this point I left Wade making a gasket for the water outlet while I went home to cut the grass before it got dark. The other workshop matter today was John was bringing in his '40 110 Sedan which Wade was going to fix/repair/replace the clutch on. However Wade had a call during the morning from John to say he couldn't even drive round the block as the rear brakes were locking up. And later Wade had another call from John to say the '40 would arrive on a tilt bed truck on Thursday because Wade's not going to be in tomorrow, Wednesday, as he's going to check on the progress on his '34 body in the panel shop on the far southern outskirts of Sydney. Quote:
Barrie, Valve cover and sump gaskets on the engine were both cork. Wade has rummaged through his "stock" and come up with new composite sump gaskets, they come in 4 interlocking pieces. And I had bought a pair of valve cover gaskets from one of the major Packard parts suppliers but haven't checked on the type of material in these. And yes, we'll be doing like Wade did on his '34 engine and crank it over with plugs out to ensure oil has filled galleries, circulated and lubricated all the moving parts. NOTE - When Wade dropped the sump on his Super 8 a couple of months ago he didn't have a new gasket to put back on so just used a liquid gasket compound instead. Seems to be working well, as he's done 2 long trips since then racking up thousands of miles and I haven't heard any mention of oil leaks. Oil usage yes, but that's another story. Quote:
Peter, Thanks for the advice, from my observations under the engine it all looks OK to this very untrained eye. But will talk to Wade about it, as this preventative maintenance strategey is great insurance while the opportunity is available. Attach file: (28.97 KB)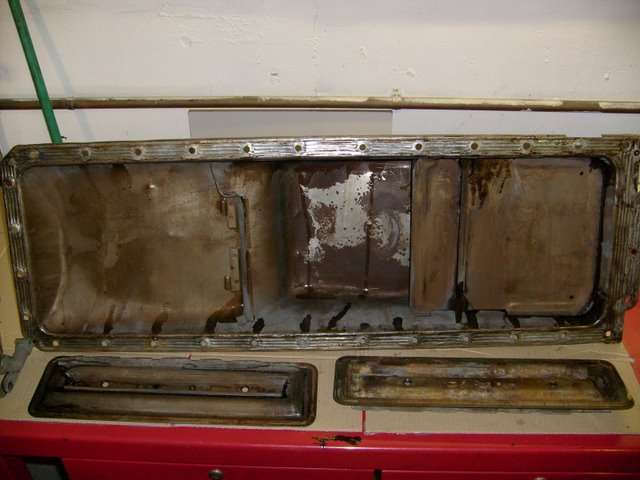 (27.16 KB) (27.16 KB)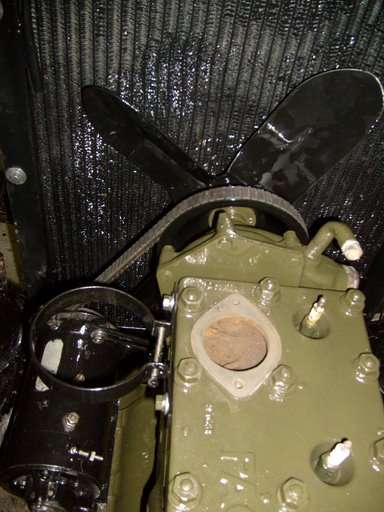 (25.23 KB) (25.23 KB)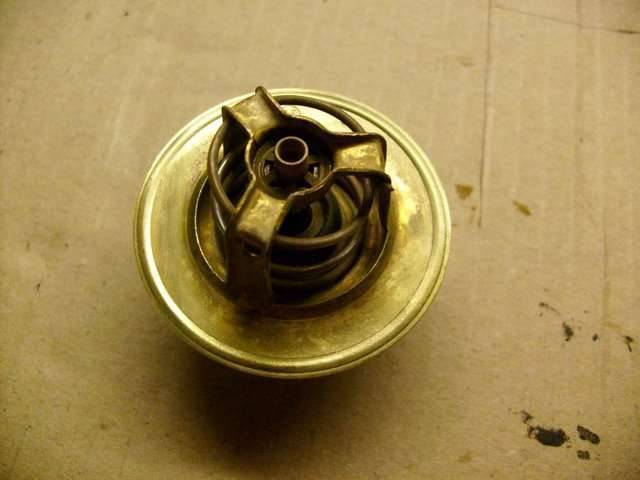 (19.88 KB) (19.88 KB)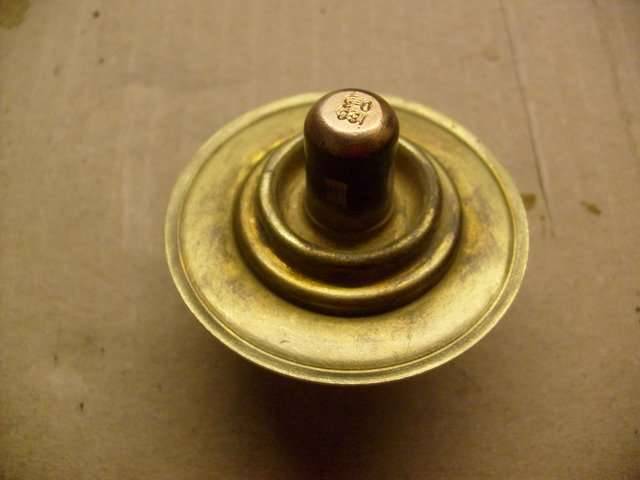 (21.69 KB) (21.69 KB)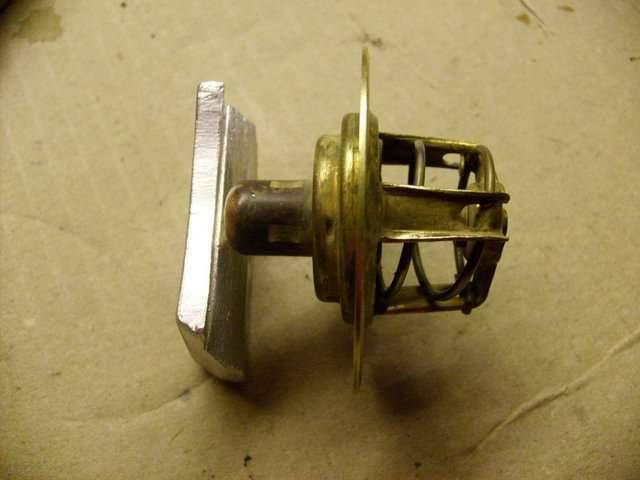 (18.83 KB) (18.83 KB)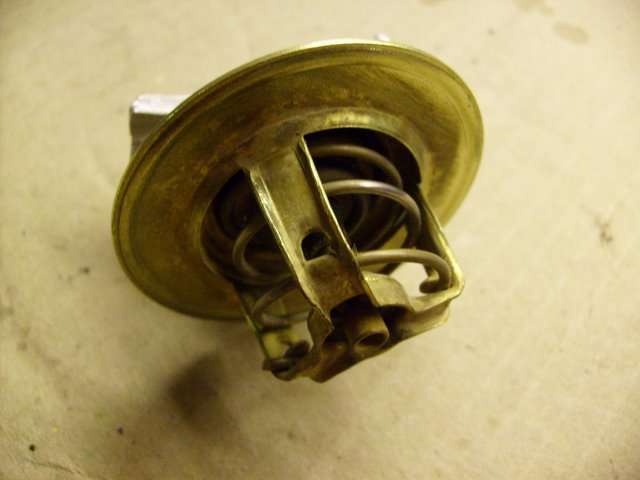 (19.58 KB) (19.58 KB)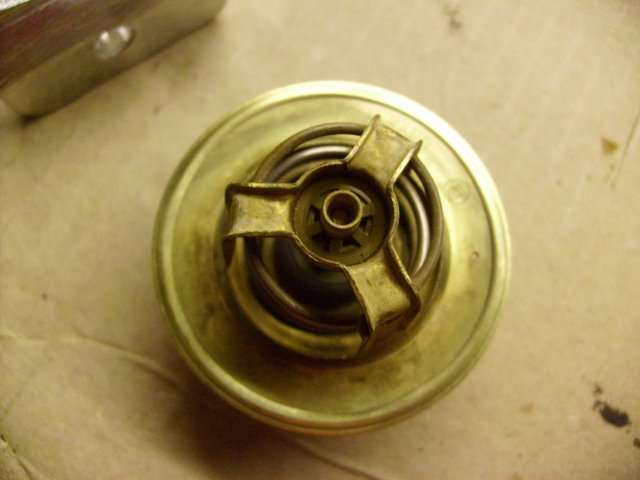 (18.26 KB) (18.26 KB)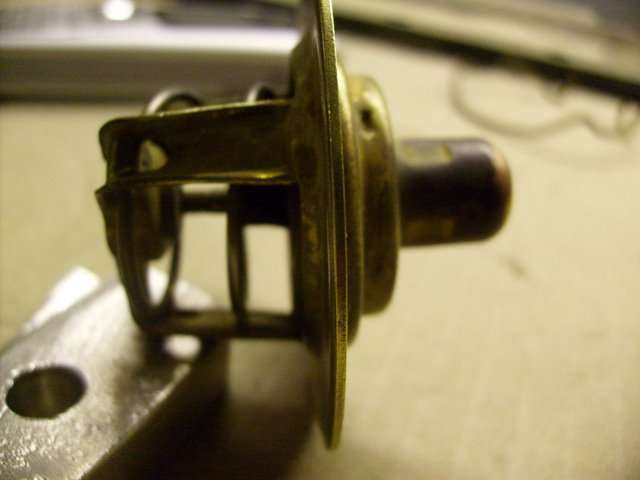 (23.77 KB) (23.77 KB) (23.77 KB) (23.77 KB)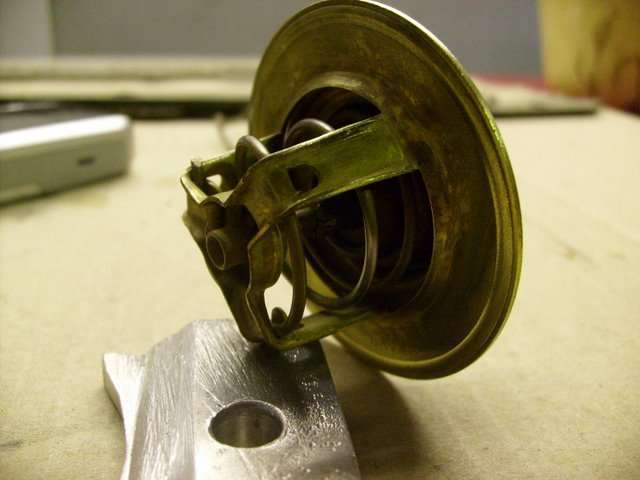
Posted on: 2008/6/24 7:29
|
|||
|
Mal
/o[]o\ ==== Bowral, Southern Highlands of NSW, Australia "Out of chaos comes order" - Nietzsche. 1938 Eight Touring Sedan - SOLD 1941 One-Twenty Club Coupe - SOLD 1948 Super Eight Limo, chassis RHD - SOLD 1950 Eight Touring Sedan - SOLD What's this? Put your Packard in the Packard Vehicle Registry! Here's how! Any questions - PM or email me at ozstatman@gmail.com |
||||
|
||||
|
Re: Mal's '41 120 Coupe
|
||||
|---|---|---|---|---|
|
Webmaster

|
I always thought this was the correct style for most of the pre-war cars:
(From Max Merritt's Website) Attach file: (23.92 KB)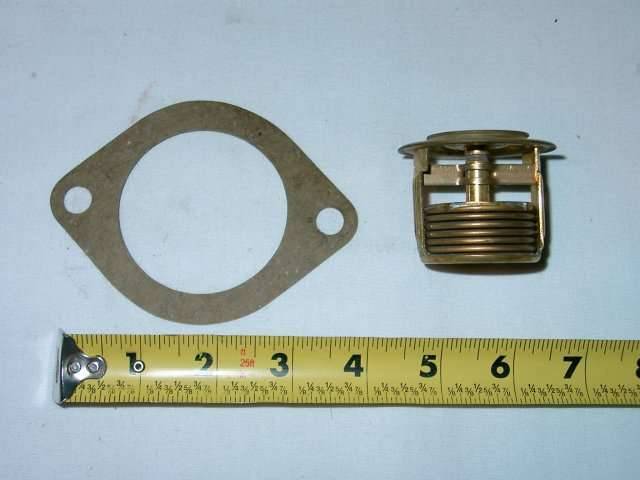
Posted on: 2008/6/24 10:51
|
|||
|
-BigKev
1954 Packard Clipper Deluxe Touring Sedan -> Registry | Project Blog 1937 Packard 115-C Convertible Coupe -> Registry | Project Blog |
||||
|
||||
|
Re: Mal's '41 120 Coupe
|
||||
|---|---|---|---|---|
|
Forum Ambassador
|
Quote:
Kev, Thanks for the pic, it matches the Harrison thermostat I bought off eBay some time ago. Description on box says "Packard 1937-50 6 and Light 8 (Standard, Clipper and Super) and is marked 160 degrees which seems a lot better for the lightly pressurised system in the '41. We'll test and use that thermostat in the re-assembly later this week.  Attach file: (21.13 KB)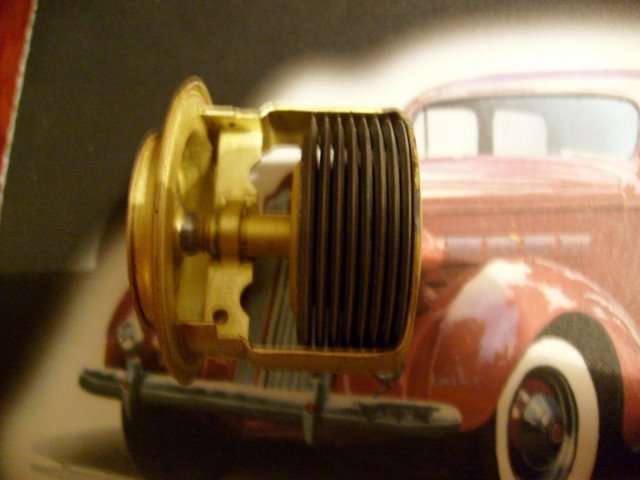
Posted on: 2008/6/24 21:39
|
|||
|
Mal
/o[]o\ ==== Bowral, Southern Highlands of NSW, Australia "Out of chaos comes order" - Nietzsche. 1938 Eight Touring Sedan - SOLD 1941 One-Twenty Club Coupe - SOLD 1948 Super Eight Limo, chassis RHD - SOLD 1950 Eight Touring Sedan - SOLD What's this? Put your Packard in the Packard Vehicle Registry! Here's how! Any questions - PM or email me at ozstatman@gmail.com |
||||
|
||||
|
Re: Mal's '41 120 Coupe
|
||||
|---|---|---|---|---|
|
Home away from home
|
Mal,
I can't help you with your thermostat (mine don't have one), but the photo is great! Tom
Posted on: 2008/6/25 3:04
|
|||
|
||||
|
Re: Mal's '41 120 Coupe
|
||||
|---|---|---|---|---|
|
Forum Ambassador
|
Quote:
Tom, As you know I've had difficulties with the quality of pic's I've posted but thanks to help from you guys the pic's have improved considerably over the last few months. I also feel that if you can include a pic or pic's relating to the post content it adds another dimension, one that can't always be expressed in words. And as you can see, with the last pic I used my Packard mouse pad as background.
Posted on: 2008/6/25 4:46
|
|||
|
Mal
/o[]o\ ==== Bowral, Southern Highlands of NSW, Australia "Out of chaos comes order" - Nietzsche. 1938 Eight Touring Sedan - SOLD 1941 One-Twenty Club Coupe - SOLD 1948 Super Eight Limo, chassis RHD - SOLD 1950 Eight Touring Sedan - SOLD What's this? Put your Packard in the Packard Vehicle Registry! Here's how! Any questions - PM or email me at ozstatman@gmail.com |
||||
|
||||
Register To PostTopic is Locked


