Merry Christmas and welcome to Packard Motor Car Information! If you're new here, please register for a free account.  
Login
Username:

Password:

Remember me


Lost Password?

Register now!
FAQ's
Main Menu
Recent Forum Topics
Who is Online
96 user(s) are online (82 user(s) are browsing Forums)

Members: 2
Guests: 94

Nevada56Hudson, kevinpackard, more...
Helping out...
PackardInfo is a free resource for Packard Owners that is completely supported by user donations. If you can help out, that would be great!

Donate via PayPal
Video Content
Visit PackardInfo.com YouTube Playlist

Donate via PayPal


Huge Miss
#1
Home away from home
Home away from home

Bob J
See User information
I have been enjoying driving Greta with her '53 327 in-line 8 this summer and have enjoyed many miles of happy motoring and lots of great reactions from fellow motorists.
I was coming across a street close to home and came up to a red light where I let off of the gas and before I could disengage the clutch a severe miss occurred along with a light sounding rattle.
My instant diagnosis was stuck valve, however I was not overly confident of this as all new valve guides were installed at rebuild and all where reamed to spec with all valves further checked for smooth action during assembly.
It was a nervous drive the rest of the way home with one foot kept on the accelerator to keep the revs up enough to prevent stalling and my other two feet running the clutch and brake!
I was in no mood to deal with it that day and decided to let her cool off and see if there was still an issue he next day, sometimes a valve (it if really was?) will come un-glued after cooling off.
I started her up the next day and found the exact same noise and miss so it was off with the inner fender, fuel pump heat shield, side valve covers, and fuel pump vacuum lines.
It took some fiddling to get the covers to clear, and I found the rear easier to get off and out of the way first. I then got the front one to clear between the manifold and timing chain housing.
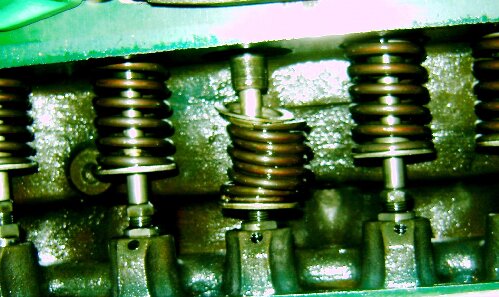
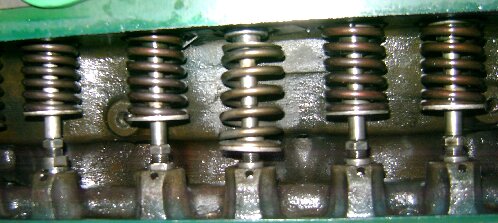
Starting at the rear cylinder I hand checked each valve and spring assembly, all looked well until I came to the front 4. There was the #3 exhaust valve with the spring drooping down like gramps pants after his suspenders let go!

Click to see original Image in a new window


Oh man, that explains it! On the one hand it was good in that it was not an error or omission by the rebuild and no fault was to be placed due to that, but I still had an inoperable engine and was looking at a fairly extensive rebuild to replace that spring.
I contacted a vendor about a head gasket, and the prospect of all the work to bleed the cooling system and remove the head was not a fun prospect.
Over lunch I mulled this over. The head gasket, although available, was not cheap, and I very much am!
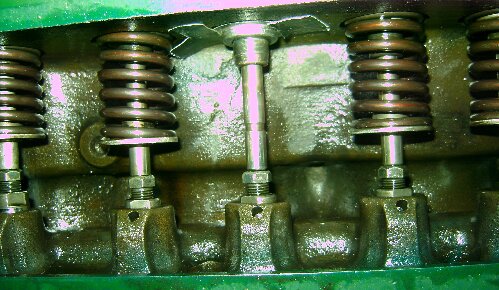
How can this be done another way. Removing the old spring should be straightforward, also the top and bottom washers. As you can see I have used solid lifters in the rebuild instead of the original hydraulic and this gave me the advantage of being able to wind down the top adjuster to increase the gap below the valve stem to extricate the old spring.
This went quite smoothly, I also used some Gorilla tape to adhere the top washer to the roof of the valve chamber to reduce the number of parts in free space while inserting the new spring.

Click to see original Image in a new window

Now, how to insert the new spring?
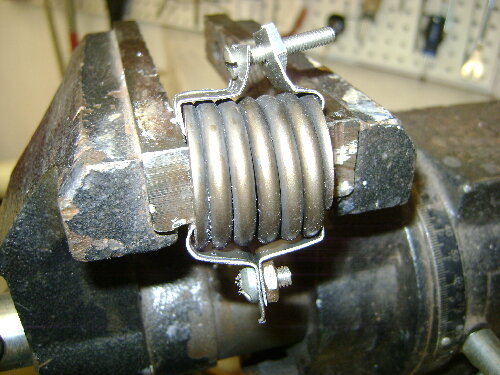
First I compressed it in the vise's jaws so it was completely compressed, leaving a small half moon of space above the jaws.
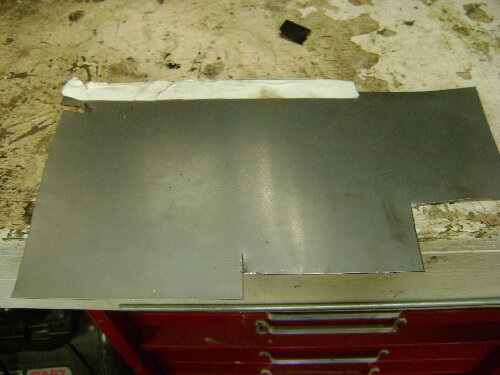
I then cut two strips of out of a piece sheet metal I had on hand

Click to see original Image in a new window

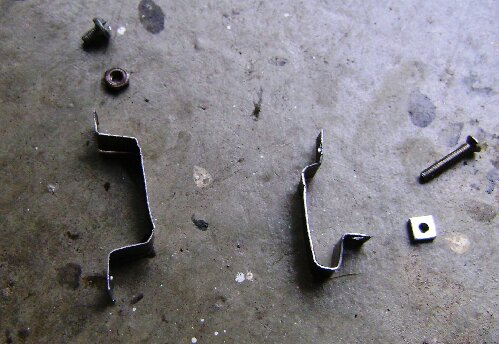
This was bent around the spring inside surface so that the two end legs met and were drilled to accept a #8 nut and screw:


Click to see original Image in a new window

the one end's legs have to be left open to thread it through the opening in the spring above the vice's jaws. The folds are brought together and held by a vice grip and the screw and nut tightened. The vice slowly opened, the spring rotated 180 degrees and the second strap installed.


Click to see original Image in a new window

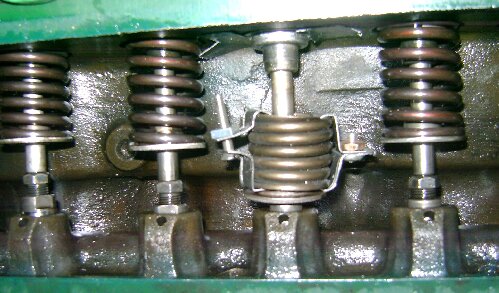
With this done I took the compressed spring and slipped it under the valve stem and above the solid lifter

Click to see original Image in a new window

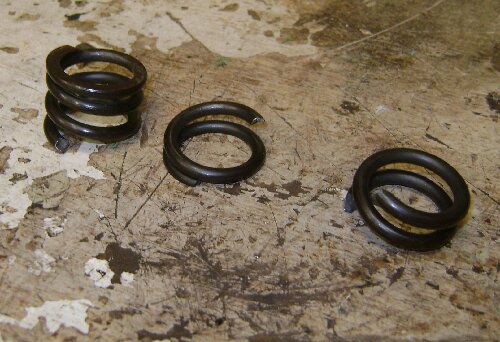
Here is an image of the culprit, I found the spring had shattered into 3 pieces, likely due to faulty wire or improper annealing after forming, whatever it had earned a place on my wall of infamy!

Click to see original Image in a new window

With the spring in place I simply unscrewed the fasteners and released the tension in the spring.
I did not want to try and set the keepers in place before loosening the compression straps as it would be too hard to control the release of the tension and more likely cause finger damage and launch the keepers to a new dimension!

Click to see original Image in a new window

One keeper was located by walking my fingers across the floor of the valve chamber, the other is likely in the sump after falling through the oil return hole right beside the lifter boss' area. It may come out in the next oil change, or not, but it is out of the game as the oil pick-up screen will keep it from the internals and the oils viscosity will stop it from coming out of the sump.
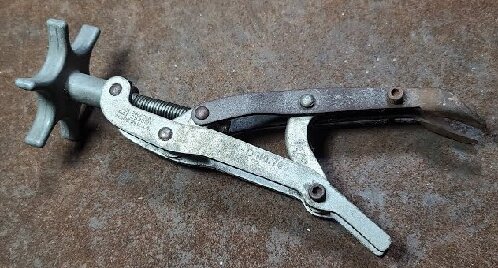
So another keeper was dug out of the parts bin and a special spring compressor tool that works by straddling the lifter and raising the bottom washer of the valve spring scissor jack style. I did not stop to take that picture, but here is the tool:

Click to see original Image in a new window

So with the spring safely compressed, the valve down so the keeper groove is fully exposed, I dabbed a little grease on each keeper to allow it to adhere to the stem. I found it easier clearance wise to install the rear (left) keeper and then spin it over to the right side and then add the second keeper. The tool easily released the valve tension trapping the keepers in the lower washer's bore. Resetting the valve clearance restored her to new and all was back as it should be.
I have driven many more miles since this job and all is well.
I hope this helps someone who has a similar issue, and give another option to complete disassembly.
Bob J.

Posted on: 10/6 15:20
 Top  Print   
LikeLove (2)


Re: Huge Miss
#2
Home away from home
Home away from home

Wat_Tyler
See User information
Bully for you!!! That's an undertaking, but you seem to have kicked its arse. If next weekend's deal comes together, I may be inheriting a valve issue myself. We'll see.


I did rebuild a M1 rifle earlier this year and the recoil spring came out in 4 or 5 pieces. That rifle is a 1943 model. I guess the steel got old and tired in each case.

Posted on: 10/6 15:28
If you're not having fun, maybe it's your own damned fault.
 Top  Print   


Re: Huge Miss
#3
Forum Ambassador
Forum Ambassador

Ozstatman
See User information
Bob J for a great description as well as the visual documentatiom. I'm sure this will help another Packard owner to fix a similar problem.

For what it's worth, probably very little, when I rebuilt my 120 engine about 15 years ago found that one of the valve springs was broken. Although it appeared to be running well up to that time, just old and worn out, like the owner. My spring had only one break, maybe that made a difference?

Posted on: 10/6 16:09
Mal
/o[]o\
====

Bowral, Southern Highlands of NSW, Australia
"Out of chaos comes order" - Nietzsche.

1938 Eight Touring Sedan - SOLD

1941 One-Twenty Club Coupe - SOLD

1948 Super Eight Limo, chassis RHD - SOLD

1950 Eight Touring Sedan - SOLD

What's this?
Put your Packard in the Packard Vehicle Registry!
Here's how!
Any questions - PM or email me at ozstatman@gmail.com
 Top  Print   


Re: Huge Miss
#4
Home away from home
Home away from home

Bob J
See User information
I forgot to note this was a "new" valve spring. I cannot tell if it was NOS from a shelf from the 50's or if it really was a newly manufactured one. It was cello wrapped and packed from the vendor. Stuff just happens, a bad spot when drawing the wire or something can happen anytime so I thought I would post this to help anyone else that finds themselves in this situation, definitely not restricted to any make or model of engine, but the L heads do require this type of tack vs our OHV brethren.
Also to your point Oz, it had run a bit rough at one point before the catastrophic one, so it may have survived the one break until the penny dropped on the second one?!
Bob J.

Posted on: 10/6 17:52
 Top  Print   


- The following Google Ad-Sense Advert helps fund the cost of providing this free resource -
- Logged in users will not see these. Please Join and Donate to help support the website -
Search
Recent Photos
Photo of the Day
Recent Registry
Upcoming Events
Website Comments or Questions?? Click Here Copyright 2006-2024, PackardInfo.com All Rights Reserved