|
Re: R9 Overdrive Solenoid Spacer direction
|
||||
|---|---|---|---|---|
|
Home away from home
|
It will only go one way-if the bolts don't line up, turn 180 degrees. Good luck
Posted on: 2012/7/1 19:44
|
|||
|
35-1200 touring sedan 42-110 convertible coupe 48-2293 station sedan |
||||
|
||||
|
Re: R9 Overdrive Solenoid Spacer direction
|
||||
|---|---|---|---|---|
|
Home away from home

|
Appreciate response, Dell, but It apparently can go both ways. So say manual.
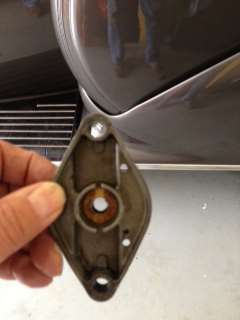
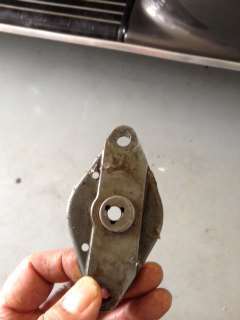
Quoting p.17 in the Transmission section of the 14-20 Series Service Manual.... The trouble proved to be the position in which the metal spacer was installed. ...Al though the two attaching cap screw holes will line up in either position, there is only one way to install the spacer so that the shaft will clear the hole in the spacer. ... In this case the spacer was installed upside down with the result that the spacer pressed so hard against the solenoid shaft that it was impossible for the pawl to slide out of the balk ring and permit the Econo-Drive to engage." The hole is offset toward one side and there are two small holes, also only on one side. Does anyone know if those item are toward the front or the rear of the car? Is there another way to know for sure, other than install it one way and if the OD doesn't work, turn it around and try that? Thanks Joe
Posted on: 2012/7/1 20:09
|
|||
|
||||
|
Re: R9 Overdrive Solenoid Spacer direction
|
||||
|---|---|---|---|---|
|
Home away from home
|
Joe
I'll have to get under my car and see. You are correct, there is only one way for it to be, and one way for the solenoid to fit to it as well. I might be able to slide under the car tomorrow and take a look for you.
Posted on: 2012/7/1 20:24
|
|||
|
West Peterson
1930 Packard Speedster Eight boattail (SOLD) 1940 Packard 1808 w/Factory Air (SOLD) 1947 Chrysler Town and Country sedan 1970 Camaro RS 1936 Cord phaeton packardinfo.com/xoops/html/modules/newbb/viewtopic.php?topic_id=4307&forum=10 aaca.org/ |
||||
|
||||
|
Re: R9 Overdrive Solenoid Spacer direction
|
||||
|---|---|---|---|---|
|
Home away from home

|
That's great of you, West. Beyond call of duty.
I don't know if you can tell once it's mounted. But you might be able to tell which side the larger lip is on. The lip with the two smaller holes is larger. You might be able to feel the holes on one side or the other. Or see it with a little mirror tool. If they all have 2 little holes, that is. I should have marked it before I made the new gasket. It's funny how it "felt" right initially. But, perhaps someone knows. Thanks, Joe
Posted on: 2012/7/1 20:56
|
|||
|
||||
|
Re: R9 Overdrive Solenoid Spacer direction
|
||||
|---|---|---|---|---|
|
Home away from home
|
Geez, I only did this last week and have already forgotten, but am almost certain the two little holes are toward the rear.
Also, are you certain that the shaft engaged with the pawl--as evidenced by the solenoid will not pull straight out? I am wondering if your car is not already stuck in overdrive fulltime, the evidence being that you can not shift it to reverse. There is an interlock built in to prevent that when the pawl is "in".
Posted on: 2012/7/1 21:24
|
|||
|
||||
|
Re: R9 Overdrive Solenoid Spacer direction
|
||||
|---|---|---|---|---|
|
Home away from home

|
Ross, thanks much.
I'll try that with small holes to the rear and we'll save West getting out and getting under. While the car was on the jack stands I tried to put it in reverse and it would not go, even tho it went into 2nd nd 3rd and 1st. I took the car off the jack stands, started it and moved it forward slightly in 1st gear. Then I was able to put it into reverse, so the overdrive lockout sleeve is free. Thank the universe.
Posted on: 2012/7/1 23:16
|
|||
|
||||
|
Re: R9 Overdrive Solenoid Spacer direction
|
||||
|---|---|---|---|---|
|
Home away from home
|
Joe; If you look at the adapter (item in your picture) you will see that the two bolt holes and the hole for the solenoid shaft are in a straight line-the male side of the adapter that fits in the od housing is off set-it can go only one way and have the bolt holes line up. It just happens that the small holes are to the rear. If you want to replace the seal C/R 3060 works well, just drive out the old seal and washer-put in the new seal and old washed and stake the washer in. Dell
Posted on: 2012/7/2 21:41
|
|||
|
35-1200 touring sedan 42-110 convertible coupe 48-2293 station sedan |
||||
|
||||
|
Re: R9 Overdrive Solenoid Spacer direction
|
||||
|---|---|---|---|---|
|
Home away from home

|
Dell, thanks for the tips. I'll get to take solenoid out again. It's leaking. I am becoming an expert. I have almost 10,000 hours in removing and installing the solenoid...incorrectly mostly.
It didn't have a seal when I opened it. It had form-a-gasket or blue silicone inside the spacer/adapter around the flange that's around the center (off set) hole when I took it out the other night. I just took it for a drive and when I parked, a trail of leaks. (I didn't go far and the tranny/OD was just filled, part of the reason I went out was to get all my fittings greased at Fast Lane Oil). But now I'm home. Tomorrow I'll get an oil seal and I'll take the solenoid out again. At the moment, it's installed with the small holes to the rear, but it won't engage. The red light comes on and it goes into freewheeling. I'm going to read up on it tonight. I truly appreciate your post here. I'm not at all mechanically inclined. Otherwise I would have marked the solenoid before taking things apart. Usually I take pictures of everything, but it's so crammed under there and I don't want to mess up my iPhone. I thought the gasket was the seal. The old gasket was beat up so I made a new one. I thought that would do it, stop leaks. But it doesn't without an oil seal. EDIT...So what I'm calling a gasket is the washer? Made of gasket materials with 4 holes around the big center hole? I'll check my parts book, too. Should have in the beginning. Thanks, Joe
Posted on: 2012/7/2 22:34
|
|||
|
||||
|
Re: R9 Overdrive Solenoid Spacer direction
|
||||
|---|---|---|---|---|
|
Home away from home
|
If it's leaking, you need to replace the seal in the spacer's center hole, through which the solenoid shaft runs.
Posted on: 2012/7/3 16:16
|
|||
|
West Peterson
1930 Packard Speedster Eight boattail (SOLD) 1940 Packard 1808 w/Factory Air (SOLD) 1947 Chrysler Town and Country sedan 1970 Camaro RS 1936 Cord phaeton packardinfo.com/xoops/html/modules/newbb/viewtopic.php?topic_id=4307&forum=10 aaca.org/ |
||||
|
||||

 (18.71 KB)


