|
Re: Our 1932 901
|
||||
|---|---|---|---|---|
|
Just popping in

|
Marston, I'm working on a 901 and have been for several years...not the fastest around for sure. If I can help you, please let me know...B
Posted on: 2011/3/21 18:16
|
|||
|
||||
|
Re: Our 1932 901
|
||||
|---|---|---|---|---|
|
Home away from home

|
For the last month or so, the tasks at hand have been working on getting the body ready for paint. The primer that was sprayed on by the previous owner (PO) is being block sanded with 80 then 150 grit paper before spraying several coats of 2K primer. So far, there have been no real bad spots - just a few low areas that show up as the 2K is blocked sanded with 150 and 320 grit paper. These are being filled with Evercoat Rage body filler and two additional coats of 2K primer will be sprayed on. This will be allowed to cure before final painting.
All nails along the roof were removed so the 1" chicken wire that was sticking out could be removed. For now, the roof has been temporarily screwed down using short #6 screws every 8" or so to the make sure that the roof was in the correct position for sanding and priming. Along with the sanding, time was spent working on doors and the door post. The loose wood screw holes were plugged using stepped dowels available from Woodcraft (suggestion by Jim Wayman worked out great). The metal on the back posts for both rear doors was removed and the wiring replaced. The previous owner had already bought various wiring harness for the car, but I didn't find one with wires for this area. Therefore, I used regular 12 gauge wire figuring that it would be out of sight. New body sills and bows for the roof, which had been made by the PO, along with all the wood was primed with an oil based primer (Sherwin-Williams colored the darkest gray they could mix). This was painted with a black oil based paint (S-W). Right now the wood under the rear window needs to be replaced and I'll put that on my to do list for now. I'll do all the remaining wood stuff like the wood for the seats, the piece that goes over the front window and flooring all at the same time.
Posted on: 2011/5/26 13:19
|
|||
|
||||
|
Re: Our 1932 901
|
||||
|---|---|---|---|---|
|
Home away from home
|
As a diversion to all the sanding, I decided to repair the king-Seely Sending unit. The fuel line was broken off where it exits the tank flange. Upon examining the unit it was determined that the unit had been repaired in the past where both the fuel and air lines exit the flange. Soft solder appeared to have been used to solder the areas where the tubing was broken.
Four one foot long lengths of 0.25" o.d. brass tubing and one of 9/32" o.d. with 0.014" wall were purchased from an e-store. Two ?" sections of the 9/32" tube was cut to be used as bushings. The first attempt to bend the ?" tube failed because the stiff brass collapsed. Therefore, one end of the tube was crimped shut and the tube filled with salt. Then the other end was crimped shut and the next attempt to bend the tube 90 degrees was successful. The 1/4" tube was cut to size and the flare fitting was removed from the broke piece of tubing. At that point, the fuel line was cut about 1/3" above the surge cup with a fine tooth hacksaw blade and the broken piece removed by heating the flange to melt the soft solder. The areas to be soldered were cleaned with extra fine emery cloth, solder paste applied, the 9/32" union slipped in place and the ?" inserted through the flange and into the open end of the union. The position of the air line was use to , align the fuel line. Lead based solder was used for the soldering of all the joints and to fix the tube to the flange. The air was replaced using the same process above. After soldering, everything was cleaned up using hot soapy water, dried and the steel flange painted with a black, fuel proof epoxy paint. Attach file:  (118.58 KB) (118.58 KB) (34.67 KB) (34.67 KB)
Posted on: 2011/6/21 20:02
|
|||
|
||||
|
Re: Our 1932 901
|
||||
|---|---|---|---|---|
|
Home away from home
|
The rain gutters (which are aluminum) and the sheet metal at the top of each door had been removed by the previous owner along with the sheet metal at the top of each door. During the removal process they were slightly bent and needed straightening before being re-installed.
The sheet metal was worked with a hammer and dolly to get it as flat as possible. It was then sanded to bare metal and given 3 coats of a 2K primer. After drying for a 3 days, they were block sanded and high spots were removed with the hammer on an anvil and dolly. Low spots were filled with a Evercoat Rage. The next day they were again block sanded and sprayed with 3 coats of 2K primer. At this point they looked good and flat. However, one did require more work as described above. The rain gutters were more of a challenge. The nails from the original installation were cut off as close as possible to the gutter itself. Any remaining part of the nail was removed using a 1/8" sanding disk on a rotary grinder. The back side of the gutter was reformed to give it some of the curvature that it originally had. This was done using a curved body hammer with light tapping. The next step on the gutters was to straighten them along both longitudinal axes. New holes for nailing were drilled between the old holes. The holes on the outside of the gutter were drilled slightly larger so the nail head would be countersunk to allowing for filling with Evercoat Rage. Multiple samples of available body nails were obtained and none seemed to be correct for nailing the gutter in place. However, #15 panel nails at the local hardware store seemed to be close diameter, but proved to be too long (1 5/8") to drive into the hardwood frame and the head was larger in diameter than what I wanted. Therefore, I decided to shorten them to 1 ?" by cutting with lineman's pliers and filing a new point. Also, the diameter of the nail head was reduced by placing the nail in a drill and reducing the size with a file while the drill was turning. Nice product, but a little time consuming when one needs about 120. Packard had installed the gutters using two #4 machine screws at the front and one #4 screw at the rear of the gutter. Using a screw at the rear was no problem since it only involved using the existing hole. However, the two at the front were rusted in and twisted off. I attempted to drill new holes, but the metal under the body's sheet metal must be a harden steel and proved to be beyond drilling. The sheet metal was reinstalled at the top of each door making sure that was it straight and flat going from front to rear and was square to the doors side to side. Care was taken to see the metal on the front and back doors met correctly at the center door jam. Number 16 panel nails were used for this installation. Now came the time consuming part of dry fitting the gutters in place. The gutters were bent so they would conform to the curvature of the body. Then the rear of the gutter was temporarily installed using a flathead #4, stainless steel machine screw (note the hole on the gutter was countersunk so the screw could be filled over) and the front end using a #16 panel nail (smaller than the #15's described above). Since the front of the gutter could not be attached any closer than 1 ?" from the front end, this area was bent inward so that nail would pull it tight against the body. Both ends were fitted so they met the reveals (front and rear) on the body, which required some filing. Starting at the front the gutter, it was bent, twisted as required so it fit such that it was slightly lower than the sheet metal of the door jam. Every 8 to 12 inches a clamp (see photo) was used to hold it in place so a 5/64' hole could be drilled through the body's sheet metal and the gutter "tacked" in place with a #16 nail driven halfway in. A short piece of nylon tubing was used on the drill bit as a stop during the drilling process so the hole would only be 3/8" deep (see photo). The process of positioning, clamping and drilling was repeated every 8 to 12" or so depending on how straight the gutter was. The gutter was also twisted as necessary while going down its length. Once I got about two-thirds of the way down the gutter (front to back) the rear #4 screw was removed. Then once I was past the rear door the curvature of the gutter was increased or decreased as required in order to align the hole in the gutter with that in the body for the rear machine screw. Then final minor adjustments were made to the gutter's alignment and its fit was adjusted down its entire length. All of the holes in the body were then drilled. Blue painters tape was used to mask off the area next to gutter to make cleanup from any squeeze out of the 3M Seam Sealer (P/N 08505) that was going to be used to ensure a water tight joint between the gutter and the body. Then the gutter was removed and the primer on the gutter and body was degreased. Starting at the front, a bead of sealer was placed on the body about one third of the distance. Nailing began starting with the first hole working back towards the rear. Five or six nails would be driven into place and the alignment was checked before they were driven all the way in and tightly count sunk. The process was repeated and when I got close to where the sealer ended, several more feet of sealer was laid down and more nails driven. Afterwards, the blue tape was removed and excess sealer removed and cleaned up using acetone. The holes in the gutter were then filled with Evercoat Rage. The gutter was then block sanded using a small custom made wood block that conformed to the gutter's curvature to remove the excess filler. Several high spots in the gutter were also filed to ensure that the surface was flat. The gutter was then primed again with a 2K material. Attach file: (77.91 KB)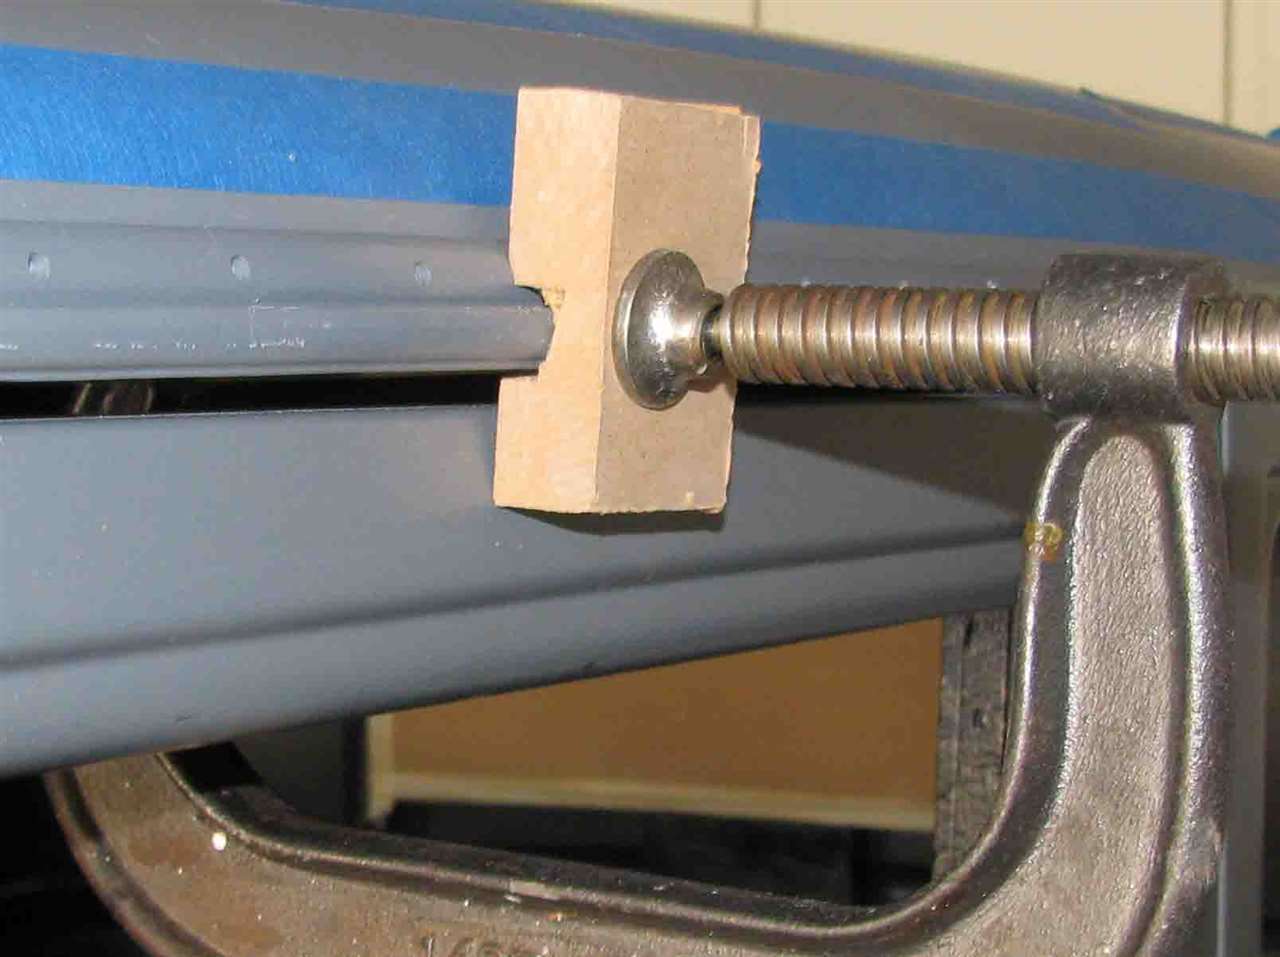 (56.04 KB) (56.04 KB)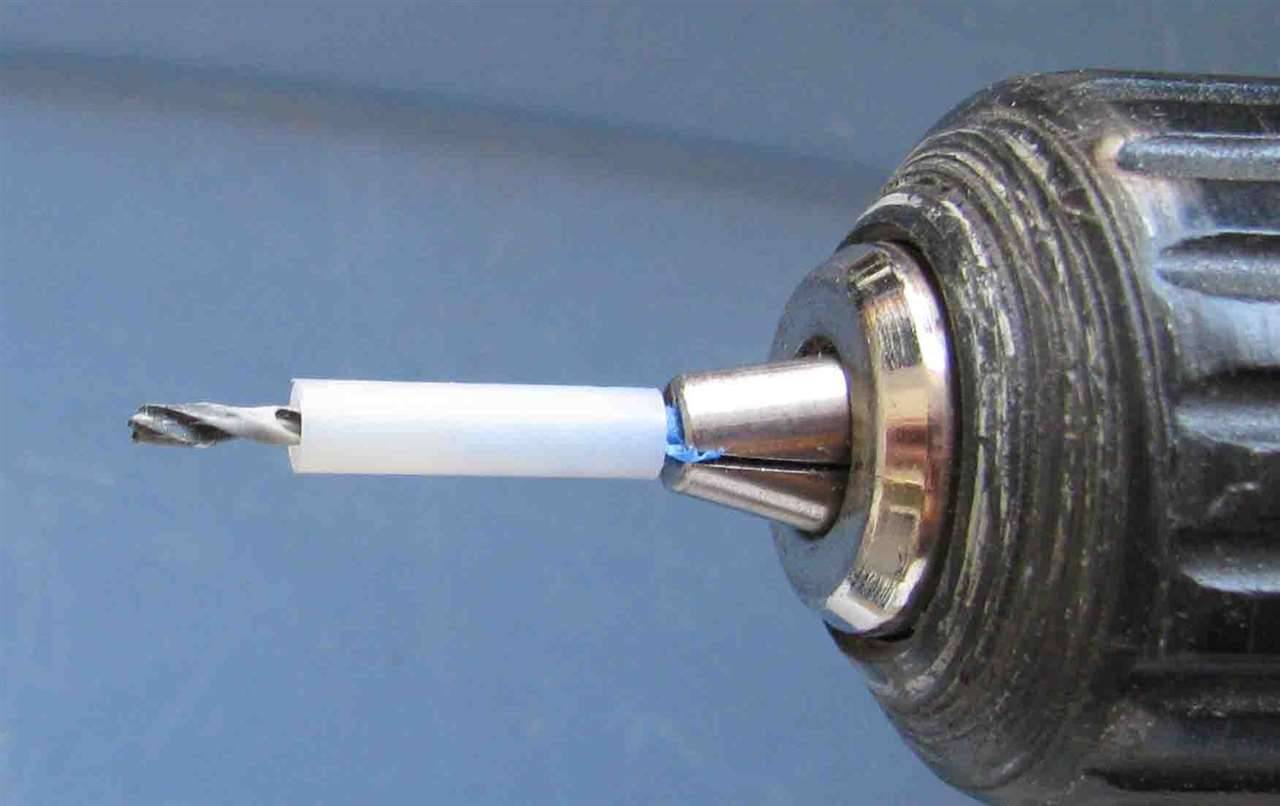
Posted on: 2011/8/13 10:41
|
|||
|
||||
|
Re: Our 1932 901
|
||||
|---|---|---|---|---|
|
Forum Ambassador

|
Marston, being an owner and driver of a somewhat similar 11th series 5-pass sedan for about 47 years, I really admire the efforts you are putting into your car. I look forward to following your progress.
Any chance that for my research into the firewall or thief-proof numbers, you can provide me with the vehicle number of your car from the patent plate? I do already have the frame number, probably from ownership prior to yours.
Posted on: 2011/8/13 13:27
|
|||
|
||||
|
Re: Our 1932 901
|
||||
|---|---|---|---|---|
|
Home away from home
|
OD,
The vehicle number on the aluminum plate is 5032372 and it was delivered to D.E. McDaniel in Pasadena, CA. I know that the last owner's father bought the car in the late 1950's from Joesph E. Bolger (2025 So. Horne St., Oceanside, CA). The person that I bought it from lived in Vista,CA (about 10 miles east of Oceanside). Any leads into its past history would greatly be welcomed. Also, thanks for the encouragement - it is appreciated after spending 25 hours just working on the gutters. Marty
Posted on: 2011/8/16 20:48
|
|||
|
||||
|
Re: Our 1932 901
|
||||
|---|---|---|---|---|
|
Home away from home
|
Well I've reached a milestone on the project. All the body work has been completed and the car is finally getting final paint. I went through over two gallons of primer, a little body filler, and uncounted feet of sand paper preparing the body and four doors. The hood, fenders and other lower parts had already been painted by the previous owner. He was going with Packard Blue and black, which was the car's original color
The wife and I decided on Carnival Red (IM-504) for the upper section and black for the lower parts. Carnival Red is a cherry color and was a paint that was available in 1932. We know that this was not a Packard color in '32, but we are taking advantage of the fact that you could get the car any color available then. Also, that the car could have been ordered from the factory in just primer. Based on this logic, we are not painting the upper section following the paint guidelines in the manual. Only the center belt will be the same as the lower section and the areas around the window will be the same as the rest of the body. I was going to shot the final paint, but decided to have it done. The four doors and four hood panels have been painted and color sanded. Attach file: (62.18 KB)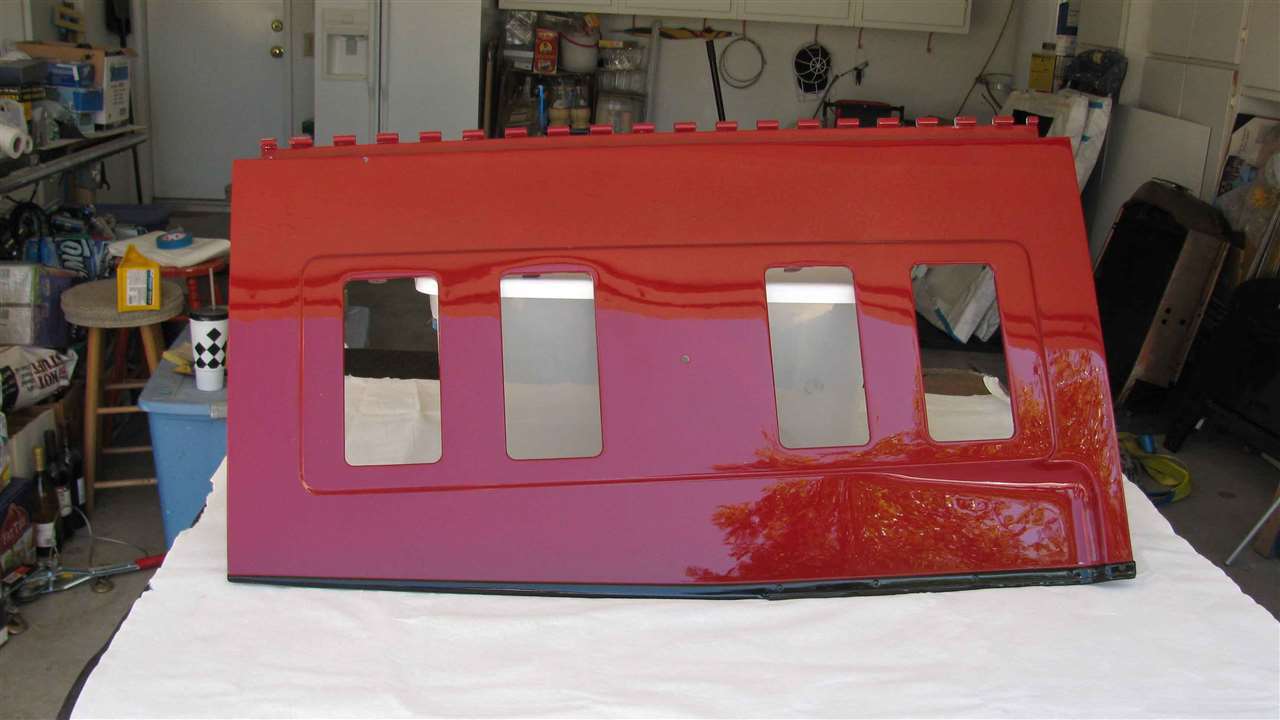 (88.06 KB) (88.06 KB) (55.35 KB) (55.35 KB)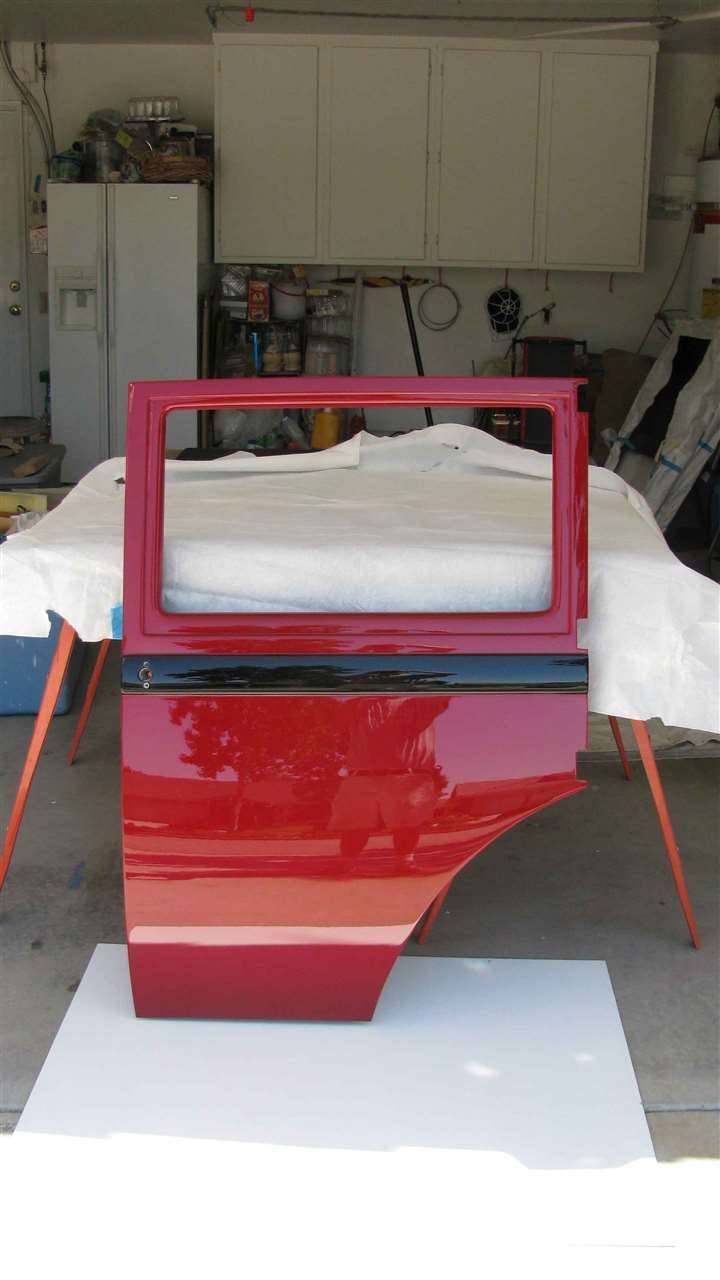
Posted on: 2012/10/3 8:19
|
|||
|
||||
|
Re: Our 1932 901
|
||||
|---|---|---|---|---|
|
Home away from home

|
Marty,
Looking good. Nice color choice. It feels great after all the blood, sweet and tears to finally get some paint on her doesn't it. Can't wait to see her being put back together. NICE WORK.
Posted on: 2012/10/4 6:06
|
|||
|
||||
|
Re: Our 1932 901
|
||||
|---|---|---|---|---|
|
Webmaster

|

Posted on: 2012/10/4 9:52
|
|||
|
-BigKev
1954 Packard Clipper Deluxe Touring Sedan -> Registry | Project Blog 1937 Packard 115-C Convertible Coupe -> Registry | Project Blog |
||||
|
||||


