|
Re: Larry's 1951 Club Sedan Project
|
||||
|---|---|---|---|---|
|
Webmaster

|
Also I was thinking about your speaker situation. Have you tried the local junk yard? The reason I ask is that some of the Big 3 manufactures used 6x9 speakers in the rear deck. Also I know Ford liked to use 5x7 speakers. I've replaced a lot of factory speakers when I used to install Car Stereos and Alarms in a previous life, and I can tell you they were low wattage, and had very small magnets on the them. Possible perfect for use in the Packard radio. Something to consider.
Posted on: 2012/4/6 20:27
|
|||
|
-BigKev
1954 Packard Clipper Deluxe Touring Sedan -> Registry | Project Blog 1937 Packard 115-C Convertible Coupe -> Registry | Project Blog |
||||
|
||||
|
Re: Larry's 1951 Club Sedan Project
|
||||
|---|---|---|---|---|
|
Forum Ambassador

|
The Boss BRS69 at 3" is the smallest depth 4 ohm I find in new speakers. They must be ashamed to show the back though. Of the gazillion stores that sell the thing, not one shows the magnet side.
If you have no luck finding one, wonder if there is any chance of buying an inexpensive speaker like that Boss or maybe the one you have and carefully transferring the cone to the old frame. It's precision work but should be possible for careful DIY types -- if they are reasonably close in size. This company sells a lot of stuff for the purpose and has how to videos and printed instructions which make it look to be not too terribly difficult -- at least with new materials.simplyspeakers.com/ Even though they are geared to higher end products in the how to material, would think the principles apply. You probably have it already in your schematics but here is speaker specs. Attach file:  (19.21 KB) (19.21 KB)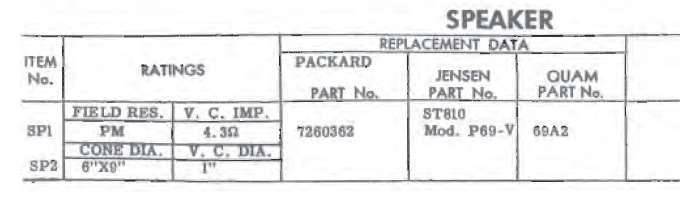
Posted on: 2012/4/6 21:07
|
|||
|
Howard
|
||||
|
||||
|
Re: Larry's 1951 Club Sedan Project
|
||||
|---|---|---|---|---|
|
Home away from home

|
Thanks for your comments gents, very helpful about sourcing a suitable speaker via junk yard or maybe adapting a 7 x 5 (which you would think would be more likely to fit).
I made enquiries at Simply Speakers and was told they don't even have a 6 x 9 reconing kit (and that was the case elsewhere). That is a shame. Like you say Howard, it seems these companies are targeting the high end speakers, which sure makes it difficult for us...Will investigate the BRS69 to see if I can get very accurate details on size. The DVC I bought was quite small and less than 3" deep but although it had a smallish magnet the frame and lugs were just totally in the way of the radio chassis. (The original speaker magnet is tiny compared even with the DVC magnet). If I could only find a recone kit I'd certainly try a DIY recone. BigKev, I've left the hinge springs unpainted for the reason that I didn't know what colour they should be! So thanks for info, and a means of reducing the chance of cracking the paint. I'll give it a go. Regarding the Matador Maroon Charles - I can provide a formula for a match if you decide to go for that colour - just PM me. . .
Posted on: 2012/4/8 8:00
|
|||
|
1951 Packard Club Sedan | [url=ht
|
||||
|
||||
|
Re: Larry's 1951 Club Sedan Project
|
||||
|---|---|---|---|---|
|
Home away from home
|
Painting the window garnish trims
This was a really enjoyable part of the resto. Nice to be getting some paint on some bits again. The local paint shop did an eye match on the colour for the interior window trims which on the '51 are a metallic silver-grey. There are about seven pieces done this colour - dashboard, four side window garnish trims, and the screen and rear screen trims. They were all badly scratched and had paint worn through, but were very straight and with virtually no rust on them. One small kink had stretched the metal on a trim and it wouldn't tap back to shape with a slapper. After heating the spot (cherry red) and quenching the metal shrank back perfectly to its original shape. Used a stripper disc to clean the parts right back to bare metal. A new stripper disk on the grinder works so much quicker so when they get down to about 25% I replace them and get the stripping happening much faster. After a degrease and etching with MetalReady the hot air gun was used to just take the chill off the parts before priming with single pack etch. It's winter here so I like to get a slight amount of warmth into parts before I spray them and the hot air gun works well (-otherwise lamps for warming the bigger panels). Broke out the new spraygun (which I've only used once). Spraying these trims in metallic silver would be my first job on some high visibility parts so I was wondering what quality of job I could do with this gun. The metallic is fairly coarse - would it lay properly? Needn't have worried as the paint went on beautifully and result was nice. While the gun was 'smokin' in my hand' I couldn't resist spraying something else . . . anything. The dog had sensed trouble and gone missing, so the grille surround plates (or whatever they are - I'm sure you'll recognize them from the pics) got sprayed, in the Matador Maroon. These also turned out nice. 309 - Most of the parts to be sprayed - stripped and ready for priming  314 -  316 - Needed to shrink out this small kink  322 - After the metalready has etched them  326/7/8 - The metallic grey went on well and is a really appealing finish for the interior window garnish trims    324/9 - These grille surrounds got a coat of the Matador Maroon as well  
Posted on: 2012/5/21 6:31
|
|||
|
1951 Packard Club Sedan | [url=ht
|
||||
|
||||
|
Re: Larry's 1951 Club Sedan Project
|
||||
|---|---|---|---|---|
|
Home away from home
|
Great work Larry! Keep on rockin'!
Posted on: 2012/5/21 8:24
|
|||
|
||||
|
Re: Larry's 1951 Club Sedan Project
|
||||
|---|---|---|---|---|
|
Webmaster
|
Silver is correct regardless of the body color.
Posted on: 2012/5/21 14:27
|
|||
|
-BigKev
1954 Packard Clipper Deluxe Touring Sedan -> Registry | Project Blog 1937 Packard 115-C Convertible Coupe -> Registry | Project Blog |
||||
|
||||
|
Re: Larry's 1951 Club Sedan Project
|
||||
|---|---|---|---|---|
|
Home away from home
|
Thanks fellas. Someone I know with a '52 has his painted silver and said he thought that was wrong and they should be body colour, so I went that direction. I'd really appreciate some pics of the silver Jim, and if anyone has a name of the silver that'd help too thanks.
I'd prefer silver anyway, that would seem a better choice. Also I'll dig out the Matador Maroon formula tomorrow - it's a PROTEC match (- PPG bought Protec in 2006, see PPG Acquires Protec . There's a local Protec shop where I live so very handy. Some of my project blog photos show the Matador Maroon a bit brighter and 'cleaner' than it actually is (- I blame the camera, and it changes depending on lighting etc. Under fluoro lights is different to sunlight as you'd expect). Here's a pic with what I believe is 'original' Matador Maroon paint. Probably it has darkened a bit over the years from what I can figure, comparing others I've seen. The most 'accurate' pic I have for the Maroon I had mixed by Protec is the firewall one (copy below). So here's more or less a 'side by side comparison'. Original(?) Matador Maroon . . . .  Match I have . . . .  Window trim colour I can help you with also, it's very close to a 2002 Nissan Pathfinder colour. Let me know if you want the details. I'm not a very good spray painter, just persevere. Where a good painter will get excellent gloss off the gun, with no 'inclusions' (dust, bugs etc), I battle, and then I do lots of after-work like wet sanding with 2000 then buffing etc. Generally the job turns out OK and if not, I just do it again.
Posted on: 2012/5/23 8:22
|
|||
|
1951 Packard Club Sedan | [url=ht
|
||||
|
||||
|
Re: Larry's 1951 Club Sedan Project
|
||||
|---|---|---|---|---|
|
Webmaster
|
Larry the silver is the same color as the bumper crossbar filler panel and the bumper filler panel used on the 53-54 models. Here are a few pics for reference:
Attach file: (78.98 KB) (70.59 KB) (70.59 KB)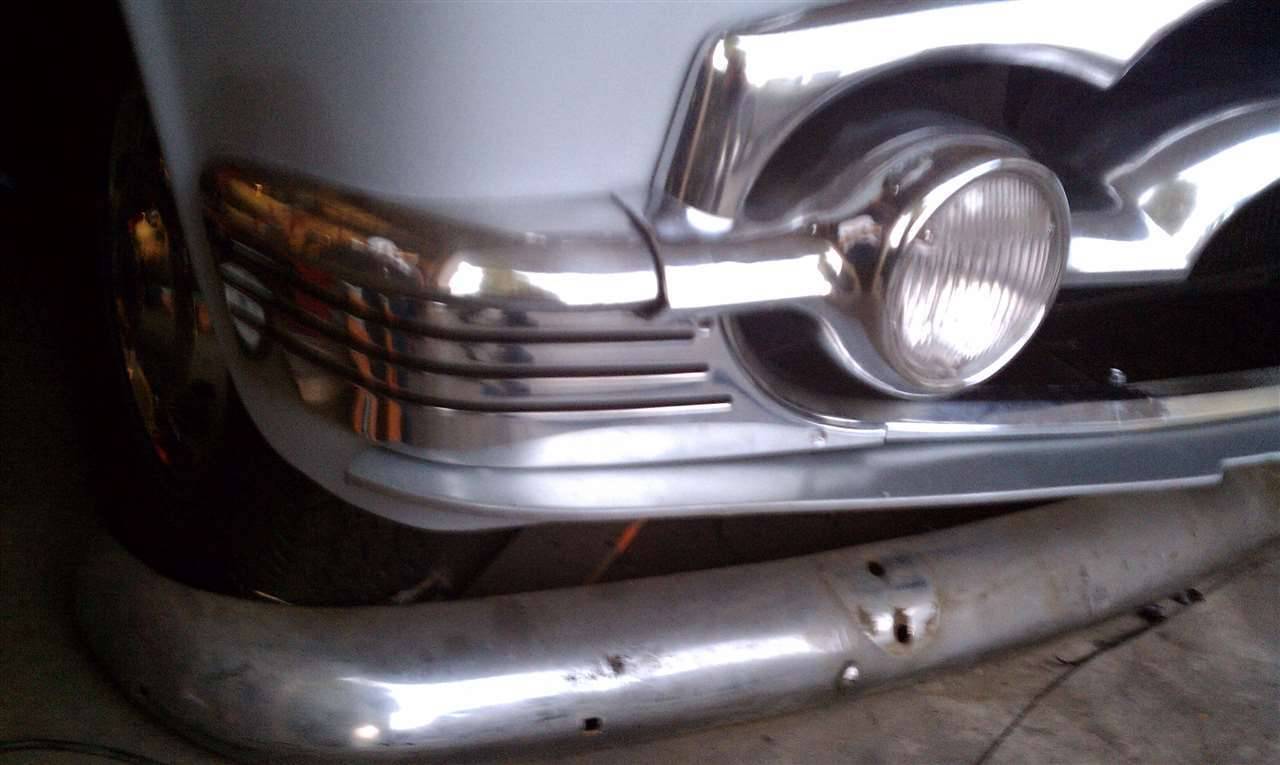 (60.39 KB) (60.39 KB)
Posted on: 2012/5/23 10:30
|
|||
|
-BigKev
1954 Packard Clipper Deluxe Touring Sedan -> Registry | Project Blog 1937 Packard 115-C Convertible Coupe -> Registry | Project Blog |
||||
|
||||
|
Re: Larry's 1951 Club Sedan Project
|
||||
|---|---|---|---|---|
|
Home away from home

|
OOps there Kev, that pan between the bumper and grill is supposed to be body color. The panels that bolt to the inner edge of the grill--which most 54's don't have, but 51-53's do, are supposed to be a flat silver.
Posted on: 2012/5/23 12:00
|
|||
|
||||


