|
Re: R9 Overdrive
|
||||
|---|---|---|---|---|
|
Forum Ambassador
|
Wouldn't hurt to look at the contacts --easy enough to do-- but since solenoid seemed to work out of the unit, they are probably OK.
I would make one more attempt at a road test after you get the solenoid and spacer oriented properly. If it still doesn't go in then you can remove the solenoid and check the contacts. If the proper orientation doesn't do it the mechanic may be right and the problem is internal. If you do check the contacts, when you remove the back half of solenoid to access them, the 4 terminal screws have to come all the way off so the cover will slide off. The bakelite or rubber hole bushings or isolators the screws fit thru may be very brittle so take care not to force anything.
Posted on: 2012/8/2 14:40
|
|||
|
Howard
|
||||
|
||||
|
Re: R9 Overdrive
|
||||
|---|---|---|---|---|
|
Home away from home

|
I would hazard a guess that the unit was oriented correctly before you removed it. The spacer can separate from the main body easily.
The 2 little holes go to the rear and the solenoid when mounted looks like the attached from the rear. Just to reiterate. My OD, after sitting since 1986, made all the click sounds and the light came on, but it would not engage when I let off the gas pedal. As mentioned many times, I have no aptitude for this stuff, so I read the service manual which said the most common problem with ODs is that the lower set of contacts get burned and that a new set of contacts, not the whole solenoid...which is what the service people were doing..., needs to be ordered. Since the factory doesn't look that great these days, I cleaned the contacts, said a prayer, reinstalled the OD, and it immediately worked perfectly, so I took a drive in the country, in OD, and kicking down to third coming out of curves. Leaks...that was another problem. Touching one of the wires to the frame causing a loss of ignition, that was yet another problem, that happened in the course of fixing the leak. Attach file:  (23.93 KB) (23.93 KB)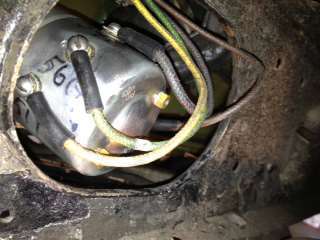
Posted on: 2012/8/2 15:02
|
|||
|
||||
|
Re: R9 Overdrive
|
||||
|---|---|---|---|---|
|
Home away from home

|
Ok-#3 is suppose be on the bottom closest to the ground. Spacer 2 holes toward the rear. I am going to clean the contacts based on Joes experience.
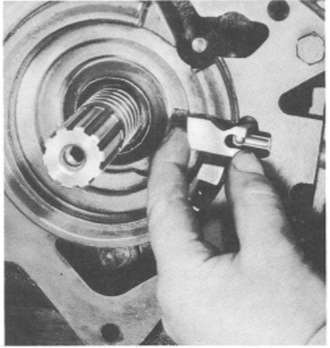
Is it possible to push the pawl back and forth-I am not sure what to use-maybe the end of a radio antenna?
Posted on: 2012/8/2 15:51
|
|||
|
||||
|
Re: R9 Overdrive
|
||||
|---|---|---|---|---|
|
Home away from home

|
I think if you just push it back into the hole, you'll get a little resistance, a springiness, so you'll have to hold the body in place with one hand and start one of the screws with the other. The do the same for the other screw. Then tighten one half way, then the other, is what I did.
Posted on: 2012/8/2 15:59
|
|||
|
||||
|
Re: R9 Overdrive
|
||||
|---|---|---|---|---|
|
Home away from home

|
Howard-any thoughts on manually moving the pawl to determine if free? Is there a spring connected to the pawl inside the OD?
thks David
Posted on: 2012/8/3 8:22
|
|||
|
||||
|
Re: R9 Overdrive
|
||||
|---|---|---|---|---|
|
Forum Ambassador
|
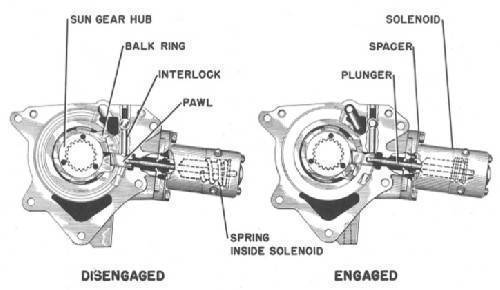
There is no spring. The movement in is provided by the solenoid and return by the spring in the solenoid.
The pawl is now in the out position so should move no further in that direction. To be able to push it in requires a clear path -- ie no interlock plate and balk ring blocking the path and one of the sun gear recesses has to be lined up to accept the end. Perhaps something like the head of a nail would fit into the pawl providing something to grab onto. I would be surprised if you can move it without a lot of good luck and probably several attempts at rotating things.
Posted on: 2012/8/3 9:11
|
|||
|
Howard
|
||||
|
||||
|
Re: R9 Overdrive
|
||||
|---|---|---|---|---|
|
Home away from home

|
Ok-I have the solenoid out again-opened the back and cleaning contacts. When I manually engage the solenoid-I am a bit confused as to what happens to #7. It appears before engagement #7 is grounded and when engaged it opens. When engaged #6 is grounded. Is there an insulator between #7 contact and the 6?
Pls tell me what I should read on an ohm meter at each terminal both engaged and unengaged thks David
Posted on: 2012/8/8 11:54
|
|||
|
||||
|
Re: R9 Overdrive
|
||||
|---|---|---|---|---|
|
Forum Ambassador
|
The two contacts are insulated from one another. The little round button at the end of the top contact leaf pressing against the lower contact leaf is a piece of phenolic. It is shown in the contact pictured here
The contacts sound as if they are correct. 7 or the lower contact leaf is the lamp and that is grounded by virtue of the solenoid plunger end to keep the lamp on until the solenoid is fully engaged. Once almost fully engaged, plunger is in far enough that the contact end no longer touches and makes contact with plunger. Contact then opens to extinguish the lamp. You would read a short to ground until the plunger is somewhere past half to two thirds out when it opens. The top contact leaf (6) is part of the ign cutout circuit. It is open until the solenoid is almost all the way energized. Once it passes a point then contact is grounded via the small button on the plate. That sets up the start of the ign cutout circuit. The entire circuit is still not complete because of an open set of relay contacts so engine keeps running normally until kickdown action is made. On the meter, that contact will be open or just the reverse of 7.
Posted on: 2012/8/8 12:29
|
|||
|
Howard
|
||||
|
||||
|
Re: R9 Overdrive
|
||||
|---|---|---|---|---|
|
Home away from home

|
It appears #7 will open-tuning light out-before #4 contact opens turning off #4 coil. The light should go out before #4 coil is turned off. As you remember in the car the light never went out-but #4 coil appeared to be turned off.
Posted on: 2012/8/8 12:36
|
|||
|
||||

