|
Re: dome light repairs
|
||||
|---|---|---|---|---|
|
Home away from home

|
I too, am working on my dome light and the reading lights in my 48. I removed the dome light cover and replaced the bulb. The light came on, but will not go out when the door is closed. The switch on the pillar was covered over by new upholstery. So, either the switch is in the on position , or is shorted. Is the switch pictured the same as mine, and how far up on the pillar is it mounted. Thanks
Posted on: 2014/1/3 17:11
|
|||
|
||||
|
Re: dome light repairs
|
||||
|---|---|---|---|---|
|
Home away from home
|
I have repaired some of the switches in my 54 and here is what I have learned.
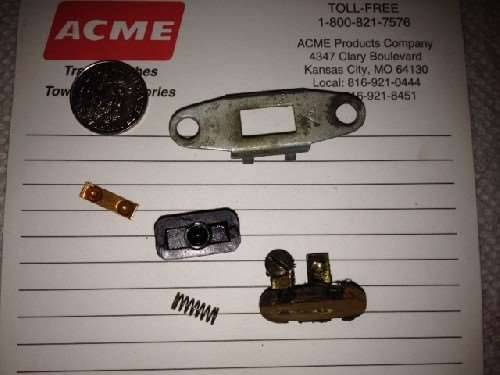
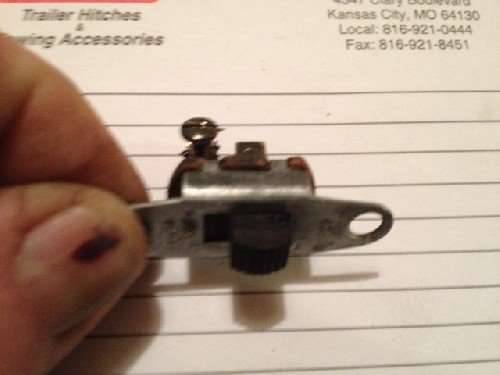
The little Door Pillar slide switch has one pole connected to ground (car metal body) and the tabs that keep the switch together are bent such that they touch the brass part of the switch. This gets Corroded so I put a drop of solder on the ground connection to improve the connection after taking the switch apart and polishing the brass. I run these kinds of parts through an ultrasonic cleaner. I only unbend the tabs far enough to get it apart as you only get a couple of unbend/bend chances. Pay attention to whether the little white dot is showing when the switch is on or off so you can put it back the same way. I use shrink tubing to insulate wires not tape. The door switches pop out and can be cleaned easily as well. Jim
Posted on: 2014/1/3 17:45
|
|||
|
||||
|
Re: dome light repairs
|
||||
|---|---|---|---|---|
|
Forum Ambassador

|
Nice work, David. I have accomplished similar repair on those switches in my 55/56 sedans.
I also sanded (1200-grit) the top of the phenolic board as it seemd to have swollen - keeping the sliding brass contact from touching the fixed cotnacts in the board. I didn't know about the white dot and its orientation - gonna have to go back and make 'em right, someday.
Posted on: 2014/1/3 18:23
|
|||
|
||||
|
Re: dome light repairs
|
||||
|---|---|---|---|---|
|
Home away from home
|
Brian, if your light comes on, the white button is in the correct position. It won't work if you put it in backwards.
As to the 48 model, the switch is located on the passenger door, about where your shoulder would be. I'd try running your fingers over the upholstery (wash your hands first - just like Mom told us). You should be able to feel a void where the switch is placed. The bad news is that you have to remove at least the upholstery on the door pillar to get to the wires. But you might get lucky and find that they just left them dangling. If some of you 48-50 guys have a car that is down for repairs, maybe they can give you a dimension from the floor. Jim, the tape was on the bullet connectors as it came from the factory. I agree the more permanent solution is the heat shrink tubing.
Posted on: 2014/1/3 18:31
|
|||
|
||||
|
Re: dome light repairs
|
||||
|---|---|---|---|---|
|
Forum Ambassador

|
Thanks for the clarification.
I seem to recall that I might have assembled it backward in my first attempt, but from that experience, I learned to pay attention to the orientation of sliding contact, and it always worked. However, that was many years ago, and I just don't recall the white dot. I may have to disassemble, or just remove the switch(es), just to repaint that nice little detail.
Posted on: 2014/1/3 18:39
|
|||
|
||||
|
Re: dome light repairs
|
||||
|---|---|---|---|---|
|
Home away from home

|
I rebuilt one of my courtesy lights ( and will probably do the other one) . The repair part is available from Auto Zone. The part is Dorman # 85801 - Double Contact Pigtail. It looks identical to the original and replaces the old worn out wiring in the light housing.
Posted on: 2014/1/5 16:33
|
|||
|
||||
|
Re: dome light repairs
|
||||
|---|---|---|---|---|
|
Home away from home

|
Dome light switch - Which is ON position - up or down ? Thanks
Posted on: 2014/1/5 17:37
|
|||
|
||||
|
Re: dome light repairs
|
||||
|---|---|---|---|---|
|
Home away from home

|
David Grubbs - I suspect the switch is still there- just covered over. Does the upholstery on the door pillar just pull off ?
Posted on: 2014/1/6 11:05
|
|||
|
||||
|
Re: dome light repairs
|
||||
|---|---|---|---|---|
|
Forum Ambassador
|
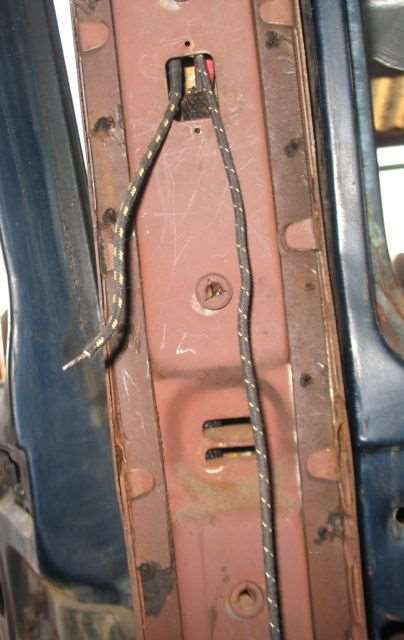
Don't mean to hijack David's thread but I might have some photos to help the question. Not sure if all years are the same but believe the 21-23 series are.
If so, the upholstery is glued over padding to a hardboard panel. That is held on by some nail like affairs which fit into retainers on door pillar. If you are going to try and remove the panel, those nails and retainers have a tenacious hold. Be very gentle and locate the "nails" exactly when prying off. I used a wide flat pry bar but had some issues. If you pry in between them, the panel can break and since the hardboard is old and brittle, if you are not right next to them they easily pull thru the panel as evidenced on one of these. The "nails" are located about 5" apart and down the center of the panel. The upholstery at the top is tacked under the headlining and at the bottom, secured lightly. Bottom is not bad but to remove completely, the entire panel will not come free without a lot of work at the top. This is a 47 and door switch is on drivers side. Switch is centered on upholstery at 7 1/2" down from the horizontal line where center panel and headlining meet. If your switch is on passenger side, the metal pillar cutout location is at the same height..
Posted on: 2014/1/6 11:34
|
|||
|
Howard
|
||||
|
||||

 (29.27 KB)


