|
Re: Coil wiring question
|
||||
|---|---|---|---|---|
|
Home away from home
|
Thanks for the tip,I will get me a point file today, hope we didn't mess up the anything using the sandpaper. It was all we had at the time.
Posted on: 2012/6/22 12:57
|
|||
|
||||
|
Re: Coil wiring question
|
||||
|---|---|---|---|---|
|
Home away from home
|
Ran the Clipper in the garage for about 5 minutes. The radiator got hot and the temp gauge pegged. Removed the thermostat , but now have a bigger problem. One bolt snapped, I drilled out to use a EZ out and snapped the EZ out. Now must work to get both of them out. I soaked the bolts with penetrating oil before trying to remove them. One came out normally and one snapped when putting pressure on my 3/8 socked wrench. Does anyone have a suggestion on get one or both of the pieces out? I guess the last resort is removing the head and taking it to a machine shop.
I blew through the radiator and fluid came into the head area so I think the radiator is okay. Help! PS The engine runs nice and smooth and I am chomping at the bid to get the car on the road.
Posted on: 2012/6/24 12:45
|
|||
|
||||
|
Re: Coil wiring question
|
||||
|---|---|---|---|---|
|
Forum Ambassador

|
What style Easy-out where you using? If one of those fluted and tapered types, you're not the first person to break one and won't be the last - they are brittle as heck and as far as I'm concerned the best place for them is in the trash can.
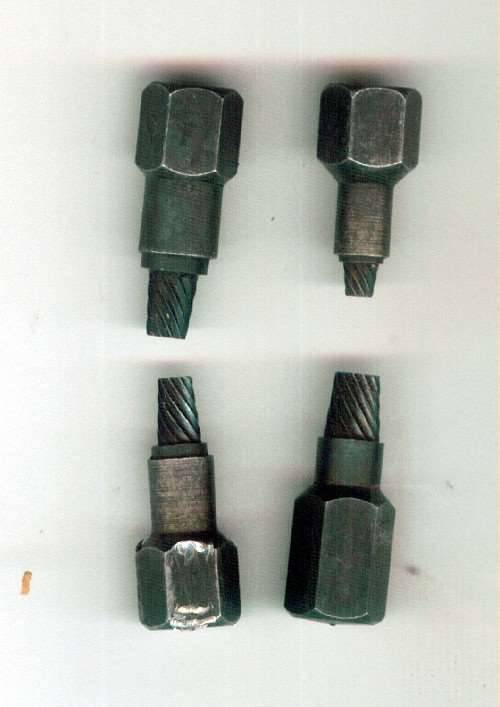
Here's a style I've had much better luck with - and never had one break off. Though the ridges are very hard they are apparently quite ductile inside. Others will have some suggestions on how to get the broken bolt with Easy-out snapped off, sometimes you can weld a bit of bolt to it.
Posted on: 2012/6/24 15:02
|
|||
|
||||
|
Re: Coil wiring question
|
||||
|---|---|---|---|---|
|
Home away from home
|
Thanks for the picture, I hadn't seen or used that type. I will ditch my old set and get the heavy duty models. I might break another bolt off while working on my Clipper. I thoought about the welding, when my neighbor get back from his trip I have him hook me up with his welder.
Posted on: 2012/6/24 16:10
|
|||
|
||||
|
Re: Coil wiring question
|
||||
|---|---|---|---|---|
|
Forum Ambassador

|
Best of luck getting it out easily. When I use the type shown in my photo, I drill for just a few thousandths less than the smaller diameter of the extractor tip and follow up with a tapered ream to enlarge the hole at the top to be closer to the larger diameter of the extractor, but still just a bit less. I tap the device in with a couple of swift hammer blows and then use a socket drive, bearing down with a lot of force the teeth into engagement and hold them there. Usually works like a charm.
Posted on: 2012/6/24 17:24
|
|||
|
||||
|
Re:1954 359 L8 Coil wiring / delco-remy 1115376 coil / 1110848 distributor/ignition wire terminal
|
||||
|---|---|---|---|---|
|
Home away from home
|
Hi Howard. I hope no one minds me jumping in on this old post.In my quest to start my 54 that was turning over but not starting I changed the plugs (autolite 308 gap 0.025), rotor from MAX MERRITT and a new coil. As discussed on another post I have a Standard UC14,UNITED C-14,Duralast C809, Napa Echlin IC-7, Petronix 40011 and the original coil with brown top and #264 stamped on top. All have different primary and secondary resistance. Turns out engine was just flooded. Easy fix. Car now bogs at cruising rpm (35mph)though. Car is positive ground with 6 volt Optima. I noticed when I replaced the coil I put the 2 wires (1 red) from the ignition on the positive terminal and the single black wire on the negative terminal. Please verify that this is absolutely incorrect! I have a wiring diagram from FD Harper that I can barely make out but it looks like red ignition wire does in fact go to the neg. terminal. Could this be the source of the bogging? Your help is greatly appreciated.
Posted on: 2019/11/15 20:02
|
|||
|
||||
|
Re: Coil wiring question
|
||||
|---|---|---|---|---|
|
Home away from home
|
Is there enough of the easy out that you might weld a piece of rod or something to it and work the easy out, out??
Posted on: 2019/11/15 20:25
|
|||
|
||||
|
Re: Coil wiring question
|
||||
|---|---|---|---|---|
|
Forum Ambassador
|
If the car is positive ground then the positive coil terminal should connect to the distributor and the negative coil terminal to the ign switch. That will result in the spark jumping in the most efficient manner -- from the hotter center electrode on the plug to the colder outer shell.
Posted on: 2019/11/15 20:30
|
|||
|
Howard
|
||||
|
||||
|
Re: Coil wiring question
|
||||
|---|---|---|---|---|
|
Home away from home
|
PTV, That was an old post from 2012. I would hope it's been fixed by now.
Wes
Posted on: 2019/11/16 11:19
|
|||
|
||||


 (73.85 KB)


