|
Re: Mike's 53 Caribbean
|
||||
|---|---|---|---|---|
|
Home away from home

|
Taking a short brake from doors to figure out why the kickdown function on my R11 overdrive is not working. I have already checked that the four wires from the kickdown switch to the coil, lockout switch, relay and solenoid are correct, and also that the kickdown switch is correctly opening and closing the circuits as it should. So far, the easy stuff looks good. Wiring and kickdown switch are good.
I performed a test that is included in the instruction manual of the "Warner Automatic Overdrive" : With the engine running, I grounded terminal 6 of the solenoid (wire 45-GBK, the one that goes to the B posts of the kickdown switch) and then actuated the kickdown switch. This shut off the engine, by grounding out the ignition coil. Reading the BW instruction manual, it seems like the solenoid is not internally closing a contact like it should when it is actuated....I guess I need to remove the solenoid, but dont want to do that unless I am sure. Can somebody confirm this is a solenoid problem? The overdrive works fine otherwise. The relay clicks, the overdrive enganges as usual, and disenganges when I get too slow. The cut in/out speed does seem to vary sometimes, but besides no kickdown, the OD works OK. In the OD trouble shooting section of the packard manual, page 21 point 4.(e) for "failure to disengage" says, "Overdrive relay faulty. Ground-out unit not operating." To check this, it says check operation of relay with a test lamp. I'm not sure how to do this. It would be easier to fix or change the relay than the slenoid...Can one of the OD geniuses help me out here? I'm OK with a multi-meter or test light, so if there are any other tests I can do before pulling a solenoid, I would be happy to do that. Thanks guys.
Posted on: 9/26 5:26
|
|||
|
1953 Clipper Delux Club Sedan, 1953 Caribbean, 1969 912, 1990 Miata
|
||||
|
||||
|
Re: Mike's 53 Caribbean
|
||||
|---|---|---|---|---|
|
Home away from home

|
Making some progress...I removed the solenoid and gave it a little clean and wire brush treatment. At rest, there is continuity between terminal 4 and the case, this must be the windings of the coil of the solenoid. that's good. Terminal 6 to ground is open when the solenoid is at rest. That is also good. I used the 6V car battery, and some jumper cables to apply positive to the ground and negative to terminal 4, and the shaft gets about 1/4 or 1/3 inch shorter. I guess that is also correct. When voltage is applied to the solenoid, I still have no connection to ground from terminal 6. If I push the shaft into the slenoid about ~1/2 inch or so, then I get the ground continuity to terminal 6 of the solenoid.
Is the actuation of the solenoid only supposed to be 1/4 inch? is there a spec on the travel of the shaft? It seems like the solenoid pulls enough to engange the OD, but not far enough to engange the second set of contacts. I used jumper cables from the battery to the solenoid, so there should be enough current getting to the winding. I double checked that the wire going from the kickdown switch goes to the side of the coil that the points are connected to. That is also right. Next step open up the solenoid and bend things so that the ground points close earlier? Or somehow get the solenoid to pull ~1/2 inch? (thanks Ross for the help and description of how this works) xxxxxxxxxxxxxxxxxxxxxx Edit: I was doing something wrong before...I re -connected things, with some better wiring, and was able to get the solenoid shaft to extend with a nice snap about 3/4 inch or so. However, with my meter attached to pin 6 and ground, I got no beep. -so no continuity. I guess I need to take the lid off of the solenoid.
Posted on: 9/26 9:46
|
|||
|
1953 Clipper Delux Club Sedan, 1953 Caribbean, 1969 912, 1990 Miata
|
||||
|
||||
|
Re: Mike's 53 Caribbean
|
||||
|---|---|---|---|---|
|
Home away from home

|
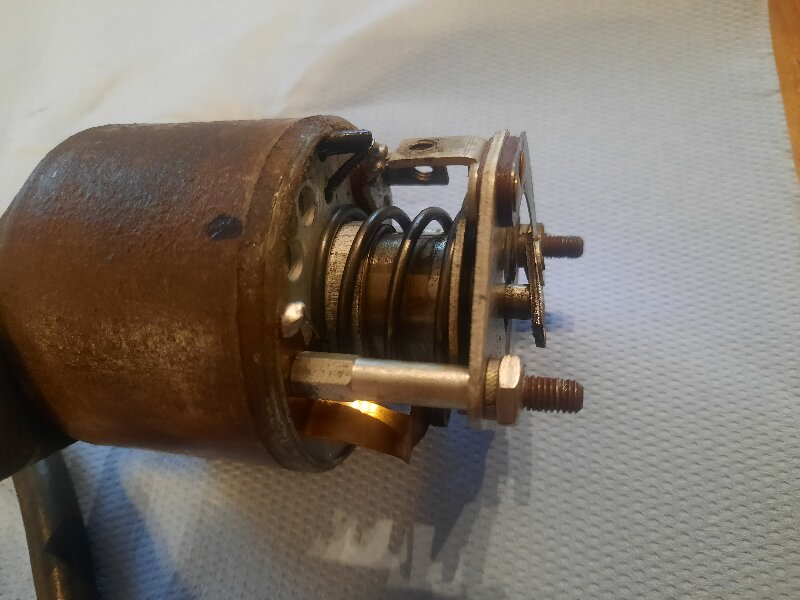
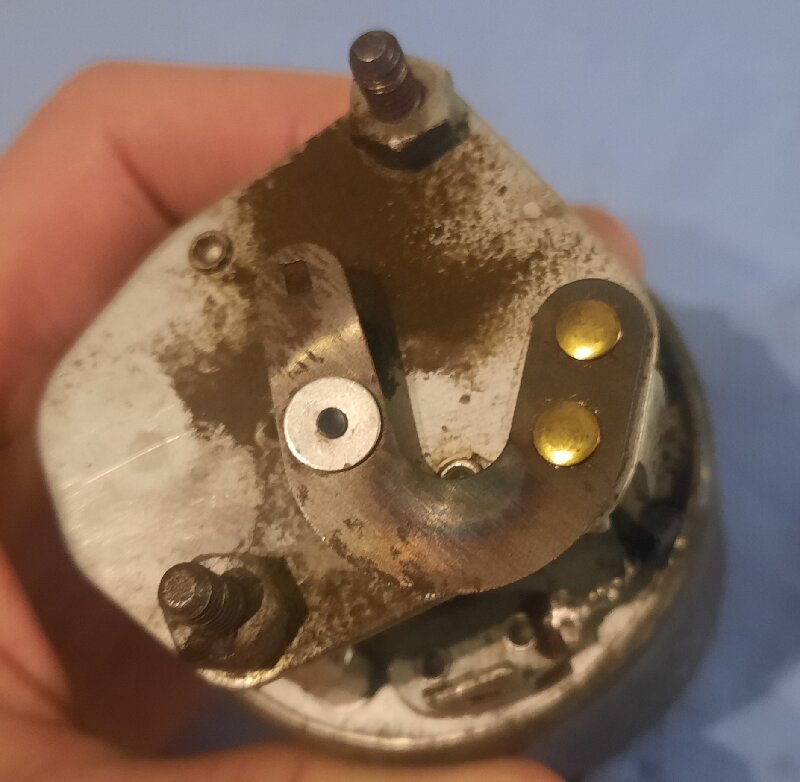
OK, I removed the cover from the solenoid, and can see that the top set of points is not closing when the shaft moves. The spring looks like it was heated up by too much current going through it. I guess this was hooked up wrong at some point in its history.
Is it ok to just try and bend the spring down to get the points to close? Or, is this solenoid toast? If I take those two little nuts off, I'm guessing the spring from the main solenoid will come out, so I don't want to take those off. Some judicial bending the next step? It would be nice to fix this with a tweak instead of buying a new/used solenoid.
Posted on: 9/26 14:29
|
|||
|
1953 Clipper Delux Club Sedan, 1953 Caribbean, 1969 912, 1990 Miata
|
||||
|
||||
|
Re: Mike's 53 Caribbean
|
||||
|---|---|---|---|---|
|
Home away from home
|
Quote:
Sure, why not? If you want to get more involved, you could probably drill out the rivets to get the spring into a better position, then reattach it with machine screws, nuts, internal lock washers, and blue Loctite as I do on the headlight switch in this video at the 25 minute mark. IF there is space.
Posted on: 9/26 15:00
|
|||
|
1955 400 | Registry | Project Blog
1955 Clipper Deluxe | Registry | Project Blog 1955 Clipper Super Panama | Registry Email (Parts/service inquiries only, please. Post all questions on the forum.) service@ultramatic.info |
||||
|
||||
|
Re: Mike's 53 Caribbean
|
||||
|---|---|---|---|---|
|
Home away from home

|
I'm just going to try some judicial bending and see if I can get the ground contacts to work again. When re-installing the solenoid, the Packard manual mentions rotating 1/4 turn and then aligning the bolt holes. Some online sources say you should energize the solenoid while you install it....Is there an agreed best practice?
Cheers!
Posted on: 9/28 4:38
|
|||
|
1953 Clipper Delux Club Sedan, 1953 Caribbean, 1969 912, 1990 Miata
|
||||
|
||||
|
Re: Mike's 53 Caribbean
|
||||
|---|---|---|---|---|
|
Home away from home
|
Not necessary to energize the solenoid on an R11 trans when installing.
Posted on: 9/28 6:47
|
|||
|
||||
|
Re: Mike's 53 Caribbean
|
||||
|---|---|---|---|---|
|
Home away from home

|
Yay!!! The solenoid install was easy. I put a little dab of grease on the shaft so that the seal would not get torn/wounded. 1/4 turn to install, and it was hooked in just right. The top bolt is a little bit of a pain to start and to tighten, but I got it. I took a short test drive ~12 miles, and kickdown is working well now. Carla is a little bit speedier now!
There is also much less noise coming from the doors now, which is also nice. I installed some dynamat type suff on the doors to quiet things down. It has made a positive difference. -similar to what Kevin did on his 54 Panama. I was a little concerned about bending the spring just because I was not so confident the bending would be a permanent fix. We will see after I take a long drive and everything gets hot, then I'll give the kickdown a try and see if that spring is still closing the contacts properly. Thanks for the tips!
Posted on: 9/28 8:42
|
|||
|
1953 Clipper Delux Club Sedan, 1953 Caribbean, 1969 912, 1990 Miata
|
||||
|
||||
|
Re: Mike's 53 Caribbean
|
||||
|---|---|---|---|---|
|
Home away from home

|
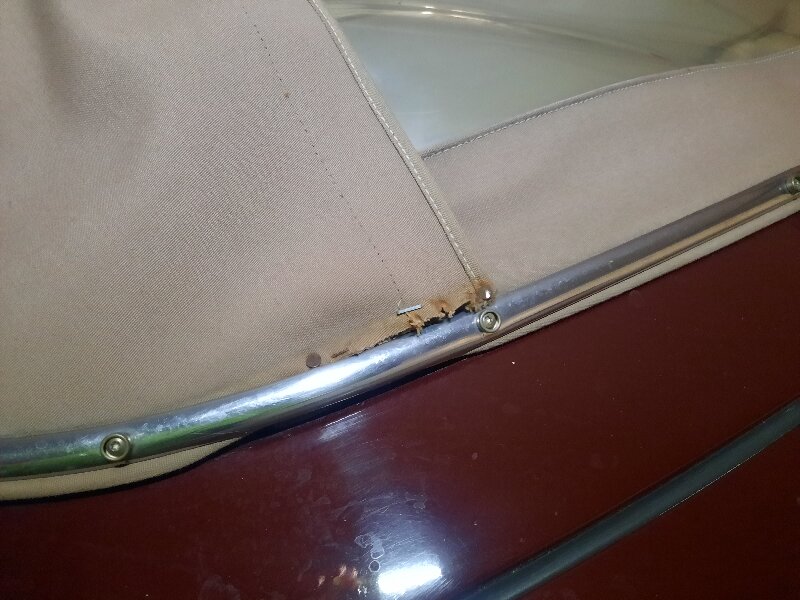
I still have not fixed the zipper for the rear window on my convertible top, but for cold weather I bought 20 little magnets and now have 10 pairs of magnets holding the window closed....The other problem that has shown up with my top is that a part has detached from the tack strip in the back. I'm thinking about taking off that stainless steel rib, and installing a new tack strip. I think the original strip is old and not holding the nails like it should.
I saw there was a link to buy the material for the tack strip, so I am considering opening up this can O-Worms. I figure if I leave the top open a bit, it will remove the tension off the back of the convertible top, and I can pull all the nails, put in a new/healthy tack strip, and find a new zipper pull that fits, fix the zipper, and re-tack the backside of the convertible top. Anybody ever try this, or have any experience with repairing an old convertible top? Also, is beige even the original color, or were the tops originally white?
Posted on: 10/13 15:43
|
|||
|
1953 Clipper Delux Club Sedan, 1953 Caribbean, 1969 912, 1990 Miata
|
||||
|
||||
|
Re: Mike's 53 Caribbean
|
||||
|---|---|---|---|---|
|
Webmaster
|
If you replace the tackle strip, use one of the newer plastic style strips which are more durable and less prone to water damage vs the old fiber board style ones.
Posted on: 10/13 16:16
|
|||
|
-BigKev
1954 Packard Clipper Deluxe Touring Sedan -> Registry | Project Blog 1937 Packard 115-C Convertible Coupe -> Registry | Project Blog |
||||
|
||||

 20240926_173555.jpg (1,877.75 KB)