|
Re: The Duchess Project: 1940 Super 8 Convertible Sedan
|
||||
|---|---|---|---|---|
|
Forum Ambassador

|
The gas level should just be at the bottom of the hole so with the little vibration of the engine idling it's possible that with the float set correctly you might get a slop-over, but nothing significant. If you get anything more than that, the float is set too high. Given your concern, I'd say begin to unscrew the plug almost all the way and check before totally removing it. If you're really apprehensive, have someone with you and if much comes out put your finger over the hole and have the other person turn off the ignition. Remember, the gas there is not under any pressure other than gravity.
Posted on: 2013/5/16 11:47
|
|||
|
||||
|
Re: The Duchess Project: 1940 Super 8 Convertible Sedan
|
||||
|---|---|---|---|---|
|
Home away from home

|
Davneto,
I overcame my chicken fears and unscrewed the fuel level plug with the car idling. No gas came out, but I could see it dancing alongside the float. Very cool. So I'm going to leave things as they are. I did another fluff test up the longest, steepest hill here, 150th, and solid all the way, and easy in 3rd gear. I might do it again just for the thrill and take a photo this time. Thanks.
Posted on: 2013/5/16 23:49
|
|||
|
||||
|
Re: The Duchess Project: 1940 Super 8 Convertible Sedan
|
||||
|---|---|---|---|---|
|
Home away from home
|
BROKEN LEAF SPRING: Stopped in at Oregon Auto Spring in Portland. They said You remove spring. We will duplicate for around $100+. You re-install spring. I'll post a picture tonight.
This has to be done at a shop? EDIT...I guess I don't know where to look. There is a separation on the front side, but the description was "left rear leaf spring has a crack" RADIO ESCUTCHEON Unless I can find one that's not broken and have it replated, I'll have to have one machined. It looks simple, but it's not. 3D printing leaves a very rough surface, not suitable for chrome. Attach file:  (16.08 KB) (16.08 KB)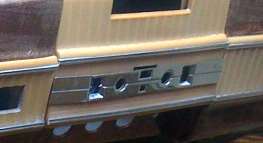 (117.84 KB) (117.84 KB) (106.51 KB) (106.51 KB)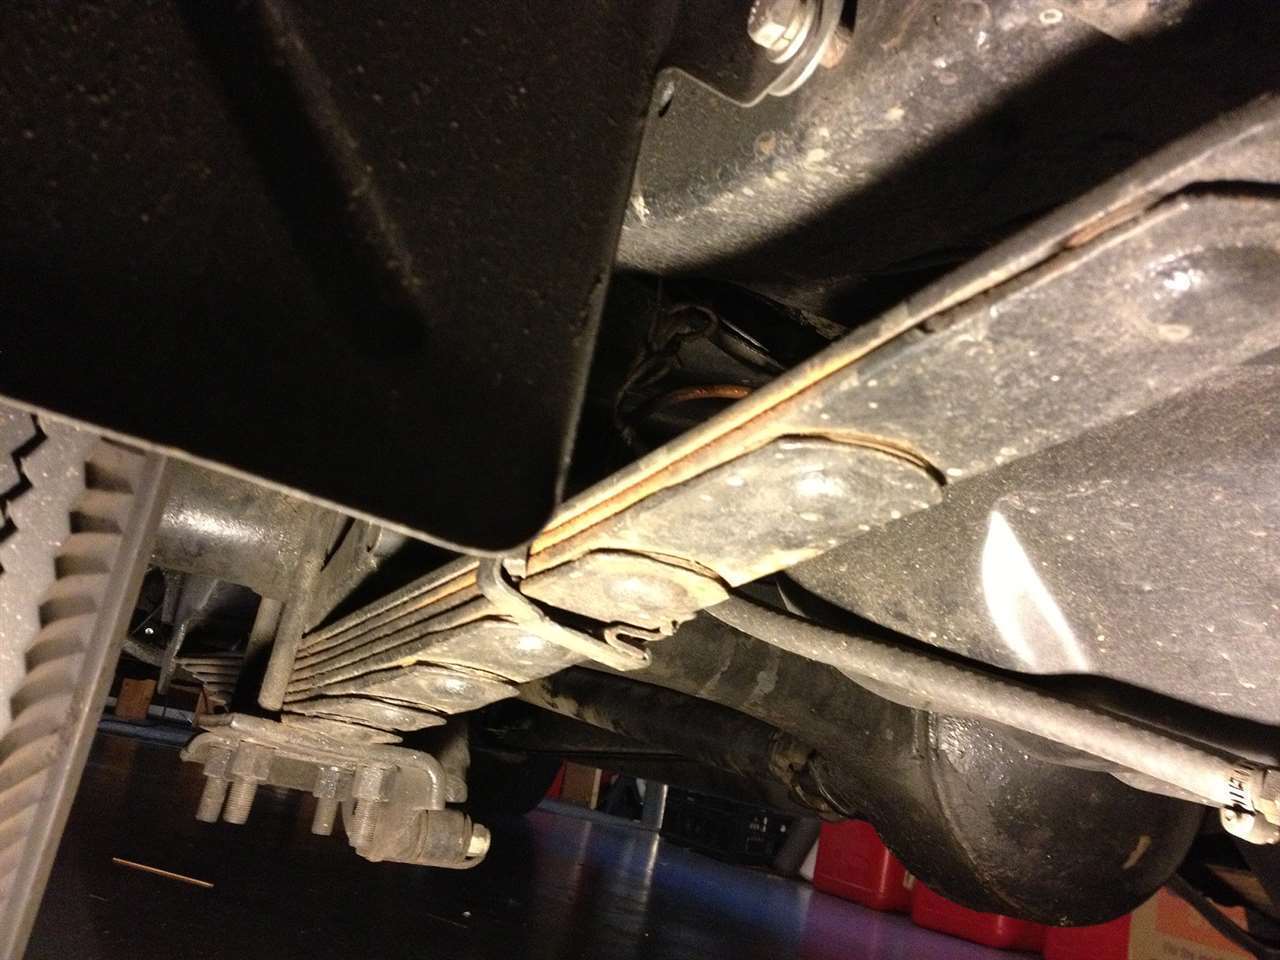 (125.54 KB) (125.54 KB)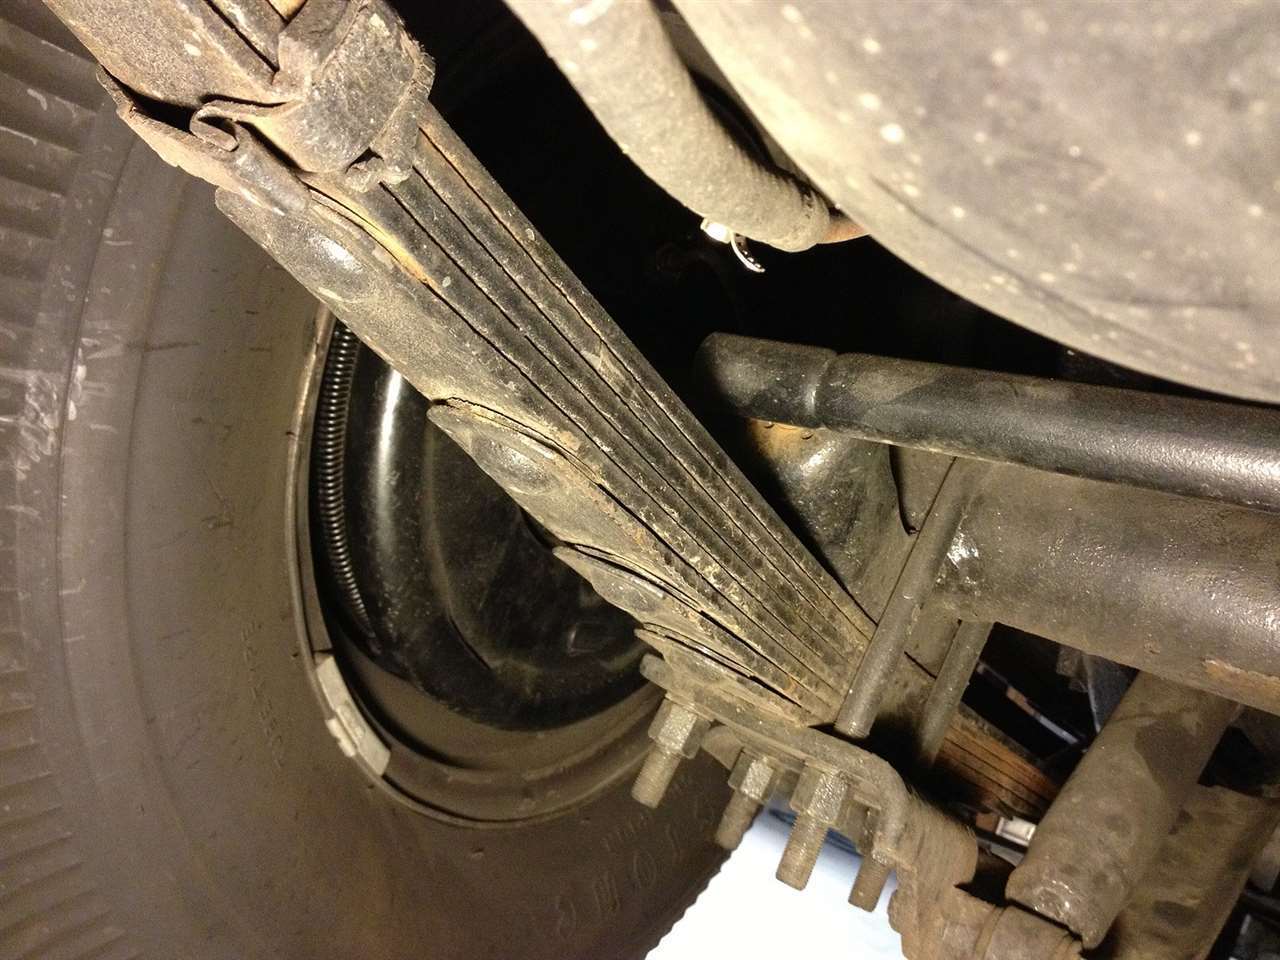
Posted on: 2013/5/21 16:12
|
|||
|
||||
|
Re: The Duchess Project: 1940 Super 8 Convertible Sedan
|
||||
|---|---|---|---|---|
|
Forum Ambassador

|
On a relatively simple but flat object like that any machinists out there know if there is a laser or water jet shop that would take on small jobs -- or do they only talk in quantities of a thousand -- items and dollars.
I know it's time consuming to figure and input CNC co-ordinates by hand so that is a big expense. If there is a software program that could scan that plate like you would a piece of paper and automatically input the X-Y data, think of what could be made for a relative pittance. Your radio plate, my Lehigh compressor valves and the list goes on.
Posted on: 2013/5/21 16:33
|
|||
|
Howard
|
||||
|
||||
|
Re: The Duchess Project: 1940 Super 8 Convertible Sedan
|
||||
|---|---|---|---|---|
|
Home away from home
|
RADIO ESCUTCHEON: I took it to this place:
http://www.adxportland.com/services/3d-printing-2/ They are innovative and they are thinking about it. The piece is a bit complicated if reproduced exactly. Photos show it is not flat at all. It was cast originally and plated. To machine a duplicate requires a fair amount of work. It has to be drawn to spec. I has to be made out of a thicker piece of metal. The beveled windows for the dial especially with those two pointers and the station identifier window, beveled in... requires hand work too. I'm going to start searching for a replacement. Short of that, maybe a flat backing plate could hold it together. It would stick out a tiny bit more, but a backing plate wouldn't require any fancy machining. Just square and round holes. Use it until I can locate a new one. Attach file: (28.33 KB)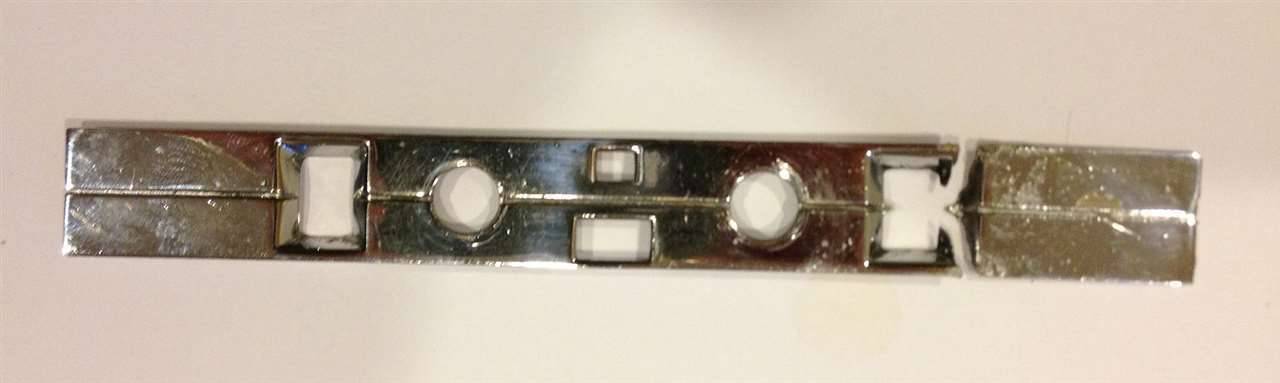 (62.12 KB) (62.12 KB) (32.93 KB) (32.93 KB)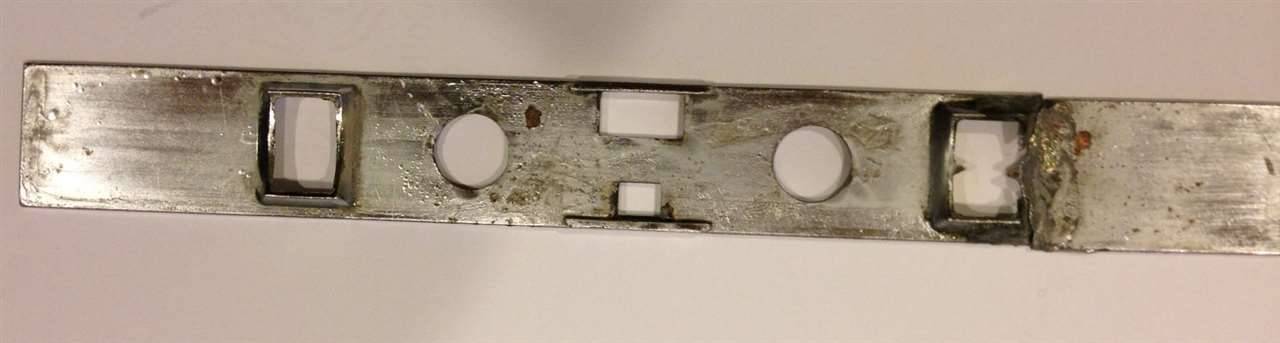 (14.54 KB) (14.54 KB)
Posted on: 2013/5/21 22:49
|
|||
|
||||
|
Re: The Duchess Project: 1940 Super 8 Convertible Sedan
|
||||
|---|---|---|---|---|
|
Home away from home

|
Joe, seems to me you would want to do both rear springs. Only doing one may affect ride height and side to side level of car. If one broke, can the other be far behind? Just a thought.
(o{}o)
Posted on: 2013/5/22 9:53
|
|||
|
We move toward
And make happen What occupies our mind... (W. Scherer) |
||||
|
||||
|
Re: The Duchess Project: 1940 Super 8 Convertible Sedan
|
||||
|---|---|---|---|---|
|
Home away from home
|
LEAF SPRINGS That's a good suggestion, JW. I'll take it back and ask the mechanic to point out the crack, which I couldn't find.
Once in the 70s, a spring or holder broke. It came down on the brake cable as I was going down a steep hill in my neighborhood. There I sat, with the hand brake forced on by the spring, and my foot on the brake, waiting for the tow truck, which had to call for a bigger back-up truck to lift the Duchess from the rear and pull it uphill. It was a little touch and go. I had the suspension checked and updated with suspension kits 7 years ago as one of the first steps in restoration which included "rear spring eye and shackle bushings. Does a special shop have to remove the springs? Do you need special equipment? If I could tackle that, I could take the springs to Oregon Auto Spring for refurbishing and re-install them.
Posted on: 2013/5/22 10:12
|
|||
|
||||
|
Re: The Duchess Project: 1940 Super 8 Convertible Sedan
|
||||
|---|---|---|---|---|
|
Home away from home
|
Quote:
It does not require special equipment. You will need to raise the car on jack stands, then stabilize the axle with additional jack stands. Raise the axle enough to relieve pressure on the rear spring pivot, then place in jack stands. The front shackles tend to the be hardest to remove because of space. I think you also need to disconnect the shocks. The springs are heavyish, so it is best to have help. Cheers, Tom
Posted on: 2013/5/22 11:27
|
|||
|
||||
|
Re: The Duchess Project: 1940 Super 8 Convertible Sedan
|
||||
|---|---|---|---|---|
|
Home away from home
|
RADIO ESCUTCHEON: I've been checking vintage radio places and have not come up with this piece. A temporary solution hit me. Fasten the left larger side of the plate normally, with the knob nuts. Leave the other smaller piece on the right side unattached to it, and just glue it in place with 3M artist's adhesive (non permanent, but very strong) to the plastic.
It looks good enough, that if I have it re-chromed in 2 pieces, I think it would look about as good as new. Attach file: (106.06 KB)
Posted on: 2013/5/23 23:48
|
|||
|
||||


