
|
Re: 51Packard's....51 Packard
|
||||
|---|---|---|---|---|
|
Forum Ambassador

|
I haven't gotten quite that deep with rust repair on any of my cars (and not that all of them need that much). Yet, I suggest that you work on replacing the frame's body support brackets, first, while you still have something left of the original floor to help with alignment.
It's been a long time since I crawled under one of the Packards, but I thought these brackets were riveted to the frame. The Frame section in the 51-54 shop manual confirms this, but goes on to recommend bolts, lockwashers, and nuts for replacement. Decades ago, my dad ran a medium- and heavy-duty truck shop in a GM store, and it was not uncommon to alter the wheelbase of said vehicles to meet the customer's needs. Spring hangers and crossmembers, which were riveted to the frame by the supplier, would have to be relocated. I can't recall exactly how they knocked the heads off of the rivets - might have been a chisel or grinder, but NO flame. Then, they used a BFH and punch to knock the rest of rivet back through the frame. To reassemble in new location, bolts (aka - cap screws) and shakeproof nuts (the kind with nylon inserts) were used - sized base on the original holes. No lockwashers needed, that way. Now, be sure to inspect your brackets carefully. A quick look at the parts books shows that each position, front-to-back, uses a different P/N, which means a difference in parts; a couple of positions even use different brackets left-to-right. Lay all of your donor brackets out on the floor, sort them out, and number them by location - like the parts book and shop manual. Then, replace them one at a time. Not sure about the rest of the approach, but thinking you might wanna replace rockers, next. Dunno why you wouldn't/couldn't go OE style with floor pan repair. While several have reported that C2C's panels may not be exact, they could - even with required fitting - save you some time and headache. Have you studied BigKev's blog for similar work on his '54 Clipper? Keep in mind that factory used sheetmetal channels that span the floor to the rocker panels to shore up the pans, but yours have lost their attachement due to rust-through. Chennels like this were use in a variety of vehciles for deacades, and I've seen bulk stock at local autobody suppliers that I felt could be drilled/nipped/tucked to fit. However, I haven't checked the dimensions of the cross-sections. If you replace any rotten subfloor channels, anchored to the replacement rocker panel assemblies, I'd think that you would have a good foundation for repairing the pans. If you decide to make you own patch panels, try to follow original contours, includingany beads, to avoid oil-canning. Perhaps others with more experience in this work will chime in with additional details and advice.
Posted on: 2013/6/2 9:09
|
|||
|
||||
|
Re: 51Packard's....51 Packard
|
||||
|---|---|---|---|---|
|
Home away from home

|
Thanks guys for your input. I'm glad bolts will be safe to use on the braces. That will be a lot easier. The guy I bought the parts from was very conscience and numbered the braces. I'll have to go back and look at what the sequence is that he used.
I put in the front rocker sections. Looks like they are going to cover most, if not all of the bad areas! The real test will be when I wire brush. You all know that more holes are bound to show up then. The molded ends of the floor braces are intact on all of my new panels so that will save a lot of fabrication work that I do not think I am capable of doing, especially with having very few metal working tools. I'm hoping to not have to replace the floor pans proper. I really don't want to have all that work to do. Keeping my fingers crossed. Since these rockers came off a '54 Cavalier and I was told the Cavalier was 1" bigger, I'm hoping there will not be a fitment issue. I had better take some measurements before I start cutting. When I said I'm not worried about doing it OEM, I was trying to say that I might have to overlap a brace or add extra metal in a way that might look different. If I find a rust hole in an area with a bead and it would be easier to seal the ends of the bead and put a patch on top, then I may go that route instead of trying to form a panel with a matching bead in it. Stuff like that. On the trunk, I am more careful because that area will show, unless I put in a mat. The floor will be easier in a way because I will not worry about that too much. Generic floor braces would be a great thing to try, even if they are different than the originals. The replacement rocker sections will need some patching of their own, but at least it gives me something to work with. I guess I am save cutting the old rocker out if I do it in sections because the other half will give support to the doors and keep the door opening in position. Given the panels I have, I wonder what would be the best place to fit them to the old parts? I'm especially concerned with the door hinge area. I guess I should take some cardboard and make a mock up of my replacement panel with it. Hopefully that will give me a good starting point for cutting. I tried that with my trunk panel, but the bracing and shape of it made it too difficult. BlackBeerd...I have new replacement outer rockers that I may be selling. I want to wait and see if I need them to fill any gaps on my new sections. Where on line did you see patch panels for the lower front fenders? I do not recall C to C offering them. EDIT: oh I see them from C to C now. I bit pricy. I wish I knew what the bottom of the front fenders should look like. Mine are pretty bad. Attach file:  (61.23 KB) (61.23 KB) (119.06 KB) (119.06 KB)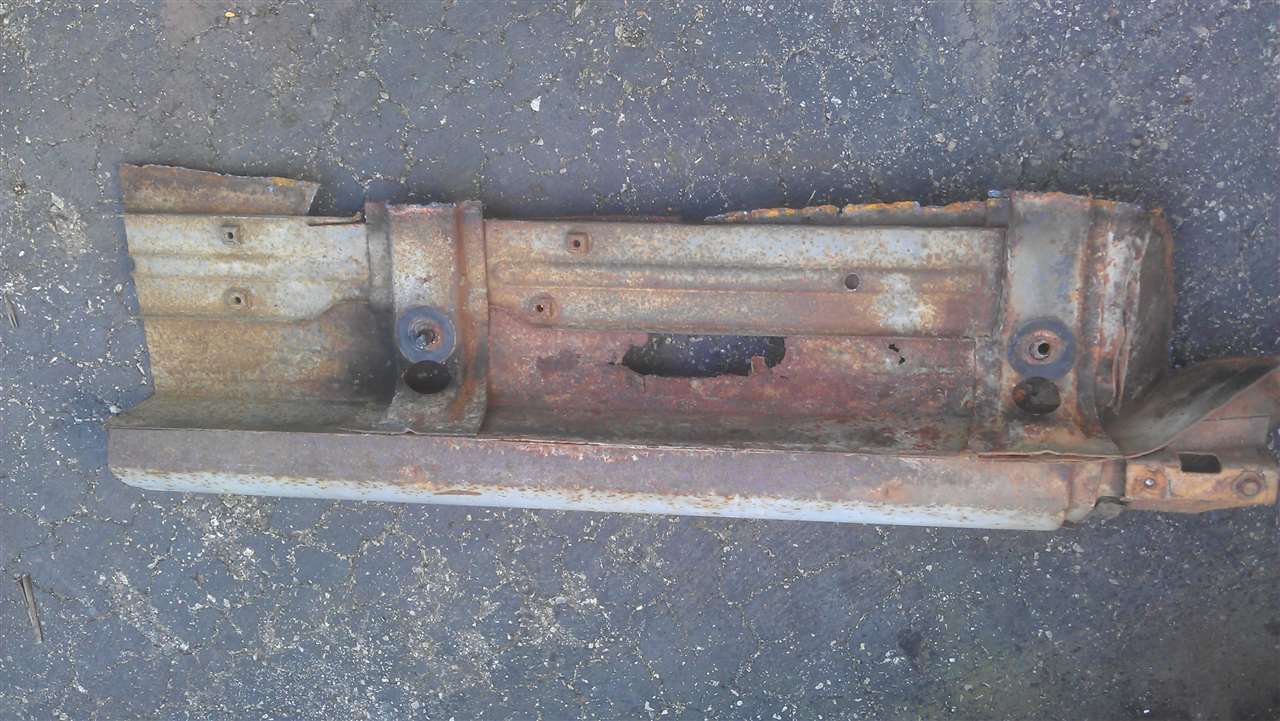 (79.35 KB) (79.35 KB)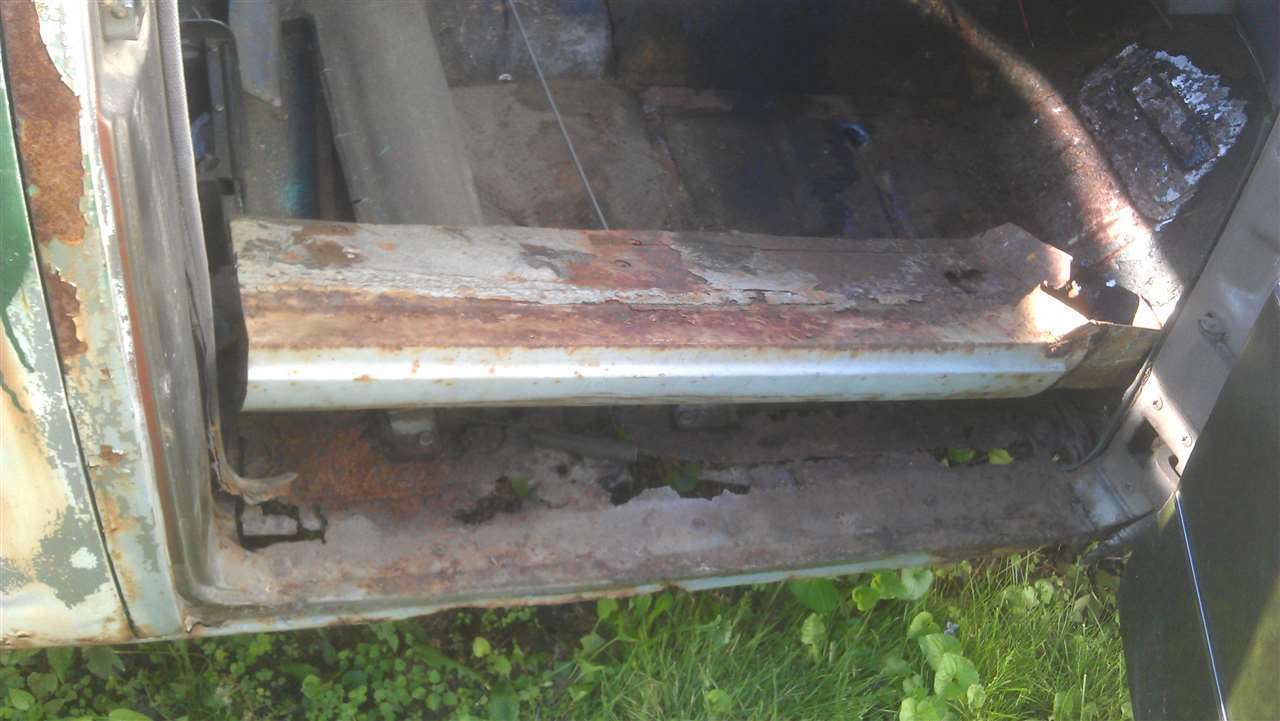 (89.75 KB) (89.75 KB)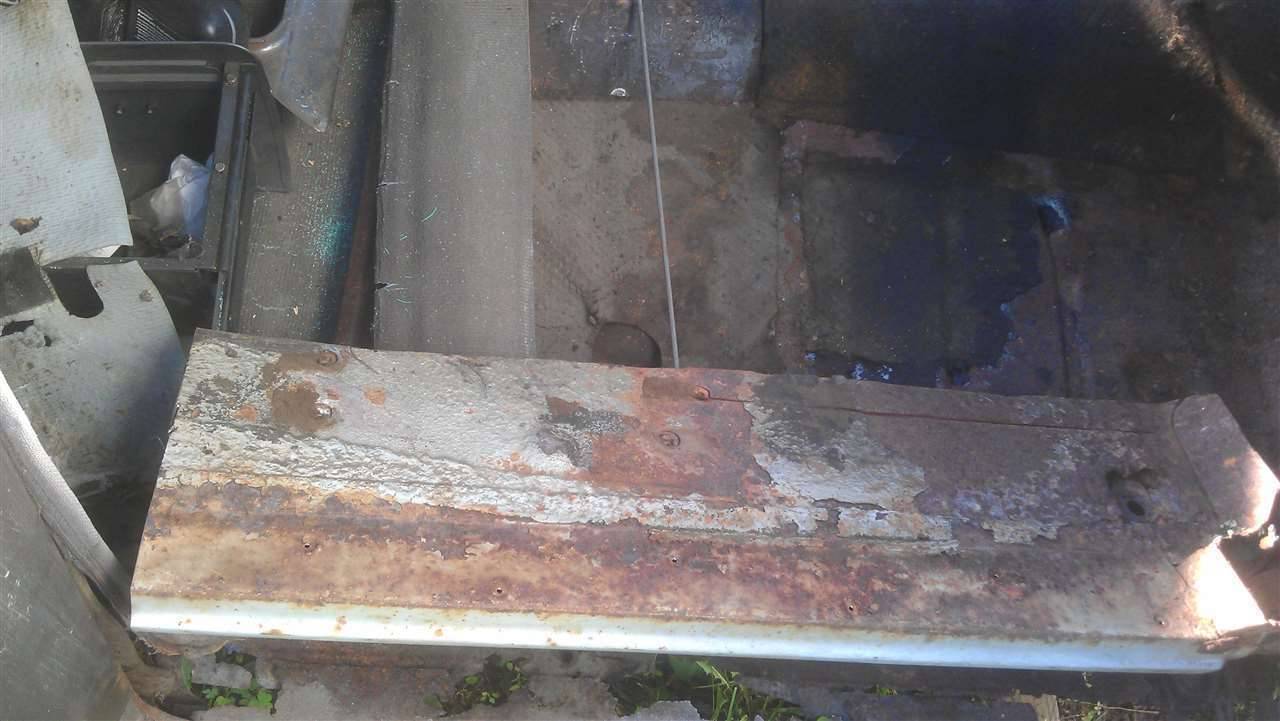
Posted on: 2013/6/2 18:12
|
|||
|
[url=h
|
||||
|
||||
|
Re: 51Packard's....51 Packard
|
||||
|---|---|---|---|---|
|
Forum Ambassador
|
I had forgotten how much extra you got with those donor sections - again, nice catch.
It seems to me that the original subfloor braces were a very simple piece that, after initial forming, was cut/notched in a trimming die and then curved in another forming die to make the transition from floor to inner rocker, yet not so complicated that they couldn't be made at home from a generic repair channel and using some rather common tools - nothing fancier than a hole saw. Quote: ...fabrication work that I do not think I am capable of doing, especially with having very few metal working tools. You might be surprised at how much you can do without any 'professional' tools. I've seen guys use a bumper jack (or 'farm jack') in lieu of a porta-power, grind piece of scrap wood, a log or even an old tree stump and use a rubber mallet to beat small pieces of sheetmetal into shape, etc. Heck, all those vintage street lights you see with fancy curved iron and conduit - an old electrician once told me he that they didn't have all these professional bending tools back then, but went to the nearest tree with a fork in it and the right sized branch! Yet, I digress... Nothing wrong with lapping patches, but there are some tools that will help you form a flange in the edge of sheetmetal to make a better lap joint. While dedicated pneumatic panel flangers are a bit pricey, I've seen an attachment that you could chuck into an air hammer, but these take some getting used to. I think I'd try a hand-operated tool, like this Flanger And Hole Punch Combination Tool from Eastwood, first. The punch is a plus that facilitates plug welding, in lieu of a spot welder. While a vise-grip type is tempting, at about half the price, I tried one once and found it rather tedious, but might be necessary for inside corners/curves. Mind you, I'm not trying to sell you anything or tell you how to spend your limited finances, but if you'll be laying in many patches, such a tool will go a long way - even for exterior panel work. Along those lines, I see no problem, aesthetically, with piecing the floor back together in sections. Strength should be the foremost consideration. Once you lay on carpet from above and undercoat from below, no one else may ever see it anyway. Then, I'm sure you can find some fairly affordable trunk lining material, locally, that will tide you over for the trunk floor. Quote: If I find a rust hole in an area with a bead and it would be easier to seal the ends of the bead and put a patch on top, then I may go that route instead of trying to form a panel with a matching bead in it. Here's a fairly simple technique if you wanna form a a small patch to fit an area with a straight bead - without any expensive forming tool. Find a piece of round bar stock that fits inside the existing bead; I don't care if it's a long bolt or a 16d nail with the head hacked off or whatever as long as it fits. Cut your patch a little bit wide, and mark the line where the bead needs to go. Open the jaws of your bench vise so the gap is just wider than the diameter of the bar stock plus twice the thickness of the patch. Lay the patch flat over the top of the vise with the bead line between the jaws. Lay the bar stock over the line and start beating it with a hammer, drawing the sheet metal down in between the jaws with it, but stop when the bar is about halfway in. By this time, you my have a couple of wings of metal standing up on either side of the bead, but you can now tighten the jaws and work those back down with hammer. As always, practice with some scrap to get a feel for it. WRT mocking up in cardboard, posterboard, paper grocery bags, etc. (even for patches), please do! Hope all this prattle this helps. Take your time; keep your mind open to possibilities. Enjoy the journey to discovery.
Posted on: 2013/6/2 20:34
|
|||
|
||||
|
Re: 51Packard's....51 Packard
|
||||
|---|---|---|---|---|
|
Webmaster

|
Harbor Freight sells a pneumatic flanger/puncher for less that $40, and it what I used to make all the step flanges on the patch panels on the car.
Posted on: 2013/6/3 10:53
|
|||
|
-BigKev
1954 Packard Clipper Deluxe Touring Sedan -> Registry | Project Blog 1937 Packard 115-C Convertible Coupe -> Registry | Project Blog |
||||
|
||||
|
Re: 51Packard's....51 Packard
|
||||
|---|---|---|---|---|
|
Home away from home
|
Thanks for the tips! On the trunk for the beads I used a cut section from a pallet rack frame with wood inside as a depth stop. Hit the metal with another wood block. Worked pretty good! Problem is the areas where the bead shallows to being flat.
I also have that flanger from Harbor Freight. Works great! I used it on a couple of the panels in the trunk. I may not be able to use it here with the floor braces being in the way. I'm hoping I do not have to remove them, but the floor section on the drivers side replacement panel is looking very thin in areas. May have to replace most of that. All my concern about having issues with removing the wood was unnecessary because it was barely hanging on! Really did not offer much support at all. I removed the seat bracket. Luckily 3 of the bolt heads broke off only requiring me to grind down one of the heads. I'm really struggling to find some "landmarks" I can use to determine where to cut the old panel out. Brackets may not be in same spot as original. New panel has the body mount bolt filled in with some kind of putty. Don't think that is OEM. Bottom section where the front fender attaches is really bad on my car. Replacement section has a bracket welded to the bottom that I would have never have known it should be there. Attach file: (93.24 KB)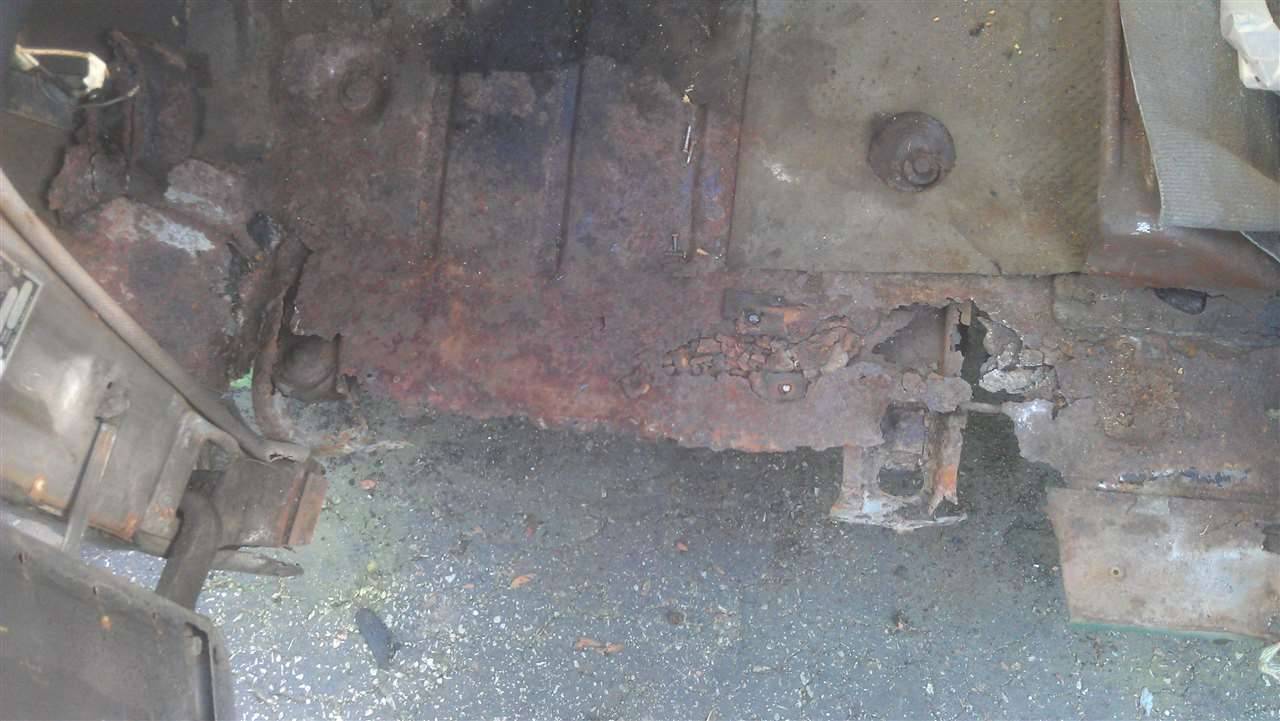 (91.12 KB) (91.12 KB)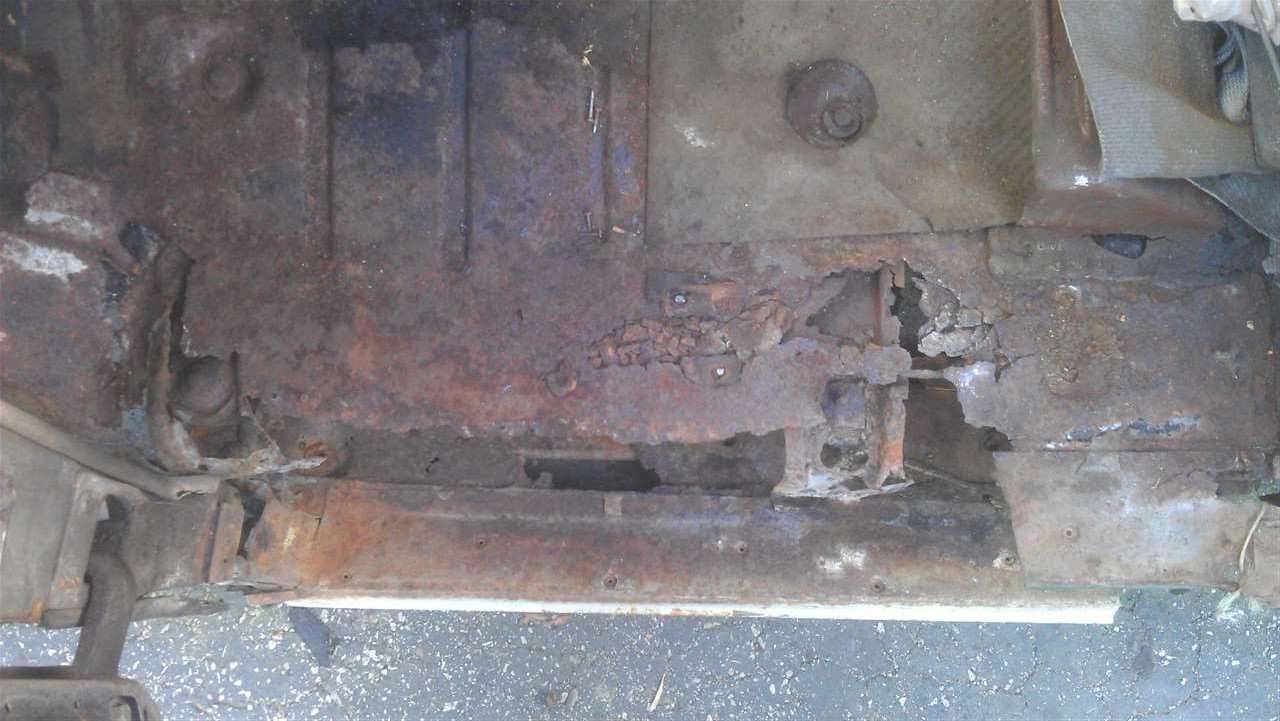 (72.30 KB) (72.30 KB) (63.69 KB) (63.69 KB)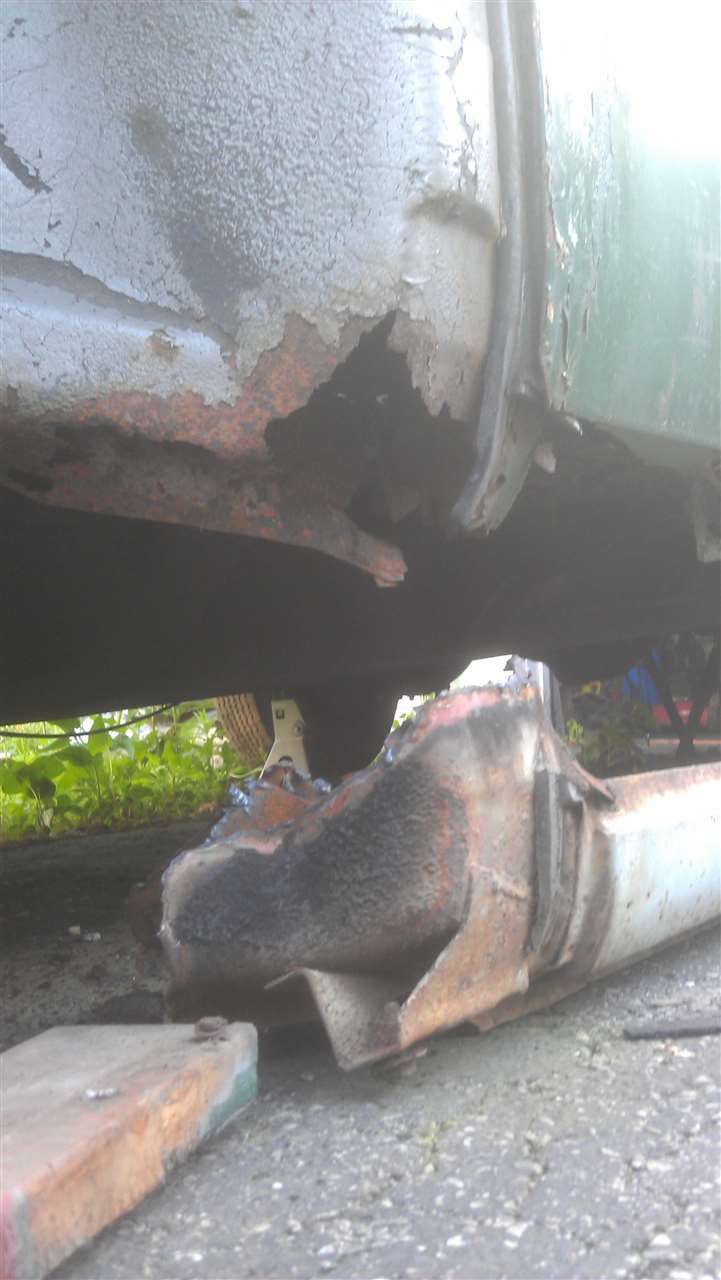
Posted on: 2013/6/3 18:55
|
|||
|
[url=h
|
||||
|
||||
|
Re: 51Packard's....51 Packard
|
||||
|---|---|---|---|---|
|
Home away from home
|
Removed some more metal. Thinking about where I should be cutting into the lower front section. Maybe right below the lower hinge. Looks like I may have to remove it. Is it even possible? What do you use to get out those Philips head screws? They must be welded in there with rust by now and will probably strip out.
The brace running parallel with the rocker was barely attached. The bolt for the seat bracket seems to be the only support it had. The only reference points I have would be the mount holes and where the bottom of the hinge is. Debating if it would be better to dissect the replacement rocker and weld the bracing in and then replace/reattach the floor. Only the end of the frame brace looks damaged. Maybe I can weld a piece of metal under it for a repair instead of replacing the entire brace? Attach file: (83.94 KB)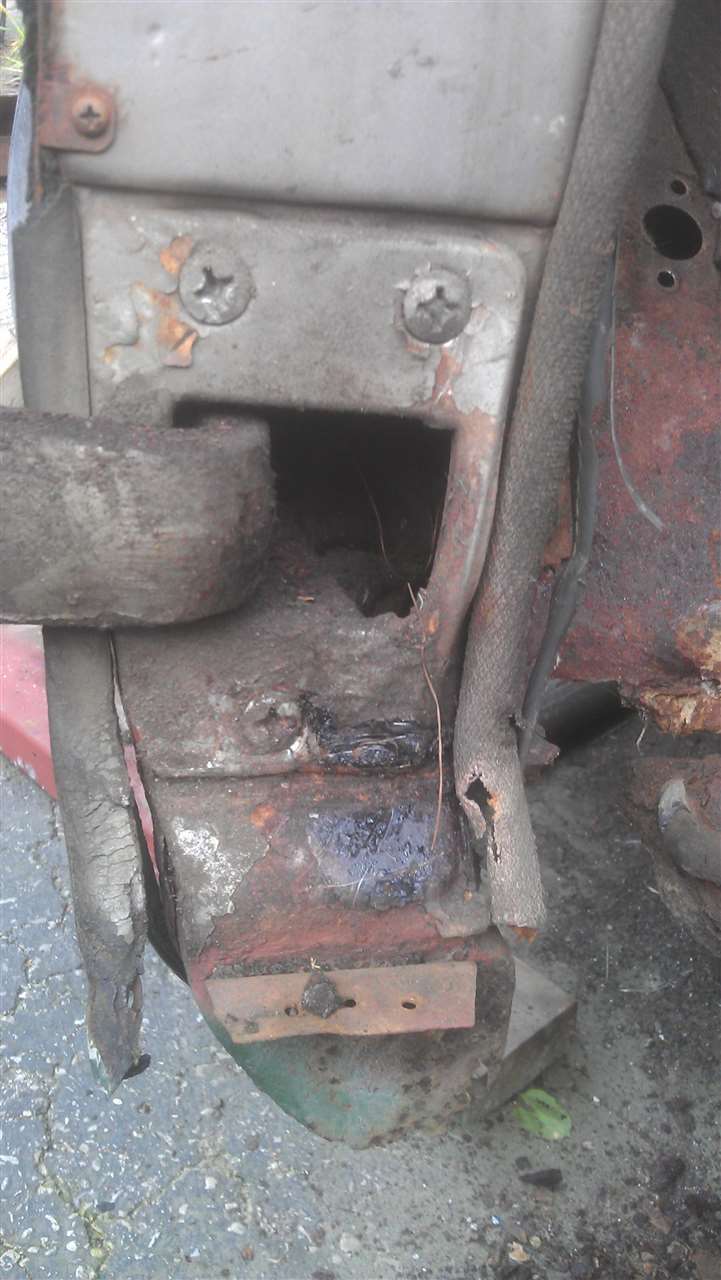 (83.03 KB) (83.03 KB)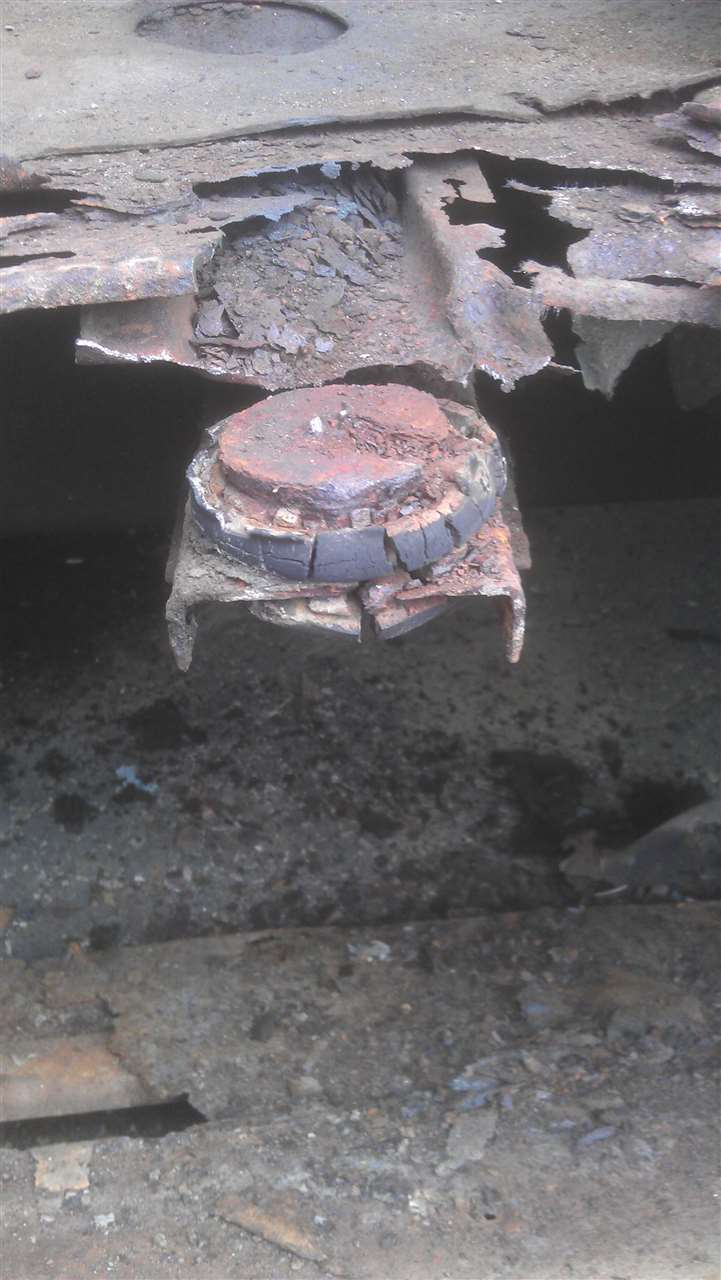 (99.29 KB) (99.29 KB)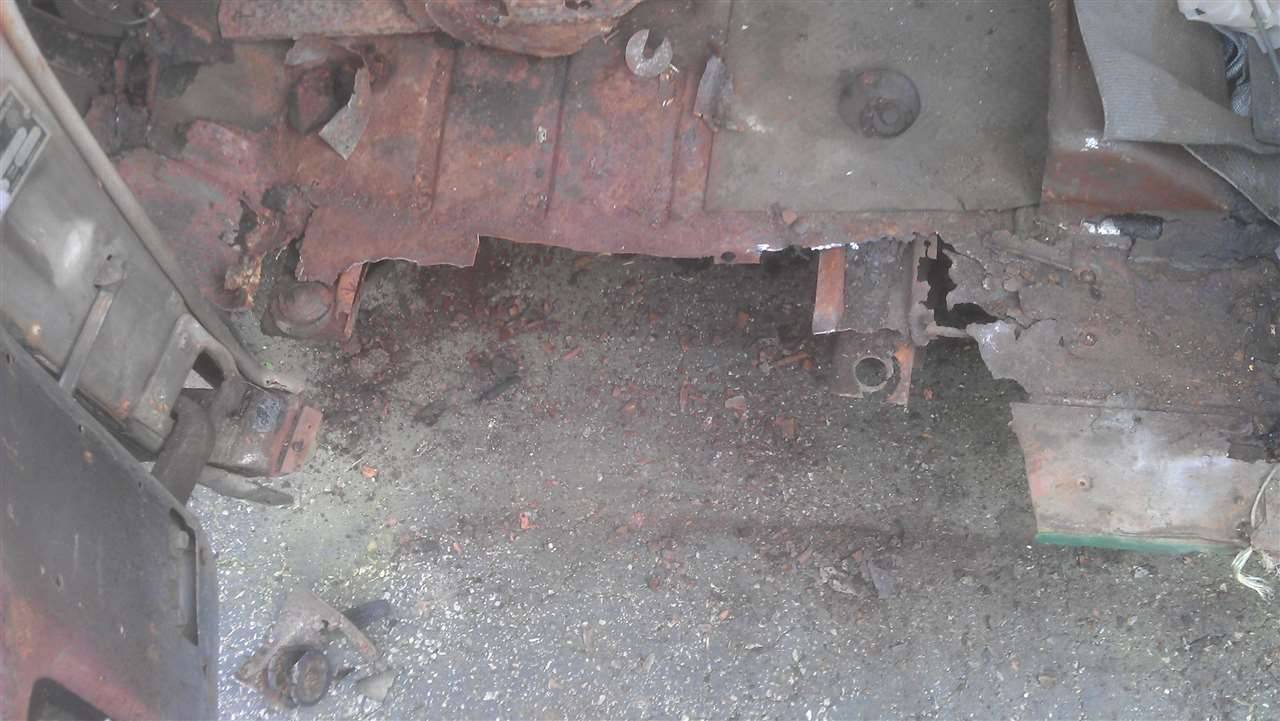 (61.54 KB) (61.54 KB)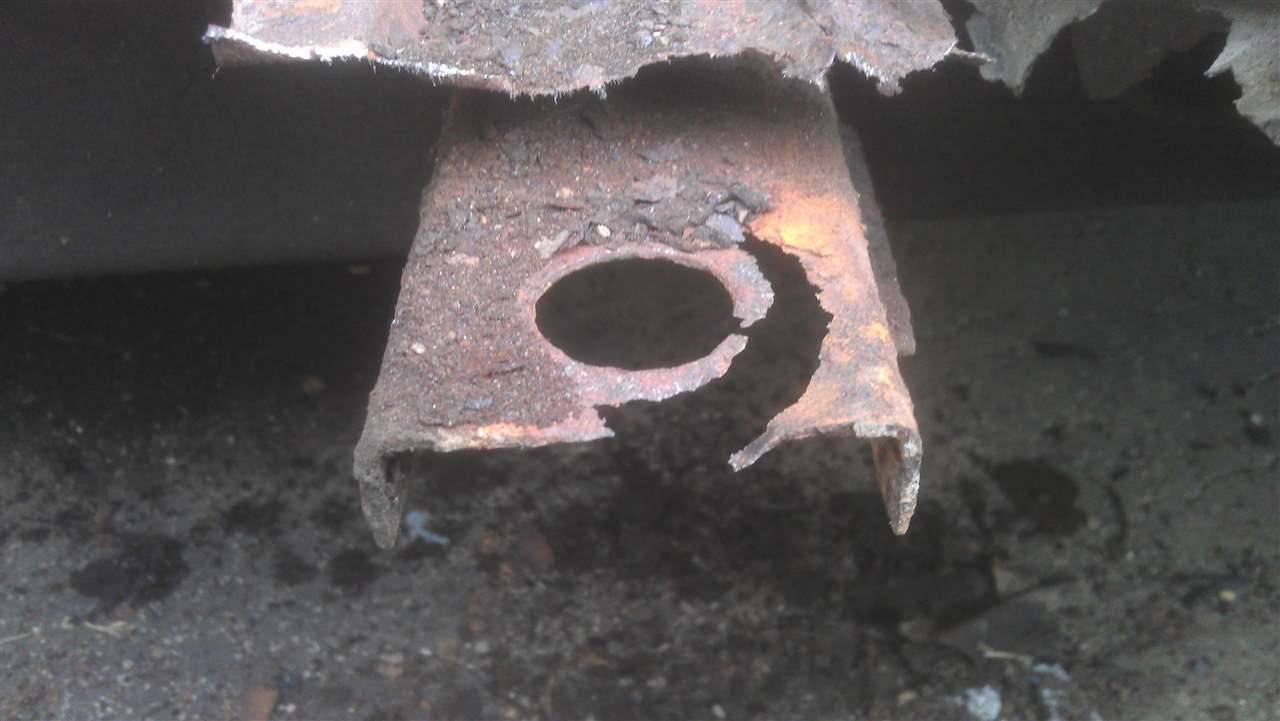
Posted on: 2013/6/4 20:04
|
|||
|
[url=h
|
||||
|
||||
|
Re: 51Packard's....51 Packard
|
||||
|---|---|---|---|---|
|
Forum Ambassador

|
I'll be honest.... I do not envy you and applaud your efforts at the same time!!
Those hinge screws.... I never could get mine out. Not even with a hammer torque screwdriver. Tried it multiple times...no go.
Posted on: 2013/6/4 20:21
|
|||
|
1937 Packard 138-CD Deluxe Touring Limousine
Maroon/Black 1090-1021 [url=https://packardinfo.com/xoops/html/modules/registry/View.php?ID=232]1955 Packard |
||||
|
||||
|
Re: 51Packard's....51 Packard
|
||||
|---|---|---|---|---|
|
Home away from home
|
Thanks Hank...sometimes I wonder what is wrong with me!
Bad news on the screws, but I expected that. Time for plan B or am I on plan F now...
Posted on: 2013/6/4 21:10
|
|||
|
[url=h
|
||||
|
||||
|
Re: 51Packard's....51 Packard
|
||||
|---|---|---|---|---|
|
Forum Ambassador
|
I just spent 30 min under my car and all I can say is I'm thankful it spent it's entire life in Texas. I can tell you I do not have the nuts to tackle a car like yours. kudos to you for sure!! not saying your crazy, just saying I do not have the skills for that at all!
body work is something I do not look forward to. I have to replace the passengers rocker, while not as bad as yours, I'm still nervous. so seriously, kudos to you bro and keep at it! more on screws...I even tried a week long venture of spraying PB on them every morning. still no go. heck I may have even tried heat. also I believe I remember Ross suggesting to someone to weld a big washer on one of there supports or frame outriggers. seems like that would work to repair that one. sounds like you have the idea already.
Posted on: 2013/6/4 21:45
|
|||
|
1937 Packard 138-CD Deluxe Touring Limousine
Maroon/Black 1090-1021 [url=https://packardinfo.com/xoops/html/modules/registry/View.php?ID=232]1955 Packard |
||||
|
||||


