

|
Re: Body off and frame pictures
|
||||
|---|---|---|---|---|
|
Forum Ambassador
|
A great job with beautiful results! Show us more.
Posted on: 2008/6/30 23:03
|
|||
|
||||
|
Re: Body off and frame pictures
|
||||
|---|---|---|---|---|
|
Forum Ambassador

|
Nice pix!
I'd seen a few Packards of this era where the entire underside of the floor pan was refinished in a primer color, but I believe that was an attempt to follow what appeared to be factory - based on findings, simialr to yours, on unrestored cars. I suspect that, because the undercoat material would be applied in that area, the factory skipped a genuine color coat (unlike modern cars) but still used primer to give a it a little tooth for the undercoat and as an additional barrier. IIRC, Eastwood Co. offers a rust encapsulating paint that is primer-colored, and I think I'll use that, topped off with rubberized undercoat. (It's not like I'm ever gonna eat of the undersideof the car.) I'd probably use POR-15 on the frame, topped off with their semigloss black ChassisCoat product.
Posted on: 2008/7/1 7:43
|
|||
|
||||
|
Re: Body off and frame pictures
|
||||
|---|---|---|---|---|
|
Home away from home
|
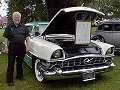
Fantastic pictures and great looking results! How did you take the body off in a home based shop? Very challenging for me just to remove the front clip. I noticed you have the six bladed fan...is yours a factory AC Carib HT?
Best Regards, Robert.
Posted on: 2008/7/1 8:21
|
|||
|
||||
|
Re: Body off and frame pictures
|
||||
|---|---|---|---|---|
|
Forum Ambassador

|
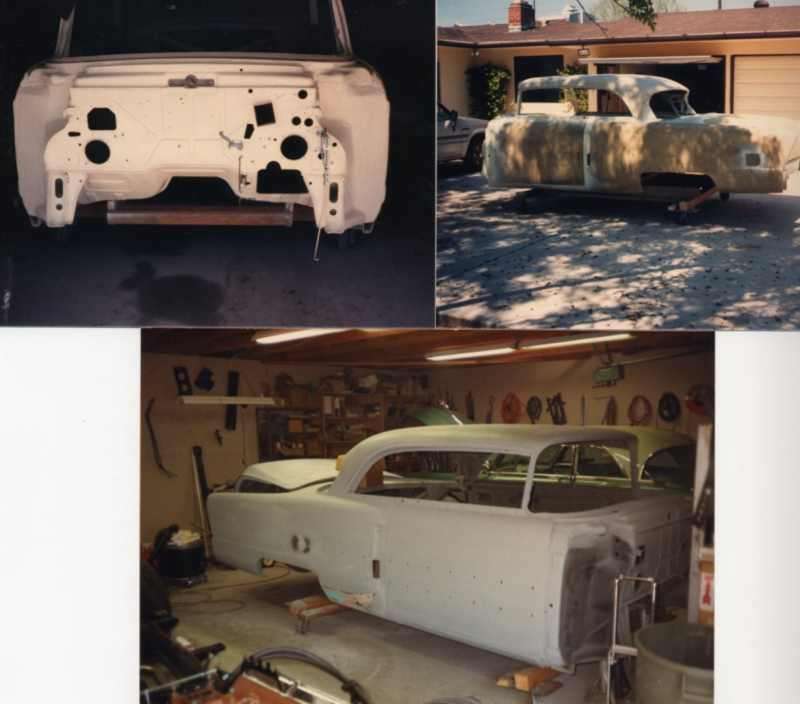
Thanks for nice words. This was done about 10 yrs ago so didn't take or have too many pictures worth posting.
As to removal, doing it myself (the hard way) involved a cherry picker in front and a device called a hi jack or hi lift in back. I'd lift one end a few inches at a time until high enough to clear rear frame kickup plus a bit. At height, inserted 2 long crosswise 4x4 supports front & rear underneath & bolted. After that just supported body on some concrete blocks, removed cherry picker and rolled frame out. Rehooked cherry picker & lowered down onto the roller base I had made to bolt to the 4x4s. IIRC it took about 1/2 day. I believe I left the doors on but the interior was gutted and all glass was out. I did install factory AC from a parts car. Most of the major pieces came from the car, but a few missing/damaged ones I had to make.
Posted on: 2008/7/1 9:06
|
|||
|
||||
|
Re: Body off and frame pictures
|
||||
|---|---|---|---|---|
|
Home away from home

|
Where did u get the rubber body mount insulators???? I plan on replacing mine by lifting one side of the body at a time unless u have a better idea.
Can u give us a diameter measurement of the fan please. It looks unusualy large.
Posted on: 2008/7/1 9:36
|
|||
|
||||
|
Re: Body off and frame pictures
|
||||
|---|---|---|---|---|
|
Home away from home
|
Would also like to know how high, wide and THICK the AC condensor is if it is easy to measure.
Posted on: 2008/7/1 9:45
|
|||
|
||||
|
Re: Body off and frame pictures
|
||||
|---|---|---|---|---|
|
Forum Ambassador
|
I see that Steele Rubber offers body mounting pads for our cars, even cross-referenced to OE P/Ns. It seems that a lot of Packard vendors get their rubber parts from Steele.
Although I've yet to purchase a set, I've heard some complaints on other parts from Steele that make me wonder whether they are using the correct density/hardness of compound in all cases.
Posted on: 2008/7/1 10:44
|
|||
|
||||
|
Re: Body off and frame pictures
|
||||
|---|---|---|---|---|
|
Just can't stay away
|
I'm doing a body off restoration on my 1955 Patrician. To replace the rotted rubber doughnuts I made new ones by cutting out the sidewalls of old tires using a large (2"?) hole saw and a smaller hole saw for the inner hole. The resulting doughnut was the right size but not thick enough, so I used two per support point. Seems to be working fine, and a lot cheaper than Steele.
Posted on: 2008/7/1 11:55
|
|||
|
||||
|
Re: Body off and frame pictures
|
||||
|---|---|---|---|---|
|
Forum Ambassador
|
To try and answer the questions. The fan is 18 1/2" diameter. It appears to be the standard Packard 6 blade for AC cars.
Condenser is 23 wide, 14 high and 1 3/4 thick with 2 rows. It covers the lower 1/2 plus of radiator and full width. I don't know if it is factory though. As to the body mounts, Steele didn't have them when I did the car. Made myself by casting them with a product called Flexane 80. That is a casting urethane which approximates rubber in texture and hardness. A softer version is the 60 but 80 felt right so chose that one. The molds were PVC pipe & fittings so diameters were as close as I could come with my setup to the originals. Around 2, 2 1/4 and I think a 1 3/4 flat. There were a few odd shaped as well. Some had shoulders and some had steel washers cast inside. The pict is of a couple of the molds that were within easy reach. Attach file:  (47.65 KB) (47.65 KB)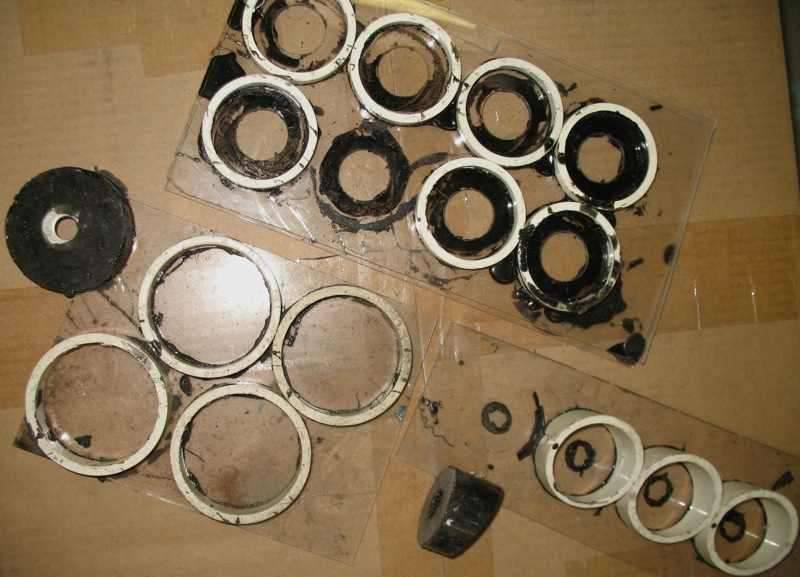
Posted on: 2008/7/1 21:26
|
|||
|
||||


