|
Re: 23rd Series - Flasher Plug Wiring
|
||||
|---|---|---|---|---|
|
Forum Ambassador

|
On the flasher, X (3) is power in so that would get 26a BLY - blue with yellow tracer - from the fuse and ign switch. P (2) is panel so that would get 27 WRX - white with red cross tracer - to the indicator light and L (1) is signal lights so that gets 39 BL - blue - to the plug going to the turn signal switch. If you need to see the wire colors it might be necessary to carefully trim some of the fabric loom weave or tape wrap on the harness back to expose unfaded wire. Some flashers have the P-L-X stamped on the bottom next to terminals and if yours does that can help to orient the flasher.
The Ultra indicator light is connected to the buss bar from ign switch GA terminal that feeds the gauges. In this case wire diagram says it is on the power in side of the temp gauge so indicator light is on any time the ign switch is in the run or right side on position. You may still have a wire pigtail and inline connector on the gauge terminal. 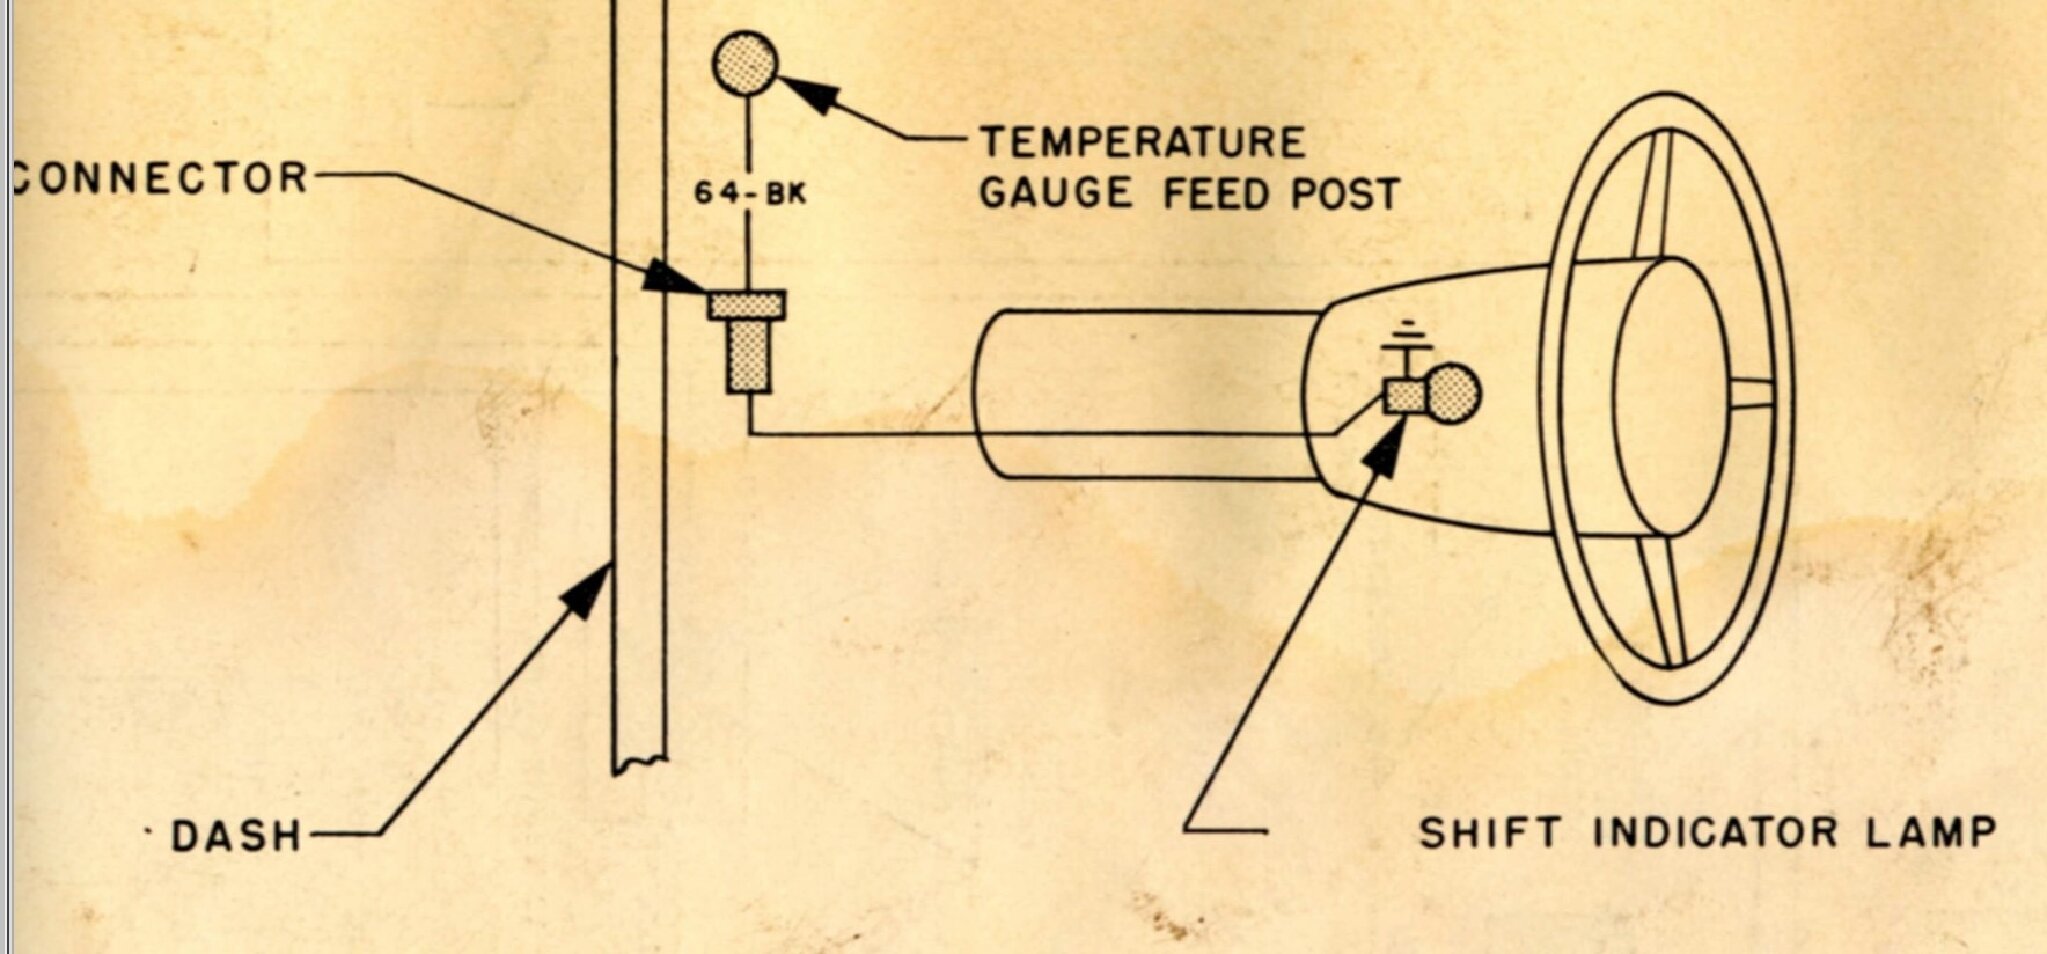
Posted on: 2024/2/22 12:12
|
|||
|
Howard
|
||||
|
||||
|
Re: 23rd Series - Flasher Plug Wiring
|
||||
|---|---|---|---|---|
|
Home away from home
|
Thanks as always, Howard. Thought I had this figured out... nope. Makes total sense on the Ultra light indicator, too.
Posted on: 2024/2/22 13:45
|
|||
|
Joe B.
Greenville, NC 1950 Super Deluxe Eight Touring Sedan, Model 2302-5 327 w/ Ultramatic, 6v+ |
||||
|
||||
|
Re: 23rd Series - Flasher Plug Wiring
|
||||
|---|---|---|---|---|
|
Home away from home
|
Hey Howard (or anyone) - got the flashers back, but a new/odd issue. In the front, both lights are blinking. They're not equal strength - the opposite direction light is much dimmer than the direction indicated. The rear lights are fine.
They're LED bulbs an updated flasher, and they definitely weren't doing this before. I don't have the flasher plug mounted yet, not sure if that would make a difference.
Posted on: 2024/2/22 15:49
|
|||
|
Joe B.
Greenville, NC 1950 Super Deluxe Eight Touring Sedan, Model 2302-5 327 w/ Ultramatic, 6v+ |
||||
|
||||
|
Re: 23rd Series - Flasher Plug Wiring
|
||||
|---|---|---|---|---|
|
Home away from home
|
That sounds like a bad ground to me, and I would guess it's the front signal/park lights causing the issue. Try pressing on the lens while the signal light is flashing to see if improves. If it does, take them apart and clean them up so the reflector makes better contact with the body.
Posted on: 2024/2/22 16:07
|
|||
|
||||
|
Re: 23rd Series - Flasher Plug Wiring
|
||||
|---|---|---|---|---|
|
Forum Ambassador
|
Dirty or corroded grounds are a big issue with Packard lights that mount their sockets in pot metal housings. Dirty switches and terminal connections can be another issue. Either could be part of the problem but LED bulbs can also be someone troublesome since their resistance characteristics and current requirements are so different than incandescent bulbs. The outside bulbs are in parallel so if one side is brighter that kind of indicates there is some extra resistance somewhere in the system.
All I can suggest is go thru and clean every terminal you can reach and pay special attention to the tail and park light housing assys where they bolt to the sheet metal. Rust and corrosion issues are well known around the studs and nuts that make the connection between sheet and pot metal. On some housings there is even a corrosion issue where the sockets are crimped to the pot metal. In some cases it has been so bad a separate ground wire had to be directly connected to the socket and run to a good ground on the sheet metal. If cleaning does not help there could be an issue with a dirty contact in the switch and that requires a bit of work to find and repair. Not sure what updated flasher you are using but LED replacements are fussy and require an electronic flasher that is not dependent on a specific resistance or else you need to add resistors at each bulb to get in the proper working range. Some of the modern flashers that say they are a replacement and will work to replace an old thermal flasher on a car are designed for negative ground. They have a thermal element which works the outside lights adequately but have a transistor to work the dash indicator light. The transistor is the wrong type for positive ground so will not let the indicator light flash. You have probably seen this drawing before but here is the turn signal system isolated from the rest of the car wiring. Attach file:  49-56 Turn Signal Extraction2.jpg (724.10 KB) 49-56 Turn Signal Extraction2.jpg (724.10 KB)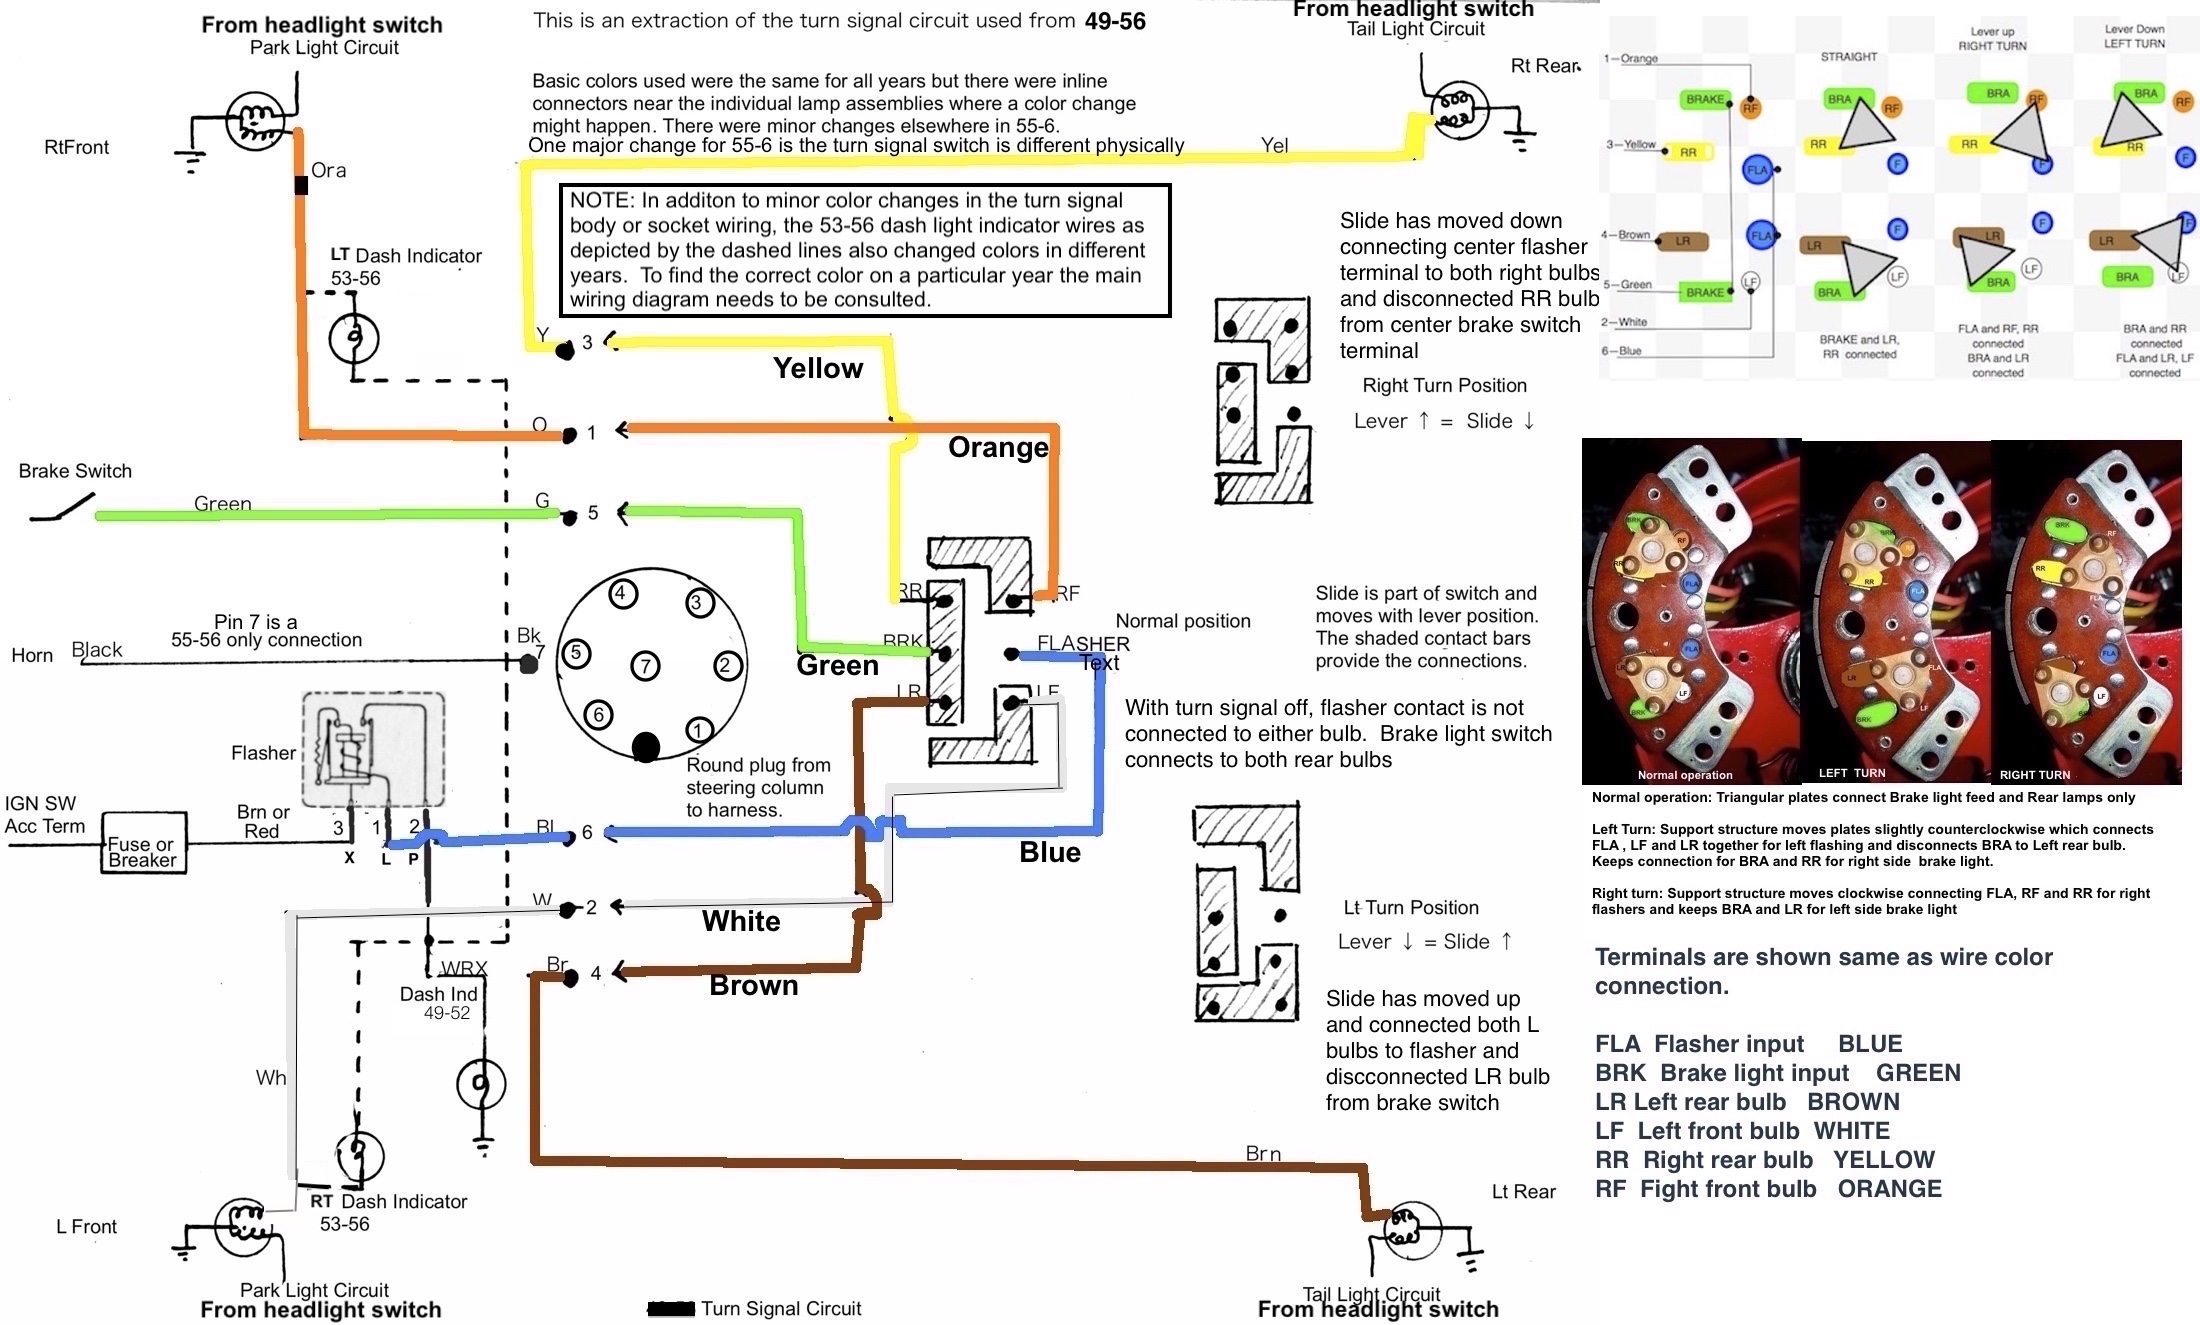
Posted on: 2024/2/22 16:14
|
|||
|
Howard
|
||||
|
||||
|
Re: 23rd Series - Flasher Plug Wiring
|
||||
|---|---|---|---|---|
|
Home away from home
|
I HADN'T seen those particular diagrams! Will keep them on hand, though!
Yeahhh, it's bizarre that it would start doing this AFTER rewiring the signal flasher plug (both front LEDs were working fine and normally before messing with the wiring behind the dash, ugh). I ended up calling the company from whom I purchased the lights (LEDLight.com) and did the test where they have you pull one of the LEDs and switch in an incandescent to see if that "corrects" the issue. Did confirm the flashers behave normally with one incandescent and one LED, which is (apparently) an indication that the flashers need "load equalizers." Not sure why I need them now, other than maybe the old wire had SO much resistance that it allowed the bulbs to work correctly? Unrelated, to the issue above (my taillights aren't showing any faults), but I did tear apart my left taillight a while back to address a dim bulb. Thoroughly cleaned the sheet metal and replaced all the threaded rod. What a difference that did indeed make. Here's what's going in: Yellow/Amber 1154s:ledlight.com/bay15d-1154-6-volt-60-smd-5730-dual-filament-reduced-profile.aspx 6v+g Signal flasher:ledlight.com/flasher-6-volt-led-3-prong-120-watt-positive-chassis.aspx Load Equalizer for each flasher:ledlight.com/led-light-load-equalizer.aspx I completely replaced wire 26 with 16ga blue wire and a 9 amp in-line glass fuse to the GA terminal on the switch. I left the other wires alone, other than to wrap them with some heat shrink tubing. Thanks again for all your help!
Posted on: 2024/2/22 16:51
|
|||
|
Joe B.
Greenville, NC 1950 Super Deluxe Eight Touring Sedan, Model 2302-5 327 w/ Ultramatic, 6v+ |
||||
|
||||
|
Re: 23rd Series - Flasher Plug Wiring
|
||||
|---|---|---|---|---|
|
Home away from home

|
The only dependable way to use LEDs on the turn signals is to use the flasher that is made for LEDs most of which require a ground wire. The one I have is for positive ground and came from the UK but its box up at my shop so can't check what it is.
Posted on: 2024/2/22 17:39
|
|||
|
All generalities are false.
Once I thought I was wrong but I was mistaken. Don Pierson Packard / IMPERIAL page CA DMV Licensed Vehicle VIN Verification 1951 Henney-Packard 3-Door Long Wheelbase Air Force Ambulance The 1951 Henney-Packard is For Sale! 1954 Packard Patrician 1954 Packard Patrician Parts Car 1956 Clipper Custom Sedan |
||||
|
||||


