|
Re: The Duchess Project: 1940 Super 8 Convertible Sedan
|
||||
|---|---|---|---|---|
|
Home away from home

|
I bought the slide hammer tool. It has no instructions. It has no pictures of the tool assembled. I gives no idea of which fixture is good for pulling an oil seal.
I searched the internet for a video on pulling the seal and what I found didn't use this tool. I don't want to damage the inside of my axle where the seal fits. One guy made a hook on the end of a bar and popped it out of a Toyota axle. http://www.youtube.com/watch?v=qevb7w9pUdk Most of the videos show how to replace it, not remove it. On this tool, the hooks swivel and don't stay hooked on the inside of the bearing. I know I must be doing wrong. If it's obvious to you how this thing works, please reply. The hook in the picture is the one that doesn't swivel. Attach file:  (46.93 KB) (46.93 KB)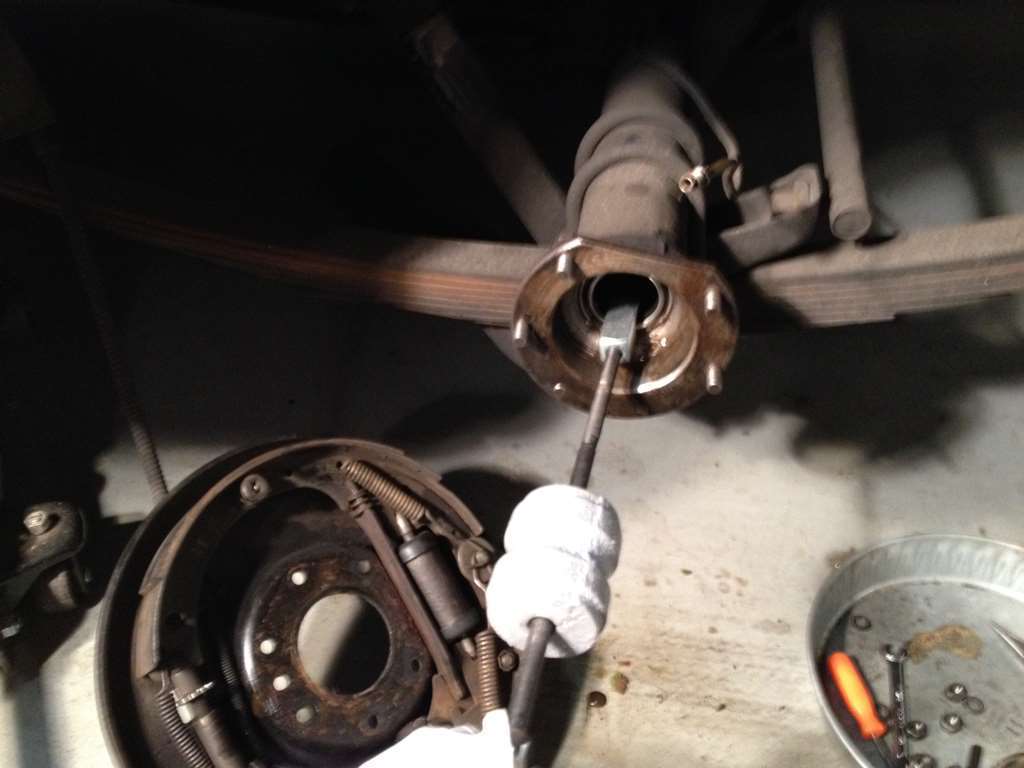 (102.77 KB) (102.77 KB)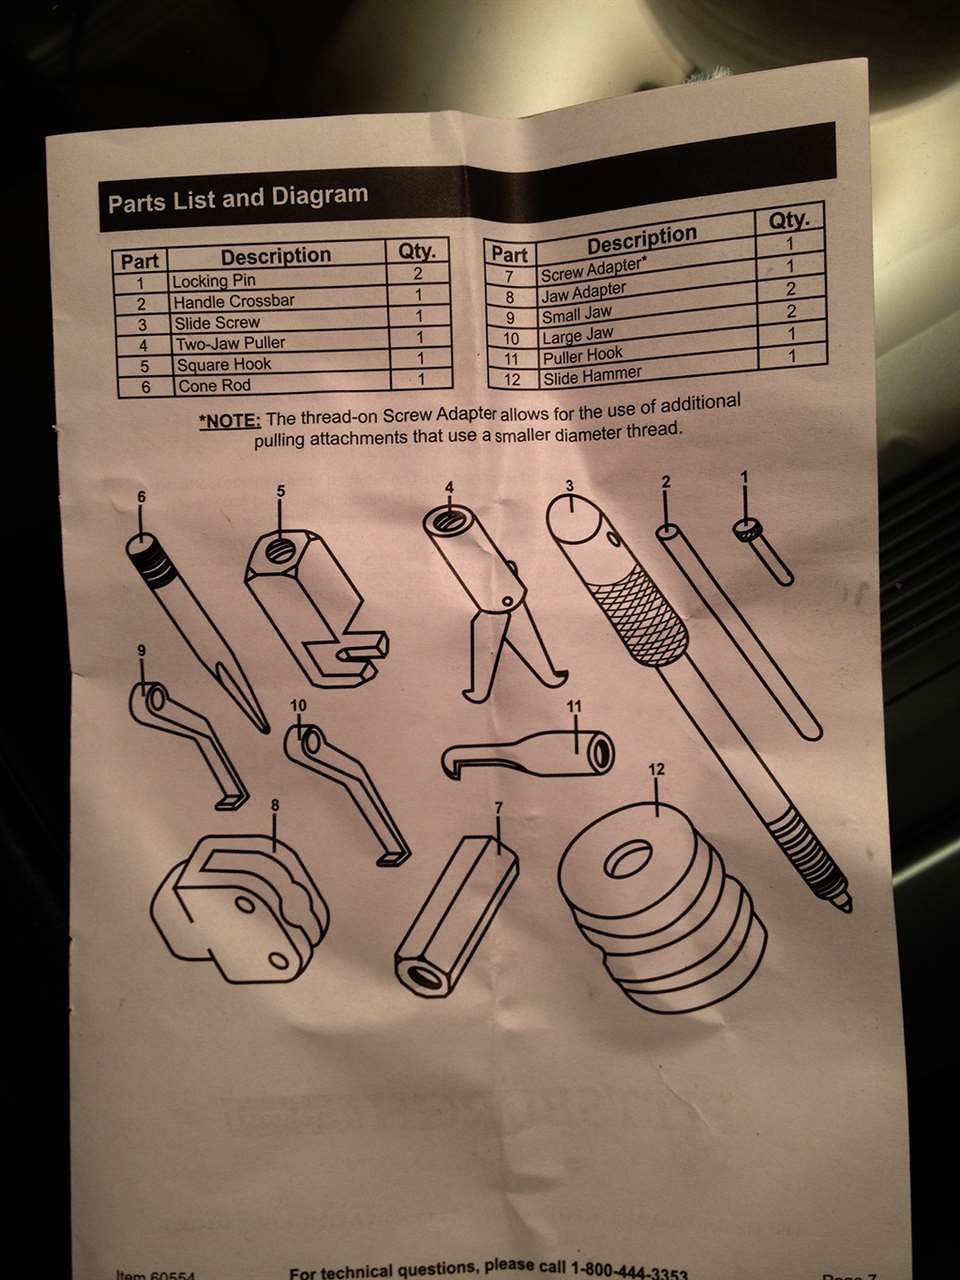 (82.66 KB) (82.66 KB)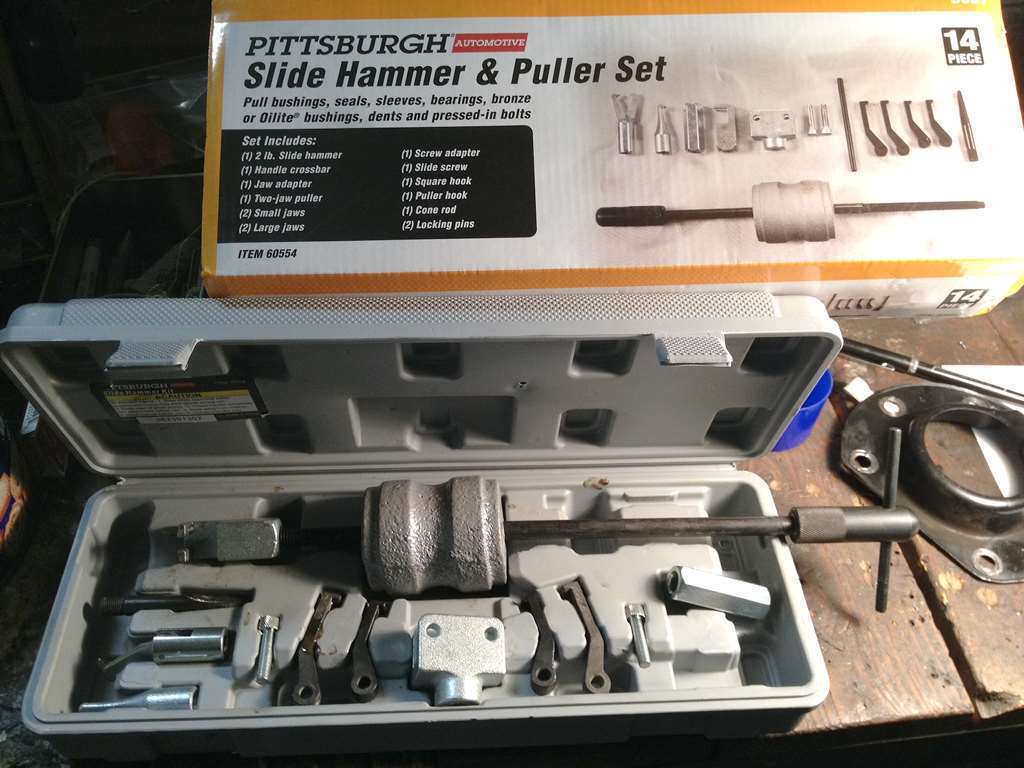
Posted on: 2014/1/21 0:46
|
|||
|
||||

|
Re: The Duchess Project: 1940 Super 8 Convertible Sedan
|
||||
|---|---|---|---|---|
|
Home away from home
|
REAR AXLE END PLAY (IN-AND-OUT)
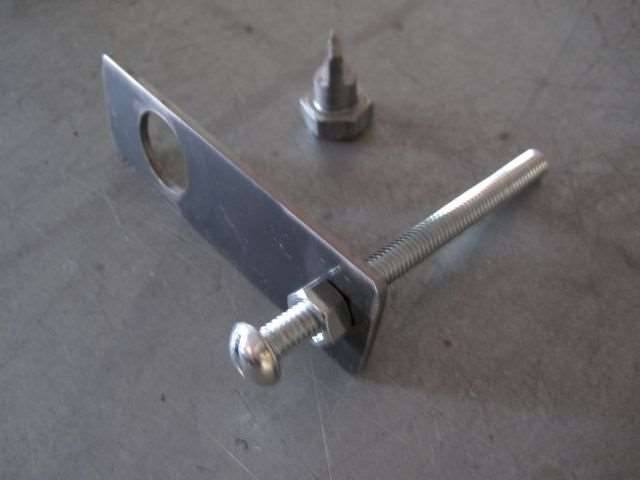
JW, yes, I did see your post about this tool before, but I still don't understand it. (It's not you, it's me.) I do understand that this is about adjusting the end play, the in and out movement of the axle, the seating of the axles, and that it only needs to be done from one side. Since I'm going to replace seals, and likely the bearings, too, on both sides, and since there were no shims on the left side, I'm going to wait until I do the right side. I may find some shims there to give me some options for adjusting the end play. I think I must actually try to follow your instructions with the actual parts. In my imagination, I can't figure out what I would be measuring with the feeler gauge if I pull the axle out. If the axle is pushed all the way in, and the screw on the tool is turned until it touches the axle housing, and I pull out the axle...what am I measuring? What "movement?" That's what I don't understand. It may become clear when I try it. I'll have an Aha moment. REAR AXLE INNER OIL SEAL HH52, I need your help using that slide hammer. Can you tell me, using the numbered parts diagram, which pieces I should use to create an oil seal pulling tool? This is my immediate problem. I got the tool figuring it would show a typical set up for pulling something round, like an oil seal, that you have to grab from the back. But the way I assembled it, the hooks don't hold, except for that one large hook (part 5) which might damage the axle flange. OUTER SEAL. It's really rusted in there. After soaking all night in Kroil I gave it a whack with the disc tool and it didn't budge, so soaking some more.
Posted on: 2014/1/21 13:51
|
|||
|
||||
|
Re: The Duchess Project: 1940 Super 8 Convertible Sedan
|
||||
|---|---|---|---|---|
|
Forum Ambassador

|
I can't figure out what I would be measuring with the feeler gauge if I pull the axle out. If the axle is pushed all the way in, and the screw on the tool is turned until it touches the axle housing, and I pull out the axle...what am I measuring? What "movement?" That's what I don't understand. It may become clear when I try it. I'll have an Aha moment.
After the axles are installed and backing plates snugged up, go to one side and give the end of the axle shaft a solid rap with a heavy hammer. Then repeat this from the other side. Regardless of whether shims are on both sides or only one side, this will displace the axles all the way to one side allow the bearing cups to reach their outermost limit (contacting the backing plate.). On whichever side the axle shaft is now displaced outwards (the opposite side from which you last hit an axle end), install the tool so the threaded rod is just in contact with the end of the axle. Now push the axle inwards to it's limit and measure how much clearance you have. On this type of axle with a thrust block and single tapered roller bearings, you only need a single adjustment, on either side with shims as long as the total amount of shims doesn't exceed the spec (0.050"?). I should note that not all Packard rear axles are done this way; for example many of the 30s senior axles used double opposed roller bearings on each axle with inner and outer cups and no thrust block. On these axles you must adjust each axle independently by adding/removing shims from BEHIND the inner race.
Posted on: 2014/1/21 15:35
|
|||
|
||||
|
Re: The Duchess Project: 1940 Super 8 Convertible Sedan
|
||||
|---|---|---|---|---|
|
Home away from home
|
Dave,
At the risk of Proving I'm dumb as a rock, if the screw is already touching the axle flange, how can I push the axle IN any further? The screw is on the tool, the tool is bolted to the axle. How can the axle get any closer? I have a couple days to figure this out, but in the meantime, do I just keep whacking outward on that inner seal? The outer one is really encrusted. I suspect the inner one is too. Thanks for patience.
Posted on: 2014/1/21 15:57
|
|||
|
||||
|
Re: The Duchess Project: 1940 Super 8 Convertible Sedan
|
||||
|---|---|---|---|---|
|
Forum Ambassador
|
I just took a look at that tool, sorry - my apologies for not seeing it's kind of the inverse of mine. Do the wrap on the axles from both sides, then on the last side that you did hit inwards, fasten the tool to the end of the axle shaft and set the screw just against the backing plate. Then go hit the opposite axle shaft and see how much clearance has developed.
Yeah, the inner seals can be pesky, I did them on 34 my a while back and they are in twice as deep as yours because it uses a double row of bearings. Just be patient, you'll get it out. Outward facing jaws on the impact tool should do it, but if worst comes to worst, drill two small holes in the seal for sheet metal screws and grasp them to pull it out, but if you do this take special care to get all the drill turnings out.
Posted on: 2014/1/21 16:22
|
|||
|
||||
|
Re: The Duchess Project: 1940 Super 8 Convertible Sedan
|
||||
|---|---|---|---|---|
|
Home away from home
|
Thanks so much. Saved me from committing myself.
In removing the seal, it's persistence that counts then. I don't know if you watched that Toyota video above, but the darn inner oil seal just snapped out in one flick of the guy's homemade hook tool. More tonight.
Posted on: 2014/1/21 16:35
|
|||
|
||||
|
Re: The Duchess Project: 1940 Super 8 Convertible Sedan
|
||||
|---|---|---|---|---|
|
Home away from home
|
Joe-
Sorry I didn't see this until just now, been traveling. Next time you need it, assemble a pair of the jaws (9 or 10) into the adaptor (8) using the pins (1). Then screw that to the slide, it helps if you screw it through enough so it holds the jaws out a bit as you noticed. Fit the ends of the jaws under the seal and give it a few good whacks with the slide outward, and it will come. Good luck Hans
Posted on: 2014/1/21 19:41
|
|||
|
1952 Model 200 Deluxe Touring Sedan
HA's 52 Grey Ghost "The problem with quotes on the internet is you never know if they're true" - Abraham Lincoln |
||||
|
||||
|
Re: The Duchess Project: 1940 Super 8 Convertible Sedan
|
||||
|---|---|---|---|---|
|
Home away from home
|
I'll try it tonight when I get home from work. I didn't screw that adapter on very far. I'll screw it on more and after putting the hooks through the seal, I'll try screwing it more to hold the hooks out so they grip the back of the seal.
If you've read any of this project blog, you know it takes me, on average, 4 complete disassemblies and reassemblies to do it right. But, boy, by then I really know it. Thanks, Hans.
Posted on: 2014/1/21 19:54
|
|||
|
||||
|
Re: The Duchess Project: 1940 Super 8 Convertible Sedan
|
||||
|---|---|---|---|---|
|
Home away from home

|
You should be able to get an inexpensive dial gauge and stand from an industrial supply house to check run out. You probably can get the gauge and stand for under forty dollars, and you will have them to use for many years to come on other projects. Maybe get them used from ebay for much less.
It's been years since I have checked axle run out, but as I remember if you use multiple shims don't put them all on the same side If I am wrong please correct me.
Posted on: 2014/1/21 21:26
|
|||
|
||||


