
|
Re: Adventures with a 1955 Clipper
|
||||
|---|---|---|---|---|
|
Forum Ambassador

|
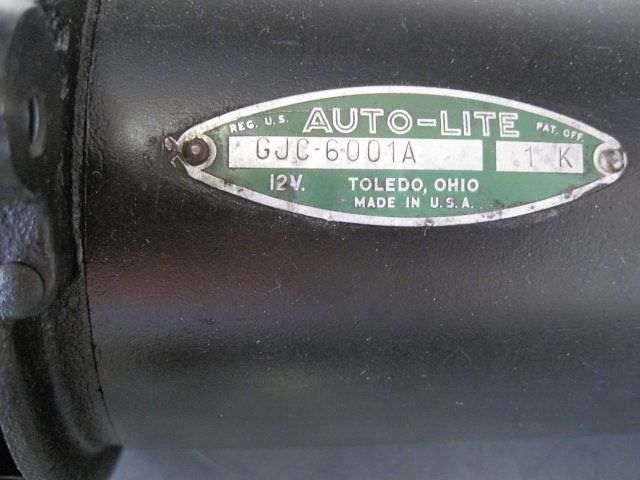
Was the Delco the proper number for the senior car or maybe another brand car? If the top tension bracket is the same, would think the mounting brackets would have less to do with belt fit since they're not very wide to offset the hole much. Would think the different brackets might be more for locating it front to back for pulley alignment rather than side to side.
Belt lists as the same with different belt for AC cars (curious why since AC cars use same fan and gen pulley setup) -- so would seem to indicate that your new Autolite generator has a larger pulley or belt doesn't fit as far down in the groove or possibly one or the other generators was off another brand car.
Posted on: 2011/6/9 12:43
|
|||
|
Howard
|
||||
|
||||
|
Re: Adventures with a 1955 Clipper
|
||||
|---|---|---|---|---|
|
Home away from home

|
Howard, good points. I will check the Delco number on the generator I took off and see what it is supposed to fit. The pulleys looked to be the same size, but I did not actually measure them. There were some washers used as spacers on the Delco installation. So, I would agree the bracket is for back and forth alignment. I'll get back to folks on this.
(o{I}o) Update 6/10: Got the Delco generator on the bench and looked it over. Classic looking 12-volt unit. No id. tag on the unit, just a "3" stamped on the body. It is probably a rebuilder's mark. Anyone need a working Delco generator? It needs to be overhauled. You can have it for the shipping charges. (o{I}o)
Posted on: 2011/6/9 18:15
|
|||
|
We move toward
And make happen What occupies our mind... (W. Scherer) |
||||
|
||||
|
Re: Adventures with a 1955 Clipper
|
||||
|---|---|---|---|---|
|
Home away from home
|
Quote:
JW, I like your emphasis on getting things cleaned up. In the old days on ships they had engine room "wipers" that kept the grease and grime off things. They were also the guys that knew when things needed fixing--overheated bearings, missing nuts and bolts etc. I think cleaning is the #1 job for fixing anything and often by the time something's clean, I know what's wrong with it, and it often isn't much. There used to be an engine-cleaning system that used pressurized steam or chemical (I think it was called "Geni" or something like that). My dad had an old unit in his shop, but never used it. It was an interesting piece of old-time hardware with a tank, hose, wand, and a drawing of a cute little "cleaning girl" on the label. I wonder if anyone here has used such a device, or if a rented steam cleaner would work. Every time I clean an engine compartment I think about how much sweat I could save with one of those things. The "Gunk" engine cleaner is so-so, just a washable solvent, and I'd never spray water on an engine, so I just end up wiping it with rags anyway. Once again, nothing beats wiping, at least as a final step, for a close look at everything (like belts, hoses, etc.), and when something wiggles or comes off in your hand, you know it isn't on very tight!
Posted on: 2011/6/9 23:34
|
|||
|
Guy
[b]Not an Expert[/ |
||||
|
||||
|
Re: Adventures with a 1955 Clipper
|
||||
|---|---|---|---|---|
|
Home away from home
|
Hello All,
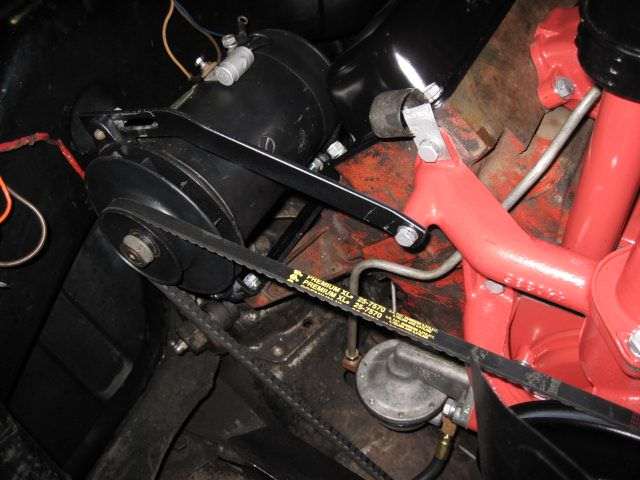
A little progress was made in the last garage session. The re-finished rocker arm covers with their new decals were installed. I finished installing the heater hoses, and a short flex hose for the fresh air heater inlet. Lastly, I got the spark plug wires installed. I managed to remove the "Clipper V-8" decals in one piece when I was refinishing the rocker arm covers. I used a hair dryer to provide heat to loosen the adhesive backing. Needless to say, I have had no use for a hair dryer in decades except for tasks like this. I decided not to use them, as new ones were available from the Packard club. I bought a set and the other engine decals from the PAC. The rocker arm cover decals are not really decals. They are more like stickers. The pattern is printed on a foil-like material and this is adhered to a paper-like material that has an adhesive backing. I think the repainted covers with their new decals really dress up the top of the engine. The heater and radiator hoses are clamped using a full circle spring hose clamp. These clamps are called Corbin clamps. Once they are on they will not come loose, but getting them over the hose into position is difficult. Manufactures liked to use this type of clamp because it was cheap and easy to install, in the factory. I bought a special pair of pliers to install these clamps. I remember, in the day, we would usually not replace them and use an aircraft type clamp instead, which is so much easier to install. I wanted the original look of the Corbin clamps, but it took a bit more time and effort to get them installed. The spark plug wires went on easily. I had labeled each wire for its respective cylinder so as not to get wires mixed-up. You will note in the photo showing the LH spark plug wires installed that the wires for the back two cylinders are separated on their brackets. This is to minimize induction firing. On a modern V-8 engine, two cylinders on one bank will fire one after the other instead of alternating from bank to bank as happens on all the other cylinders. In the Packard design, cylinders 5 and 7, the rear two on the LH side do this. Induction firing, as it was called in the day, is a transformer-like effect where the pulse from one spark plug wire will transfer to an adjacent wire. This was a problem for all V-8s in the day due to high compression ratios and spark plug wire insulation that was not as good as today's product. This induction firing means a pulse will be delivered to a cylinder at the wrong time causing a rough running engine. By separating the wires as far apart as the bracket design allows minimizes this effect. To better deal with this problem, Packard came out with a redesign of the brackets in 1956 that provided considerably more separation. I have a set and may install them at a later date. This is probably more than you ever wanted to know about induction firing, but you never know when the cocktail conversation will lag and you will need something exciting with which to fill in the silence. One more thing about the spark plug wires. The previous owner installed a nice set of Packard Cable 440 wires. Packard Cable Division of GM made these wires, not the Packard Motor Car Co. Many here know that before the Packard brothers, Ward and J.W., started making motor cars in Warren, Ohio, in 1899 they were in the business of making electrical equipment and supplies. I think the name of the company was The Packard Electric Co. Early on, General Motors bought the electric company from the Packards and continued to use the name and the Packard script logo. Packard wires on a Packard motor car - how cool. Next time I will do some electrical work and install some parts on the left hand side. Take care. (o{I}o) Attach file:  (4.81 KB) (4.81 KB)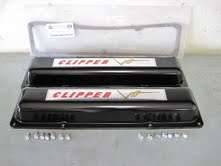 (51.86 KB) (51.86 KB)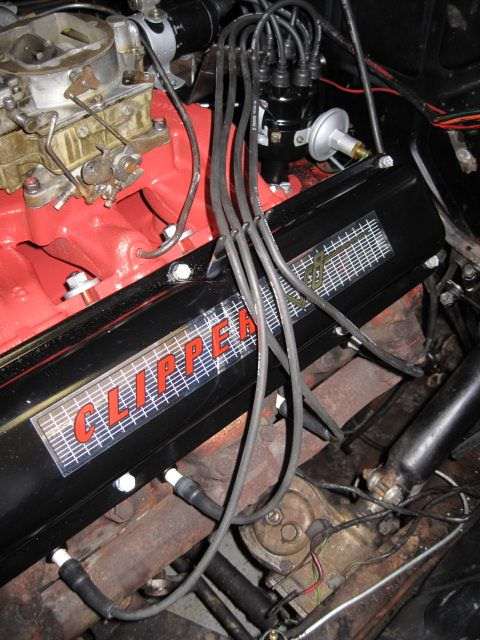 (4.97 KB) (4.97 KB)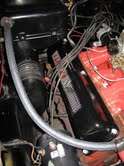 (4.49 KB) (4.49 KB)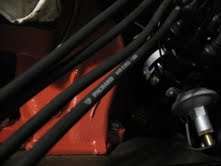 (33.96 KB) (33.96 KB) (3.54 KB) (3.54 KB)
Posted on: 2011/6/10 16:08
|
|||
|
We move toward
And make happen What occupies our mind... (W. Scherer) |
||||
|
||||
|
Re: Adventures with a 1955 Clipper
|
||||
|---|---|---|---|---|
|
Home away from home

|
Corbin clamps are easy when you know the trick. First put the clamps on the hose, then slide the hose into place while holding the clamp open with the pliers. I believe this is how they do it on the assembly line, they do not waste time there.
Posted on: 2011/6/10 21:04
|
|||
|
||||
|
Re: Adventures with a 1955 Clipper
|
||||
|---|---|---|---|---|
|
Home away from home
|
I find it easier to put the clamp on the hose far enough back so the hose can be slid on without needing to hold the clamp open, then squeezing the clamp open and sliding it up. Less hassle than trying to hold the clamp open at the same time as you slide the hose on. Differnt strokes...
Posted on: 2011/6/10 21:39
|
|||
|
Guy
[b]Not an Expert[/ |
||||
|
||||
|
Re: Adventures with a 1955 Clipper
|
||||
|---|---|---|---|---|
|
Home away from home
|
Quote:
Guy, that is the procedure I finally figured out. Plus it helps to have some liquid dish washing detergent on the hose (inside and outside) to help slide the hose on to the fitting and to help slide the clamp over the hose. (o{I}o)
Posted on: 2011/6/10 22:45
|
|||
|
We move toward
And make happen What occupies our mind... (W. Scherer) |
||||
|
||||
|
Re: Adventures with a 1955 Clipper
|
||||
|---|---|---|---|---|
|
Home away from home
|
Or, #2 permatex is a good lubricant that also fills any imperfections on the hose or receiving end. NOTE: Put any sealant on the RECEIVING END, NOT inside the hose... otherwise as you push the hose on it rolls the sealant back into the hose where it can leave a bead of sealant that will come loose eventually. When it's put on right in a thin layer, #2 Permatex also aids later removal of the hose.
I know some people are entirely against using any sealant, but especially with older cars with pitted metal surfaces, I think it's good added security. Especially with Corbin clamps that cannot be tightened beyond their original spring tension like aircraft clamps can. You can't just screw a Corbin clamp a little tighter to stop seepage. Also, do Corbin clamps retain their tension after a couple of R&R's? Or should new ones go on every time a hose is removed or replaced? I'd really like to know, because I change a lot of fuel filters on my boat engine, and the kits many times include spring type clamps, and it's easier to just move them back to change the filter and then slide them into place. Getting them on the fuel line the first time is a beeyatch.
Posted on: 2011/6/11 13:50
|
|||
|
Guy
[b]Not an Expert[/ |
||||
|
||||
|
Re: Adventures with a 1955 Clipper
|
||||
|---|---|---|---|---|
|
Home away from home
|
Guy, the clamps I used for the radiator and heater hoses create a lot of tension, and I would say that they could be removed and replaced many times and still provide good clamping. I don't know if this is true for the smaller and lighter fuel line size clamps. My guess is no, they are of a one-time use design.
(o{I}o)
Posted on: 2011/6/11 22:55
|
|||
|
We move toward
And make happen What occupies our mind... (W. Scherer) |
||||
|
||||


