|
Re: DIY Torsion level control switch conversion
|
||||
|---|---|---|---|---|
|
Home away from home
|
Send one to me h.
I will try it
Posted on: 2023/4/23 22:55
|
|||
|
Riki
|
||||
|
||||
|
Re: High Speed Rear End for 1941 Packard 110 club coupe?
|
||||
|---|---|---|---|---|
|
Forum Ambassador

|
Being the thread is headed up for a '41 110 Coupe, it's a 6.
And Frank D Roman,  to PackardInfo. I invite you to include your '41 110 Club Coupe in PackardInfo's Packard Vehicle Registry. to PackardInfo. I invite you to include your '41 110 Club Coupe in PackardInfo's Packard Vehicle Registry.
Posted on: 2023/4/23 22:27
|
|||
|
Mal
/o[]o\ ====  Bowral, Southern Highlands of NSW, Australia "Out of chaos comes order" - Nietzsche. 1938 Eight Touring Sedan - SOLD 1941 One-Twenty Club Coupe - SOLD 1948 Super Eight Limo, chassis RHD - SOLD 1950 Eight Touring Sedan - SOLD What's this?  Put your Packard in the Packard Vehicle Registry! Here's how! Any questions - PM or email me at ozstatman@gmail.com |
||||
|
||||
|
1937 "120" Rebound Bumper Lower
|
||||
|---|---|---|---|---|
|
Just can't stay away

|
While at Hershey several years ago I purchased from a vendor what I thought was the front coil spring bumper for a 37-120 (#333035) and the vendor confirmed that it was. After removing the coil springs on my 37-120 this weekend, the upper rubber bumper has three studs in the bumper. The set I purchased at Hershey has only one stud in the center of the rubber bumper. I see Max Merritt has this single stud bumper #333035 listed as "Rebound Bumper Lower 1935-1939" My question is, where does this "rebound bumper lower" go? I see Steele rubber does sell the three stud bumper but does the single stud bumper just go on certain models? I've searched in the manuals I have and didn't find any info.? See Photo
Attach file:  20230423_223450.jpg (212.56 KB) 20230423_223450.jpg (212.56 KB)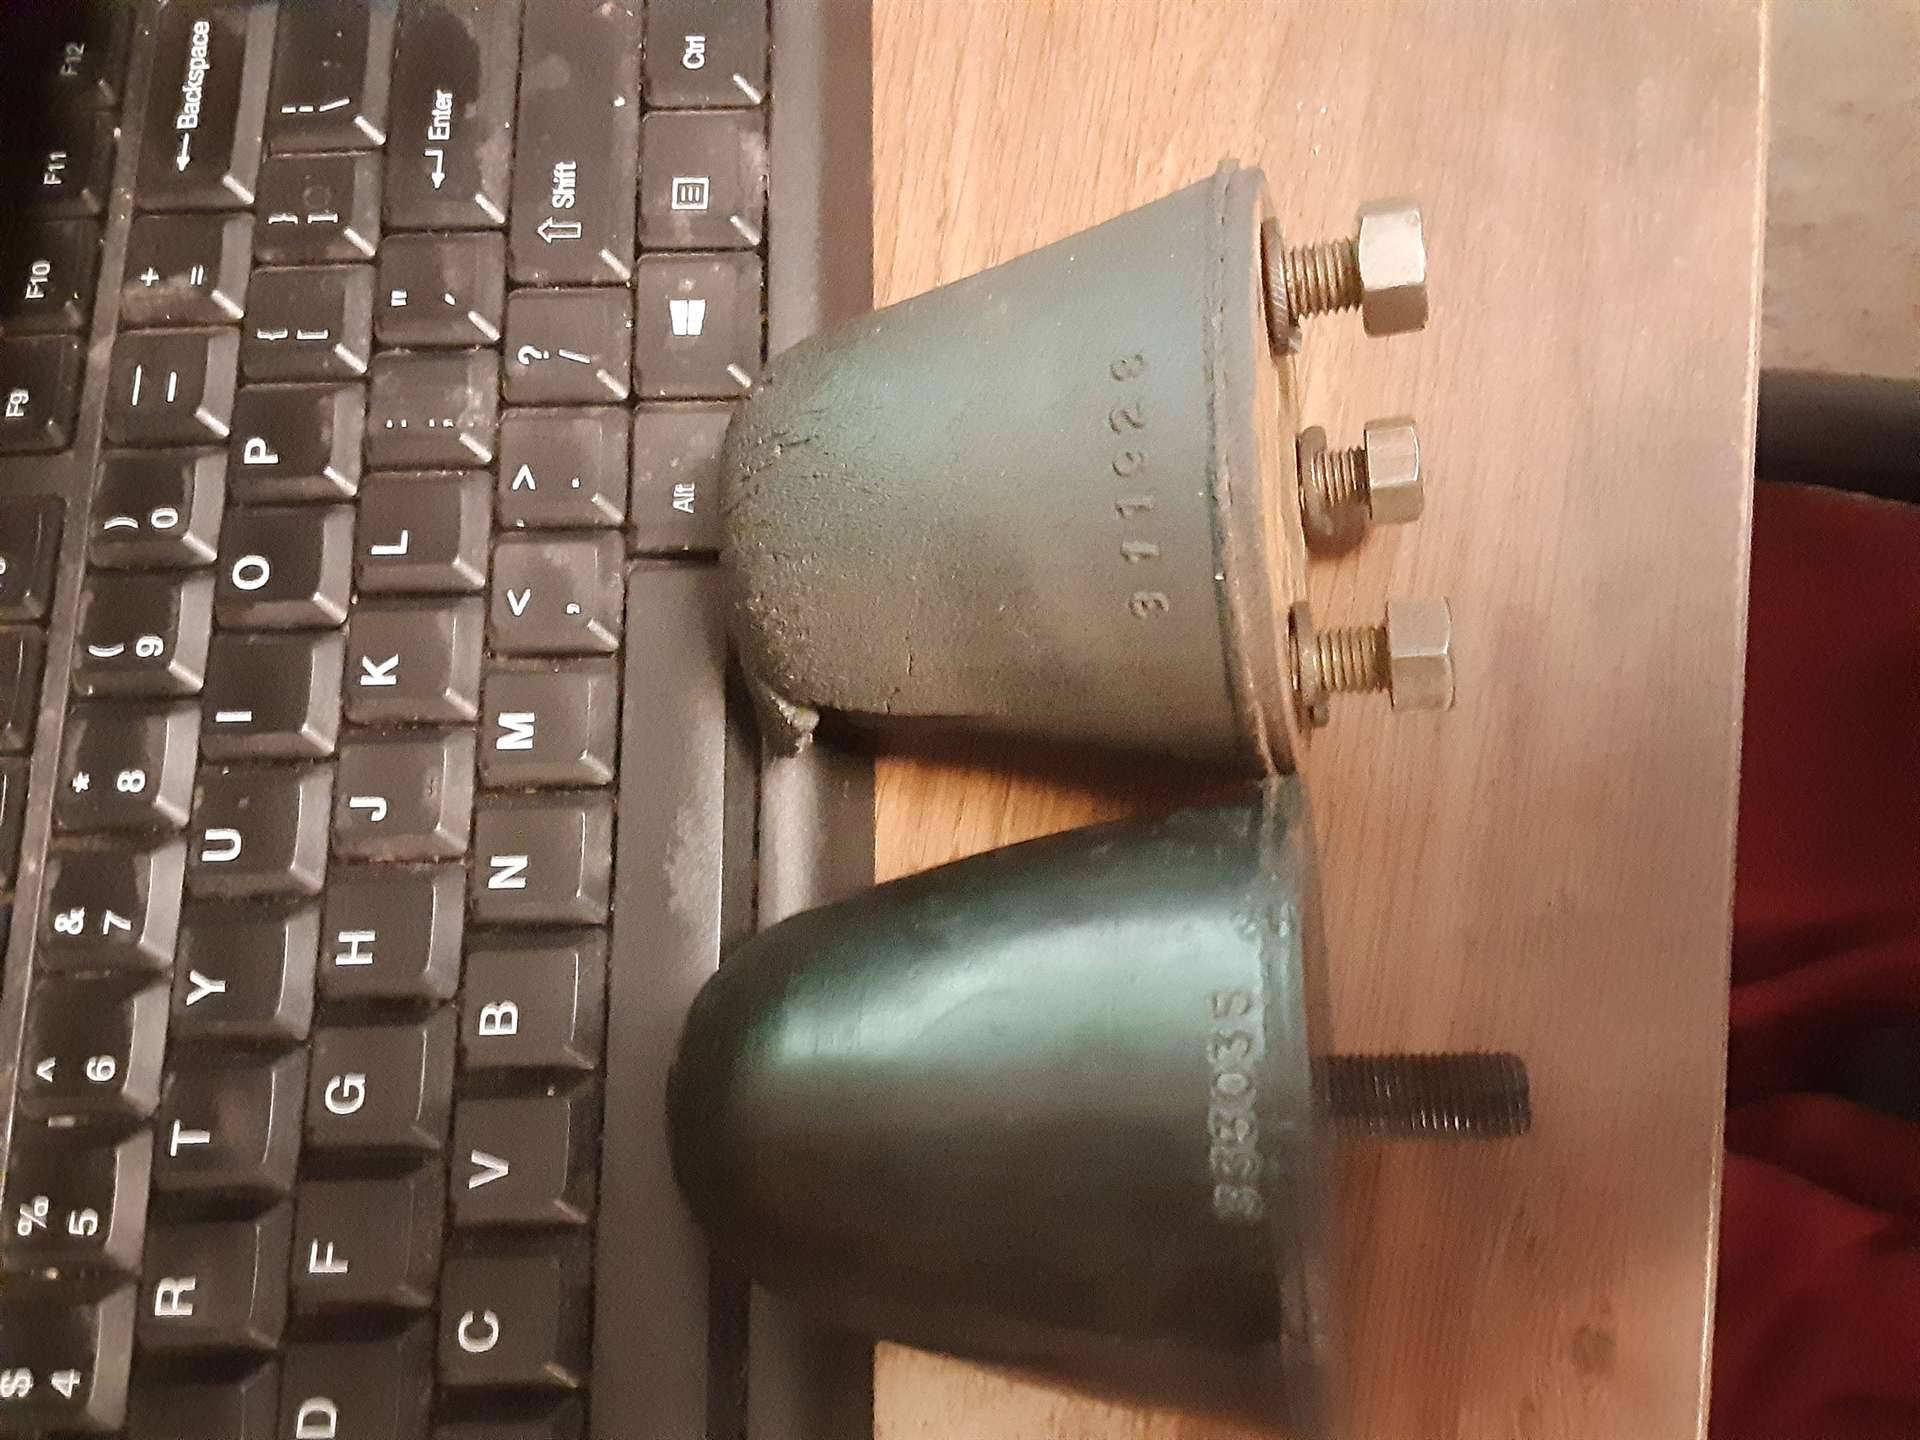
Posted on: 2023/4/23 22:03
|
|||
|
||||
|
Re: High Speed Rear End for 1941 Packard 110 club coupe?
|
||||
|---|---|---|---|---|
|
Home away from home

|
Is your car a 115 six, a 120 eight, or one of the "senior" cars?
What size tires are you using?
Posted on: 2023/4/23 21:25
|
|||
|
||||
|
DIY Torsion level control switch conversion
|
||||
|---|---|---|---|---|
|
Forum Ambassador

|
If the switch fails, here is one way to eliminate the bimetal timing section and sometimes erratic contacts in the stock control switches by adding solid state time delay relays. No idea which vendors are selling the exchange switches so here is an option if an owner wants to do a conversion himself. Different relays may work better or not at all but I chose these because they were fairly inexpensive and readily available.
The relays I used are by INITEQ number INRXTD12X30B and are currently sold as a pair by Amazon. These are 12v 30 amp contact automotive type relays. Some Ebay vendors also sell a similar relay. Riki shows another brand in one of his posts. Space is extremely tight inside the control sw box. The INITEQ relays are 1 1/8” square x 1 15/16“ long. The flag terminal brings total length to 2 1/4”. Any larger relay may not fit and not sure if there would need to be any mods to the mounting bracket showing on the type relay Riki purchased. The easily found TD relays all seem to have a delay of 10 seconds which is longer than the factory specified 5-7 second delay but still a reasonable number. First step was to unsolder 4 wires and unscrew the old relay bracket to remove the complete relay assy. I could not find a way to avoid cutting the bimetal strips out of the box and still have the relays fit. A Dremel with cut-off wheel was used to cut the bimetal assy off the swivel bracket just as is done with the other solid state conversions. A couple of the old contacts were bent out of the way on the phenolic circuit board at the bottom to make room for the new support plate but nothing else needed cutting. A hole was drilled in the pot metal for a new ground stud connection and two new wires were soldered to the existing pink and yellow terminals going to the outside. NOTE: Because the terminals have a large mass you will need a fairly high wattage soldering iron for this —at least 200 watts. New wires were also soldered back onto the terminals connected to the contacts operated by the lever and torsion bar. A regular wattage soldering iron will work for those. Because space is so tight I chose to use insulated flag style quick disconnects to connect the relays but those do need a special crimper. Another option would be to solder wires directly to the relays. If you do that make sure not to overheat the relay terminals and carefully insulate the terminals after the wires are on so they can not touch the cover. A plate was also made to support the relays above the still existing contacts on the switch bottom. I chose to use a 1/16 thick phenolic material with dimensions of 1 7/8 x 2 1/8. Holes were drilled and countersunk in the plate to utilize the old relay bracket screw mounting location and threaded holes. The plate was placed on 1/2" standoffs using 3/4" screws. Note that the original relay bracket screws in the switch are an odd size -- 5-40 thread. That size is available but not typically found at local hardware stores. You could use easier to find 4-40 screws thru the original holes with a nut under the box to hold the screws or drill and tap the holes for 6-32. IF you have a 55 switch, electrically they are the same with the main difference being the location of the terminals on the bottom. 55 switches had 3 exposed screw terminals and they are in different spots. Pink and Yellow wires would need to go to the different terminal locations. Here are a few photos of a 56 switch as well as the new wiring diagram. NOTE: The wiring diagram is for the 56 Negative ground switch conversion. Wires 85 and 86 on each relay would need to be swapped for the 55 Positive ground. Both configurations test well on a bench but I will not be able to crawl under to test the conversion in a car. Attach file: TL 1.jpg (186.49 KB)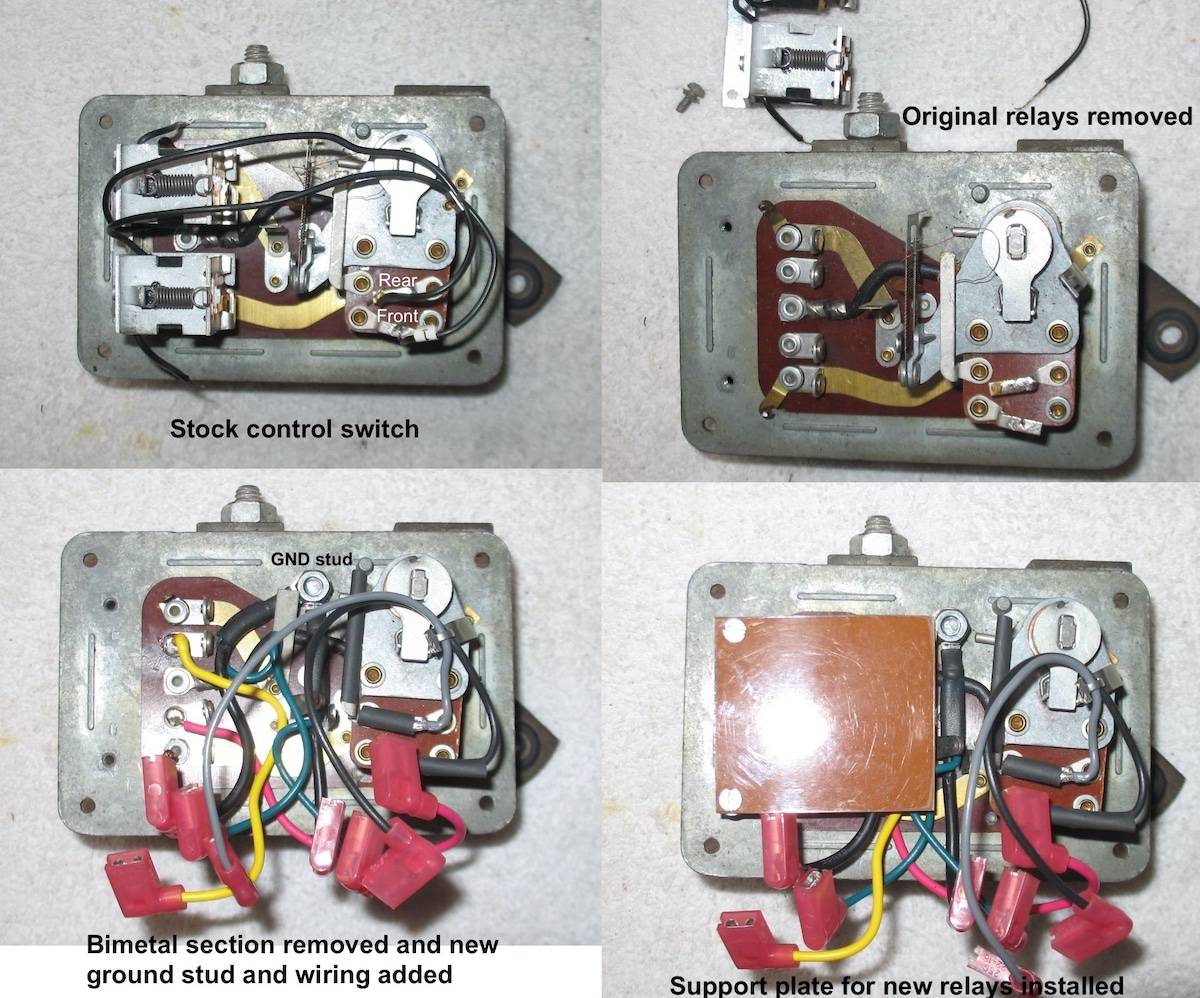 TL 2.jpg (139.18 KB) TL 2.jpg (139.18 KB)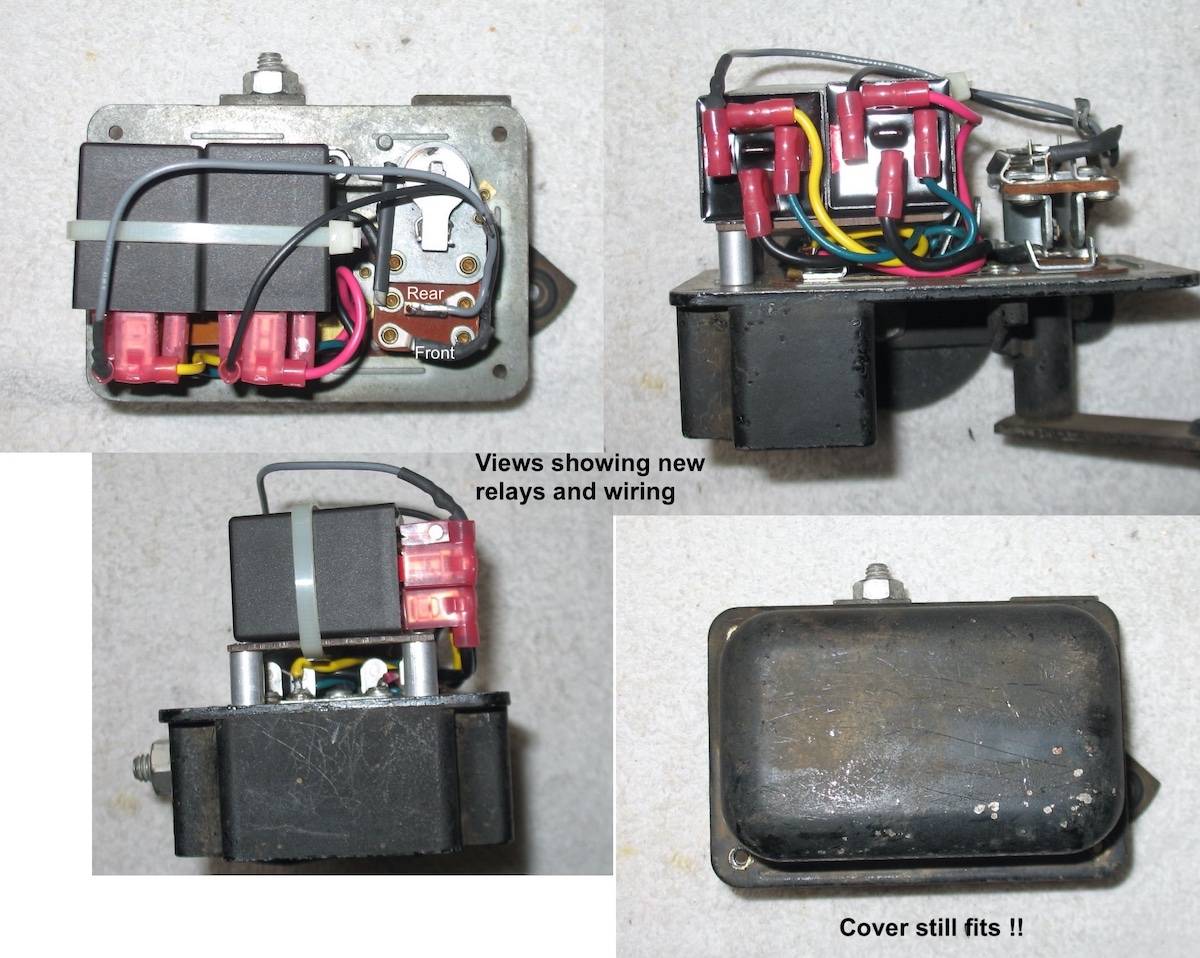 56TorSwitch1 2.jpg (168.79 KB) 56TorSwitch1 2.jpg (168.79 KB)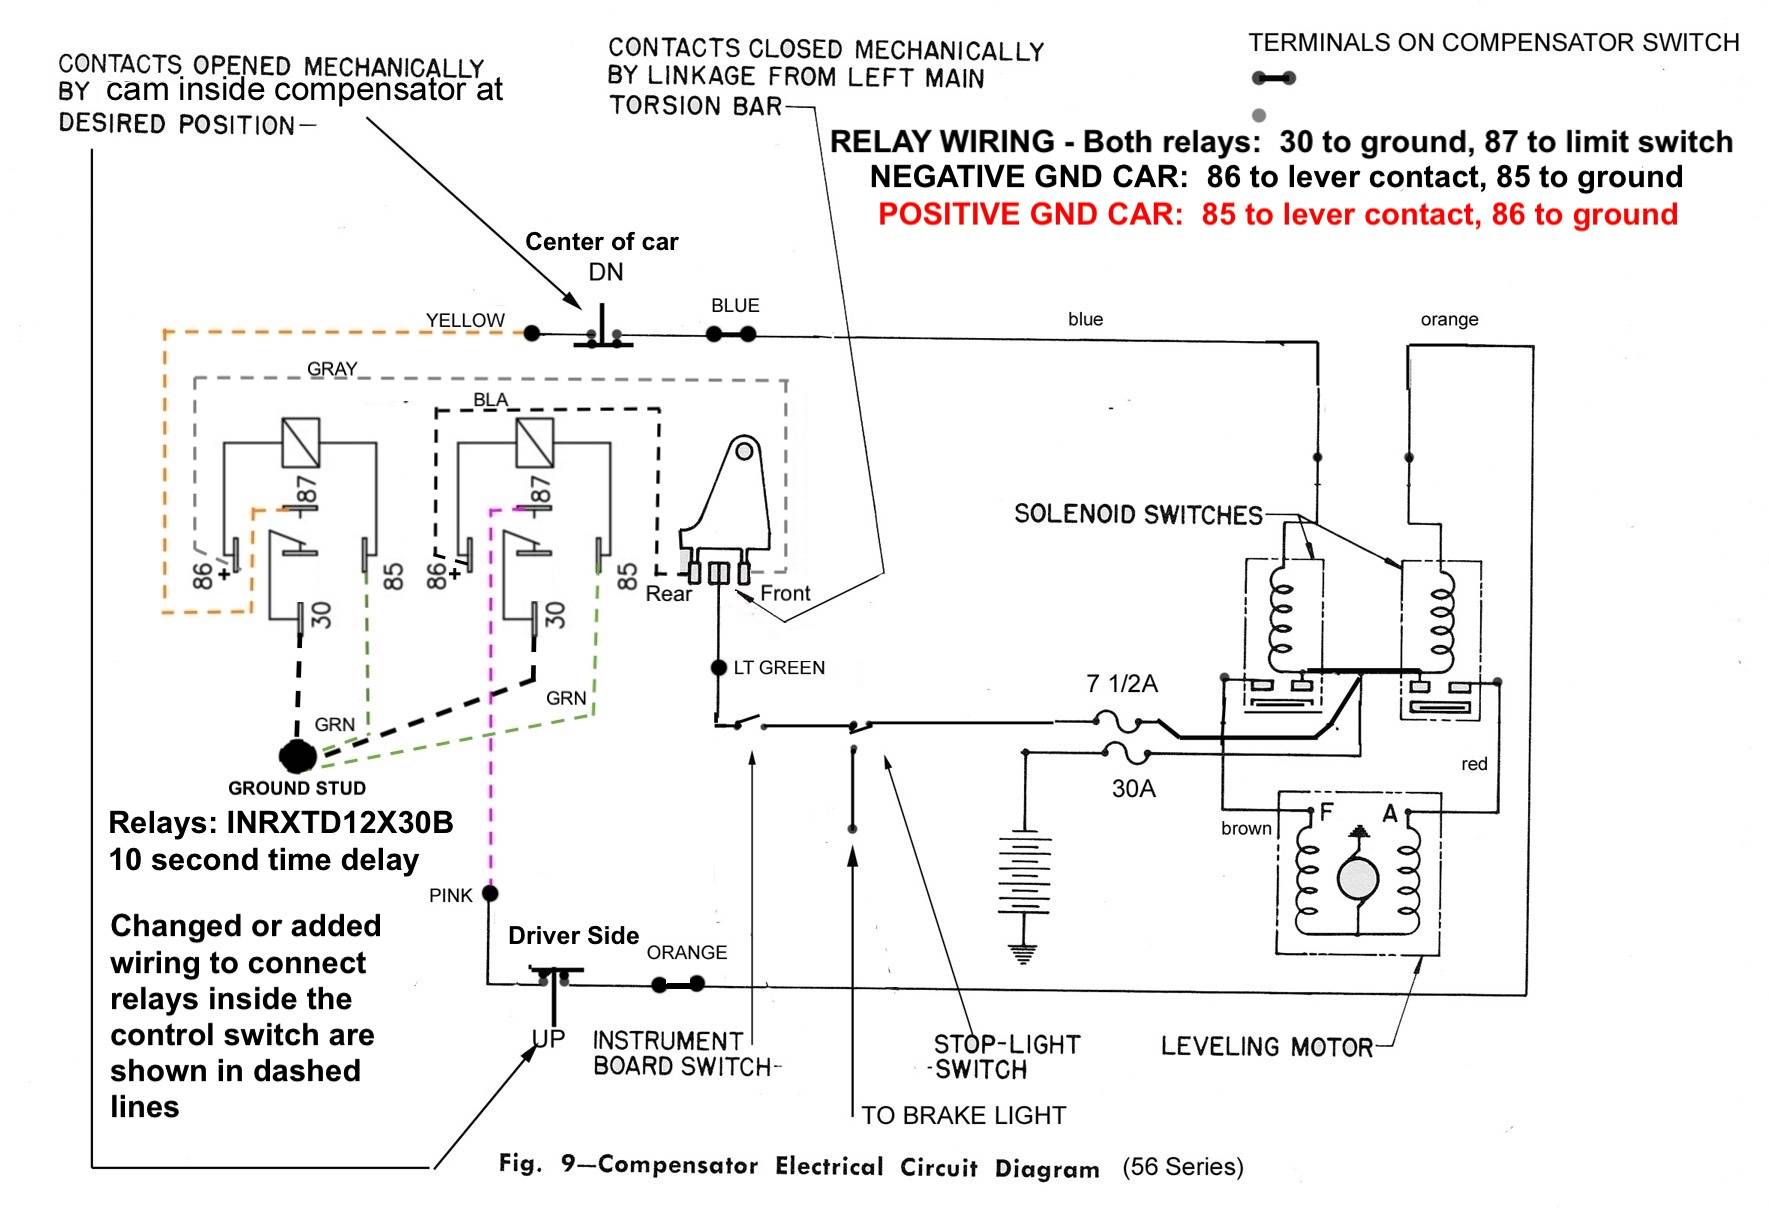
Posted on: 2023/4/23 21:21
|
|||
|
Howard
|
||||
|
||||
|
High Speed Rear End for 1941 Packard 110 club coupe?
|
||||
|---|---|---|---|---|
|
Just popping in
|
My '41 Packard club coupe seems to be geared low as the top speed is 45-50 mph.
Thus, it is not safe for interstate travel. Rather than finding an R-9 of R-11 overdrive unit, is it possible to put in a different gear ratio that will give my car another 15 mph? I am not a mechanic so I do not not if the higher speed rear end is out there. Suggestions are welcome, Thanks
Posted on: 2023/4/23 21:09
|
|||
|
||||
|
Re: interior door handle removal...,mystery
|
||||
|---|---|---|---|---|
|
Home away from home
|
That's for the spring clip removal, right?
Back in the '70's I used a bent nail and a pair of vice grips to remove the spring clips on my old '65 Falcon. Used the same technique on my '37 115c when I had to replace the door glass a couple years back. No sweat.
Posted on: 2023/4/23 20:35
|
|||
|
||||
|
Re:
|
||||
|---|---|---|---|---|
|
Home away from home
|
Finally had some more progress on the '40 today; installed the RF suspension finally, but the rubber bumpers are not yet installed.
Interesting process to install the suspension: Raised front frame with an engine hoist. Used longer than normal bolts on the lower, inner suspension support (under where the radiator would be) which supplied about 2" more freeplay in the spring support arm. Compressed the spring with two compressors near each other to compress the spring into a "C" shape. Placed jack under the spring support, installed spring in its' well. Installed torque arm back to the frame; then tightened the bolts on the spring support arm, then removed the spring compressors while supporting the lower arm with the jack. Still need to address the shocks...
Posted on: 2023/4/23 20:15
|
|||
|
||||
|
Re: 53 patrician power booster rebuild
|
||||
|---|---|---|---|---|
|
Home away from home

|
Yes, I read on a post he made that the previous owner of my car, when he had the power brakes rebuilt, asked the guy to make it less touchy. So now it takes pretty much the same force as regular brakes, just way less travel.
 It was some guy in Florida rebuilding them, don't remember who.
Posted on: 2023/4/23 19:10
|
|||
|
'55 400. Needs aesthetic parts put back on, and electrical system sorted.
'55 Clipper Deluxe. Engine is stuck-ish. |
||||
|
||||
|
Re: BigKev
|
||||
|---|---|---|---|---|
|
Webmaster

|
I was able to get the inner fenders installed today. I had to reform the two front brake lines as the lines needed to sit nearly flat on the frame and pretty close to the shock for the inner fender to clear.
I had already altered the left inner fender to clear the alternator. And I mounted a terminal block there as well similar to the postwar cars. But I did need to also modify the right inner fender as well to clear the carb air intake. The outer fender had already been altered. So the inner followed suit and was a pretty easy change. Attach file: Screenshot_20230423_162615_Gallery.jpg (147.38 KB) Screenshot_20230423_162639_Gallery.jpg (119.98 KB) Screenshot_20230423_162639_Gallery.jpg (119.98 KB)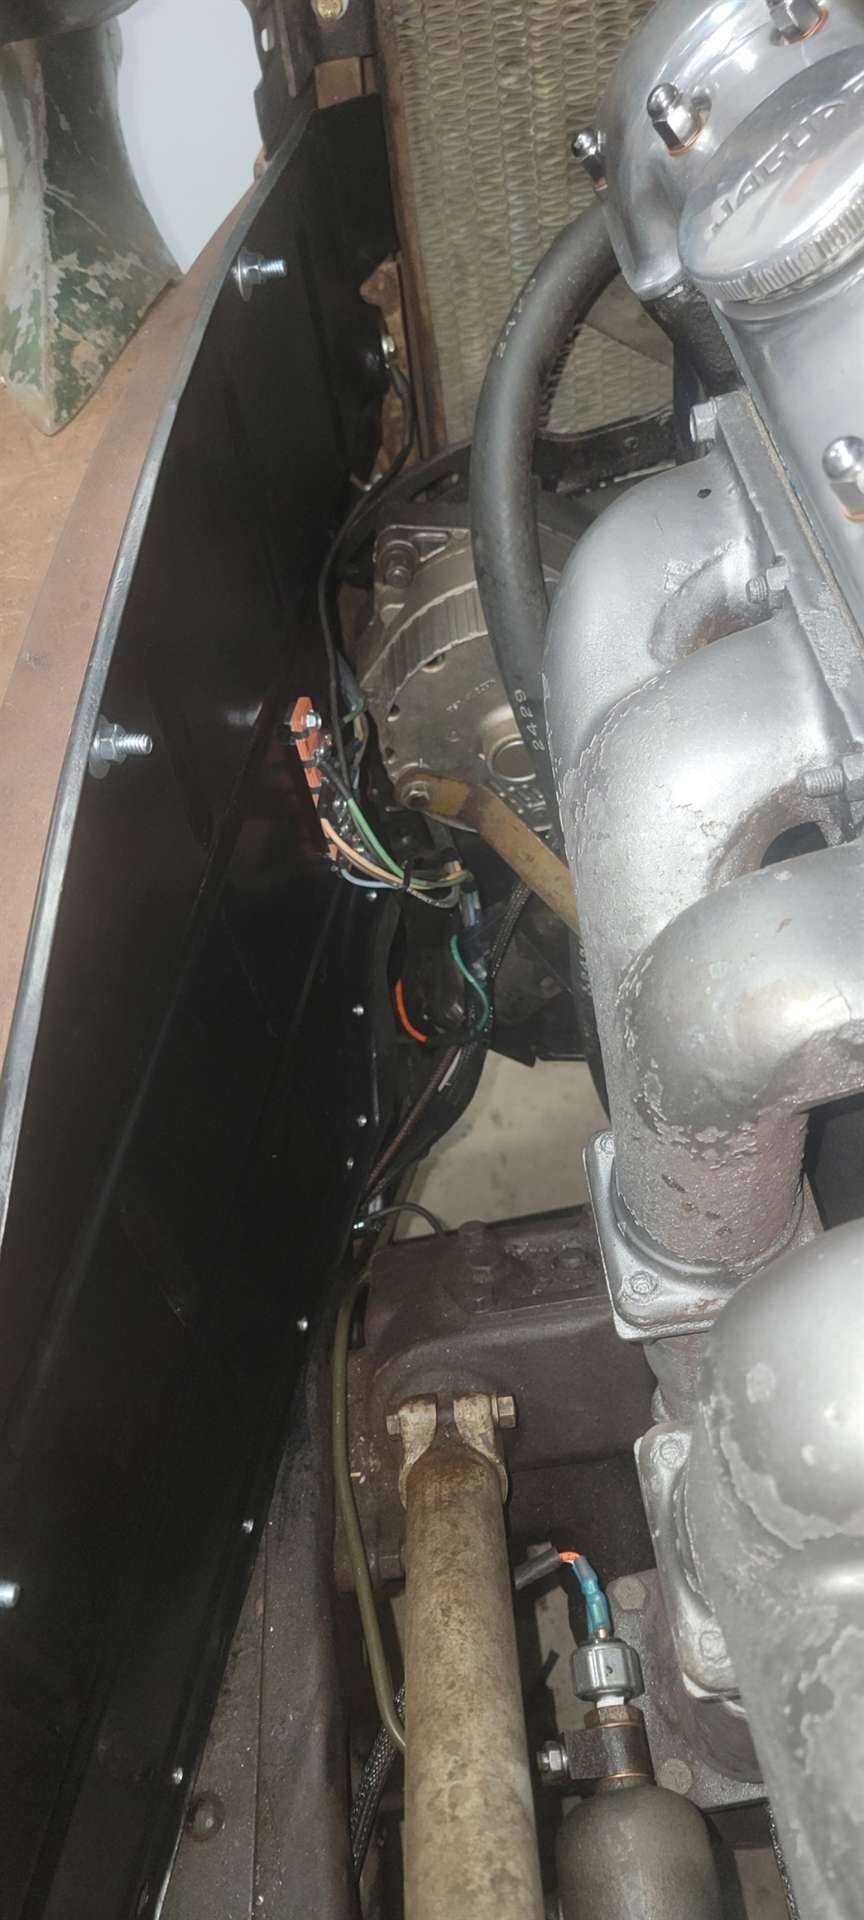 Screenshot_20230423_162654_Gallery.jpg (167.28 KB) Screenshot_20230423_162654_Gallery.jpg (167.28 KB)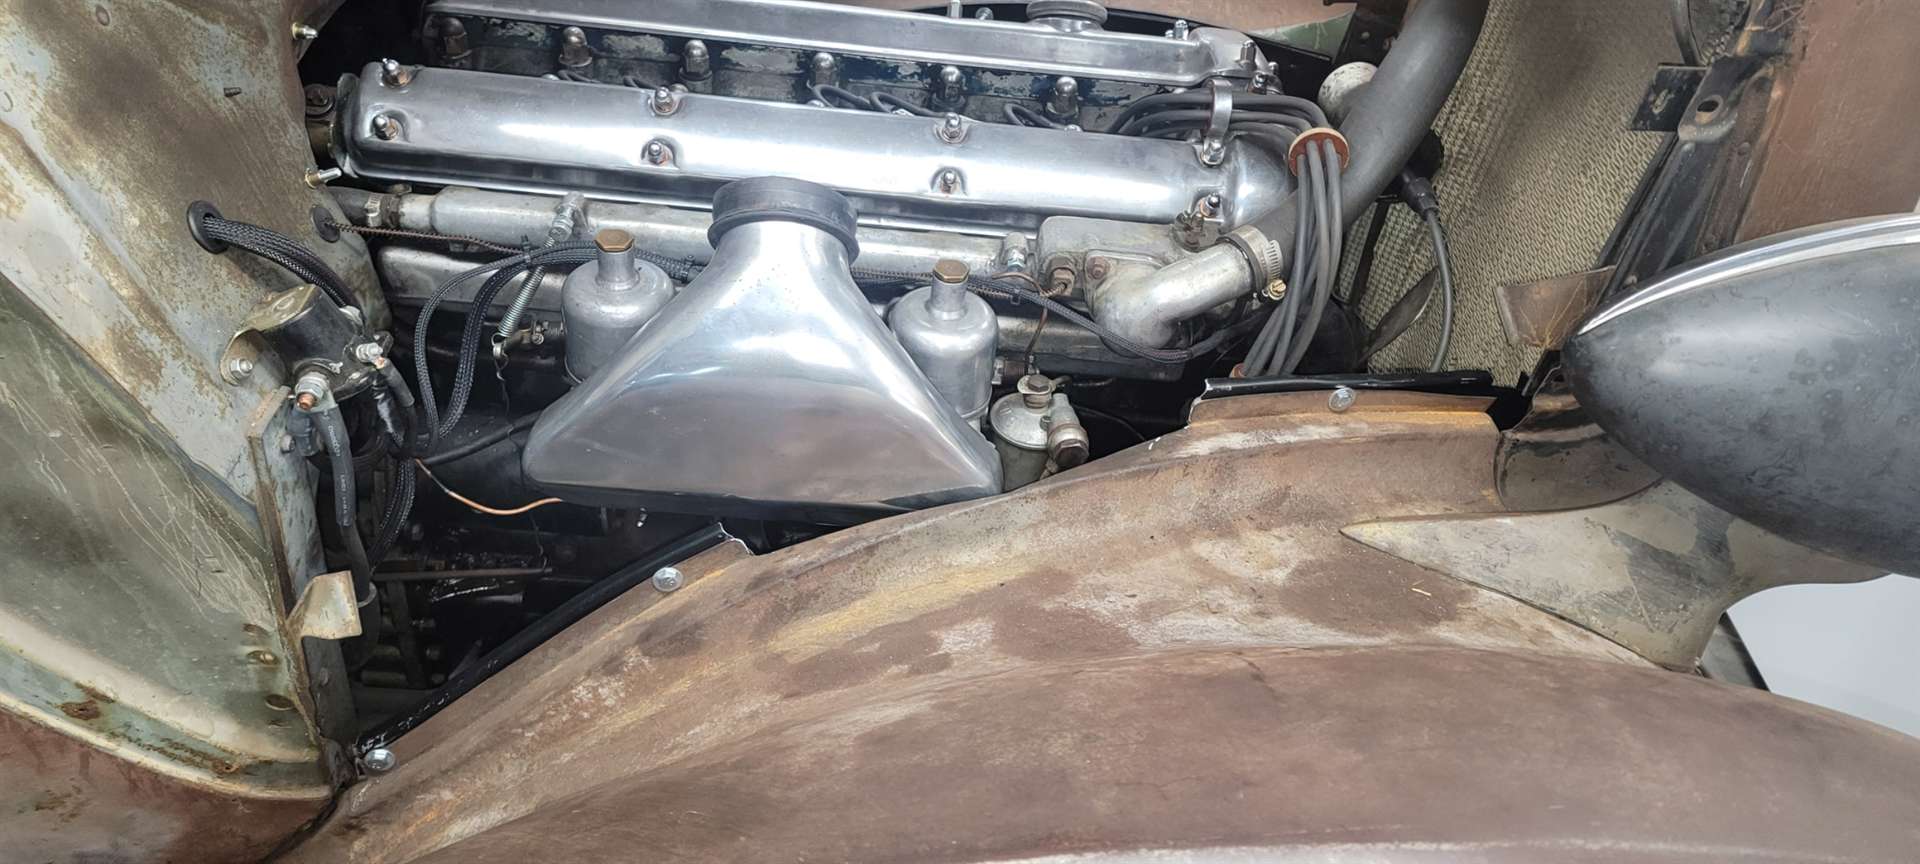
Posted on: 2023/4/23 16:37
|
|||
|
-BigKev
1954 Packard Clipper Deluxe Touring Sedan -> Registry | Project Blog 1937 Packard 115-C Convertible Coupe -> Registry | Project Blog |
||||
|
||||


