|
Re: 48 49 50 Instrument Switch Panel bulbs
|
||||
|---|---|---|---|---|
|
Forum Ambassador
|
The one connected to headlight switch goes in a little jewel or hole above the headlight switch. It is supposed to illuminate when switch is on to give the operator an indication.
Posted on: 2011/9/17 22:32
|
|||
|
Howard
|
||||
|
||||
|
Re: 48 49 50 Instrument Switch Panel bulbs
|
||||
|---|---|---|---|---|
|
Home away from home
|
I just got finished yesterday installing that bulb above the headlight switch on my 1950 Series 23. It is nearly impossible to see or get to. The bulb socket plugs into a hole behind the dash and above the headlight switch. I reached it by removing the front seat bottom, padding the hard edges with pillows and blankets, laying on my back, and using a light to see the area. I was installing a new bulb in a new socket that came on my new wiring harness. If you stick a finger above the headlight switch from behind the dash you can feel the hole where the socket plugs in. The bulb is a small diameter one, not the same size as those for the instrument lights. Since this is part of a total rewiring job I also had the heater controls removed, along with the radio. With those in place a hard job would be even harder.
If your car is fully assembled now you need to find the bulb socket and pull it out of its mounting hole to get access to the bulb. I love my Packard but working under the dash is damn hard for an old guy.
Posted on: 2011/9/18 21:53
|
|||
|
Fred Puhn

|
||||
|
||||
|
Re: 48 49 50 Instrument Switch Panel bulbs
|
||||
|---|---|---|---|---|
|
Home away from home

|
Yes, working under the dash is hard even for a younger guy!
Mine is removed at present for refurbishing the wood grain. So hopefully it will be easier to install all the bulbs etc. These bulbs are rather dim? I mean you cant see them in the daytime?
Posted on: 2011/9/20 1:29
|
|||
|
||||
|
Re: 48 49 50 Instrument Switch Panel bulbs
|
||||
|---|---|---|---|---|
|
Home away from home
|
Yes the dim bulbs are part of the fun in owning a Packard. I will be on the lookout for one of the modern brighter bulbs that is small enough to fit inside the space. Also I have hopes that cleaning all the wiring connections will result in a brighter light.
Posted on: 2011/9/20 9:32
|
|||
|
Fred Puhn

|
||||
|
||||
|
Re: 48 49 50 Instrument Switch Panel bulbs
|
||||
|---|---|---|---|---|
|
Forum Ambassador

|
I guess you guys know that it's not the brighteness per se of the bulbs that's the problem, it's the deterioration of the radioactive paint on the numerals and pointers. The instruments are not designed to be brightly lit, rather the numerals and pointers "glow".
Posted on: 2011/9/20 9:41
|
|||
|
||||
|
Re: 48 49 50 Instrument Switch Panel bulbs
|
||||
|---|---|---|---|---|
|
Forum Ambassador
|
When lit at night, weren't the new clusters a barely visible or faint purple because of the UV filters and had bright glowing green numerals and pointers.
Posted on: 2011/9/20 10:05
|
|||
|
Howard
|
||||
|
||||
|
Re: 48 49 50 Instrument Switch Panel bulbs
|
||||
|---|---|---|---|---|
|
Forum Ambassador

|
Correct.
Randy Berger has had some experience with restoring the pointers and numerals to their original function - perhaps he'll chime in on this.
Posted on: 2011/9/20 10:13
|
|||
|
||||
|
Re: 48 49 50 Instrument Switch Panel bulbs
|
||||
|---|---|---|---|---|
|
Home away from home
|
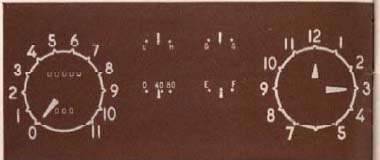
The Flite-Glo instrument panel is supposed to look like the attached. I haven't had a chance to check out the '49 yet, but with the '50, the numerals/gauge faces glow nicely but the pointers are dead.
Attach file:  (7.55 KB) (7.55 KB)
Posted on: 2011/9/20 10:28
|
|||
|
||||
|
Re: 48 49 50 Instrument Switch Panel bulbs
|
||||
|---|---|---|---|---|
|
Home away from home
|
I touched up my clock and pointers when i had the dash out. I used the europium paint from united nuclear if i recall correctly.
Others above are right, it's not that the bulbs are dim, it's that the paint isn't glowing as well. You should not see regular radiant light on the dash, the little UV filters should take care of that. Use whatever 6v bulb you find that fits in the socket (make sure it's around 6v and not around 13v. Might be like 7.5 or 5v on the package) The paint was kind of thick, like a paste, but i'm guessing if you warmed it up by putting the bottle in a cup of hot water and then mixing it well, you might get a thinner consistency. Clean the needle arms well, sanding lightly if need be, to get the loose flakes off, then paint. The new paint works so well that if i'm outside with the car and pull in the garage the gauges glow brightly, without the dash lights on at all!
Posted on: 2011/9/20 11:33
|
|||
|
||||


