|
Re: Howard's 47 Custom project
|
||||
|---|---|---|---|---|
|
Home away from home

|
Yes it costs, Howard, but it looks great and you won't have to do it again. Plus you'll be cooler than a cucumber.
Joe
Posted on: 2015/5/19 17:00
|
|||
|
||||
|
Re: Howard's 47 Custom project
|
||||
|---|---|---|---|---|
|
Home away from home
|
Howard, that is one COOL car in more ways than one!
Wes
Posted on: 2015/5/20 8:28
|
|||
|
||||
|
Re: Howard's 47 Custom project
|
||||
|---|---|---|---|---|
|
Forum Ambassador
|
Been doing some assembly so the car can leave where it has been parked for almost 20 years with a little dignity. Its next adventure is tentatively scheduled sometime next month at the upholstery shop. My guy will do seats by themselves but insists on the car being present when he does door panels and headliners. Says he does not do house calls either.
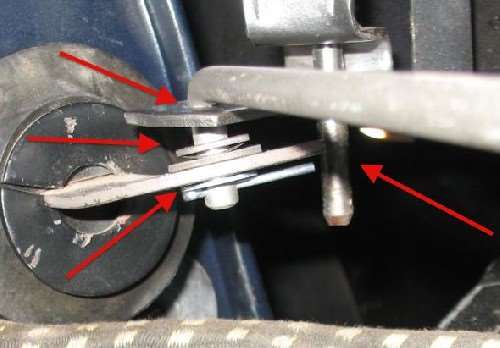
 In putting the hood mechanism back together was wondering about some details in the hood release mechanisms. The parts book is not very enlightening with just a mention of washers, wave washers, and cotter keys at the operating rod connection. Could someone examine or post a photo of their 46-50 mechanisms and tell me what is supposed to be where. Here is mine and I wouldn't be surprised if there are some washers or other pieces missing after all these years. With the long rod end sticking down connecting the two parts it seems like there is too much slop and ought to be more items to take up some of the space between the two pieces. Also below the lower bracket of the locking clamp pivot pin end. The large spring in the center of the clamp keeps the clamp pulled down yet lets it move upward when the hood tilts from the opposite side so there can't be anything to prevent that. Is there anything other than a washer and cotter key at the bottom to keep the pin in the bracket?
Posted on: 2015/7/25 10:43
|
|||
|
Howard
|
||||
|
||||
|
Re: Howard's 47 Custom project
|
||||
|---|---|---|---|---|
|
Home away from home
|
Howard,
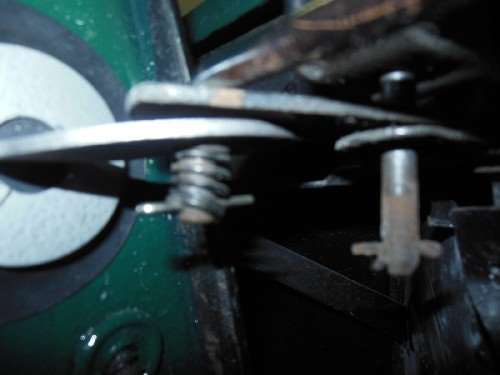
Mine has a spring at the very bottom and nothing between the arms. The long pin just has a cotter pin at the bottom. Not sure if this correct, but it works. Mark
Posted on: 2015/7/26 1:15
|
|||
|
||||
|
Re: Howard's 47 Custom project
|
||||
|---|---|---|---|---|
|
Home away from home

|
Mark, the spring looks as if it makes sense as countermeasure against rattles at least.
Posted on: 2015/7/26 4:20
|
|||
|
The story of ZIS-110, ZIS-115, ZIL-111 & Chaika GAZ-13 on www.guscha.de
|
||||
|
||||
|
Re: Howard's 47 Custom project
|
||||
|---|---|---|---|---|
|
Home away from home

|
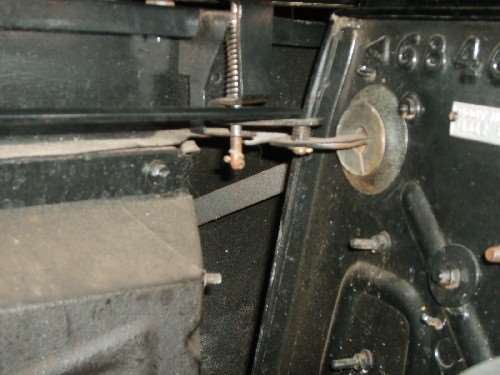
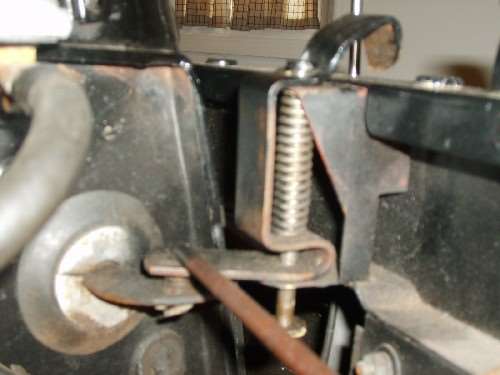
Howard and Mark, I believe your photos of the hood latch assembly show it incorrectly installed. I've attached photos of the right and left sides as assembled near the firewall. Hope this helps.
Posted on: 2015/7/26 8:11
|
|||
|
||||
|
Re: Howard's 47 Custom project
|
||||
|---|---|---|---|---|
|
Forum Ambassador
|
Thanks much for the photos. The short compression springs apparently have been lost so it makes sense why the rod is loose and looked incorrect. The washer and wave washer I do have probably goes on the far clamp connection.
Posted on: 2015/7/26 8:32
|
|||
|
Howard
|
||||
|
||||
|
Re: Howard's 47 Custom project
|
||||
|---|---|---|---|---|
|
Forum Ambassador
|
Other projects are still in progress. AC mechanical and electrical is for the most part done. Reworked the relay module I mentioned earlier so I can keep the car 6v and hopefully not have to worry about maintaining a separate 12v battery. If I could have found some 6v solenoid valves for the vent and temp controls, would have kept it all 6v. To make it work now, have an additional 6v battery and the module located in a box next to the unit in the trunk. That one is normally in parallel with the main battery so it is kept charged. When the AC is turned on the second battery transfers to a series arrangement and feeds the AC unit directly. Probably went overkill on a couple of things but had nothing better to do. I tried to anticipate any contingencies such as the main battery accidentally hooked up in a reverse polarity connection or having the smaller battery in the circuit when starting with too small of wires to carry any starting current. Hopefully I took care of those possibilities but time will tell.
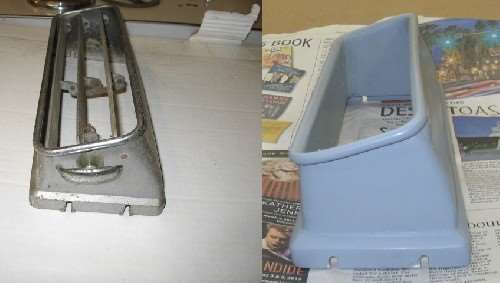
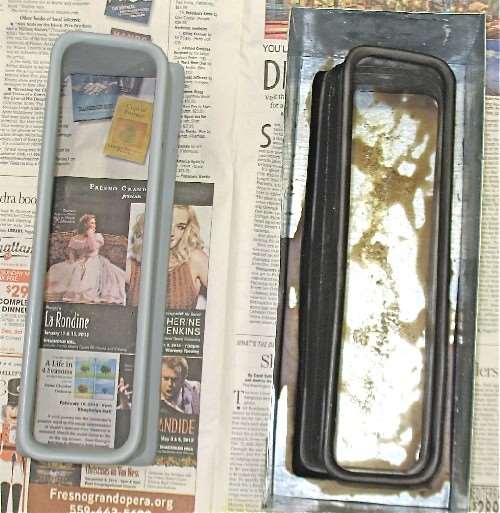
Have also worked on my version of the knobs and the prewar vent. Knobs are also for the most part done and turned out OK. Made a new enlarged pattern to account for the zinc shrinkage so the second set fit better than the first set. I did learn a couple of things by the time the last one of those was done so may redo the bunch again but they are usable as is. That is one nice thing about working in something that can be remelted. PackardV8 was correct in that the zinc polished up quite nicely. Don't think I will need to have them chromed because with just the polishing they seem to match the old originals very well. Not sure how to keep them that way though. Maybe clear lacquer. The current project is my version of the prewar vent. With the photo O_D took and some others plus dimensions Joe was kind enough to supply I made a slightly oversized version out of wood of what I thought it looked like. Not being very artistic it is kind of hard for me to judge just by photos. Here are the photos of what I came up with and a wax casting in the container almost ready to have the investment material poured. To my thinking, while not a perfect match to the original it will be satisfactory for my use. I also wanted mine a bit taller than the original so the opening would be above the high seat back a bit more. The photos are not quite at the same angle so hopefully mine is not as much taller as the photos would indicate. Made a silicone mold out of the pattern to cast some duplicates in wax. Next is to do the zinc so I can see how much shrinkage and if I guessed close enough on the oversize. Trying to figure out now just how to pour that much zinc with my crude and small facilities without burning me or the house. Also thinking I first need to have a filler in the center to make a cavity to keep investment material use down. That should also make the thickness of the investment more even so it will heat equally on both sides of the wax so that will burn out more evenly. After I get an as cast size will work on the louvers.
Posted on: 2015/7/26 11:58
|
|||
|
Howard
|
||||
|
||||
|
Re: Howard's 47 Custom project
|
||||
|---|---|---|---|---|
|
Forum Ambassador
|
Still continuing (stubbornly plodding along) intermittently with making the prewar AC vent.
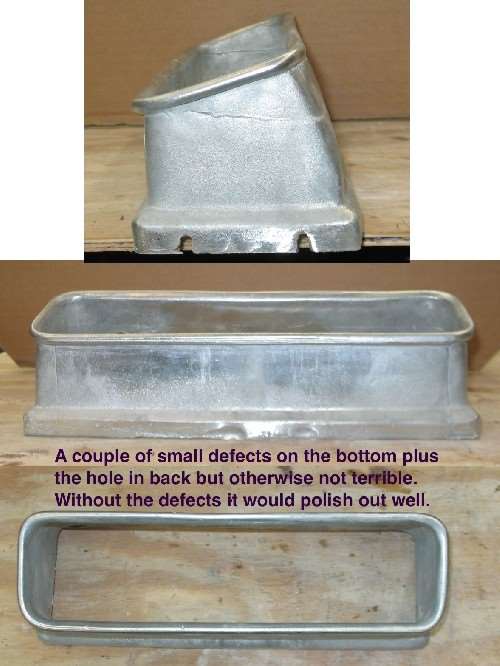
Cast my first zinc attempt a couple of weeks ago and shall we say there was quite a bit to be desired on that one. After rethinking the mold, remelted the first and made the second attempt today. It turned out almost presentable. Not quite car quality yet but certainly good enough to start figuring out the louver size and spacing so the mounting holes can be located in the casting with the next attempt. In a pinch JB Weld and paint would make this one usable.
Posted on: 2015/8/13 16:30
|
|||
|
Howard
|
||||
|
||||


 (26.54 KB)