|
Re: Howard's 47 Custom project
|
||||
|---|---|---|---|---|
|
Forum Ambassador
|
Things on the chassis are in a holding pattern while parts arrive. The brake overhaul kit arrived but tubing was a custom make so will take another 2-3 weeks. Some of the rubber and mechanical stuff is also a week or two out. No sense installing anything that will be in the way of the tubing.
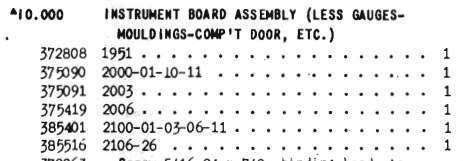
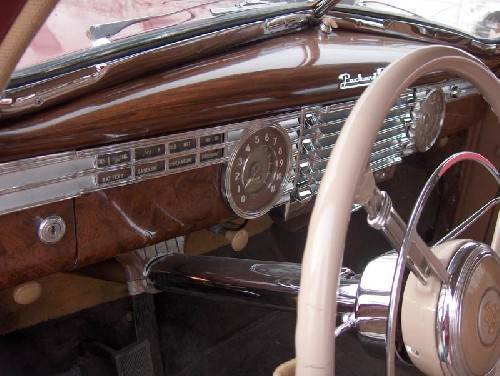
Going to start working on getting some of the interior items in order. To that end will have to think about what to do with the instrument panel. It, along with many of the other pieces, were "touched up" over the years so I can't get a good handle on what should be there. Will send an email to grain-it and see if they have any ideas on which plates are needed but I must say those that just painted their dashes a nice simple single color might have had a good idea. In checking the parts manual I see there are two main panel assys listed for the 2106 but only one glove box door or instrument panel end. Anyone care to comment on what would be different to require two main dash assys. A few photos show what would appear to be various treatments between Customs and other models but I can't see a reason for two 47 Custom dashes. This photo I borrowed is looking like a possibility for the Custom 2106 but the burl pattern looks large. I think what is now visible on mine that was protected by the chrome is smaller. Are we in agreement?
Posted on: 2013/5/8 16:59
|
|||
|
Howard
|
||||
|
||||
|
Re: Howard's 47 Custom project
|
||||
|---|---|---|---|---|
|
Home away from home
|
Perhaps one of them is the export version. Just a guess. Your instrument board looks like mine with the two types of wood graining. Most attractive.
(o{}o)
Posted on: 2013/5/8 19:20
|
|||
|
We move toward
And make happen What occupies our mind... (W. Scherer) |
||||
|
||||
|
Re: Howard's 47 Custom project
|
||||
|---|---|---|---|---|
|
Home away from home
|
Just a suggestion for you regarding body mounting rubbers. I was mortified by the cost of new ones for my '51 so found an alternative. Rubber 'boat rollers' (- as used on boat trailers) were the same diameter as my old hard-as-a-rock mounts, and of a very tough genuine rubber composition.
Not sure if your '47 uses similar round mounting rubbers but if it does then maybe a similar alternative is worth considering? I cut rounds carefully with a 'greased hacksaw'(to be same as original thickness). It's high quality rubber and has to withstand sun, sea and the weight of a small boat rolling over it. You can cut about five or more rubbers from one roller, and a roller is minimal bucks. It might be worthwhile squirting a bit of grease into your front suspension/ upper inners etc and seeing if it actually needs a full replacement kit or not. I bought the full Kanter front end kit then discovered my suspension was in very good condition, so quite a waste of around $500! Now have an almost complete set of spares. Plating of bolts - many ways and suggestions look good. As well, there is a 'blackening kit' available here in Oz which works well for those out-of-sight black bolts. Soak bolts etc for 5-10minutes then in the special oil provided. Does a good job! They are like the black oxided shop-bought originals and won't rust or easily mark when the spanner is applied. Caswell might sell a similar kit? Love the '47's Howard, it will be a beautiful car!
Posted on: 2013/5/8 19:34
|
|||
|
1951 Packard Club Sedan | [url=ht
|
||||
|
||||
|
Re: Howard's 47 Custom project
|
||||
|---|---|---|---|---|
|
Forum Ambassador
|
Maybe it's export but there is a different number for those R hand and special vehicle cars. The Custom doesn't show as being one of the vehicles exported.
As for the dash, I can only hope one day mine looks as good as the middle photo. I'm afraid with my lack of artistic talent it will stay more as the third photo shows it now. Thankfully my body mounts are different. Just a square piece of rubber/fabric belt like material. Don't think I will have to bother with them. Decided not to get the front end kit either. Just ordered the stabilizer bushings and spring bounce rubber. The steering idler might need work as it has some up/down play. Not sure how much should be there but can just order a kit for that.
Posted on: 2013/5/8 19:37
|
|||
|
Howard
|
||||
|
||||
|
Re: Howard's 47 Custom project
|
||||
|---|---|---|---|---|
|
Forum Ambassador
|
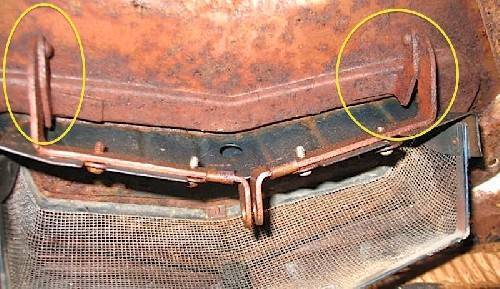
Aggravating issue has come up. The cowl vent hinges are rusted solid. In spite of days of PB Blaster and trans fluid and acetone treatment the vent refuses to budge. Even removed the wiper assy to have better access but there is really no place to grab onto and hold. As you see, the small hinge attachment to the body sheetmetal is less than robust so I don't want to get too violent. Before I do something stupid, any ideas would be appreciated.
Posted on: 2013/5/10 9:28
|
|||
|
Howard
|
||||
|
||||
|
Re: Howard's 47 Custom project
|
||||
|---|---|---|---|---|
|
Webmaster
|
Heat it with a torch and maybe it well help to break loose.
Posted on: 2013/5/10 9:45
|
|||
|
-BigKev
1954 Packard Clipper Deluxe Touring Sedan -> Registry | Project Blog 1937 Packard 115-C Convertible Coupe -> Registry | Project Blog |
||||
|
||||
|
Re: Howard's 47 Custom project
|
||||
|---|---|---|---|---|
|
Forum Ambassador

|
Perhaps a bit of heat followed by more PB Blaster or maybe the mixture of 50/50 acetone and ATF which I have read is the best penetrating oil. Probably a good dose of patience also.
Posted on: 2013/5/10 10:00
|
|||
|
______________________________________________
Dave |
||||
|
||||
|
Re: Howard's 47 Custom project
|
||||
|---|---|---|---|---|
|
Forum Ambassador

|
Howard, I've had a similar problems in the past, most recently with a frozen throttle shaft on a carburetor. Might I suggest a trick that's worked well for me; that in addition to your favorite rust-buster snake oil, you somehow attach a light spring to keep the item under slight but constant tension in the direction of opening while allowing it to soak.
Posted on: 2013/5/10 10:24
|
|||
|
||||
|
Re: Howard's 47 Custom project
|
||||
|---|---|---|---|---|
|
Home away from home
|
Howard,
Here is the cycle I have used successfully in the past: 1) Heat with a torch 2) Cool with penetrant 3) Heat with a torch 4) Cool very quickly with ice-water 5) Heat with a torch 6) Cool with penetrant, really soaking the part 7) Leave overnight 8) GOTO 1) Yes, GOTO loops are evil, but sometimes necessary.... The ice water treatment provides a shock to the joint. It is more violent at the molecular level than any hammer. If you want more violence, use a dry ice/ETOH mix. Cheers, Tom
Posted on: 2013/5/10 12:52
|
|||
|
||||

 (19.65 KB)