|
Re: Mal's '41 120 Coupe
|
||||
|---|---|---|---|---|
|
Forum Ambassador

|
Thursday 21st August 2008
Spent only a couple of hours at the workshop this morning and, as Wade wasn't in, I was left to my own devices. Spent most of the time making a pair of brackets to mount the front turn indicators. As the bumper isn't back on the '41 yet, mocked it up on the bench using the re-chromed bumper, the two outer over-riders as well as the bumper brackets. The method used was similar to that used for the rear brackets but because these bends were diagonally across the width of the aluminium so that the bracket clears the outer over-rider is a little more complex. Must have fluked the right front first as this turned out well, but will require some minor tweaking to level it out once the bumper's on the '41.The left front wasn't so accommodating because of the diagonal bending required and although it looked reasonable it is different to the right side. Tried switching around brackets to see if that helped but it didn't do so, and just before I left I thought I'd try and re-bend it, bad move! It now just looks like a bumpy piece of aluminium!  Such is life and there's always tomorrow, so with those thoughts in mind I will make another one tomorrow. Such is life and there's always tomorrow, so with those thoughts in mind I will make another one tomorrow. Eric, yesterday I forgot to take any pictures of Wade's 34 radiator and it's mounting to the chassis so made sure I did so today. There's also some pic's of Kevin's '35 radiator as it's out of the car. See linkhttp://picasaweb.google.com/ozstatman/WadesWorkshopAugust2008/photo#5236787489365667698 Attach file:  (26.99 KB) (26.99 KB)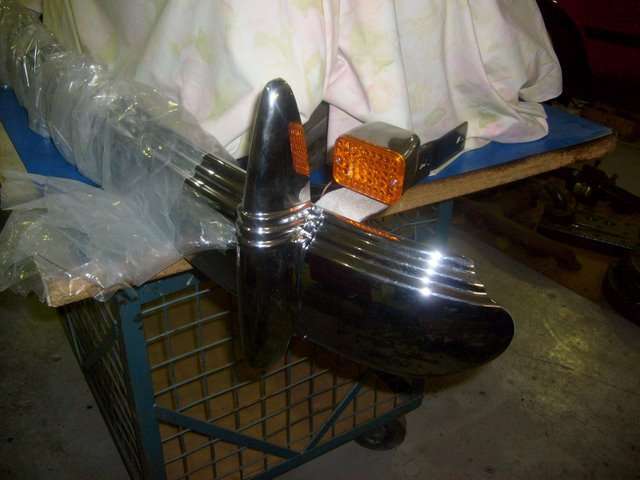 (26.35 KB) (26.35 KB)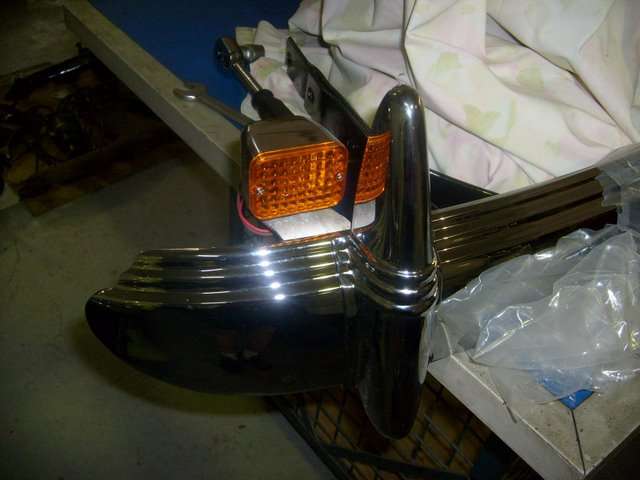 (24.52 KB) (24.52 KB)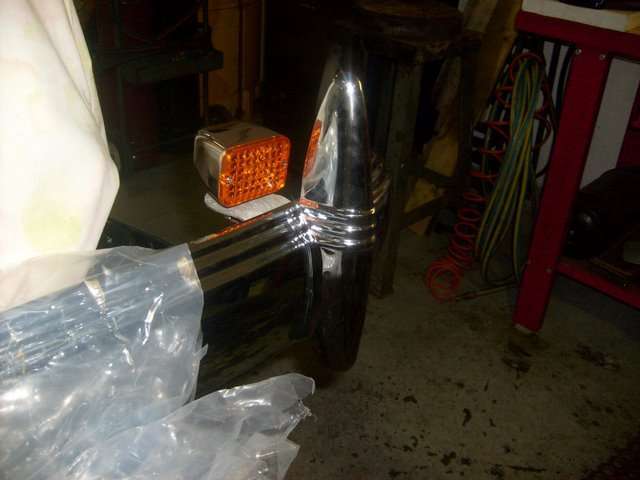 (22.75 KB) (22.75 KB)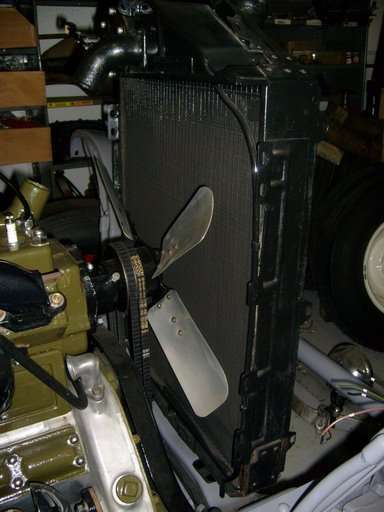
Posted on: 2008/8/20 22:19
|
|||
|
Mal
/o[]o\ ====  Bowral, Southern Highlands of NSW, Australia "Out of chaos comes order" - Nietzsche. 1938 Eight Touring Sedan - SOLD 1941 One-Twenty Club Coupe - SOLD 1948 Super Eight Limo, chassis RHD - SOLD 1950 Eight Touring Sedan - SOLD What's this?  Put your Packard in the Packard Vehicle Registry! Here's how! Any questions - PM or email me at ozstatman@gmail.com |
||||
|
||||
|
Re: Mal's '41 120 Coupe
|
||||
|---|---|---|---|---|
|
Forum Ambassador
|
Friday 22nd August 2008
Started at the workshop by re-tapping the threads for the lower front body to front fender mounting. And re-tapped those remaining threads along the lower edge of the side hood panels. While I was doing this Wade was getting ready to install the pistons, piston pins and rings into Kevin's '35 engine. By the time I had finished my task Wade was just about ready to start assembly of the new 0.030" over Egge pistons and pins and Grant rings. It's quiet a demanding job as the rods have to be installed before the crankshaft is installed because the big-ends of the con-rods are too large to slip down the cylinders. The rods, with the top half of the big-end bearing in place, were inserted on Wednesday before the crankshaft was yo-yoed in and out until the crank was in and turning freely. Today the pins were checked for fit on the little-end bushes, removed then fitted to the pistons which had been ringed on the bench. The ring compressor was then clamped to the piston but before the piston is pushed down the cylinder the crank has to be rotated because of clearance and alignment issues with the weights on the crankshaft. There has to be enough clearance at the sides of the big-ends to pass by the weights. By the way, all through these processes the oil can got a bloody good workout with oil liberally applied to all working surfaces during assembly. Assembly started at #8 and, on a cylinder by cylinder basis, worked forward. Started slowly and by the time we got to #5 I was just about to say to Wade, after watching him installing rings on 3 pistons, that I'd like to try my hand at it. But as he was putting on the lower compression ring, and very carefully too, it just snapped! Wade didn't seem too concerned and the reason for this became apparent later. So he continued on and another couple of pistons later I put my hand up to have a go. It was so nerve wracking after the mishap the Wade had had that, after I put only the oil/scraper rings on the one piston, I chickened out and left the rest to Wade. Carried on until only #1 remained and at this point Wade went looking for some spare rings, which explained his earlier apparent nonchalance. But, the only rings to be found were oil/scraper rings. To continue engine assembly the flywheel was re-installed, tightened up and the castellated nuts pinned. At this point of time John wandered over and when told of the ring mishap, picked up the box the rings came in, rang the Sydney supplier of Grant rings but without luck as they didn't have that part number in stock. He then did a google search which turned up some info but not what was required. Then a measuring session of the piston, ring grooves and John was back on to the Grant ring supplier for a ring to fit. Had to leave the workshop then, as the guys were packing up to go out to lunch, and if the avenue of the local Grant supplier falls through Wade will then order a new set tonight from the US. Attach file: (33.03 KB)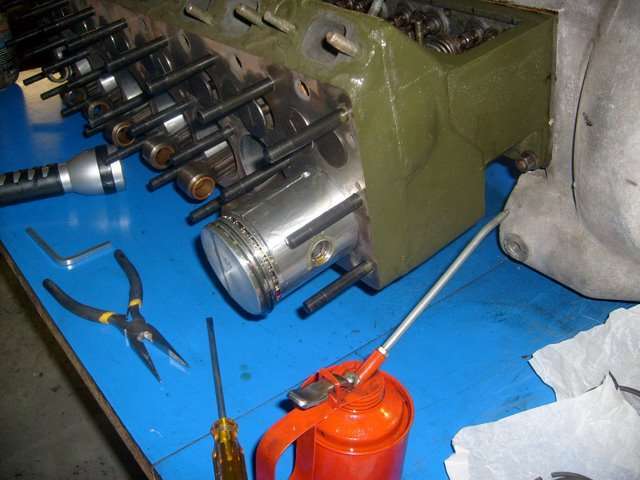 (32.90 KB) (32.90 KB) (38.10 KB) (38.10 KB)
Posted on: 2008/8/22 0:44
|
|||
|
Mal
/o[]o\ ==== Bowral, Southern Highlands of NSW, Australia "Out of chaos comes order" - Nietzsche. 1938 Eight Touring Sedan - SOLD 1941 One-Twenty Club Coupe - SOLD 1948 Super Eight Limo, chassis RHD - SOLD 1950 Eight Touring Sedan - SOLD What's this? Put your Packard in the Packard Vehicle Registry! Here's how! Any questions - PM or email me at ozstatman@gmail.com |
||||
|
||||
|
Re: Mal's '41 120 Coupe
|
||||
|---|---|---|---|---|
|
Forum Ambassador
|
Tuesday 26th August 2008
Back to the workshop this morning after Sundays 1800 car extravaganza at Eastern Creek and grand-daughter baby sitting duties yesterday. However, on Sunday at Eastern Creek, Wade had spotted some taillight sockets at a vendors stand so I was sooled onto them. Reason being one of the bulb seating springs had snapped when it was taken out of the '41 and the other didn't look real healthy either. So located the vendors garage, they were using the garages in pit lane for vendors, trade displays and specialist displays, and found the taillight sockets. Now this was in a big garage and there were rows of boxes some on tables some on the floor and all similar types of parts mostly relating to automotive electrics. Took 1 of the 4 sockets I found to a guy selling stuff in one corner, but they weren't his parts, so he directed me to a guy down the other end. Turned out they weren't his parts either, but before he discovered that said he'd sell them for 50 cents each, and then re-directed me back to the first guy who by now was selling a complete set of 1/43 scale NBA logo'd model cars to my younger son, aaaah the folly of youth! I was then re-directed to still another guy on the other side of the garage and this time found the right vendor, only trouble was he wanted $2 each, but needing them bought all four. We'll now probably replace the springs in the front fender lights as well. And, at home on Sunday night, Harvey rang to say he'd put a coat of clear on the dash and would put 3 or 4 more coats of clear on, on Wednesday. So given a week after that to set and harden should be ready on Wednesday 3rd September. Looks like I'll have the dash back just before I go to the Gold Coast on Thursday 4th September for my brother's 60th birthday celebration. I return from the Gold Coast on the 7th but as Wade and Gina are departing for Canada and the US on the 15th not much is likely to be done until they return after their 6 weeks away. Wade is going to Hershey, Gina is not, with some other Aussie Packard guys so if you're there keep an ear out for Aussie accents! And a note about my Gold Coast trip. I'm driving and planning to visit Packard Club members on the way up and back otherwise I may never get to meet them. I'm also going to be taking plenty of pic's of their Packards, one guy has about 20 and most of these are 20's era, oldest is a '19, and will post a story of the trip and pic's in the General Forum on my return. But back to the workshop, didn't I say this earlier? While Wade went out in his Super 8 and bought a modern seal to replace the original front crankshaft seal for Kevin's '35 engine rebuild I cleaned, prepped and POR-15'd the area where Kablan had cut out the rust from the lower front body. Wade and I also went round the corner and Sam machined the crankshaft seal ring down to 46.8mm to fit the modern seal now being used because the ring was heavily pitted and worn. Then watched, asked questions and helped where I could with re-installation of the timing chain and timing cover, the harmonic balancer and crankshaft pulley. BTW, on Friday afternoon John had found a set of the right Grant rings and ordered these to be delivered on Monday. And on Monday Wade had installed the clutch and pressure plates, oil pump, the main bearing oil piping and 34 split-pins to the main and big-end bearings which were torqued down to spec. However on Monday the rings weren't delivered and were promised for Tuesday morning, and still nothing, and finally were delivered 3:00pm. #1 piston and rod were then installed by 3:30pm at which time I took my leave. Wade will torque down the big-end and split-pin it and install the sump today I'd imagine. Didn't return straight home but went and picked up the '41 temp sender and gauges which now has a new sending bulb and head fitting courtesy of Ron of Mobile Instrument Service. Oh, and for those with young children or grand-children on my travels this afternoon I saw "The Wiggles" "Big Red Car" in a repair shop near Blacktown. For those who don't know about "The Wiggles" here's a link to their website.http://www.thewiggles.com.au/au/home/ Attach file: (36.88 KB)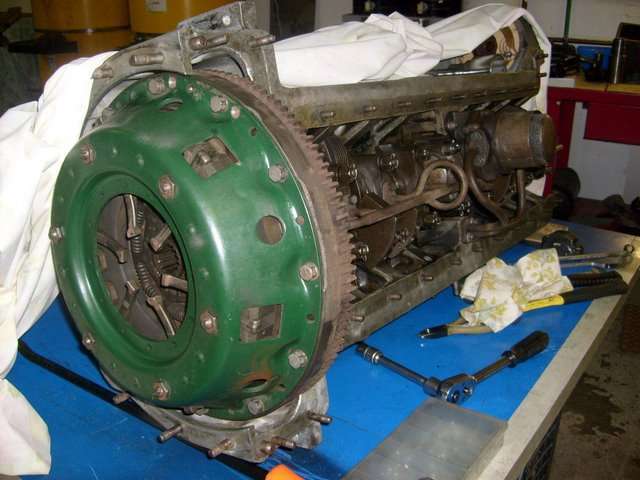 (32.42 KB) (32.42 KB)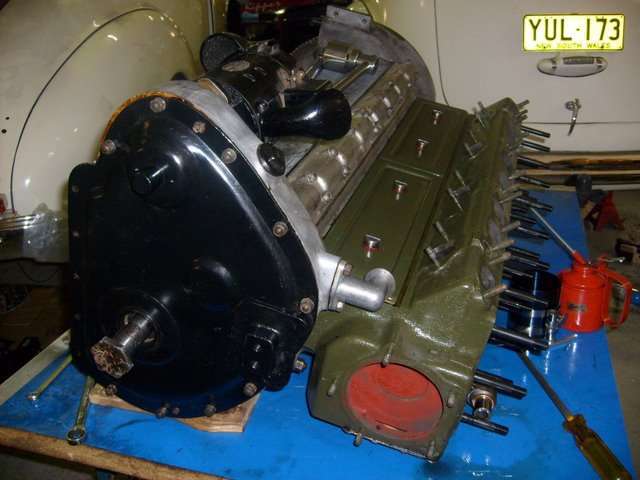 (11.05 KB) (11.05 KB) (30.09 KB) (30.09 KB)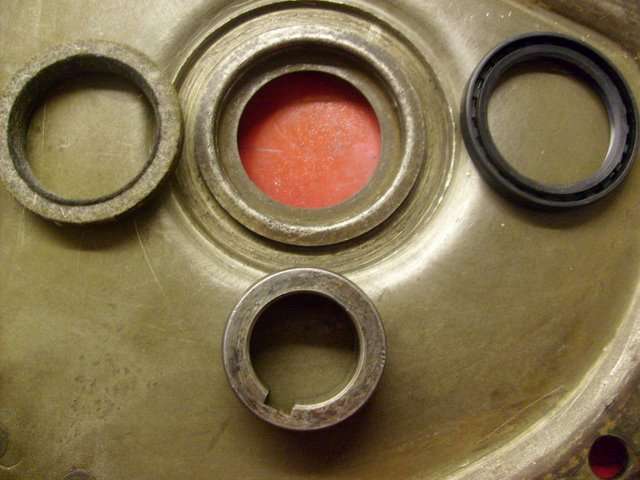 (18.76 KB) (18.76 KB)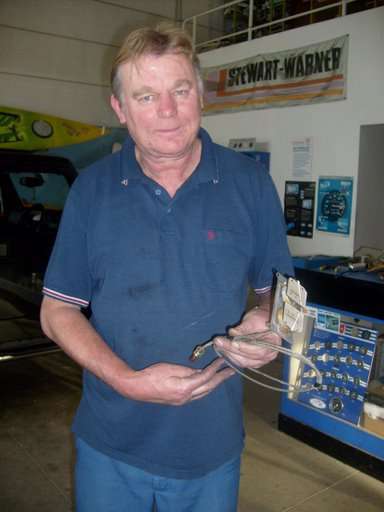 (17.63 KB) (17.63 KB)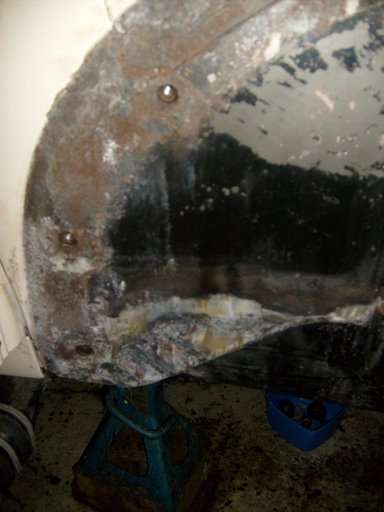 (15.38 KB) (15.38 KB)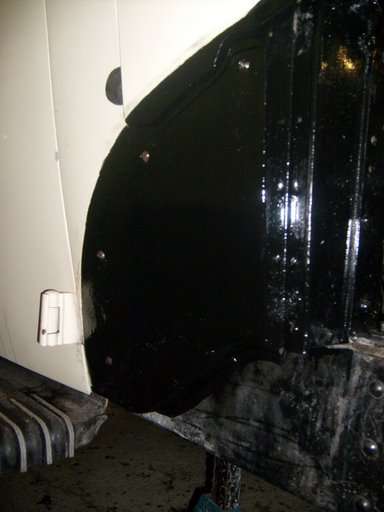 (28.56 KB) (28.56 KB)
Posted on: 2008/8/26 5:22
|
|||
|
Mal
/o[]o\ ==== Bowral, Southern Highlands of NSW, Australia "Out of chaos comes order" - Nietzsche. 1938 Eight Touring Sedan - SOLD 1941 One-Twenty Club Coupe - SOLD 1948 Super Eight Limo, chassis RHD - SOLD 1950 Eight Touring Sedan - SOLD What's this? Put your Packard in the Packard Vehicle Registry! Here's how! Any questions - PM or email me at ozstatman@gmail.com |
||||
|
||||

|
Re: Mal's '41 120 Coupe
|
||||
|---|---|---|---|---|
|
Forum Ambassador
|
Wednesday 27th August 2008
Before leaving for the workshop rang Paul of Vintage Wiring Harness and left a message about the extra cable I'd ordered a couple of weeks ago. He rang back while I was at the workshop and will send the extra cable lengths today. he'd been waiting for more connectors to arrive to send them all together. And the pity was, as Wade told me yesterday,he was at Eastern Creek on Sunday, and if I known that could have arranged with him to have picked up the cable from him. Anyway, while Wade worked on the '35 engine, I busied myself installing the temp/oil gauge back in the instrument face and feeding the sending tube and bulb through the firewall and connecting it up to the rear of the '41's head. After that Wade suggested we look at the OD Governor and Solenoids, so while he carried on with his '35 stuff for a while I read the '41 manual and also an article written by a Packard club member from Western Australia many many years ago about his trials and tribulations in relation to getting his OD working properly. And of course it's all Greek to me, because when it comes to the electrical side of things I'm at a complete loss. By this time Wade was ready to start so out with his trusty multimeter, the Optima battery for power and the Solenoid and Governor. Couldn't raise anything out of the Solenoid when connecting it to power so a bit of mechanical persuasion ,pushing on the engagement rod loosened that up and, hey presto, it jigged back and forth like a hyperactive pogo stick. There was a lot of testing by connecting the multimeter to terminals 3, 4, 6 & 7 without much response on the mulimeter. So the cap was removed, and of course I had to clean up more POR-15 overpaint around the join of the cap to the body and the threaded studs which had no nuts on them that I'd painted over. Came apart easily once the paint seal was broken or removed. Then with Wade studying the manual, gaining insights from the old article, observation and testing he managed to coax it all back to life. One down, on to the Governor, with a similar initial non response to multimeter testing. Then testing by running the shaft in an electric drill bringing the revs up slowly, still nothing. So off with the bakelite cap, Wade weaving his magic and a good clean up and back onto the drill and it works! After this refilled the bakelite cap with silicone as the pic's will show. Also took the opportunity to attach the the OD wiring harness to the Solenoid as it's near impossible to do so once it's back in the '41. After all that attention to OD components for the '41 then turned to the '35 engine. Yesterday Wade hadn't installed the sump because the gasket pieces were curled up, so he placed them on the sump studs and left them overnight and brought them back to shape. So while I was temp gauging and reading up on OD's he was cementing the gasket pieces, block surface and sump surface and then installing the sump and it's attendant 27 nuts and washers. Wade determined that at this point, without the manifolds, carb, starter motor and other pieces, the engine would be re-installed in the '35. Fortunately there was enough room between the '41 and John's '39 to manouvere the engine crane with '35 engine attached from it's place of residence behind Wade's '37 120 and then Jon's '39 for the last 9 months at least since the '41's arrival. This was relatively easy and so was the initial positioning in the '35's engine bay but the next part was somewhat more difficult. Getting the engine to align both horizontally and vertically so it was centred for the clutch spigot shaft proved much more of a challenge. By this time both Rick and John had come over as they didn't want to miss such an auspicious occasion. More likely though, seeing the length of time the whole engine saga had taken, they probably were checking to make sure it really was happening! Anyway just as well they were on hand as their experience, not to mention muscle, came in handy. With a jack under the gearbox to lift it's front slightly, Rick pushing on the front of the engine and Wade and myself guiding from the sides it finally slipped into place when all was aligned. A couple of nuts to temporarily anchor the trans studs and Wade installed the front engine mount. This was no mean feat in itself as the designers obviously had no hands on experience themselves otherwise it would be a lot lot easier than it is. I put on all the nuts, washers and bolt to tie together the trans and engine while Wade installed the throttle linkage. The steering box had also been bolted back in before the engine was re-installed, it had been taken out so the wiring for the lights which passes down the centre of the column could be accessed. Quote:
And David, The cost of my the repair was AU$132, about US$112 at current exchange rates. I had been quoted AU$250 plus shipping costs by another repairer as they would have sent it away to Melbourne, 500 miles south for repair, so I'm pleased. And to answer your other query I rang Ron at Mobile Instrument Service and he said yes with a new bulb, beryllium/copper tube and armoured wire to a length of about 6' at a cost of about AU$200, US$170 approx. Attach file: (17.27 KB)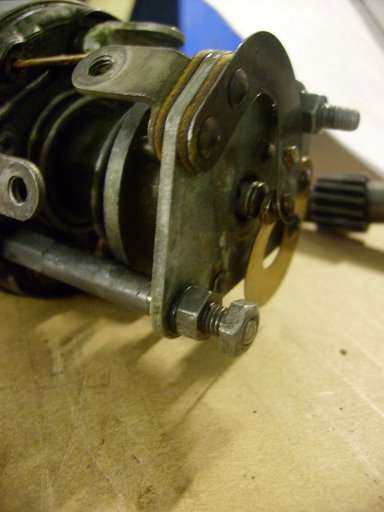 (17.73 KB) (17.73 KB)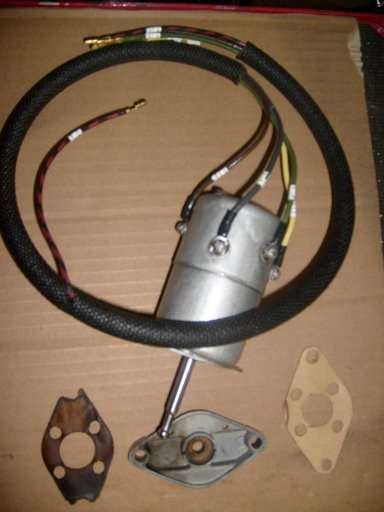 (24.77 KB) (24.77 KB)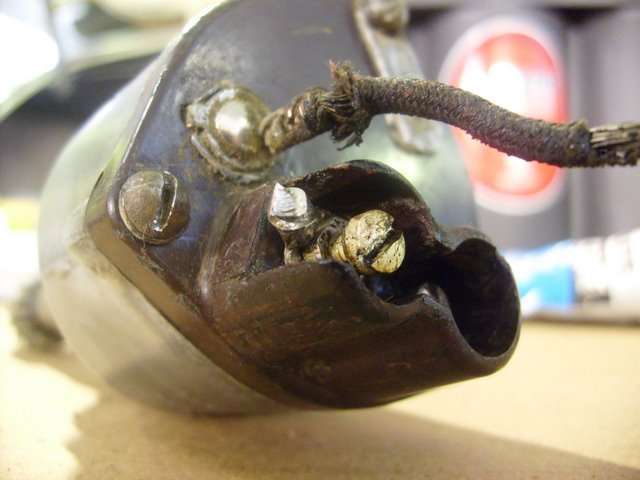 (20.70 KB) (20.70 KB) (25.65 KB) (25.65 KB) (40.77 KB) (40.77 KB)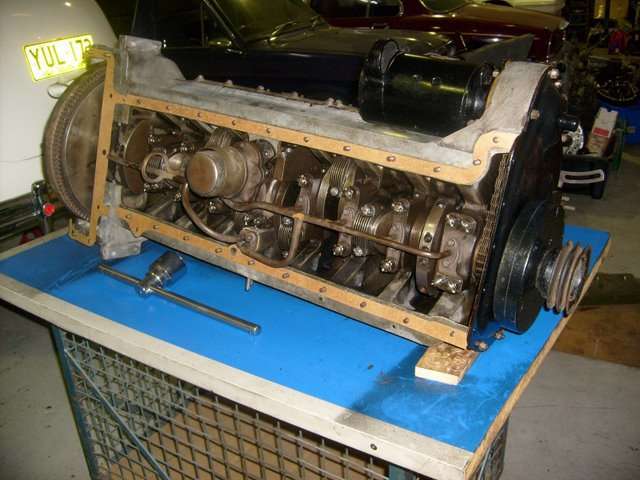 (31.93 KB) (31.93 KB) (33.92 KB) (33.92 KB)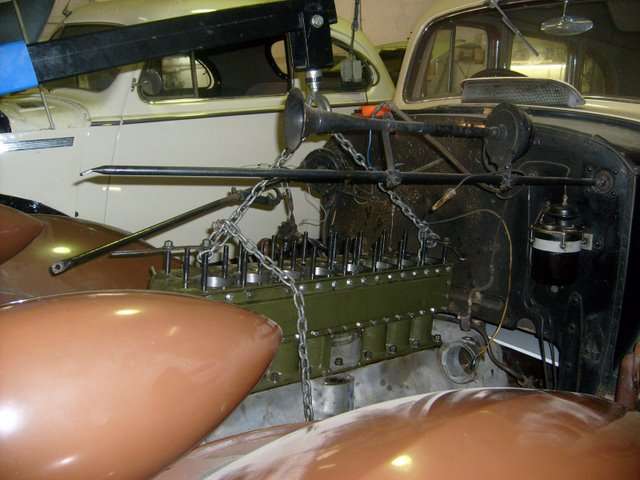 (36.56 KB) (36.56 KB)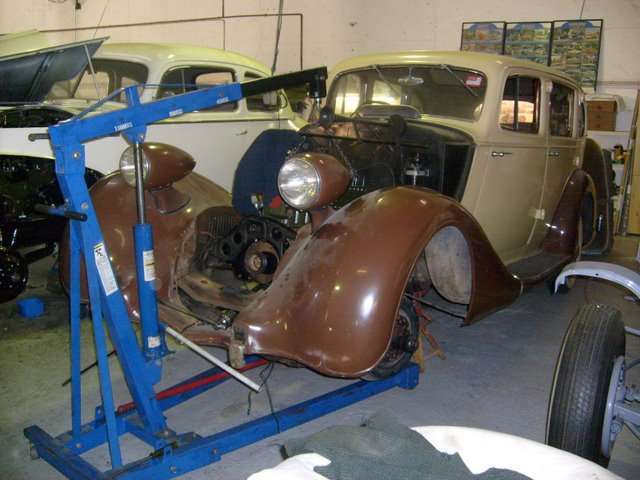 (35.35 KB) (35.35 KB)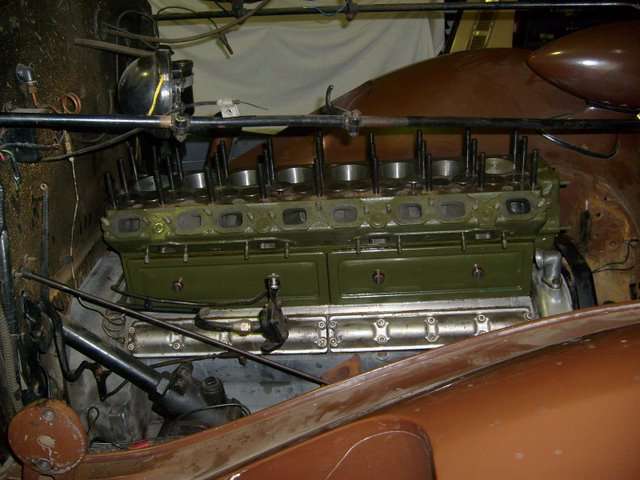
Posted on: 2008/8/27 3:40
|
|||
|
Mal
/o[]o\ ==== Bowral, Southern Highlands of NSW, Australia "Out of chaos comes order" - Nietzsche. 1938 Eight Touring Sedan - SOLD 1941 One-Twenty Club Coupe - SOLD 1948 Super Eight Limo, chassis RHD - SOLD 1950 Eight Touring Sedan - SOLD What's this? Put your Packard in the Packard Vehicle Registry! Here's how! Any questions - PM or email me at ozstatman@gmail.com |
||||
|
||||
|
Re: Mal's '41 120 Coupe
|
||||
|---|---|---|---|---|
|
Forum Ambassador
|
Thursday 28th August 2008
Quote:
Didn't get to the workshop today, but in the mail received the extra cable I ordered after speaking to Paul yesterday. Australia Post is doing something right! Attach file: (32.25 KB)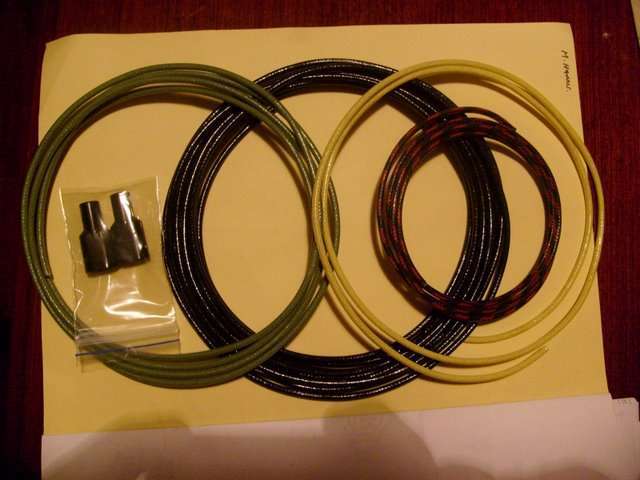
Posted on: 2008/8/28 3:32
|
|||
|
Mal
/o[]o\ ==== Bowral, Southern Highlands of NSW, Australia "Out of chaos comes order" - Nietzsche. 1938 Eight Touring Sedan - SOLD 1941 One-Twenty Club Coupe - SOLD 1948 Super Eight Limo, chassis RHD - SOLD 1950 Eight Touring Sedan - SOLD What's this? Put your Packard in the Packard Vehicle Registry! Here's how! Any questions - PM or email me at ozstatman@gmail.com |
||||
|
||||
|
Re: Mal's '41 120 Coupe
|
||||
|---|---|---|---|---|
|
Forum Ambassador
|
Wednesday 3rd September 2008
Not much happening on the Packard front since last week because my 85yo Mum went into hospital, a minor stroke together with a mild respiratory tract infection, but picked her up from hospital today and she's home now. But before the hospital went to the workshop to do some work on her hearing aids. Besides being deaf she's also got short term memory loss and putting down and loosing hearing aids doesn't help when you need to communicate with her. These hearing aids had had the batteries inserted upside down and were jammed in and no amount of shaking, levering or prying with sharp edged implements could get them out. At the workshop I ran past Wade what I intended to do, to use his powerful magnet to pull them out, but I didn't know whether the magnet would fritz the internals of the hearing aid and neither did Wade! First up just tested to see whether a mild magnet would attach to the battery using the telescopic nut/bolt/washer/screw type, and it did. Then onto the big magnet and the first battery came out straight away, so easy! Not so the other one because this one had gone under the knife amongst other sharp instruments and it must have formed a tiny lip preventing the magnet from pulling out the battery. On to Plan "B", drilling out the recalcitrant battery. Used Wades spring loaded centre punch to mark the battery. You just push the sharp tip against the surface you're marking and it "springs" against the surface as it's pushed into it, a nifty tool. Did this a dozen or so times then using about an 1/8" drill bit in the power drill at low revs pushed the indented battery into the turning bit. Shhhhh - don't tell the OH&S people about this or they'll go ballistic. Anyway, all I have to say is, it worked! While I was doing the hearing aids Wade was busy installing the radiator hoses on Kevin's '35 Sedan. Just about everything is back on the engine, which Wade has cranked over but not started yet. By the time I was finished Wade was filling the radiator with water so I started taking pic's of the engine from the right side, then of Wade filling the radiator, then around to the left side where a small spurt of water was flowing from the bottom to the water jacket cover about 1/4 to a 1/3rd of the way from the back of the engine. Pointed this out to Wade, who uttered a few magic words which I'm sure accompany all Packard re-build's, then got a pic of the fountain in operation. Had to leave Wade at this stage to get to the hospital to pick up my Mum. But Packard related activity for the day didn't stop there. Because, as my Dad and I were entering the hospital, June wife of Sam the owner of the '24 Sport Tourer, was walking out with a friend, small world. Oh, and because of this kerfuffle, the trip to the Gold Coast taking the opportunity to visit Packard owners there and back was cancelled. But I will be doing that some day soon and will report back with pic's when done. EDIT - Also had a call from Harvey on Tuesday, he'd put 3 coats of clear on the freshly wood-grained dash on Monday and it's looking good. Now has to wait a week then finish the surface and we'll be ready to rock. Attach file: (27.04 KB)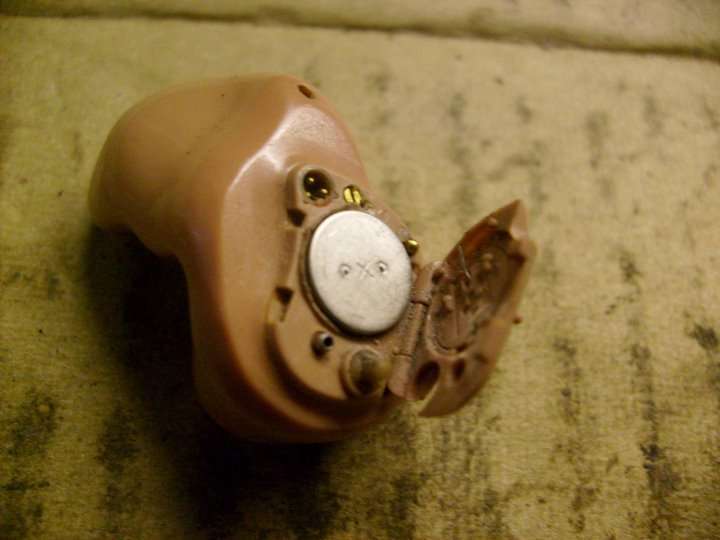 (21.52 KB) (21.52 KB) (25.08 KB) (25.08 KB)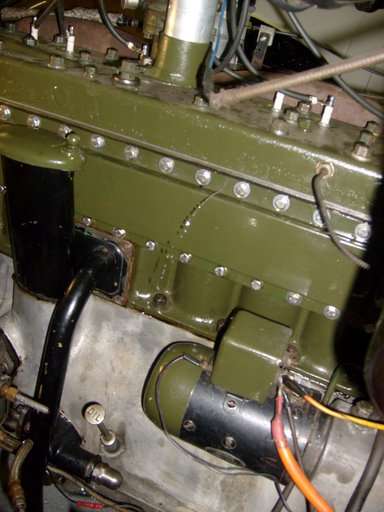 (34.54 KB) (34.54 KB)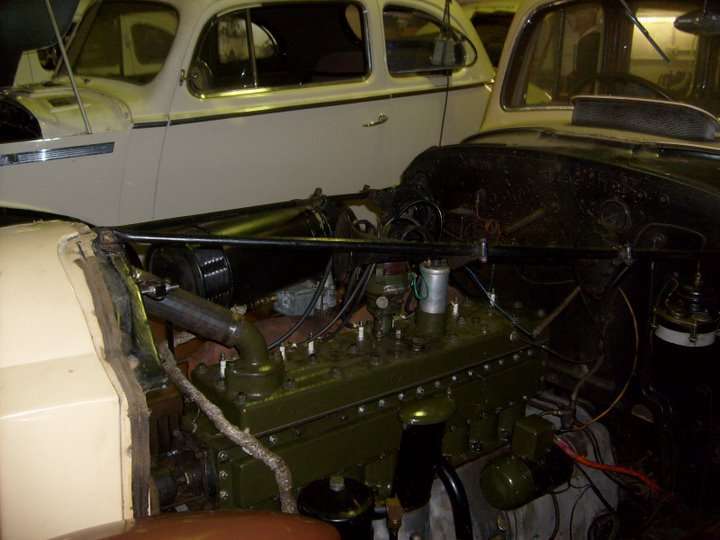 (54.84 KB) (54.84 KB)
Posted on: 2008/9/3 2:16
|
|||
|
Mal
/o[]o\ ==== Bowral, Southern Highlands of NSW, Australia "Out of chaos comes order" - Nietzsche. 1938 Eight Touring Sedan - SOLD 1941 One-Twenty Club Coupe - SOLD 1948 Super Eight Limo, chassis RHD - SOLD 1950 Eight Touring Sedan - SOLD What's this? Put your Packard in the Packard Vehicle Registry! Here's how! Any questions - PM or email me at ozstatman@gmail.com |
||||
|
||||
|
Re: Mal's '41 120 Coupe
|
||||
|---|---|---|---|---|
|
Forum Ambassador
|
Friday 5th September 2008
Arrived at the workshop to be greeted by John and Rick to the refrain of "the apprentice has returned", didn't realise they missed me so much. And early in the piece, at the start of this saga, I'd mentioned John was a Mazda rotary specialist and it was evident today with three RX7's in getting attention And found Wade working on Kevin's '35. The leak in the water jacket cover has been fixed by silver soldering and the engine is running. Of course along the way there were dramas one of which was the carburettor, which was already damaged when the '35 arrived at the workshop, in fact it had a "loan" carb on it from Peter Toet. It now has the base of Kevin's carb and the top of Wade's spare carb for the '34 on it and it runs well. Wade is very pleased that it is running so well and smoothly at that, and all I can say it's a tribute to him. There are still some matters to be resolved regarding the engine, the major one being the fuel pump which leaks like a sieve when the engine is running. The hood is back on and I gave Wade a hand to remount the front bumper bar. While Wade was getting the front turn indicators working on the '35 I ran a new wire from the licence plate light through the trunk lid, under the top lip and down the side of the trunk to the grommeted hole in the trunk floor for the '41. Did this by hooking and twisting the new wire to be used to the old wire still in situ and drawing the new one through by pulling the old one out. Easy, cause Wade gave me instructions and advise to make it as easy as it was! Then Wade said I could solder on new fittings to the new wires for the licence plate and trunk lights. Almost had a heart attack when he said that as I've never soldered anything in my life ! Anyway after I got over the shock Wade said it was simple and demonstrated by doing the new wire to the licence plate light first, talking all the way through the process and explaining every step along the way. Then it was my turn to do the trunk light. And I must say it wasn't that hard, but then again I've got a great teacher, and another first in my mechanical education, soldering! One thing Wade stressed was the necessity for everything to be clean otherwise the solder might not work effectively and provide a good contact path. Then it was onto testing the trunk light, but nothing registered on the meter! Had to take the fitting apart and, besides the wire at the base of the fitting being broken, found a fuse or switch at the base of the bulb contact that mystifies us. I'm using the royal plural here as everything electrical is a mystery to me! Wade thinks this thing might be a fuse or a mercury type switch that activates the trunk light when the trunk is opened. Whatever it is it's dead! See second and third pic's for the "thing" and it's position in the light fitting assembly. Questions - What is it? Switch or Fuse? And where can I get one? After that it was back to the '35. Wade was installing a relay for the driving lights and spent a fair bit of time under the dash tracing the wiring used for these lights. The wiring for them was running through the ignition switch to a separate toggle switch at the bottom of the dash. Wade removed the toggle switch and re-routed the wiring for the driving lights. I acted as gofer, so Wade could maintain his position under the dash, fetching tools and such. The relay was then mounted inside the right front fender and connected but no lights! Wade had cleaned, checked and tested the relay on the bench beforehand, as it was a used one he bought at a swap meet, and it tested out OK. By passed the relay and the left driving light worked but not the right. So there's 3 areas to resolve, the wiring to the right driving light, the driving light itself or the relay. But before we could go further John came over so say they were getting ready to go to lunch, so work stopped. And with Wade going to Gilgandra with Gina tomorrow to visit Gina's Mum and not being back until Wednesday things will stay as they are till then. And a little aside, when the relay was being mounted I noticed that the rear mount for the right front spring is itself "spring mounted". Wade believes this was to counteract "shimmy" for cars equipped with beam front axles and this was Packard's solution in 1935. On the way home went to Salmon Bros, an electrical wholesaler, and bought some bullet connectors for the wiring needed for the '41. Then called into see Richard of Australian Hood Irons, a backyard business, specialising in making Wooden Hood (Top to you US guys) Bows, Replacement Parts, Accessories. New Sets, Repairs and Rivets. I actually pass by the house every time I go to or from the workshop and never knew this business was there. Wade had picked up the guys card at a swap meet and needed some rivets to use in his '34 restoration. So equipped with samples of the three rivets Wade was after I stopped in there. Walking down the drive saw an early 50's Bentley and Richard said it was his fathers originally and on opening the garage door there was a 20's Vauxhall which he's going on a run in this weekend, a T series MG and hanging in the roof was another early Vauxhall body. I'll have to return as one of rivets Wade wanted wasn't a good match but I've got a sample from Richard for Wades perusal. And when I go back next week I'll take pic's of Richard's cars as time didn't allow that today. Attach file: (34.99 KB)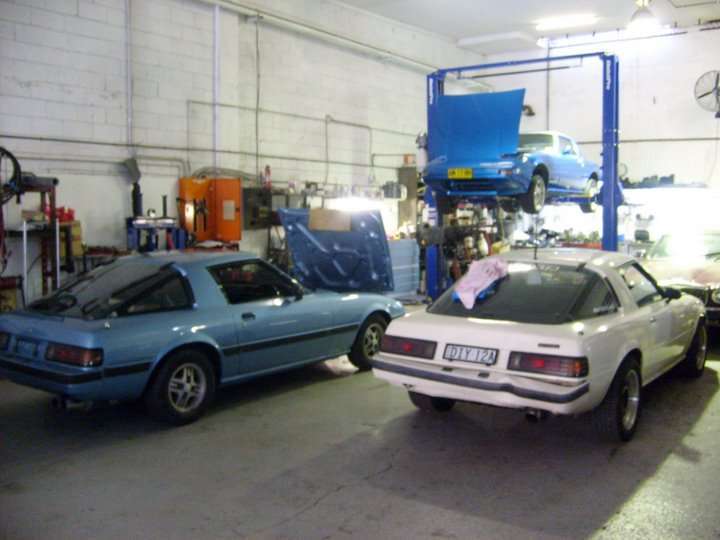 (12.94 KB) (12.94 KB) (20.34 KB) (20.34 KB)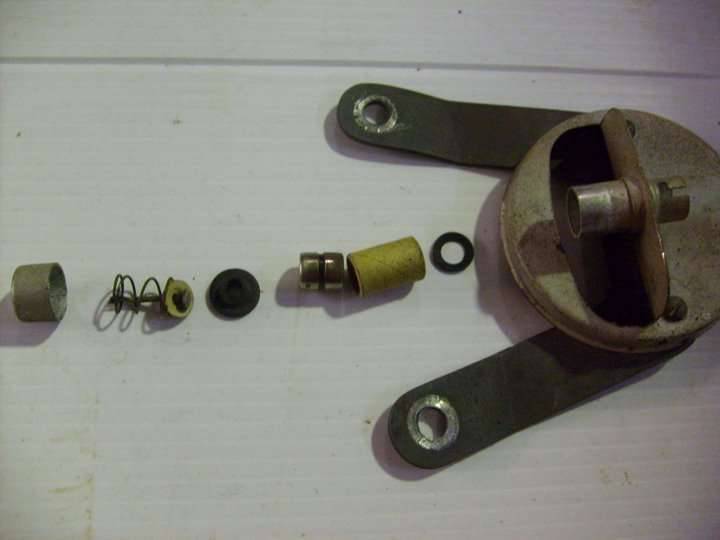 (17.64 KB) (17.64 KB)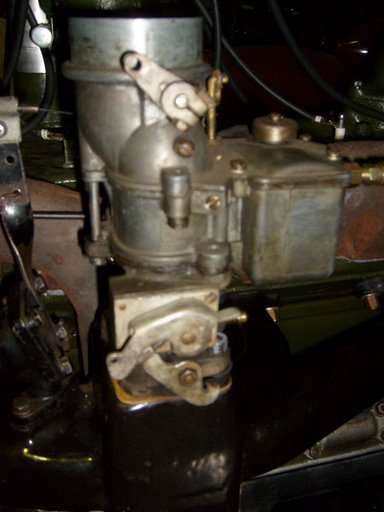 (24.06 KB) (24.06 KB) (31.24 KB) (31.24 KB) (34.28 KB) (34.28 KB) (24.84 KB) (24.84 KB)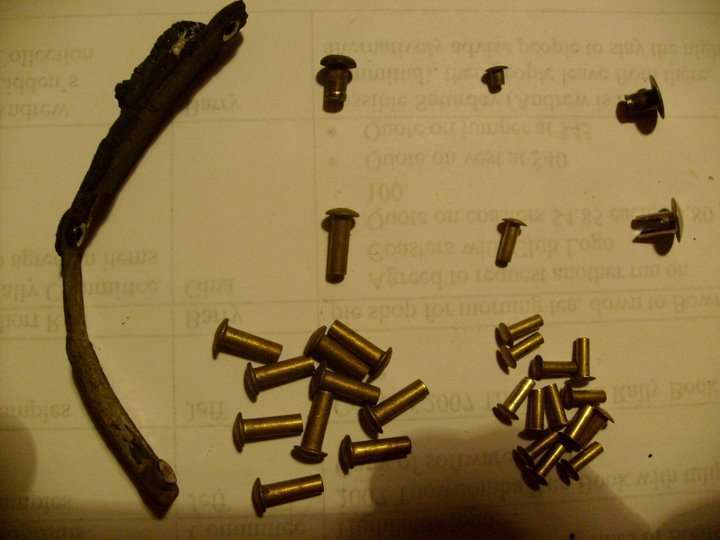 (30.80 KB) (30.80 KB)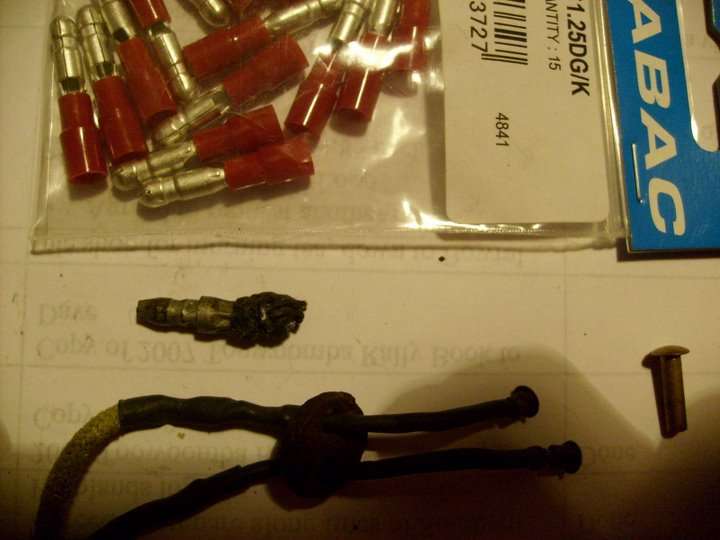
Posted on: 2008/9/5 2:01
|
|||
|
Mal
/o[]o\ ==== Bowral, Southern Highlands of NSW, Australia "Out of chaos comes order" - Nietzsche. 1938 Eight Touring Sedan - SOLD 1941 One-Twenty Club Coupe - SOLD 1948 Super Eight Limo, chassis RHD - SOLD 1950 Eight Touring Sedan - SOLD What's this? Put your Packard in the Packard Vehicle Registry! Here's how! Any questions - PM or email me at ozstatman@gmail.com |
||||
|
||||
|
Re: Mal's '41 120 Coupe
|
||||
|---|---|---|---|---|
|
Home away from home
|
Mal,
The spring assembly on the back of the front suspension spring is called a trunion block, and it is an anti-shimmy device. It was developed in 1929 and first used in production on the 1930 7th series cars. During testing of pre-production 7th series cars the Packard engineers noticed that one car in particular did not have any shimmy. An investigation of that car found that the rear spring shackle on the front left spring had not been completely tightened down during assembly, and this loose spring attachment compensated for shimmy. This discovery led to the development of the trunion block, which was used until Packard implemented their independent front axle system. Kind of a neat 'accidental' discovery. Tom
Posted on: 2008/9/5 6:47
|
|||
|
||||
|
Re: Mal's '41 120 Coupe
|
||||
|---|---|---|---|---|
|
Home away from home
|
Oh, and that 'switch' is a switch, either mercury or ball roller switch. Here is a site that might get you started on finding a replacement:
http://www.allproducts.com/ee/oncque/01-tilt_switch.html Cheers, Tom
Posted on: 2008/9/5 7:59
|
|||
|
||||
Register To PostTopic is Locked


