
|
Re: Adventures with a 1955 Clipper
|
||||
|---|---|---|---|---|
|
Home away from home

|
Ross, thanks for the compliment and idea on grommets for the clutch and brake pedal carpet penetrations. I removed the pedals, refinished them, and installed new pads. It's off to Cars & Coffee tomorrow morning. Take care.
(o{}o)
Posted on: 2011/9/3 21:03
|
|||
|
We move toward
And make happen What occupies our mind... (W. Scherer) |
||||
|
||||
|
Re: Adventures with a 1955 Clipper
|
||||
|---|---|---|---|---|
|
Home away from home
|
Quote:
Craig, thanks. It was fun. I am still impressed with the people who do a real restoration. There must be a special place in heaven for them. (o{}o)
Posted on: 2011/9/3 21:06
|
|||
|
We move toward
And make happen What occupies our mind... (W. Scherer) |
||||
|
||||
|
Re: Adventures with a 1955 Clipper
|
||||
|---|---|---|---|---|
|
Home away from home
|
The adventure continues. Getting ready to drive the Clipper to the Cars & Coffee on Sunday, an ugly problem raised its head.
The car has been getting harder to start and keep running smoothly until warmed up. Sunday it was particularly bad. It got started but was running more rough than ever and would not stay running. When trying to restart it for the third or fourth time it backfired. Badly. It blew a hole in the muffler. Clearly, this was not the car I was going to drive that day. Previous to this the engine had been acting like it was flooding, but it was not doing this. I loosened the choke valve two notches as it was acting like it was being over choked. The first thought that came to mind was that the timing chain had jumped a tooth. It was acting that way. I thought about it and decided to try the simple and easy things first. I removed the distributor cap and felt the rotor. The rotor was loose on the shaft. It had a sloppy fit feel to it. The Clipper is Auto-Lite equipped. The rotor is a new one and looked in good condition. There is a spring steel insert in it for fitting on the shaft. I bent the insert so that it would fit tighter on the shaft and restarted the car. It started easier and ran more smoothly than on Sunday. No backfiring, but still rough running and hard to maintain an idle. The noise from the blown muffler makes it hard to determine what is going on. I ordered a new rotor from NAPA and installed it. The new rotor looks exactly like the old one. However, the fit was much better, no sloppy feeling with this one. No movement on the shaft. Started the car and it ran better than before, but still a bit rough. I readjusted the carburetor idle jet screws so they were out a turn and a half. This seemed to help the idling. I have not done a final adjustment to them, but it is better. I stopped for the day and thought I would see if readers here have some advice. The points are new and are adjusted to .016". The cap is new and looks good. The gasoline is new, I filled it up a couple of day before all of this. Interesting, that on the day I filled the tank, I drove the car around a bit and it was running fine, no problems. I thought about fuel/fuel supply, but do not think this is the problem. The new rotor made a big difference. Any suggestions or recommendations? Any and all are appreciated. Thanks. (o{I}o)
Posted on: 2011/9/7 15:03
|
|||
|
We move toward
And make happen What occupies our mind... (W. Scherer) |
||||
|
||||
|
Re: Adventures with a 1955 Clipper
|
||||
|---|---|---|---|---|
|
Forum Ambassador

|
did you check the gap on the plugs....did you check the cables?
did you set the choke back the way it was before the issue happened, but after you replaced the rotor etc? is there maybe some trash affecting fuel pressure.... just thinking out loud. Hank
Posted on: 2011/9/7 15:40
|
|||
|
1937 Packard 138-CD Deluxe Touring Limousine
Maroon/Black 1090-1021 [url=https://packardinfo.com/xoops/html/modules/registry/View.php?ID=232]1955 Packard |
||||
|
||||
|
Re: Adventures with a 1955 Clipper
|
||||
|---|---|---|---|---|
|
Home away from home
|
Henry, thanks. I have been thinking out loud too and I believe the best thing for me to do is to go back to basics and recheck everything. Then, report back and seek help if needed. I expect it will be something elementary. I do not want to take up any more bandwidth until I have done more. I will share photos of the exploded muffler. It is impressive. Thanks to all.
(o{}o)
Posted on: 2011/9/7 21:21
|
|||
|
We move toward
And make happen What occupies our mind... (W. Scherer) |
||||
|
||||
|
Re: Adventures with a 1955 Clipper
|
||||
|---|---|---|---|---|
|
Home away from home
|
It runs!
I decided to go back to basics and check the ignition and fuel systems. The rotor, as mentioned before, was loose on the shaft. I replaced the rotor with a new one from NAPA (which fit snugly), but no difference in starting and running. I checked the points for burning and gap, and the cap as well. All looked good. No burned points, which meant the condenser was good too. Next I screwed in a new set of spark plugs (Champion J-16Y). The old plugs looked black and fuel fouled. Still no difference in starting and running. I rolled the engine to be on TDC for No. 1. The rotor was pointing just where it should be pointing, so I ruled out a jumped timing chain. Then, I exchanged the coil with one that was on the car when I bought it. I had installed a vintage Auto-Lite coil to replace the Petronix unit. According to the vendor, the A-L coil was taken off of a Packard that had sat outside for 20-30 years. I was actually after the bracket, but decided to use both. The A-L coil check out at about 2 ohms, and the Petronix has a 1.5 ohm spec and checked out to this. Still no difference in starting and running. Satisfied that the ignition system was probably not the fault I turned my attention to the fuel system. I checked the fuel filter (Carter ceramic) and it was clear. I checked the fuel pump output and pressure and it tested good. Then I removed the fuel level sight plugs in the Carter carburetor to view the fuel level in the chambers. I could see the fuel level in the secondary chamber, but not the primary. In addition, it looked like the float might be rubbing against the inside wall of the chamber. Off with the carburetor and I removed its top. Fuel bowls were clean and nothing look amiss. I reset the floats, actually raising them about 1/8" each. Reassembled the carburetor and installed it. It tried to run, but still the same problem - it would catch and then run rough and then die. The engine acted just like it was flooded. I opened the choke plate so that it was fully open, started the car and it started to run better clearing itself like a flooded motor. This time it kept running and sounding better. I let the engine run for about 10-15 minutes. It would idle down and accelerate normally. I checked the timing and it was at 7 1/2 deg BTC, just where I had set it. I believe it was a combination of old gas, too tight a choke setting, and never getting the engine to run long enough to clear itself of the excess fuel fouling. I will see how it starts tomorrow, but I think every thing is good. Then it will be off to the muffler shop to replace the imploded muffler. Thanks for your attention and time with this. (o{}o)
Posted on: 2011/9/11 13:31
|
|||
|
We move toward
And make happen What occupies our mind... (W. Scherer) |
||||
|
||||
|
Re: Adventures with a 1955 Clipper
|
||||
|---|---|---|---|---|
|
Home away from home
|
JW,
Pic of muffler?
Posted on: 2011/9/13 18:40
|
|||
|
Guy
[b]Not an Expert[/ |
||||
|
||||
|
Re: Adventures with a 1955 Clipper
|
||||
|---|---|---|---|---|
|
Home away from home
|
Guy, I am off to the Midas muffler shop tomorrow morning to have the muffler replaced. I decided not to try and do the job myself. I have done this job on the 115C and the Clipper Custom, but enough is enough. I'll take a photo and share it. It will be impressive. Zoom, zoom.
(o[]o)
Posted on: 2011/9/13 22:02
|
|||
|
We move toward
And make happen What occupies our mind... (W. Scherer) |
||||
|
||||
|
Re: Adventures with a 1955 Clipper
|
||||
|---|---|---|---|---|
|
Home away from home
|
I had the exploded muffler replaced today at the neighborhood Midas muffler shop. Here are photos of the old and new mufflers. The Clipper is certainly quieter. What next? Oh yes, the leaking pinion shaft oil seal. I think I'll wait for cooler weather to do this job. Take care.
(o[]o) Attach file:  (31.48 KB) (31.48 KB)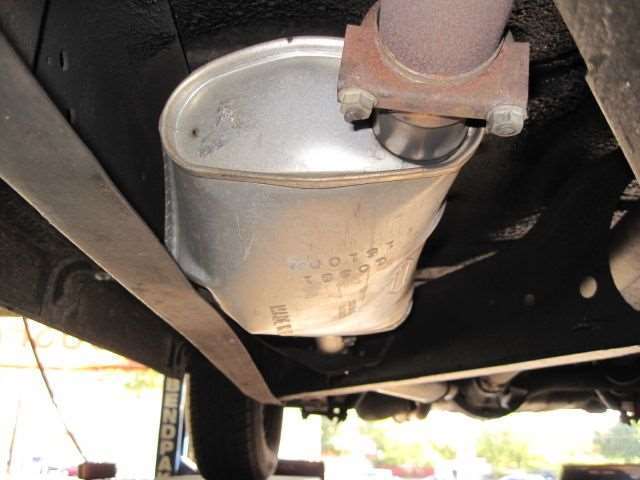 (30.37 KB) (30.37 KB)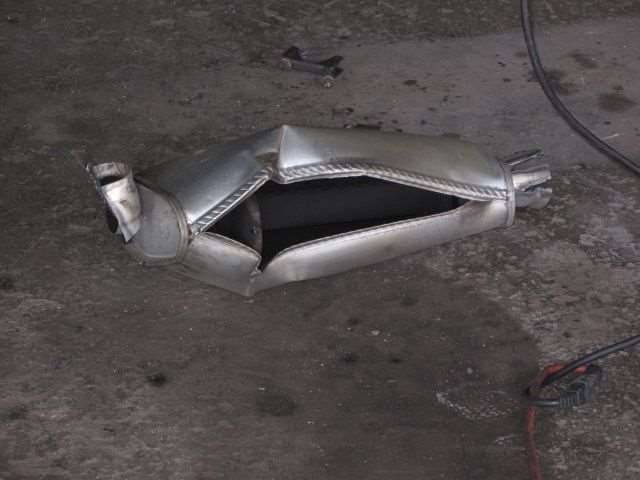 (26.66 KB) (26.66 KB)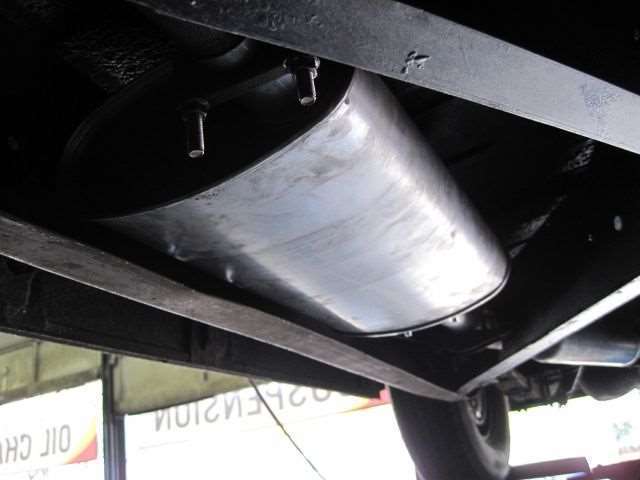
Posted on: 2011/9/14 11:51
|
|||
|
We move toward
And make happen What occupies our mind... (W. Scherer) |
||||
|
||||


