 (14.94 KB)
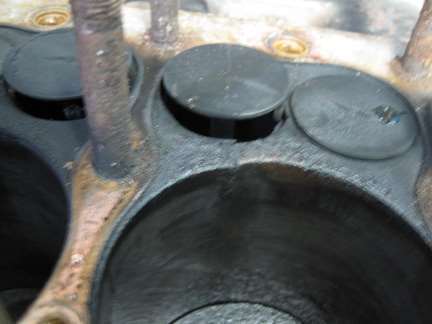
|
Re: 1928 526 block removal
|
||||
|---|---|---|---|---|
|
Home away from home
|
Dell,
Yes you can remove the block only. I have done this on both a 126 and 633 so I am sure you can do it on the 526. I did not remove the radiator. David
Posted on: 2012/12/16 15:51
|
|||
|
||||
|
Re: 1928 526 block removal
|
||||
|---|---|---|---|---|
|
Home away from home
|
Wow, that's a big "crack". You seem to be missing some metal around that valve but it looks like it can be fixed with a modern valve seat. Good luck.
Posted on: 2012/12/16 16:55
|
|||
|
||||
|
Re: 1928 526 block removal
|
||||
|---|---|---|---|---|
|
Home away from home
|
as it turns out david the radiator has to come off on the 526 to get the water pump off. have the valves out now and it turns out two cylinders were cracked and pined with new seats installed. this was done over 30 years ago and as you can see by the pictures the repair failed. does anyone know of any pitfalls i need to look for in removing the pan, rod and piston assembles. thanks for the help. dell
Posted on: 2012/12/19 23:25
|
|||
|
35-1200 touring sedan 42-110 convertible coupe 48-2293 station sedan |
||||
|
||||
|
Re: 1928 526 block removal
|
||||
|---|---|---|---|---|
|
Forum Ambassador

|
Quite straight forward removing the pan and pistons and rods and it was pretty much a standard operation for that style of engine, depending on the repair needed. And equally straight forward removing the bores from the crankcase. I don't recall the situation on the 526/533 but it's possible the big end of the rod is larger than the bore so you may have to remove the rod caps, push the rod up far enough to remove the piston pin, and then the piston out from the top and the rod from below. At least this is the way on the 320 cubic inch 8 cylinder engines. You may also have to do a bit of crank rotating to allow the big end of the rod to clear the counterweights. I say all this based on a slightly later engines but believe it all applies.
Posted on: 2012/12/19 23:40
|
|||
|
||||
|
Re: 1928 526 block removal
|
||||
|---|---|---|---|---|
|
Home away from home
|
Dell,
The big ends on the 633 are too big for the bore so I simply lifted the block off the crankcase with the pistons after removing the big end caps. I don't know whether this applies to the 526. To reassemble it I fitted the pistons to the block before lowering it into position while turning the crankshaft to receive the big ends. I did it alone but it would be easier with 2 people. I am pretty sure I only tilted the radiator forward enough to remove the water pump but it would be easier to remove the radiator . I would like comment on the cracks because I had a similar problem. My car had a number of cracks between the valve seats. I discussed the problem with a number of experts and was persuaded that there was a good chance that the cracks could be pinned (Metalock) and I had this done by a very reputable operator who said that the risk was that there would not be enough metal thickness to support the pins. The repair failed very quickly and I believe that years of internal corrosion had weakened the block causing the cracks and causing the failure of the pins - I would not try this process in a combustion chamber again. I discussed welding of the block with a company that had a good reputation for this type of work on old engines. They advised that the repair would probably be successful, it would be very expensive and once completed the bores and all faces would need to be re-machined to rectify the distortion caused by the welding. I did nothing for a while and was extremely fortunate in having a friend donate his spare block which I had sleeved to take the new pistons from my engine and the car has been good since. Turning to you car and assuming you do not have a spare block, any attempt to repair it will probably require valve inserts and cylinder sleeves, after the cracks are welded or pinned. The cracks would indicate that it is very likely that your block has lost much of its strength to corrosion and this would put at risk any repairs. I doubt that a block that has failed as your has would have the strength to hold the interference fit valve inserts bearing in mind that they do not strengthen the block but increase the stress around the valve seat area. This is simply my opinion, and I would welcome expert advice if I am wrong. Keeps us posted on how you fix it. David
Posted on: 2012/12/20 4:14
|
|||
|
||||
|
Re: 1928 526 block removal
|
||||
|---|---|---|---|---|
|
Forum Ambassador
|
DavidM: I'm really impressed that you singlehandedly lowered the cylinder bores with the pistons and rod small ends already installed onto the crankcase and then installed the rod caps. I know this was a routine method at the time but I've been thru this a couple of times and got apprehensive about trying it, even with a helper, so I installed the naked cylinder bore first and then pistons in from above and rods from below. Any special advice or tips about how you did this? Or was it really that simple? I guess you started with all the pistons at TDC or even slightly above deck height and rotated the crank to bring each set of rod journals fully upwards and then tapped the piston and rod down onto the journal? I'd appreciate some details, should I ever do this again.
Posted on: 2012/12/20 10:05
|
|||
|
||||
|
Re: 1928 526 block removal
|
||||
|---|---|---|---|---|
|
Home away from home
|
OD:
It was done just as you describe, there is not much more I can add. I starting with all pistons on TDC initially then rotated the crankshaft to receive pairs of big ends and pushed those two pistons down from the top to meet the crank. I recall having to find the best initial position for the crankshaft so that when turning the crankshaft it cleared the free hanging con rods, but it became easier as each pair were connected. I did this whole operation twice about a year apart, firstly after the block had been pinned then again with the "new" replacement block. I hope not to have to go through that all again!
Posted on: 2012/12/20 16:01
|
|||
|
||||
|
Re: 1928 526 block removal
|
||||
|---|---|---|---|---|
|
Home away from home
|
david; lifted the block off today, rods came out the top ok. to remove #1,2,5,6 it was necessary to remove cap and then turn crank 180 degrees to get past counter weight. no problems after that. question- does the drive gear for oil and dist. go in a special spot? thanks dell
Posted on: 2012/12/21 20:43
|
|||
|
35-1200 touring sedan 42-110 convertible coupe 48-2293 station sedan |
||||
|
||||
|
Re: 1928 526 block removal
|
||||
|---|---|---|---|---|
|
Home away from home

|
I don't know the best way to assemble those motors because I have never seen a factory film. Although Packard did sell reconditioned blocks with pistons installed. I'll have to check the parts book for clues.
The service literature has always indicated rod from the bottom and piston from the top. I found this is readily accomplished with the motor standing up on a work bench. As well, a piston pin machined to a taper as a pilot to facilitate alignment. Another tip is to make up a paper bearing shell from tape to protect the crank from nicks. After turning the crank the paper shell is removed. This is especially critical as regards insert bearings which require pristine surfaces. After the rod is assembled the crank can be turned once and the cap removed to check for any marks which can then be removed using 2000 grit. Even slight jostling can cause a high spot. Sometimes these high spots are there just from moving the crank around during shipping and machining. And they bend very easily as well. I would use a gantry crane for installation as an assembly to minimize damage. Either way, the process is not an easy one.
Posted on: 2012/12/22 12:58
|
|||
|
||||


