|
Re: 55 400 headliner
|
||||
|---|---|---|---|---|
|
Home away from home
|
Has no one replied yet? Where are you in the process? Do you have your sound /heat deadening in place? Have you sandblasted and etch primered all the side support rails tack strips, and retaining teeth and bows? Pictures please.
Usually the bows are numbered as removed so reinstall in same and install headliner hanging from these. With all windshield and rear glass trim removed-you might want to place the screws back into the visor retainer holes to make them easy to feel after final install so as to cut holes accurately . Normally the install starts at the front by stretching and gluing the frt edge. Then next day or after cure stretch frt to back and secure rear edge. Then the stretching and pulling to the sides and tucking inside to the tack strips and up to the teeth will commence. Holding the excess on the side with one hand and pushing up behind the tack strip with a bindi plastic spreader. Good luck. A final trim of excess and tuck behind the tack strip and cut for visors. Then there is the wind lace. Did you purchase new windlace?
Posted on: 2020/12/8 9:09
|
|||
|
||||
|
Re: 55 400 headliner
|
||||
|---|---|---|---|---|
|
Home away from home
|
That would be "bondo" spreader. Darn auto correct!
Posted on: 2020/12/8 9:12
|
|||
|
||||
|
Re: 55 400 headliner
|
||||
|---|---|---|---|---|
|
Home away from home

|
You can actually correct the typo on the original! Anyway, that's not nearly as bad as some funny and even embarrassing auto-corrects that my iPad makes.
Posted on: 2020/12/8 14:36
|
|||
|
||||
|
Re: 55 400 headliner
|
||||
|---|---|---|---|---|
|
Home away from home

|
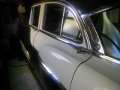
THANK YOU FOR YOUR RESPONSE. THE SOUND DEADER/ HEAT PAD IS IN PLACE, INTERIOR COATED WITH POR 15, BOWS CLEANED PAINTED AND MARKED FOR POSITION. ALL GLASS IS IN PLACE. PACKARD HARD TOP HAS THREE CLIPS ABOVE THE BACK WINDOW THAT LOCK THE LAST BOW IN PLACE, SUGGESTING STARTING AT THE BACK AND WORKING FORWARED?? NO TACK STRIPS OR TEETHE PRESENT. PICS SHOW BOW GROMMETS, SOUND DEADER, PAINTED SURFACE. LEFT SIDE PHOTO SHOWS HEADLINER CLIPPED OVER BODY EDGE. WHEN THE OLD PATTERN WAS USED AS A PATTERN NO EXTRA WAS ALLOWED FOR TRIMMING, SO THAT THE HEADLINER IS PRECISELY CENTERED. THE PICS ALSO SHOW THE SCREW HOLES AND OLD SECTION OF HEADLINER. A STAINLESS STEEL TRIM COVERS THE INSIDE AND IS SCREWED FROM THE OUTSIDE.
Attach file:  (74.34 KB) (74.34 KB)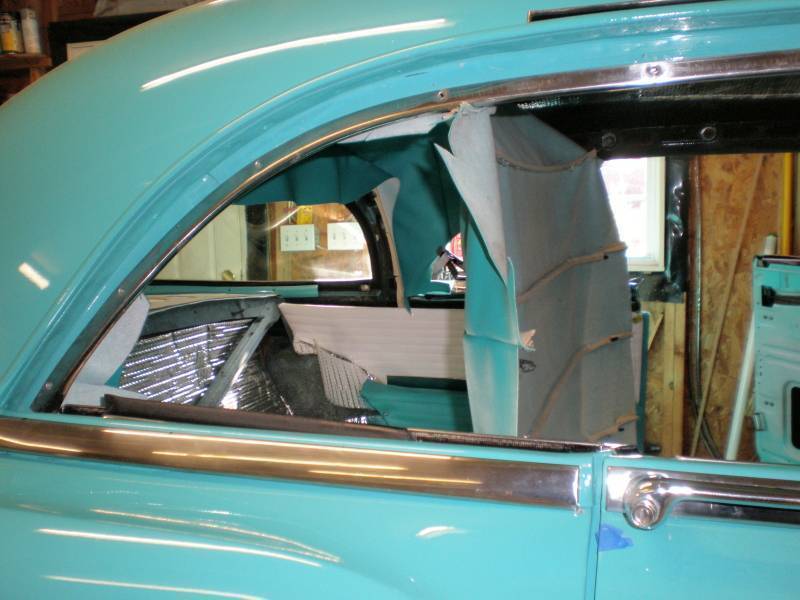 (64.84 KB) (64.84 KB)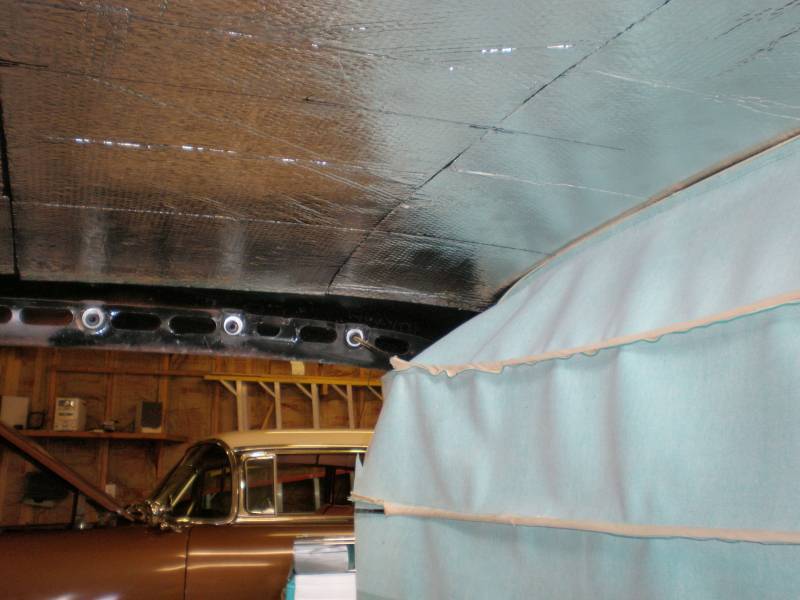 (69.02 KB) (69.02 KB) (65.71 KB) (65.71 KB)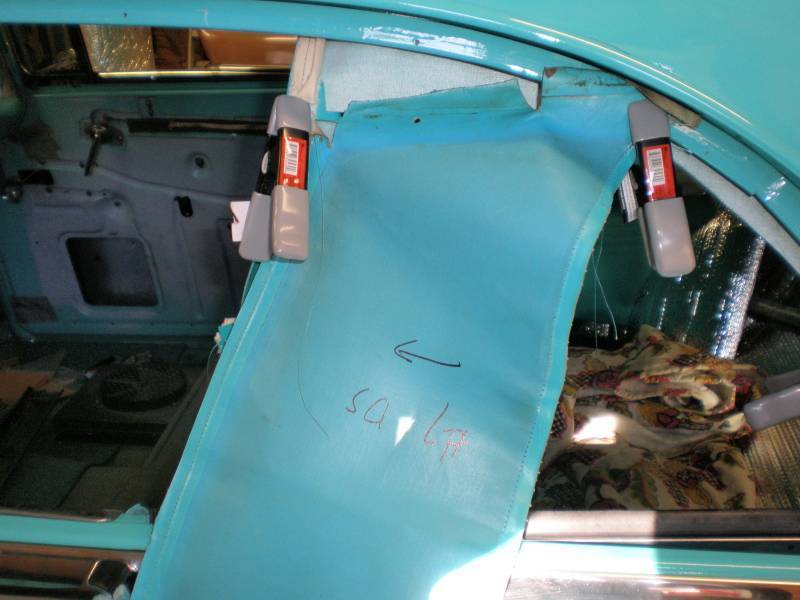
Posted on: 2020/12/8 14:51
|
|||
|
||||
|
Re: 55 400 headliner
|
||||
|---|---|---|---|---|
|
Home away from home
|
On some vehicles there is full interior garnish moldings above the door openings so liner is stapled to tack strips and hidden by moldings. You should have replaced all tack strips as they crumble and will not hold staples. Are you saying there are no toothed retainers on your car? I assume you removed the liner so you saw it fully installed and have all retainers and moldings. There are videos on utube showing both types. One is on a 55 chev and is very similar to the 4 door clippers. 2 door may be different. I had mentioned on another thread a long time ago if a first time diy liner, best to start with a cloth one which is more forgiving. I advise patterning liner wide on sides and front and trim after. Pros usually need to steam a liner if leather, suede, vinyl etc. one vid shows steaming. If you have experience here this will serve to help others. Do you have a pro style steamer?
Posted on: 2020/12/8 19:00
|
|||
|
||||
|
Re: 55 400 headliner
|
||||
|---|---|---|---|---|
|
Home away from home

|
You are correct that the headliner installs from the rear as those stays position the rearmost bow. Use lots of clamps to simulate the stainless retainers as you work forward trying to keep the bows as vertical as possible. After you have tacked the headliner to the tack strips front and rear you can glue the panels around the outside of the roof rail. The rearmost panel is a bit of a booger to fit around the window.
Just for reference sake, the hardtops are vastly different in trimming details than the sedans because of the long stainless retainers. Fortunately, they also cover a multitude of sins.
Posted on: 2020/12/8 19:51
|
|||
|
||||
|
Re: 55 400 headliner
|
||||
|---|---|---|---|---|
|
Home away from home
|
Yes, Thank you for your response. The 55 has a stainless molding that hides the inside of the headliner. However, there were no tacking strips or toothed retainers. I did manage not to loose any clips. Have looked at a couple on line videos but they are not very clear to me. Yes I do have a steamer . Bought it used when the wife and I did the seats and side panels on a 56 400 some years ago.
Posted on: 2020/12/8 19:55
|
|||
|
||||
|
Re: 55 400 headliner
|
||||
|---|---|---|---|---|
|
Home away from home
|
Mine is still a work in progress.
But. When the car is in the sun and beats up. The headliner will shrink. And the only contact cement that I have found that works is pilobond. It will hold up to heat.. Heat increase its bond. MC master care sells it. I ordered my headliner from JC whitney. Years ago. In the 70s they were 34 bucks. Now a couple of hundred. Attach file: (186.83 KB)
Posted on: 2020/12/8 22:14
|
|||
|
Riki
|
||||
|
||||
|
Re: 55 400 headliner
|
||||
|---|---|---|---|---|
|
Home away from home
|
Thanks Rikki , Ross. Keep up the good work. Just for ref: if you use keywords "1955 headliner install" ( no make model) you will see one at 12:42 min runtime and one at 26:40 run time , one shows the toothed retainer and the other stapling to tack strip and that one details trimming the bow listing on the sides to enable pulling down and stretching the sides to eliminate all side to side wrinkles. Are you saying there are no toothed retainers OR the tack strip to attach and stretch the liner side to side? Is there windlace? could you detail your procedure.
As stated before , the importance of sharing info on the most difficult and expensive hurdles on these oldies for DIYers is needed : For those entering the hobby to get a feel for what they do and do not want to tackle, to eliminate transport to and from shops during refurb, to complete a job when there is no expert specialty shop nearby ie very rural local, and to not be so far under water on the lower price point cars as to abandon projects so more of these can be kept on for others to appreciate. I will be interested to see your progress. Certainly the 55 I did was described as show ready by the next owner and my 40 Willy's coup with 41 tilt nose (KRYPT to NIGHT)was acceptable for local cruise nights. (I'm not talking Riddler award here). Yes it was a play on words: say it fast- the other drivers nemesis (Superman ref) and in the more literal my possible outcome as described by my wife back in the day. By the way- the wire frames littering the roadsides after elections are acceptable free headliner bow materials and other uses-(try to do a bowed headliner on a 40 Willy's coup with NOTHING THERE to start with. Carpet edge tackless ( not the wood at wall attachment but the metal toothed with the finished edge) can have the rolled lip trimmed off and can be used to reproduce rusted or missing headliner attachment. Some more DIY advice-door panels can be saved/replaced/repaired at home. On fifties cars where they are water damaged/wrinkled even on doors with multiple colors separated by stainless trim , We created a process of recreating the full door panel with thin doorskin then spray gluing the original vinyl to it. In the areas where there was a pleated vinyl destroyed and rotting thread, we used new vinyl and cardboard by indenting the cardboard on its natural corrigations every inch then drawing pencil lines on those same lines on the back ,we were able to sew on a regular home sewing machine pleated vinyl panels of any size or color by sewing vinyl DOWN cardboard up following pencil lines creating perfectly straight pleats. Thick card board recreates fifties style-thin foam sandwiched in between for puffier look. As many know without a commercial machine and upper walking foot this usually cannot be done at home but it works this way because the supple vinyl is down in contact with the Toothed walking foot on a home machine. Leaving the sides an inch long simply spray glue these to doorskin and wrap n staple edges on back. Do an internet search for "the heaviest thread on a home machine" for info on all the settings. It was very satisfying to repair or remake one panel for twelve bucks and have people not be able to determine repairs from originals. Spray dye works well on door handle pulls if not cracked separating. One last tip. A word about temperature. Body work, spray tack, weatherstrip adhesive etc will not perform at temps below 68 so if you are in the north working this time of year-heat the work area. Spray tack in the greenhouse in the sun! 80 degrees better. Even after heating- I used to place a light stand an old friend gave me and use old school spots, halogen work lamps etc on the area to be worked on until the sheet metal was warm on the palm . Then work in small areas. Be careful of heaters flames etc with the fumes caused by glues, sprays,paints bondo etc. wish I had more pics of all that but in the days before vlogs, forums and such I was more focused on getting the job done than tutoring. good luck all. Happy holidays.
Posted on: 2020/12/9 11:06
|
|||
|
||||


