|
Re: Don’s 1937 (120) 138CD Deluxe Touring Limo
|
||||
|---|---|---|---|---|
|
Home away from home
|
The cowl bolt nuts may be accessible by removing the kick panels. If you've gotten past the undercoating, that's a big plus. Make a note or take pictures of any shim stacks, etc, that you may encounter. You may need some fender welting or rubber items for the joints around the radiator shell, headlight pedestals, and so forth.
Posted on: 4/29 8:01
|
|||
|
||||
|
Re: Don’s 1937 (120) 138CD Deluxe Touring Limo
|
||||
|---|---|---|---|---|
|
Webmaster
|
Where the fenders bolt to the cowl, they go into caged nuts that are part of a floating panel section that does not penetrate into the kick panel area.
Posted on: 4/29 9:36
|
|||
|
-BigKev
1954 Packard Clipper Deluxe Touring Sedan -> Registry | Project Blog 1937 Packard 115-C Convertible Coupe -> Registry | Project Blog |
||||
|
||||
|
Re: Don’s 1937 (120) 138CD Deluxe Touring Limo
|
||||
|---|---|---|---|---|
|
Home away from home
|
Progress…
I got 1-5/16 socket and was able to get the nuts off the sidemount support with no problem at all. Surprisingly, the bolts from fenders to the cowl came out without a fuss. So now, I just need to work on the bolts to the running boards. Those are all VERY rusty, so they may be a challenge. But worst case, I can carefully cut them off if needed. So….I’m getting close and I’d like someone to make sure I’m not missing anything for the front clip removal. 1. Remove front bumper and brackets….done 2. Remove hood….done 3. Remove running board trim….done 4. Remove support bars under fenders….done 5. Remove bolts from fenders to cowl….done 6. Remove nuts from sidemount supports….done (I put these back on until I’m ready to actually lift off the clip)….done. 7. Remove bolts to running boards…. 8. Disconnect wiring harness to right headlight bucket and secure….done 9. Drain coolant 10. Disconnect radiator upper and lower hoses 11. Remove bolt under center of radiator (this should be easy for me since Allen just replaced it) 12. Recruit the Three Hooligans. 13.. Lift up and out . Is there anything I’m missing?
Posted on: 4/29 19:01
|
|||
|
||||
|
Re: Don’s 1937 (120) 138CD Deluxe Touring Limo
|
||||
|---|---|---|---|---|
|
Webmaster
|
Disconnect left harness as well.
Are you planing on taking the fenders/grille/radiator off as one piece? The nuts and bolts between the fenders and running boards are nothing special, just common bolts/nuts. I'd replace the fasteners anyway. Same goes with any off the other bolts. Replace with new zinc plated hardware that will give you some corrosion protection, and clean threads. I used grade 5 bolts.
Posted on: 4/29 19:13
|
|||
|
-BigKev
1954 Packard Clipper Deluxe Touring Sedan -> Registry | Project Blog 1937 Packard 115-C Convertible Coupe -> Registry | Project Blog |
||||
|
||||
|
Re: Don’s 1937 (120) 138CD Deluxe Touring Limo
|
||||
|---|---|---|---|---|
|
Home away from home
|
A while back I bought a relatively cheap hydraulic nut cracker that has already paid for itself in getting off a stuck head nut! It hardly took any effort at all and has small end pieces too that should fit your running board nuts. However, since then back home away from my shop, I had another project with rusted nuts so I just drilled a hole in from either side and they came right off although I purposely drilled into the treads too so will have to replace the bolts.
Posted on: 4/29 19:56
|
|||
|
||||
|
Re: Don’s 1937 (120) 138CD Deluxe Touring Limo
|
||||
|---|---|---|---|---|
|
Home away from home
|
Yes…I’m replacing all of the hardware and yes, the left headlight bucket is also disconnected. I forgot to mention that since it is so short.
Also, I forgot to list “disconnect the radiator support rods”. I’m am planning to take the front clip off as one piece…radiator, radiator shell, and front fenders. Fingers crossed, but it’s going pretty well so far. One thing I’m a bit concerned about is making sure I don’t make the break in in the left fender worse. It has the common break in it right about center. We’ll just have to be careful and keep it supported well.
Posted on: 4/29 20:06
|
|||
|
||||
|
Re: Don’s 1937 (120) 138CD Deluxe Touring Limo
|
||||
|---|---|---|---|---|
|
Webmaster
|
Don't forget the lower fender to frame braces.
Also, you may want to put some kind of tape or something on the cowl above where the fender attaches. The front clip needs go straight up to clear that lower pivot bolt. So the tape may help prevent any scratching from then fender contacting the cowl during the extraction.
Posted on: 4/29 20:22
|
|||
|
-BigKev
1954 Packard Clipper Deluxe Touring Sedan -> Registry | Project Blog 1937 Packard 115-C Convertible Coupe -> Registry | Project Blog |
||||
|
||||
|
Re: Don’s 1937 (120) 138CD Deluxe Touring Limo
|
||||
|---|---|---|---|---|
|
Home away from home
|
Thanks, Kev.
I assume the braces you are talking about are the ones shown here along with my bumper brackets. Obviously, I have those out and all cleaned up. 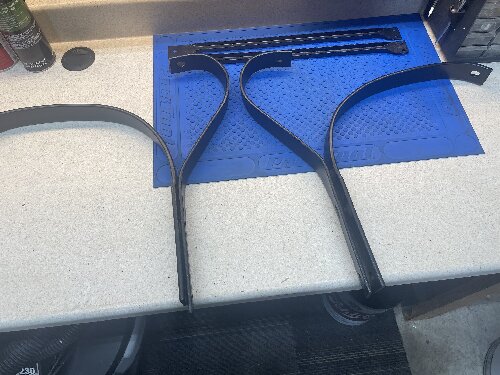
Posted on: 4/29 20:35
|
|||
|
||||
|
Re: Don’s 1937 (120) 138CD Deluxe Touring Limo
|
||||
|---|---|---|---|---|
|
Home away from home
|
You might want to stabilize the cracked fender using a C-clamp and a couple of shaped pieces of wood or a pair of those rubber sanding blocks. That would allow you to clamp the cracked area between the wood or rubber blocks to prevent any tearing or kinking as you handle the fender assembly.
Posted on: 4/29 21:49
|
|||
|
||||

