|
Re: Mal's '41 120 Coupe
|
||||
|---|---|---|---|---|
|
Forum Ambassador

|
Quote:
Dave, When we removed the backing plates from the car there were shims there, but on both sides. Still have the shims and haven't thrown anything out unless it's been replaced or is beyond repair. Does this mean that instead of re-installing the axles and inner cones one at a time they should be done together so that it is approximately even for each side?
Posted on: 2008/5/17 15:53
|
|||
|
Mal
/o[]o\ ====  Bowral, Southern Highlands of NSW, Australia "Out of chaos comes order" - Nietzsche. 1938 Eight Touring Sedan - SOLD 1941 One-Twenty Club Coupe - SOLD 1948 Super Eight Limo, chassis RHD - SOLD 1950 Eight Touring Sedan - SOLD What's this?  Put your Packard in the Packard Vehicle Registry! Here's how! Any questions - PM or email me at ozstatman@gmail.com |
||||
|
||||
|
Re: Mal's '41 120 Coupe
|
||||
|---|---|---|---|---|
|
Forum Ambassador
|
Tuesday 20th May 2008
Arrived at the workshop relatively early, beat Wade in! Started by removing the bolts on the front universal joint as I'm removing the tailshaft to clean and paint it. Turns out for me this is an all day project, and did I mention previously I'm on the slow side? So after removing the tailshaft Wade advised there should be marks on the front of the shaft and on the front universal so that it lines up correctly. He also said that mine didn't look aligned because the front and rear universal joints weren't aligned. So after much cleaning of the tailshaft and fittings got all the Idaho dirt and muck off mostly on the wire brush wheel and found the alignment marks. Wade also rounded up a pair of O rings to use instead of the cactussed felt seal on the front universal joint. After all this, Marine Cleaned, Metal Readied then POR-15'd the tailshaft and other associated bits. Tomorrow I'll put it all back in the '41. During all this Wade, besides making the coffee for the guys he does each morning, was working on his '37 Super 8. Yesterday he'd reinstalled the water pump, radiator, grill and hood. And today he worked installing a new cowl vent gasket, in which I helped him for a change, because after he'd glued the gasket in place, I held down the vent while he tightened the nuts and bolts to hold it in place as per the manual. Also, because most of the dash was presently accessible, he was sorting out the wiring there as it was more like a bowl of spaghetti than a wiring loom! When I left towards the end of the afternoon he was still at it. And I got under Wade's '37 120 to do the measuring I promised Eric I'd do. Wade was most accommodating bringing the '37 down from where it was parked, getting a jack under the diff to provide me with clearance to get under on the creeper and finally having a good laugh as I attempted to get up off the creeper at the end of it all. Attach file:  (43.47 KB) (43.47 KB)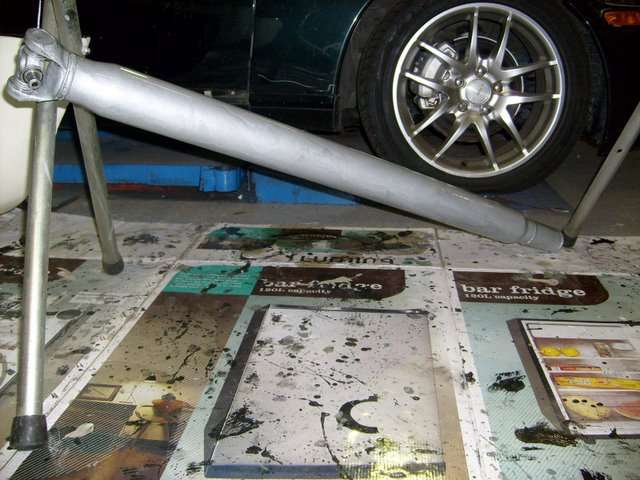 (25.20 KB) (25.20 KB)
Posted on: 2008/5/20 3:38
|
|||
|
Mal
/o[]o\ ==== Bowral, Southern Highlands of NSW, Australia "Out of chaos comes order" - Nietzsche. 1938 Eight Touring Sedan - SOLD 1941 One-Twenty Club Coupe - SOLD 1948 Super Eight Limo, chassis RHD - SOLD 1950 Eight Touring Sedan - SOLD What's this? Put your Packard in the Packard Vehicle Registry! Here's how! Any questions - PM or email me at ozstatman@gmail.com |
||||
|
||||
|
Re: Mal's '41 120 Coupe
|
||||
|---|---|---|---|---|
|
Forum Ambassador
|
Wednesday 21st May 2008
Started at the workshop, by taking and cleaning up the painted parts from yesterday in preparation for re-installation of the tailshaft. Where the POR-15 had "puddled", it seems very thin and runny leading to this phenomenom, in critical areas these were cleaned up. Also further cleaned the uni-joint caps by dis-assembling them to ensure they were properly clean, and it was surprising how much cleaner they were after this! In re-assembling and packing the uni-joint caps, as in most tasks where some repetition is involved, found that I got better at it as I went along. So by the time I finished the last one I considered going back and doing the first one again, but restrained myself and just packed a little more grease in. Wade advised and assisted me in installing the front yoke seal and retainer and in greasing the front sliding splines. Then it was up to me to re-install the completed tailshaft assembly. This was accomplished without any dramas by balancing the rear end of the shaft with my feet while using a bar through 2 holes in the frame to hold up the front while I aligned and secured the caps. With the rear caps, positioned the shaft, again with the bar through the frame while aligning and securing the caps. Next spent some time in an initial clean up of the Starter and Generator, should finish these up tomorrow, when Wade will check the brushes in them. And speaking of Wade, he was beavering away under and behind his dash. Installed new hot air tubing, maybe not completely kosher, from the heater to the windscreen demister outlets. And also kept going in his sorting out of the wiring, time and many slipshod repairs and the installation of turn indicators and an electric fuel pump, with it's switch in the glove box, had taken their toll. Wade told me he is installing a new relay(I think that's what he called it - if not, look for a correction tomorrow) under the dash to cope with the additional demands now on the electrical system. Yesterday, as part of this, he was cannibalising the old wiring harness from his '34 for appropriate sections to use in the Super 8. Attach file: (31.63 KB)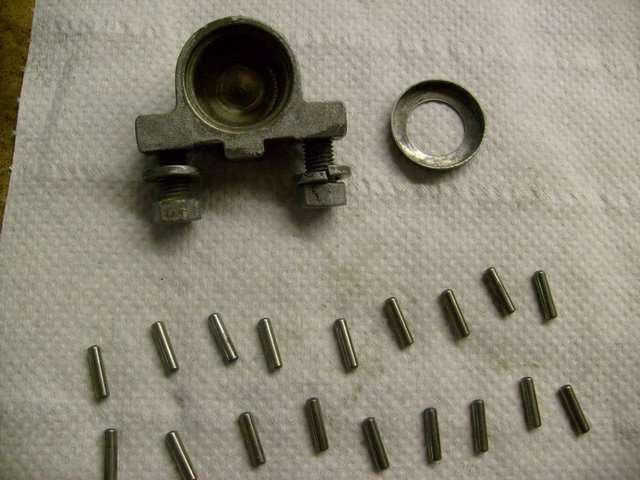 (32.32 KB) (32.32 KB)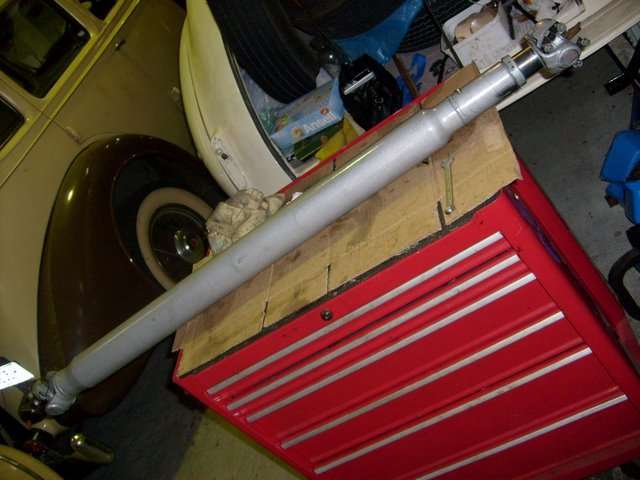 (18.91 KB) (18.91 KB) (26.28 KB) (26.28 KB)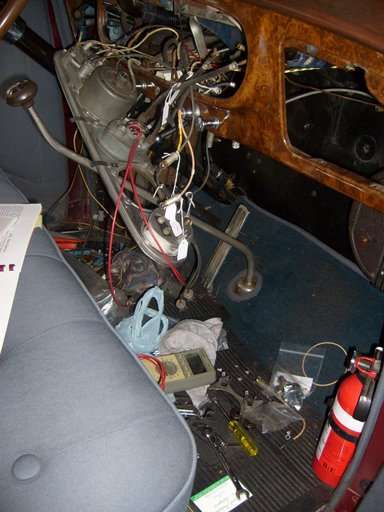 (37.20 KB) (37.20 KB)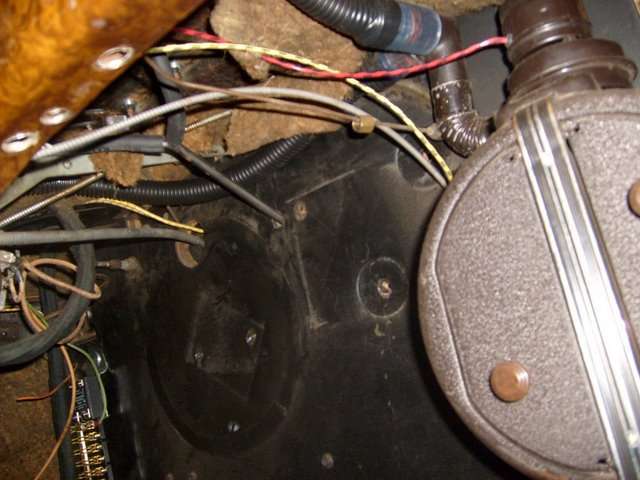
Posted on: 2008/5/21 2:58
|
|||
|
Mal
/o[]o\ ==== Bowral, Southern Highlands of NSW, Australia "Out of chaos comes order" - Nietzsche. 1938 Eight Touring Sedan - SOLD 1941 One-Twenty Club Coupe - SOLD 1948 Super Eight Limo, chassis RHD - SOLD 1950 Eight Touring Sedan - SOLD What's this? Put your Packard in the Packard Vehicle Registry! Here's how! Any questions - PM or email me at ozstatman@gmail.com |
||||
|
||||
|
Re: Mal's '41 120 Coupe
|
||||
|---|---|---|---|---|
|
Forum Ambassador
|
Thursday 22nd May 2008
After dropping in at the Motor Registry Office to reserve a selected number plate for the '41 arrived at the Workshop. Instead of finishing the cleaning of the Starter and Generator we revisited the rear axle issue. Removed the right side axle protruding from the housing and couldn't see anything apparent that would have caused this. Then removed the left side axle and measured/compared them, both same length and the new bearings are pressed on correctly, also measured sizes of new bearings and cones and compared with old bearings and all came within 0.002". Reading the various manuals didn't shed much light on the matter as they concentrated more on the set up inside the diff rather than axle removal and installation. Anyway then re-installed both axles at the same time which left both slightly proud from the housing. Then commenced to clean up the backing plates surfaces where these retain the bearings, I'd POR-15'd these areas, and also cleaned excess POR-15 from the shanks/threads of the backing plate bolts. Will commence assembly of backing plates, shims, etc on Saturday as we're off to see the grand daughters this afternoon. Left Wade still working on his Super 8 dash and, if all goes well, he expects to have it done by the end of the day. Attach file: (33.79 KB)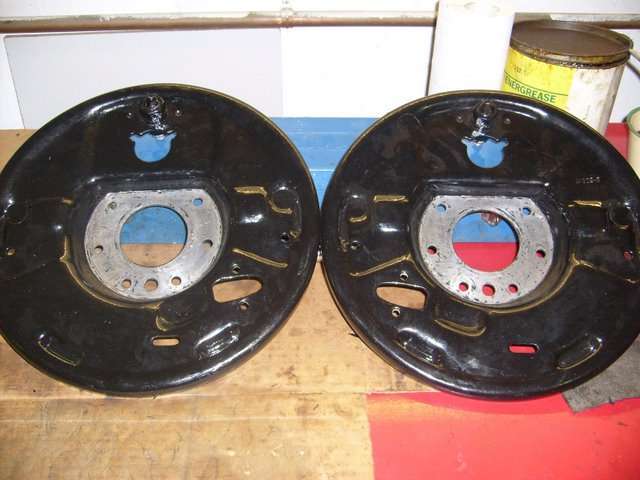
Posted on: 2008/5/21 22:01
|
|||
|
Mal
/o[]o\ ==== Bowral, Southern Highlands of NSW, Australia "Out of chaos comes order" - Nietzsche. 1938 Eight Touring Sedan - SOLD 1941 One-Twenty Club Coupe - SOLD 1948 Super Eight Limo, chassis RHD - SOLD 1950 Eight Touring Sedan - SOLD What's this? Put your Packard in the Packard Vehicle Registry! Here's how! Any questions - PM or email me at ozstatman@gmail.com |
||||
|
||||
|
Re: Mal's '41 120 Coupe
|
||||
|---|---|---|---|---|
|
Forum Ambassador
|
Saturday 24th May 2008
I had been searching for a hood ornament for Harvey, the guy doing my dash woodgraining, and yesterday I ordered one for his 40 Willys sedan. Least I can do, as he said he needed a good one, and he's only charging me for the cost of materials! Also yesterday went for a run in the '38 up to my wife's sisters, about 20 miles. A very pleasant drive and although not a hot day it was mainly to see how the new temp gauge worked. On the way there ran at about 155/160 and after stopping and picking her up went up to 180. And on the way back after being in some traffic, where it stayed up around 170/180, once we got a good run it was back down to 160. The real test will come of course when the weather warms up again. Also had a look through my tins of old nuts and bolts because one of the bolts to hold the backing plate to the rear end was fully threaded while all the rest had a smooth shoulder at the head end where they pass through the the end of the diff housing and the backing plate and retainers. Could only find one, from the literally 1,000 collected over the years, and it was chrome plated! Anyway, after that short diversion, this morning arrived at the workshop to find Wade about to start his Super 8. He was checking it for radiator shutter operation after the radiator makeover recently and it worked well except that he had to cover the grill with some thick material so the engine would get up to temp to allow the shutters to open. He's finished the dash re-wiring and tidy up and that's all back in place without wires hanging down below it, see pic's. Wade spent most of the rest of his time doing his Super 8 distributor. The points in it when it arrived from the US were shot so Wade replaced them with a "temporary" set from who knows what. In the meantime he'd bought the right points for it but in going to install these found he didn't have the tiny nuts/bolts/etc required so spent considerable time rooting through his collection of cast-offs and was finally able to come up with some to fit. Works very well now, as he showed me with the timing light, spot on! Wade had earlier looked through his excess nuts and bolts and found me a match with a nut and bolt from his '34 project, so I now won't have one glistening highlight on the rear end! I was then given instructions on shimming the rear backing plates which basically boiled down to mounting the shims, gaskets and backing plates each side and seeing how much movement there was when pushing/pulling the axles on each side, which was minimal in both cases, as Wade doesn't have the equipment to measure the play, but they hardly moved! I then took them all off again and liberally applied liquid gasket sealer to all surfaces from the axle housing end, gaskets, shims to the backing plates and bearing oil guard and retainer. A very messy and sticky operation but necessary and now the backing plates are re-installed. Also cleaned up the tapered end fittings of the rear sway bar where I'd overpainted with POR-15, this de'POR-15ing is now a recurring theme. Found one of the threads was damaged on the sway bar so Wade brought out his set of taps and dies and I carefully cut the damaged thread successfully, now the rear sway bar and shock are ready for installation on Monday. While the rear brakes won't be done until the master cylinder and front brakes are completed after the replacement stub axle arrives so that the brake system can be flushed, filled with silicon fluid, bled and then left in peace. Attach file: (35.13 KB)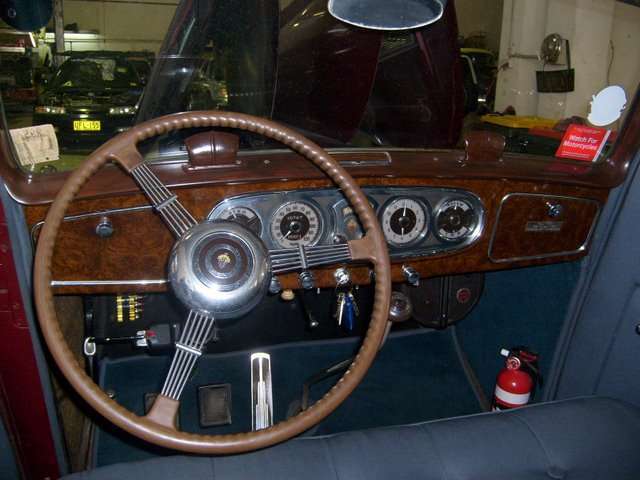 (21.59 KB) (21.59 KB)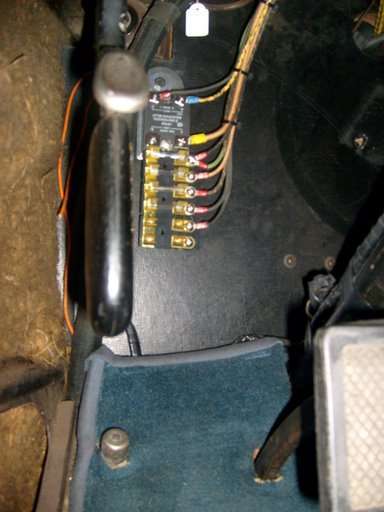 (34.25 KB) (34.25 KB)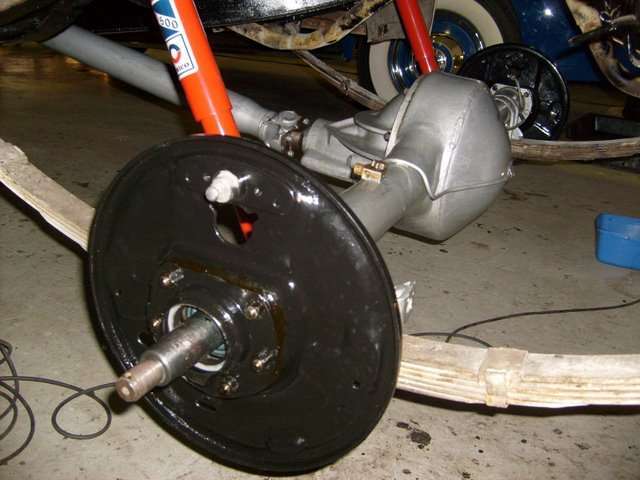
Posted on: 2008/5/23 23:53
|
|||
|
Mal
/o[]o\ ==== Bowral, Southern Highlands of NSW, Australia "Out of chaos comes order" - Nietzsche. 1938 Eight Touring Sedan - SOLD 1941 One-Twenty Club Coupe - SOLD 1948 Super Eight Limo, chassis RHD - SOLD 1950 Eight Touring Sedan - SOLD What's this? Put your Packard in the Packard Vehicle Registry! Here's how! Any questions - PM or email me at ozstatman@gmail.com |
||||
|
||||
|
Re: Mal's '41 120 Coupe
|
||||
|---|---|---|---|---|
|
Forum Ambassador
|
Tuesday 27th May 2008
Last night updated the blog for Monday's efforts at the workshop but when I went to the update button found nothing. All was lost so as it was about midnight local time gave it away and went to bed instead. Now, to recreate yesterday effort and add in today's stuff. Yesterday arrived at the workshop late morning to find Wade polishing the '37 Super 8. The Super 8 had been washed on Saturday to remove the dirt and grime from the Ballarat trip earlier this month but after the wash there were still marks from radiator overflow, hence the polishing. And soon after I arrived so did Peter from the Packard Club. Peter has a '38 120 sedan and he was picking up an engine from Wade for it as his has had a cracked block for some time. The engine he got comprises the internals from the engine that Wade originally rebuilt for his '37 120 together with a spare block from Club Stock. The rebuilt engine only had 1,000 miles on it before it too cracked a block and Wade then rebuilt a '46 engine that is in his 120 today. After loading up Peter's trailer with all the bits then it was time for coffee and a yarn so by the time I got to work on the '41 it was now early afternoon. First thing on the '41 was de-POR-15ing the tapered holes on the diff and shock arm for the rear sway bar. Then mounting it in the car was rather straight-forward requiring only minimal movement of the shock arm until it all lined up. Next up was preparing the fuel tank for re-installation. Removed the fuel guage sending unit and cleaned up the surfaces then made a gasket to fit. Wade then checked the guage sending unit with his tester and found a problem but a spray with Rick's ?magic? electronic parts aerosol seemed to fix that. Then, because the ?T? bolts to secure the tank straps had been cut through in their removal, Wade started modifying a couple of bolts to use in their place. This involved grinding the top of the bolt at the beginning of the thread so that is was slightly hollow. Then around to the machine shop where Sam welded another bolt to the hollowed out end to form a T. Back to our workshop, and while Wade went to the Post Office to mail some stuff to the Packard Club in New Zealand, I proceeded to hacksaw off the heads of the bolts and grinding and running a die over the ends of the cut threads, one successful and one not. Not to fear though, Wade borrowed John's die nuts and was able to save my attempt. Lastly, Wade spray painted the T bolts black and left them to dry overnight for installation tomorrow. There was more yesterday I'm sure, but with the passage of time not to forget old-timers disease, this is all I can recall now. Today arrived at the workshop to find Wade polishing the Super 8 because the polishing yesterday hadn't removed all traces of the radiator overflow staining. Wade suspended his polishing and we prepared for the tank installation. Wade and I inserted the T bolts into the straps and while I cut some rubber sheeting to size to use on top of the tank in lieu of the original material and also some rubber strapping with lipped edges to use between the straps and tank Wade inserted the tank straps into the retaining slots and had prepared the undercar area. With a bit of struggling, aligning and re-aligning the tank it was nicely re-positioned but then Wade couldn't get the T bolts to reach their holes in the rear crossmember. Because of the use of thicker rubber on top of the tank and the rubber stripping between the tank and the straps it was now impossible for the T bolts to be done up. While Wade went back to polishing the Super 8 I took off to Lee Bros for some longer replacement bolts. On returning with 4? bolts in lieu of the 2? previously used then the same grinding, round to get Sam to weld them up and this time, after I hacksawed off the heads, Wade ground and checked the threads with the die nut without any drama. This time all worked perfectly and now the tank is securely in place albeit with looooong T bolts. Then I set to cleaning the main fuel line to tank connection, again this was over-painted with POR-15 and after many attempts, because I was fearful of cross-threading in the brass fitting for the tank line, finally aligned and fitted the lines together. At this point I undid the connection and Wade passed me the air line and I blew out the stale gas and gunk from the main line. Thought it would be easy to re-connect the lines but the previous connection must have been a lucky one. Finally after much trying and tweaking of both lines positions I had them back together again. With Wade going back to finishing his polishing my next task was to de-POR-15 all the other brake line and fuel line fittings so that when their turn came they'd be ready. At the of all that Wade came over and started looking things over again, you might remember every time he does this it ends up costing me. Well this time was no exception. Pulled out the radiator hoses I'd got from the US and the top hose looks too short although this will be revisited after the new front engine mount is installed as the engine should sit properly then. The bottom hoses require a pipe bend between them and then they should fit. While Wade took off the radiator hoses which were almost rock solid with age and the lower one almost split through on 2 places I took off the distributor cap which I'd left hanging by the plug leads when the distributor was removed and part of the Electromatic clutch linkage not being used. Then with Wades assistance, as oil catcher, I removed the oil filter and lines. All this is to provide me with better and clearer access to paint the engine and firewall while Wade is away next week in the Super 8. Wade and Gina, who gets back Sunday night from Thailand, are off on Wednesday for the Border Run. This run is a 3 day rally sited about 700+ miles south-west from Sydney where the borders of the States of New South Wales, Victoria and South Australia meet. So while Wades away I'll paint! Part of Wades inspection was of the radiator which Wade discovered had parts of it's sides loose. There was also packing at the front of the radiator so it wouldn't rub on it's supporting frame. This necessitated removal of the radiator and it was decided to do this without removing any more body panels. The bolts down each side were taken off and the fan removed from the water pump and the radiator tilted back to be lifted and slid over the engine, but the drain cock at the front of the radiator was catching. So off it came but still not enough room so removal of the water pump was required but because the front engine mount was cactus the 2 lower bolts securing it could not be accessed. This required removal of the engine mount frame and necessitating the engine being jacked up to provide clearance. Finally after all this the radiator was brought out with Wade on one side and me on the other lifting it up, back and sliding it to the drivers side where it was then slid out under the side hood panel with mission accomplished! Attach file: (34.80 KB) (18.71 KB) (18.71 KB) (20.77 KB) (20.77 KB)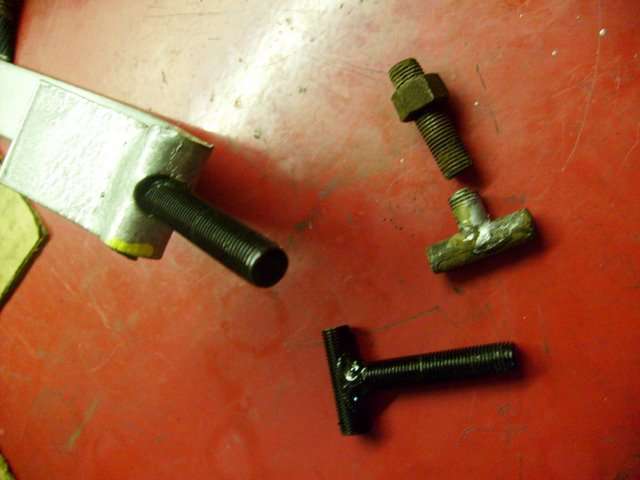 (21.68 KB) (21.68 KB) (27.85 KB) (27.85 KB)
Posted on: 2008/5/27 15:11
|
|||
|
Mal
/o[]o\ ==== Bowral, Southern Highlands of NSW, Australia "Out of chaos comes order" - Nietzsche. 1938 Eight Touring Sedan - SOLD 1941 One-Twenty Club Coupe - SOLD 1948 Super Eight Limo, chassis RHD - SOLD 1950 Eight Touring Sedan - SOLD What's this? Put your Packard in the Packard Vehicle Registry! Here's how! Any questions - PM or email me at ozstatman@gmail.com |
||||
|
||||

|
Re: Mal's '41 120 Coupe
|
||||
|---|---|---|---|---|
|
Forum Ambassador
|
Quote:
Dave, Thanks for your concern regarding end play on the axle shafts. I've mentioned your post to Wade, the bloke who I'm relying on heavily for his knowledge, expertise and experience in Packard mechanical matters, and asked him to have a look at your suggestion.
Posted on: 2008/5/28 2:40
|
|||
|
Mal
/o[]o\ ==== Bowral, Southern Highlands of NSW, Australia "Out of chaos comes order" - Nietzsche. 1938 Eight Touring Sedan - SOLD 1941 One-Twenty Club Coupe - SOLD 1948 Super Eight Limo, chassis RHD - SOLD 1950 Eight Touring Sedan - SOLD What's this? Put your Packard in the Packard Vehicle Registry! Here's how! Any questions - PM or email me at ozstatman@gmail.com |
||||
|
||||
|
Re: Mal's '41 120 Coupe
|
||||
|---|---|---|---|---|
|
Forum Ambassador
|
Wednesday 28th May 2008
Started at the workshop cleaning up some of the parts removed yesterday while Wade was again cleaning the Super 8, this time all the window glass using a product called, I think, Rainex which repels water and is also apparently an excellent glass cleaner. When Wade finished that, after about an hour, we started on removal of the Steering Crank & Ball Stud which had defeated our attempts to remove it early last December. However although we removed the nut and washer from the top, which had previously been inaccessible, we weren't able to drive the bolt down and out. This after, first removing the harmonic balancer, then lowering the engine so that the snout of the crank was below the top of the drift being used by about 1" to avoid damaging the crank, then using bigger and bigger hammers as well as liberal doses of penetrant but all to no avail. Seems like our last option is the application of heat, and to this end Wade went out and got some full oxygen and acetylene bottles to use tomorrow when we planned to tackle it again. While Wade was out I was kept busy cleaning the parts removed yesterday and today as the pic's will show. And a little surprise awaited me when I returned home as Kath tells me we're now visting her sister tomorrow and not Friday. So I wont be going to the workshop until Saturday as we're also visiting our daughter and grand-daughters on Friday. At least I'll be able to drop off the reversing light switch to Harvey for his '37 Super 8 that Wade pulled off his parts '34 chassis and cleaned up and tested. Attach file: (26.95 KB) (27.83 KB) (27.83 KB) (30.12 KB) (30.12 KB) (29.59 KB) (29.59 KB)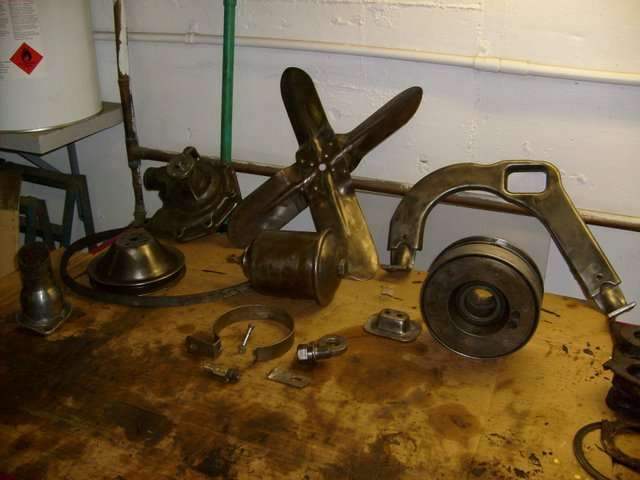 (24.43 KB) (24.43 KB)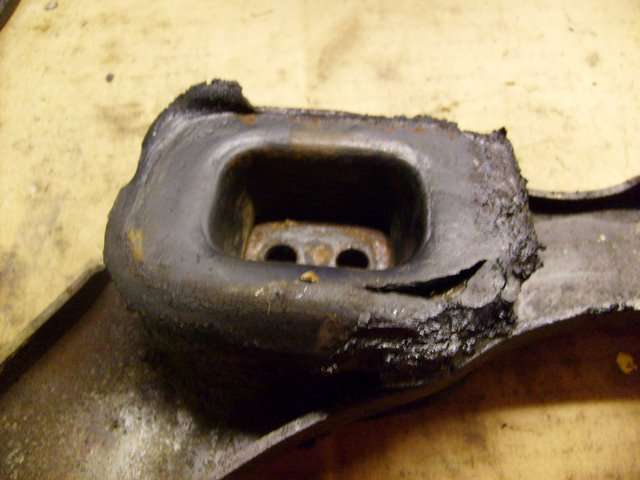 (24.68 KB) (24.68 KB)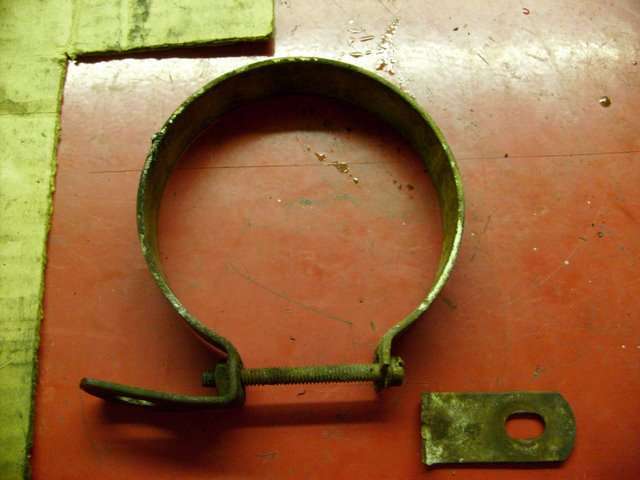
Posted on: 2008/5/28 3:10
|
|||
|
Mal
/o[]o\ ==== Bowral, Southern Highlands of NSW, Australia "Out of chaos comes order" - Nietzsche. 1938 Eight Touring Sedan - SOLD 1941 One-Twenty Club Coupe - SOLD 1948 Super Eight Limo, chassis RHD - SOLD 1950 Eight Touring Sedan - SOLD What's this? Put your Packard in the Packard Vehicle Registry! Here's how! Any questions - PM or email me at ozstatman@gmail.com |
||||
|
||||
|
Re: Mal's '41 120 Coupe
|
||||
|---|---|---|---|---|
|
Webmaster

|
Mal,
The oil filter bracket on '54 was cracked in the same place and the other ear showed evidence of a prior crack the was brazed shut. I just welded the crack closed with my Oxy-Acet torch. I think that over tightening the bracket clamp bolt and the vibration causes this problem.
Posted on: 2008/5/28 16:55
|
|||
|
-BigKev
1954 Packard Clipper Deluxe Touring Sedan -> Registry | Project Blog 1937 Packard 115-C Convertible Coupe -> Registry | Project Blog |
||||
|
||||
Register To PostTopic is Locked


