|
Re: Wade's Workshop
|
||||
|---|---|---|---|---|
|
Forum Ambassador

|
 Peter, although that is said somewhat tongue in cheek! When it comes to things electrical my eyes glaze over as I've never had any understanding of this type of magic. Peter, although that is said somewhat tongue in cheek! When it comes to things electrical my eyes glaze over as I've never had any understanding of this type of magic.And Gerd, too. With the help of Google Translate, I now know what a амперме́тр is, but I still don't understand it!EDIT - Peter, you said it could be the circuit breaker on the light switch because it's showing full discharge. At the time the photo was taken, the car was just idling and the lights weren't turned on. So how does the light switch, and it's circuit breaker, come into play? Remember, I'm the dunce of the class here when it comes to electricity.
Posted on: 2015/7/5 4:58
|
|||
|
Mal
/o[]o\ ====  Bowral, Southern Highlands of NSW, Australia "Out of chaos comes order" - Nietzsche. 1938 Eight Touring Sedan - SOLD 1941 One-Twenty Club Coupe - SOLD 1948 Super Eight Limo, chassis RHD - SOLD 1950 Eight Touring Sedan - SOLD What's this?  Put your Packard in the Packard Vehicle Registry! Here's how! Any questions - PM or email me at ozstatman@gmail.com |
||||
|
||||

|
Re: Wade's Workshop
|
||||
|---|---|---|---|---|
|
Forum Ambassador
|
Wednesday 8th July 2015
Visited Sydney today and called into the workshop where Wade had left 1) the Harmonic Balancer from pepepackard, 2) the Coupes original water pump, which Wade rebuilt, 3) a set of timing case gaskets, 4) a pair of timing case oil seals(..3 & 4 being "off the shelf" items!) and 5) a nice and tasty surprise courtesy of Gina, see photo below. Howard, for your advice on matters electrical. No doubt will be helpful once I start on that side of things.Speaking of which, haven't done anything with the Coupe yet. Besides, while still sorting my "stuff" into some sort of permanency in the garage, it's also school holiday time here and two of our granddaughters and one grandson have been occupying our time. In addition I need to put up the missing link in the shelving which I'm aiming to do tomorrow. So all going well, with kids back at school next week, the Coupe will finally be attended to! Attach file:  (22.60 KB) (22.60 KB)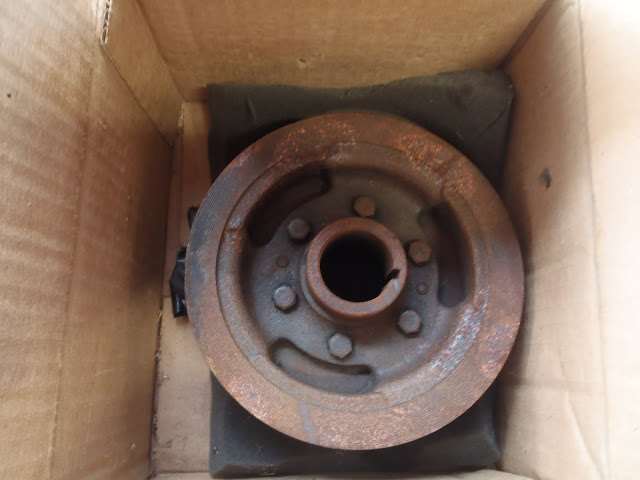 (24.91 KB) (24.91 KB) (36.28 KB) (36.28 KB)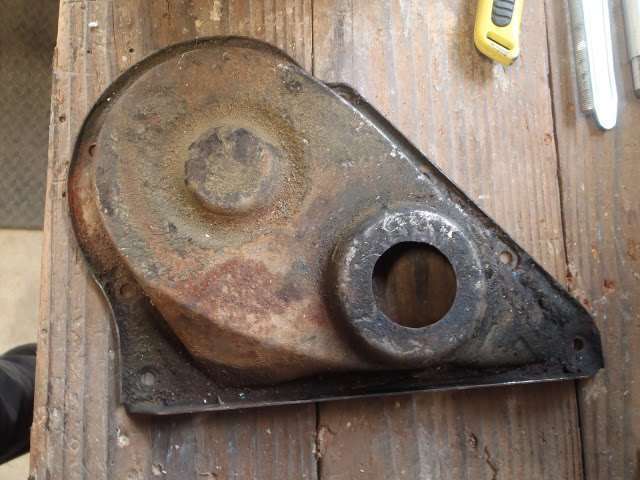 (22.88 KB) (22.88 KB) (15.56 KB) (15.56 KB)
Posted on: 2015/7/8 2:30
|
|||
|
Mal
/o[]o\ ==== Bowral, Southern Highlands of NSW, Australia "Out of chaos comes order" - Nietzsche. 1938 Eight Touring Sedan - SOLD 1941 One-Twenty Club Coupe - SOLD 1948 Super Eight Limo, chassis RHD - SOLD 1950 Eight Touring Sedan - SOLD What's this? Put your Packard in the Packard Vehicle Registry! Here's how! Any questions - PM or email me at ozstatman@gmail.com |
||||
|
||||
|
Re: Wade's Workshop
|
||||
|---|---|---|---|---|
|
Forum Ambassador
|
Sunday 19th July 2015
After much shuffling, some sorting, putting up another section of high shelving and re-organisation, although the latter will be a continuous process, the garage was finally in an acceptable state to start working on the Coupe. This work will reveal if I really learnt anything in my 5 plus years apprenticeship with Wade. So it was with some trepidation, not having Wade to guide me through, that I started the process of removing the front clip. I know it can be done as the Coupe underwent front clip removal back in 2009 for an engine rebuild. This time though there's just me with the biggest problems I imagine I'll face being removal of the bonnet(hood) and the front clip itself after that. Started by jacking the front up and putting a pair of jackstands under the frame rails. Naturally it wasn't high enough and through the course of the day rejacked and rejackstanded it twice more. First thing off was the front bumper complete with stone shield, that whole apparatus being placed to one side well out of the way. Next was the bonnet(hood). First disconnected the bonnet(hood) props,  should have left that to last for this part of the process. The front mount of the bonnet(hood) was easy, only requiring three bolts to be removed. Then came the rear clamp, my hat goes off to the untold countless mechanics and owners who have had to get under Packard dashes. Easy enough to see the nuts holding the bolts but another matter altogether to access them. Wires, cables, demister(defroster) duct and the cowl vent drain all conspire, together with being bent into unnatural plus uncomfortable positions, to make access almost impossible. But never fear, one thing I've learnt from Wade is perseverance. The right side nut came out surprisingly easy but that was obviously to lull me into a false sense of accomplishment because the left side presented it's own set of restrictions. But, as I said, perseverance paid off and eventually off came the nut, which I still have to find, but I know it's in there! Also noticed the right side bonnet(hood) side panel is secured to the cowl by a clip(Which I think is "correct"). However the left side panel is secured to the cowl by a bolt which I imagine was welded to the panel previously, so I undid the nut. To access under the dash I'd removed the front seat squab and laid a folded blanket on the floor and over the seat frame. The seat squab went onto a pair of aluminium(aluminum) trestles and was covered by an old towel. That made a great repository for the bonnet(hood) once I got it off the Coupe. This was accomplished with some degree of difficulty, not having anyone to help, but did manage. Also unbolted the right side radiator stay from the cowl, the left side stay having been removed, and not reinstalled, when the harmonic balancer was replaced. should have left that to last for this part of the process. The front mount of the bonnet(hood) was easy, only requiring three bolts to be removed. Then came the rear clamp, my hat goes off to the untold countless mechanics and owners who have had to get under Packard dashes. Easy enough to see the nuts holding the bolts but another matter altogether to access them. Wires, cables, demister(defroster) duct and the cowl vent drain all conspire, together with being bent into unnatural plus uncomfortable positions, to make access almost impossible. But never fear, one thing I've learnt from Wade is perseverance. The right side nut came out surprisingly easy but that was obviously to lull me into a false sense of accomplishment because the left side presented it's own set of restrictions. But, as I said, perseverance paid off and eventually off came the nut, which I still have to find, but I know it's in there! Also noticed the right side bonnet(hood) side panel is secured to the cowl by a clip(Which I think is "correct"). However the left side panel is secured to the cowl by a bolt which I imagine was welded to the panel previously, so I undid the nut. To access under the dash I'd removed the front seat squab and laid a folded blanket on the floor and over the seat frame. The seat squab went onto a pair of aluminium(aluminum) trestles and was covered by an old towel. That made a great repository for the bonnet(hood) once I got it off the Coupe. This was accomplished with some degree of difficulty, not having anyone to help, but did manage. Also unbolted the right side radiator stay from the cowl, the left side stay having been removed, and not reinstalled, when the harmonic balancer was replaced.Then under the car to remove the bolts, 4 each side, securing the rear of the mudguards(fenders) to the cowl, fairly easily done. Back up top to disconnect the wiring, being the headlight/parklight/turn signal part of the wiring harness(loom). Was going well, with the 3 wires on the body of the terminal block(correct me please if that's not the right terminology), taken care of. But there are also wires from the main part of the harness(loom) affixed to the rearmost bolt securing the terminal to the inner mudguard(fender) and the bolt turned with the nut! Not being an orangutan, I couldn't reach under the mudguard(fender) to hold a spanner(wrench) on the head of the bolt while undoing the nut inside the engine compartment. After repeated attempts with socket extensions, trying to jury rig a spanner(wrench) in place on the head of the bolt I finally bit the bullet and asked my wife if she could "help". To my surprise she said yes! But I think this will be the first and last time that she has her head under the front mudguard(fender) of a Packard. Even then there were problems until I realised the head of the bolt was a smaller size, 5/16", than the nut, 3/8". Didn't have that size spanner(wrench) or socket but fortunately a 7mm socket did the trick. Profusely thanked my wife, for this act above and beyond the call of duty. Apparently the marriage vows don't cover this sort of situation, who knew? Part of my profuse thanks was downing tools, cleaning up and making dinner.But I'll be back to the Coupe tomorrow. Will be under, over and in to drain the cooling system, unbolt the radiator, disconnect the radiator hoses, disconnect the headlight harness(loom) I think it's clipped to the front crossmember and any other parts needing undoing or disconnection to permit the clip to be lifted off. Attach file: (33.20 KB)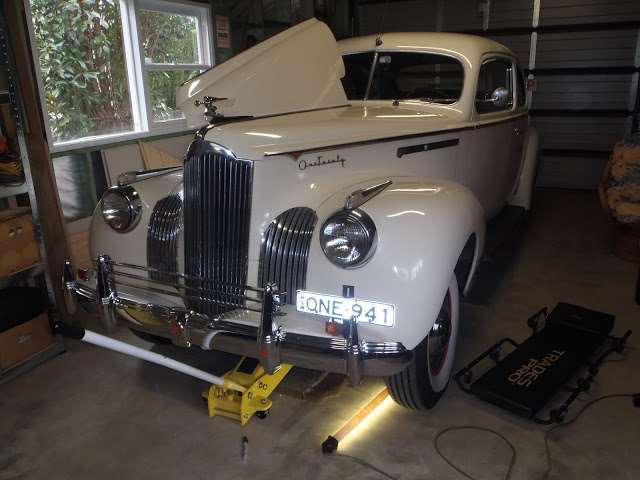 (32.00 KB) (32.00 KB)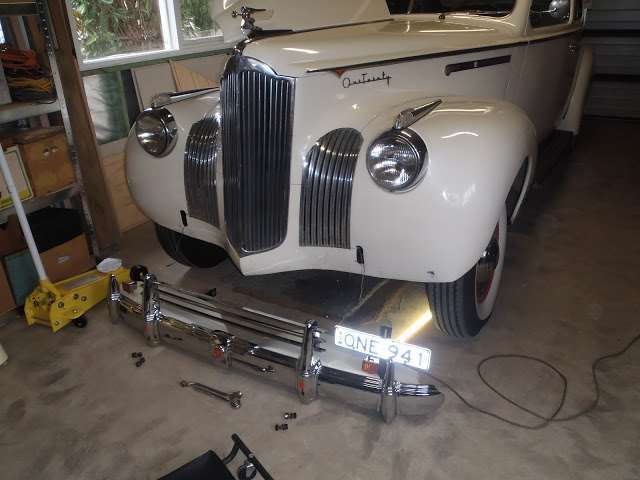 (33.30 KB) (33.30 KB) (34.17 KB) (34.17 KB)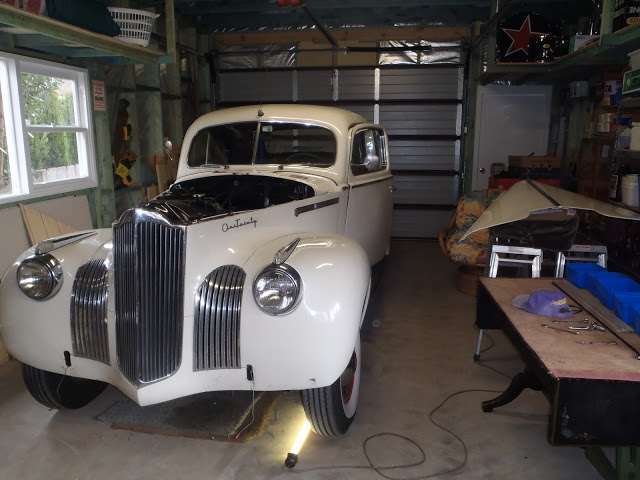 (36.28 KB) (36.28 KB) (41.17 KB) (41.17 KB)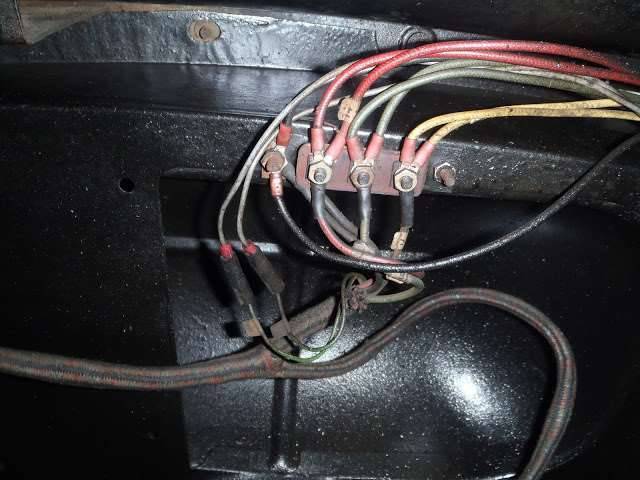
Posted on: 2015/7/19 5:21
|
|||
|
Mal
/o[]o\ ==== Bowral, Southern Highlands of NSW, Australia "Out of chaos comes order" - Nietzsche. 1938 Eight Touring Sedan - SOLD 1941 One-Twenty Club Coupe - SOLD 1948 Super Eight Limo, chassis RHD - SOLD 1950 Eight Touring Sedan - SOLD What's this? Put your Packard in the Packard Vehicle Registry! Here's how! Any questions - PM or email me at ozstatman@gmail.com |
||||
|
||||
|
Re: Wade's Workshop
|
||||
|---|---|---|---|---|
|
Home away from home
|
Quote:
... To my surprise The power of orange jam ... from Gina?
Posted on: 2015/7/19 5:28
|
|||
|
The story of ZIS-110, ZIS-115, ZIL-111 & Chaika GAZ-13 on www.guscha.de
|
||||
|
||||
|
Re: Wade's Workshop
|
||||
|---|---|---|---|---|
|
Forum Ambassador
|
Is was either that or lurve!
Posted on: 2015/7/19 5:33
|
|||
|
Mal
/o[]o\ ==== Bowral, Southern Highlands of NSW, Australia "Out of chaos comes order" - Nietzsche. 1938 Eight Touring Sedan - SOLD 1941 One-Twenty Club Coupe - SOLD 1948 Super Eight Limo, chassis RHD - SOLD 1950 Eight Touring Sedan - SOLD What's this? Put your Packard in the Packard Vehicle Registry! Here's how! Any questions - PM or email me at ozstatman@gmail.com |
||||
|
||||
|
Re: Wade's Workshop
|
||||
|---|---|---|---|---|
|
Home away from home
|
My wife will help me if I really need it and have wine available!
Posted on: 2015/7/19 8:37
|
|||
|
1937 120 1092 - Original survivor for driving and continued preservation. Project blog / Registry
1937 115 1082 - Total basket case, partial restoration, sold Hershey 2015 Project blog / Registry |
||||
|
||||
|
Re: Wade's Workshop
|
||||
|---|---|---|---|---|
|
Forum Ambassador
|
Monday 20th July 2015
Hmmmm......removing the front clip is somewhat harder than I thought it would be. Saying that, it's mainly me rather than the process. Didn't get to the Coupe until this afternoon and at this stage the clip is still "on" but just sitting there. Under the car, releasing the headlight harness from the frame was easy. Next was going to be unfastening the nut holding the radiator collar to the front crossmember but there wasn't a nut to unfasten! Looks like it was missed being put on again back in 2010. Then turned to the radiator drain cock at the front of the lower radiator tank, the cock turned but.....nothing happened! So resorted to a partial drain by loosening off the hose to the water pump at the water pump inlet, caught "most" of the coolant but a lot still escaped. Didn't matter though, I'm an old hand with mop and bucket from the workshop days. Rigged up my hoist at this stage, an old 1 ton chain block I picked up from EleanorS. Chained it to 2 of the garages rafters about 4' in front of the Coupe, should be OK(I hope). Plan is to roll the Coupe into position under the chain block, hoist the front clip up, roll the Coupe back then lower the clip to the floor. Put the front wheels back on and rolled the Coupe into position. Then using 2 lengths of rope, one attached to the mudguard(fender) brackets attached to the radiator collar, the other threaded through the gills of the inner mudguard(fender) and the big air vent, looped these through the lifting hook of the chain block and started lifting. Front was coming up OK, rear looked to be struggling. Discovered a couple of things, instead of "bolts, 4 each side, securing the rear of the mudguards(fenders) to the cowl" should have also found the nut and bolt each side securing the inner mudguard(fender) panels to the cowl! Also discovered the left side mudguard(fender) brace was still attached and......I'd missed the clamp holding the wiring harness(loom) to the inner mudguard(fender) panel. As well the fuel pump heat shield was fouling and the fan was catching the lower radiator hose. At this time decided to abandon the lift, returning the clip to sit on the frame and will take up the running tomorrow. Attach file: (34.17 KB)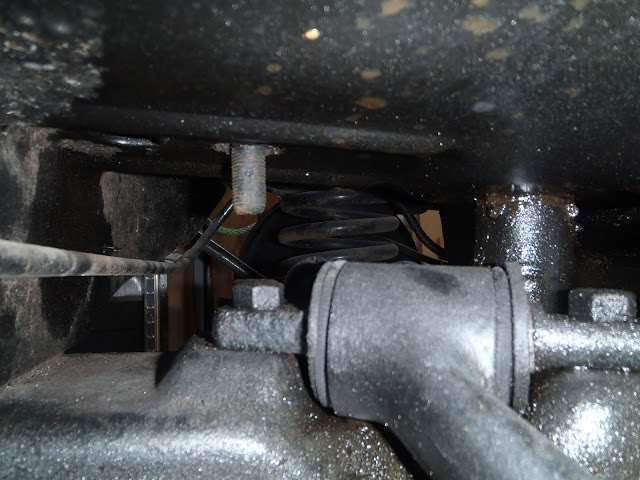 (30.25 KB) (30.25 KB)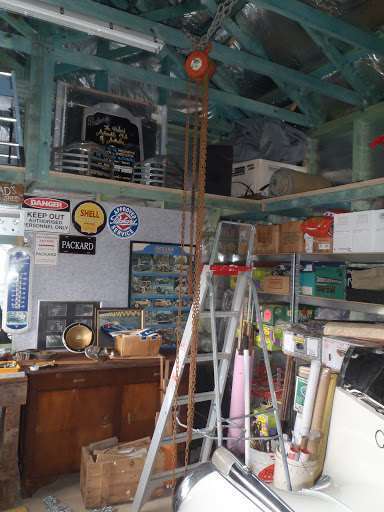 (24.26 KB) (24.26 KB)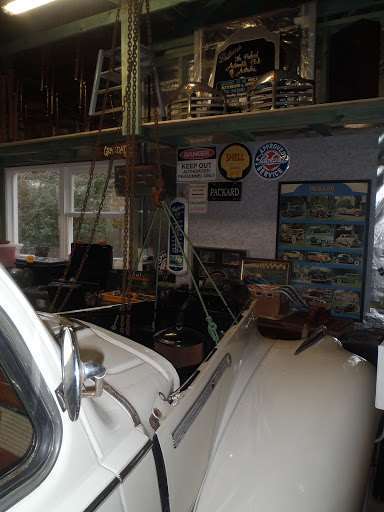
Posted on: 2015/7/20 4:19
|
|||
|
Mal
/o[]o\ ==== Bowral, Southern Highlands of NSW, Australia "Out of chaos comes order" - Nietzsche. 1938 Eight Touring Sedan - SOLD 1941 One-Twenty Club Coupe - SOLD 1948 Super Eight Limo, chassis RHD - SOLD 1950 Eight Touring Sedan - SOLD What's this? Put your Packard in the Packard Vehicle Registry! Here's how! Any questions - PM or email me at ozstatman@gmail.com |
||||
|
||||
|
Re: Wade's Workshop
|
||||
|---|---|---|---|---|
|
Home away from home
|
Mal; You need to put a 4 by 4 on top of the rafters or a block between them as not to damage the rafter ( cross ties is what they are) good luck. Jon
Posted on: 2015/7/20 9:24
|
|||
|
35-1200 touring sedan 42-110 convertible coupe 48-2293 station sedan |
||||
|
||||
|
Re: Wade's Workshop
|
||||
|---|---|---|---|---|
|
Forum Ambassador
|
Tuesday 21st July 2015
Not much done today except the clip is now separated from the body. Main obstacle needing to be overcome was removal of the fan, which had been catching on the lower radiator hose. Although I've done this a number of times before it's always a chore because of the lack of working space between the fan and the radiator. As I've said previously, the radiator acts like a cheese grater on the skin and is NOT a comfortable working experience. After working for a while on one of the four bolts with little progress, bit the bullet and off to the tool shop for a 7/16" ratchet spanner(wrench). At the tool shop, after the young guy said they are costly found a wide selection of ratchet spanners(wrenches). That is all except for a 7/16", or I could have bought a full set for an exorbitant price! Next stop, the hardware store, where they didn't have singles, only sets at a less but still exorbitant price. Third port of call was Supercheap Auto. Again no singles, only sets, but now at a realistic price. Home again, and gee isn't it good to have the right tool for the job? Still requires some knuckle scraping but the bulk of the work is done without the cheese grater effect!Now the moment of truth, was there enough clearance, had I forgotten or missed some other fastening/bracket/hose/ fitting? Started raising the clip with the chain block, main problem being to keep the chain from rattling against the mudguard(fender) but soon developed a technique for that. Would raise it a bit, check each rear corner of each mudguard(fender) and the radiator, fuel pump heat shield and generally check the whole situation, raise again, repeat checks, raise again, etc, etc. When the clip was up high enough for the rear of the mudguards(fenders) to clear the front tyres pushed the Coupe back without any worries. Positioned the thick towels being used at the rear of each mudguard(fender) on the floor with another under the bottom of the grill shell then lowered the clip to the floor. Jon, for the advice "put a 4 by 4 on top of the rafters or a block between them as not to damage the Attach file: (35.21 KB)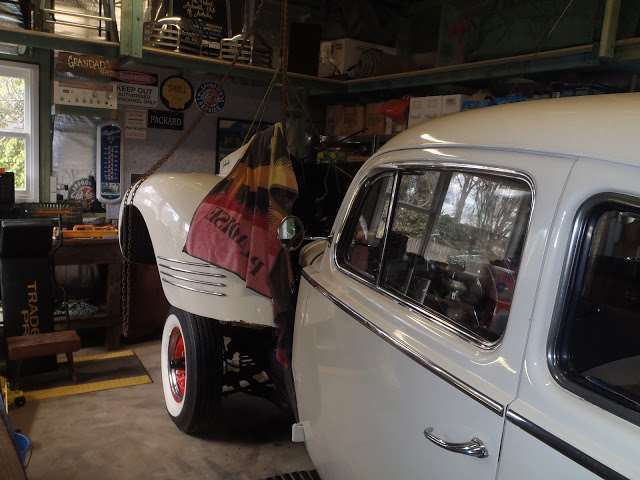 (27.98 KB) (27.98 KB)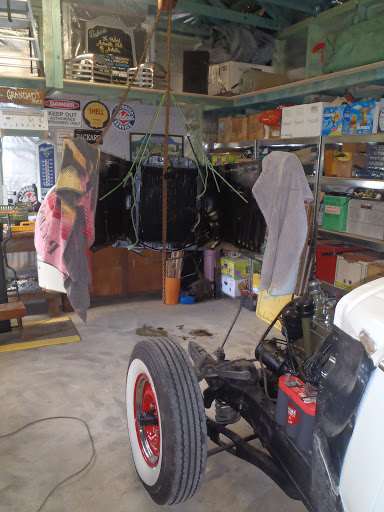 (36.59 KB) (36.59 KB)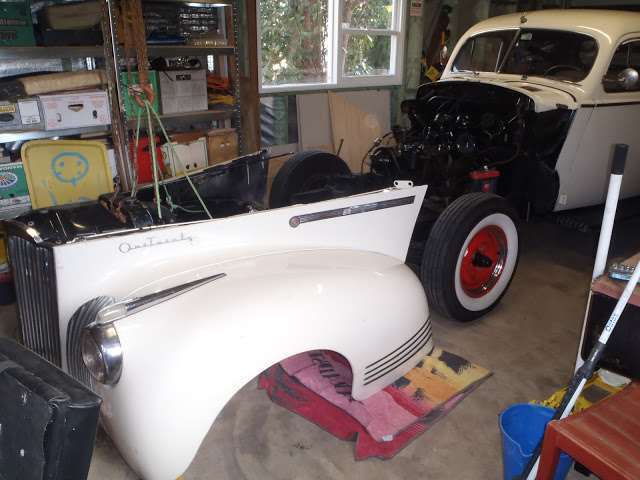 (40.45 KB) (40.45 KB)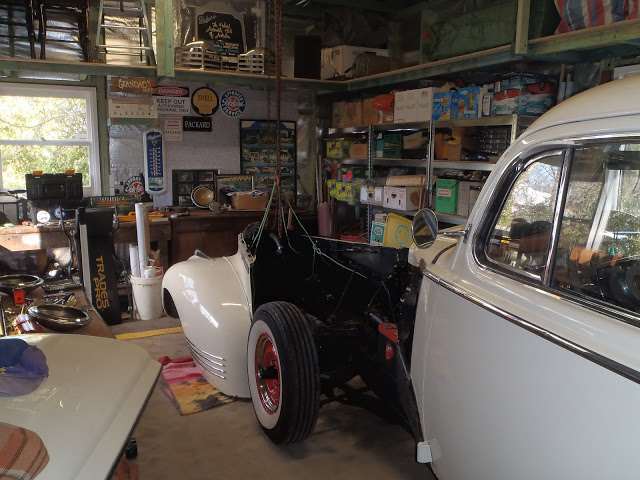
Posted on: 2015/7/21 3:54
|
|||
|
Mal
/o[]o\ ==== Bowral, Southern Highlands of NSW, Australia "Out of chaos comes order" - Nietzsche. 1938 Eight Touring Sedan - SOLD 1941 One-Twenty Club Coupe - SOLD 1948 Super Eight Limo, chassis RHD - SOLD 1950 Eight Touring Sedan - SOLD What's this? Put your Packard in the Packard Vehicle Registry! Here's how! Any questions - PM or email me at ozstatman@gmail.com |
||||
|
||||
Register To PostTopic is Locked


