|
Re: David's Workshop
|
||||
|---|---|---|---|---|
|
Forum Ambassador

|
Wednesday 1st February, 2017
NOTE - Thread renamed for today - David's Workshop! Of course Lee Bros had the brass nuts, and you know what? They are called "manifold nuts", fancy that, and a lot of guys buy them for their old cars! Saving David a trip to Lee Bros I was also to pick up 6 x 3/16 BSF(British Standard Fine) x 5/8" long, steel or brass, slotted or phillips headed screws. Instead I came away with 6 x 10/32 UNF x 5/8" long stainless steel phillips headed screws. The old guy, about my age, behind the counter told me 3/16" BSF and 10/32 UNF are the same thread, learn something new every day. These screws are to be used in a project David's working on for a mate, a 1950 Daimler Special Sports, one of 500 made 1950-52. David is doing all the work on the aluminium(aluminum) body, replacing any rotten wood then painting it. Once it's ready the body will go on David's body dolly and the chassis will go elsewhere for mechanical refurbishment. And to prove that 10/32 UNF IS the same as 3/16" BSF David fitted a screw to the Daimlers door! Then came the real David's Workshop experience when I mentioned now that I have the brass nuts the only other thing remaining was repair or replacement of the tailpipe exhaust hanger bracket(Group 6.002). The bracket, at the top where it mounts to the chassis, has a thick canvas like strip which had separated at one end. David, like Wade, dived into his shelves full of parts and materials and came up with a loooong roll of thick canvas like material, only this was rubberised on one side. Almost a perfect match. David then proceeded to cut me 2 strips using his bandsaw. Then, in the drillpress, drilled out the 3 holes required and then round filed them to fit because pieces of canvas still remained in the holes drilled. Just goes to show the benefits of a well equipped workshop. However I stopped him from de-riveting the old material and re-riveting the new material to the hanger itself. Rosie the Riveter can rest easy as I'm going to drill out the old rivet and replace with a nut, bolt and lockwasher, my workshop is not well equipped and I'm not as talented. And, when I arrived David was getting ready his 1912 Maxwell for a weekend rally down my way. I might just see him around. Attach file:  (57.43 KB) (57.43 KB)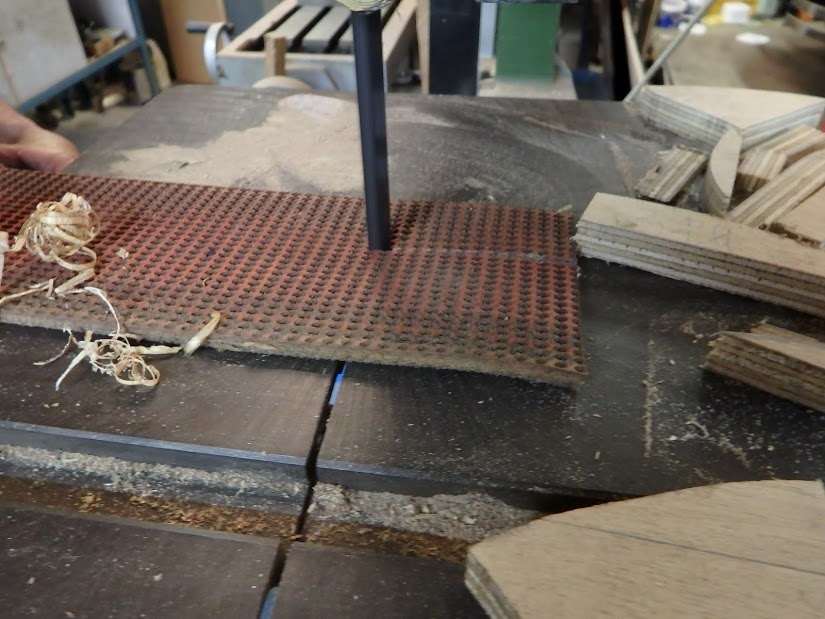 (51.01 KB) (51.01 KB)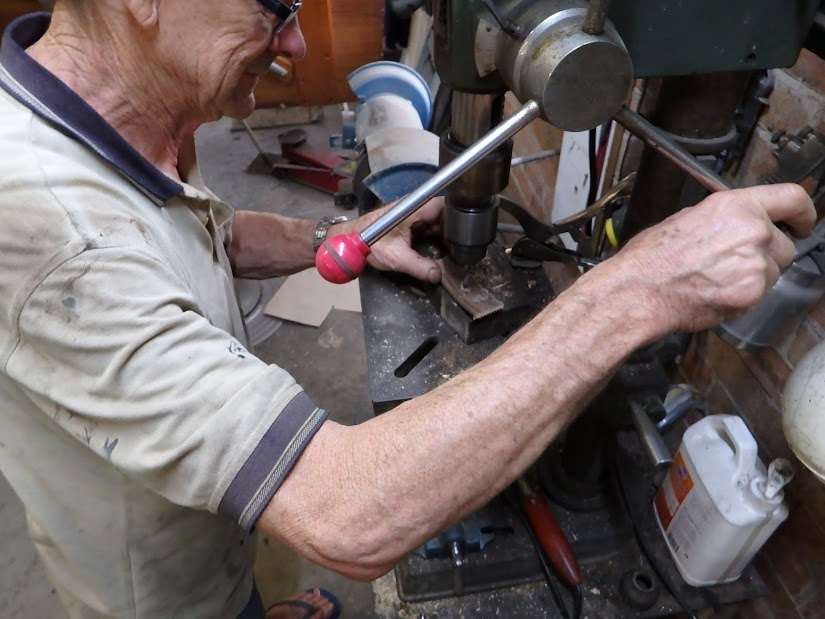 (66.92 KB) (66.92 KB) (58.25 KB) (58.25 KB) (62.86 KB) (62.86 KB)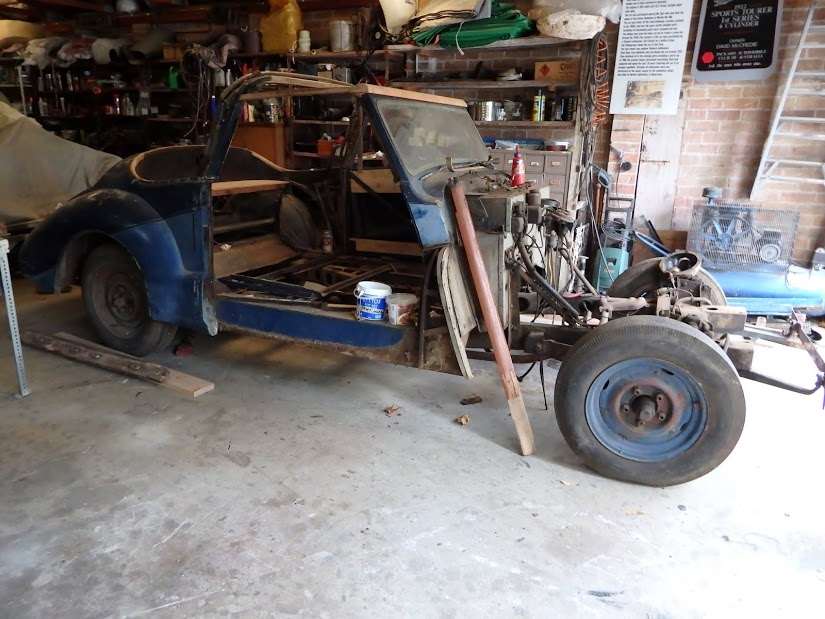 (55.32 KB) (55.32 KB) (79.48 KB) (79.48 KB) (17.10 KB) (17.10 KB)
Posted on: 2017/2/1 1:01
|
|||
|
Mal
/o[]o\ ====  Bowral, Southern Highlands of NSW, Australia "Out of chaos comes order" - Nietzsche. 1938 Eight Touring Sedan - SOLD 1941 One-Twenty Club Coupe - SOLD 1948 Super Eight Limo, chassis RHD - SOLD 1950 Eight Touring Sedan - SOLD What's this?  Put your Packard in the Packard Vehicle Registry! Here's how! Any questions - PM or email me at ozstatman@gmail.com |
||||
|
||||
|
Re: David's Workshop
|
||||
|---|---|---|---|---|
|
Forum Ambassador
|
Thursday 1st February, 2017
Drilled out the rivet, refiled the holes in the canvas/rubber strapping then reassembled the hanger using a nut, bolt and spring washer. That was the easy part, getting the hanger back on to the frame is another matter altogether. Although it was awkward to remove, now realise it would have been impossible if hadn't been broken in the first place. Only reason I could get it off before was BECAUSE it was broken. With it broken I could access one nut and bolt and once that and the hanger was off the other nut and bolt became accessible. With the hanger now a complete unit I can get one nut and bolt on but not the other. Either my hands are much too large or hands and arms won't bend enough or a combination of the two is conspiring against me. Remember now the hanger was out 9 years ago but at that time so was the fuel tank! Thinking my next step might be to either drop the fuel tank(again!) or drop/wrestle the exhaust pipe out of the way. Because of that impasse, left the hanger for another day and turned to reinstalling the manifold assembly. Dropped the chain block hook down, connected the roped manifold assembly to the hook and hoisted it to clear the bonnet(hood) edge line. Pushed the Coupe under the manifold assembly and lowered away. It was almost perfect for a rough "eye" job, only needing to push the Coupe back a couple of inches. Harder when further lowering as there needed to be various push and shoves to enable the manifold assembly to clear the heater hoses, oil pressure line, vacuum line, fuel line, etc. Once past those obstacles a little readjusting of the centre of gravity together with very gentle use of the chain to incrementally lower/raise the manifold assembly and it slipped on like it was made for it! Oh, it was made for it was it? That explains it. Want to formally thank the chain block, without it I would never have been able to this. It was just too heavy to lift, carry, reach over a Packard mudguard(fender) and wriggle it into place. Anyway, that was the easy part, the hard part was kneeling under the mudguard(fender) putting the thick washers on(easy) and the new brass manifold nuts(from easy to near impossible). As said earlier: "Either my hands are much too large or hands and arms won't bend enough or a combination of the two is conspiring against me." Took about an hour just to get the nuts on finger tight! Left it at that for the day because the grandkids were coming over. And I'm sure Peter won't mind "too much" if I share this edited email advice from a few days back: "Sorry about the "naughty rabbit" thing. It relates to a cartoon about a rabbit which was very active on Noah's Ark. ......The graphite side is usually opposite the stamping side of the gasket. Most gaskets have metal innards and have a curl to the cut. You would assemble the curl to the block. There are a few different stamping methods so go with your gut feeling. Remember that there is a specific foot lbs rating for the attachment nuts(25?)." Putting aside the naughty rabbit thing, now that I understand it it's quite funny at my expense of course, and studied Peters advice regarding the gaskets. Closer examination couldn't determine either the graphite side or the curl to the cut. Besides the 2 end gaskets look the same with one having to be installed reversed from the other so graphite side or curl MUST be wrong for one of them(I think)! Instead went with my gut feeling and hopefully, because I have a very big gut, that'll hold me in good stead. Time will tell. Unlikely to get back to the Coupe tomorrow because my daughter has roped me in to pick up some furniture for her. However I intend to catch up with David and his Veteran(Pre 1919) car club at Berrima on Saturday morning. Attach file: (17.93 KB)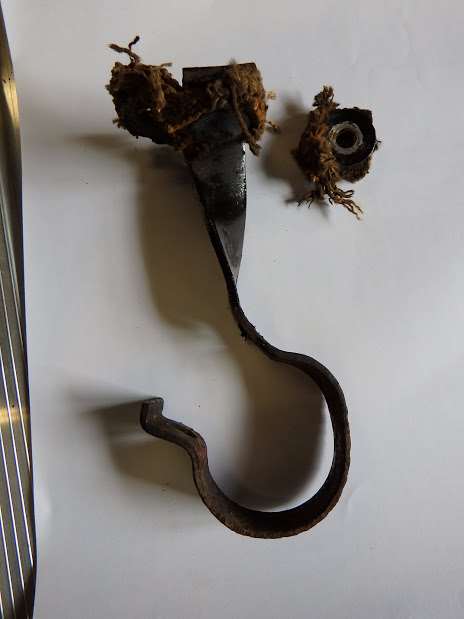 (15.31 KB) (15.31 KB)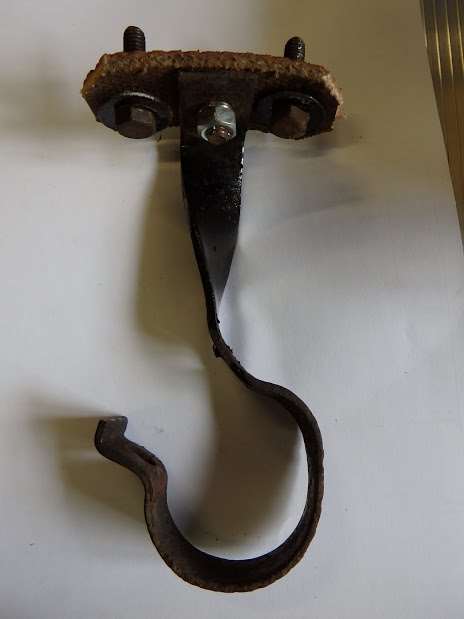 (37.23 KB) (37.23 KB) (41.41 KB) (41.41 KB)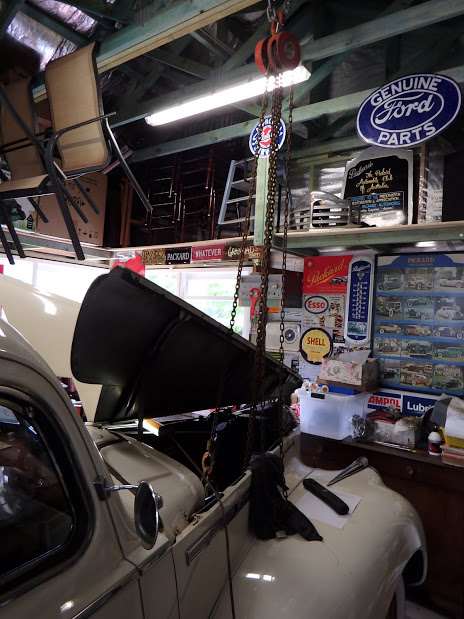
Posted on: 2017/2/2 2:39
|
|||
|
Mal
/o[]o\ ==== Bowral, Southern Highlands of NSW, Australia "Out of chaos comes order" - Nietzsche. 1938 Eight Touring Sedan - SOLD 1941 One-Twenty Club Coupe - SOLD 1948 Super Eight Limo, chassis RHD - SOLD 1950 Eight Touring Sedan - SOLD What's this? Put your Packard in the Packard Vehicle Registry! Here's how! Any questions - PM or email me at ozstatman@gmail.com |
||||
|
||||

|
Re: Wade's Workshop
|
||||
|---|---|---|---|---|
|
Forum Ambassador
|
David,
Thanks for the suggestion as well as the offer to fabricate the part for me. However it has given me an idea and, if I can find a little time tomorrow, I'll try it.
Posted on: 2017/2/2 5:15
|
|||
|
Mal
/o[]o\ ==== Bowral, Southern Highlands of NSW, Australia "Out of chaos comes order" - Nietzsche. 1938 Eight Touring Sedan - SOLD 1941 One-Twenty Club Coupe - SOLD 1948 Super Eight Limo, chassis RHD - SOLD 1950 Eight Touring Sedan - SOLD What's this? Put your Packard in the Packard Vehicle Registry! Here's how! Any questions - PM or email me at ozstatman@gmail.com |
||||
|
||||
|
Re: Wade's Workshop
|
||||
|---|---|---|---|---|
|
Forum Ambassador
|
Thursday 16th February, 2017
Friday 2nd February - "it has given me an idea and, if I can find a little time tomorrow, I'll try it" Famous last words because tomorrow never came! Reason being my back played up on me, was still mobile but restricted in movement by pain and stiffness. But with the passage of time, the back is now good enough to let me again work on the Coupe. The "idea", in lieu of a 200+km round trip for David to weld two bolts to a plate, was to: use an aluminium(aluminum) plate then bend the ends of the plate to hold the heads of the bolts, and it worked! Before that, tightened the manifold assembly to the block. But this time didn't use any RTV, as advised by other Forum Members and Peter. Also didn't follow Peter's other advice of: "Remember that there is a specific foot lbs rating for the attachment nuts(25?)". Have a torque wrench but fail to see how it could be used on all the manifold nuts! There are ten studs and nuts of which 4 are pretty well directly accessible, being the two at each end. Another two are reasonably accessible while the other four need "three armed monkeys"(apologies to all three armed monkeys who read this) just to reach them let alone tighten them as per "spec". Instead went with that other attribute Peter also suggested, "gut feeling", and tightened them till my elbow went click. And that was hard to do with some nuts only allowing 1/2 or 1 flat to turn before having to reset the spanner(wrench) on the nut. Anyway, with the manifold assembly now in place, reinstalled the carburettor(carburetor) and the vacuum and fuel lines. Also reconnected the engine pipe to the exhaust manifold and the engine pipe clamp to the bellhousing. Still to remount and reconnect the accelerator linkage. There's still a lot to do and check before the Coupe can be fired up which, as long as my body holds together, will be tomorrow. Attach file: (23.89 KB)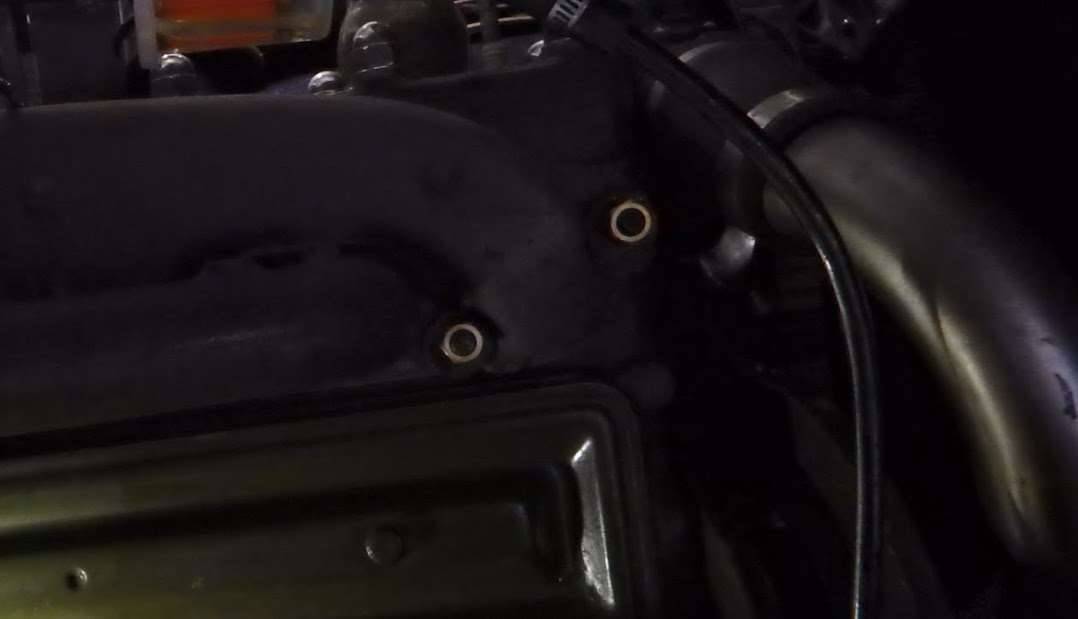 (49.58 KB) (49.58 KB)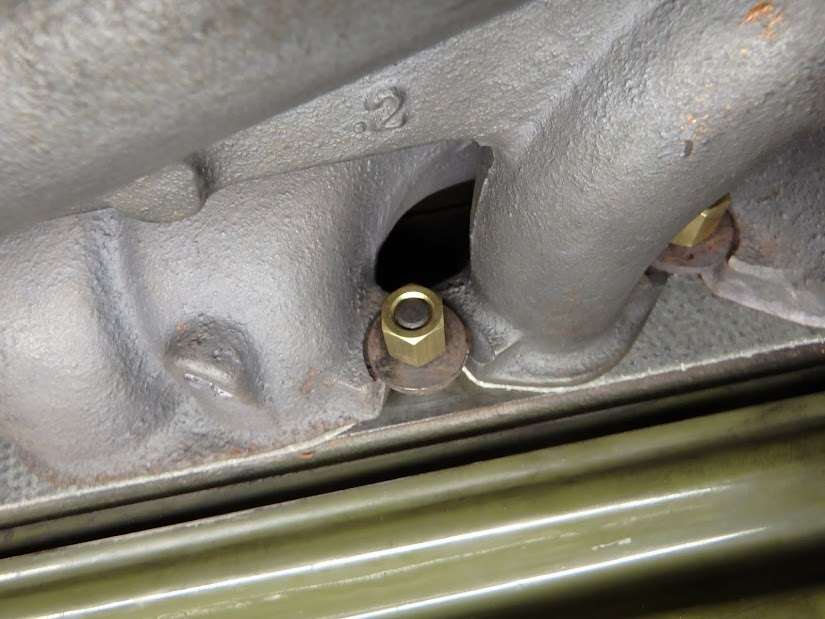 (51.94 KB) (51.94 KB) (32.67 KB) (32.67 KB)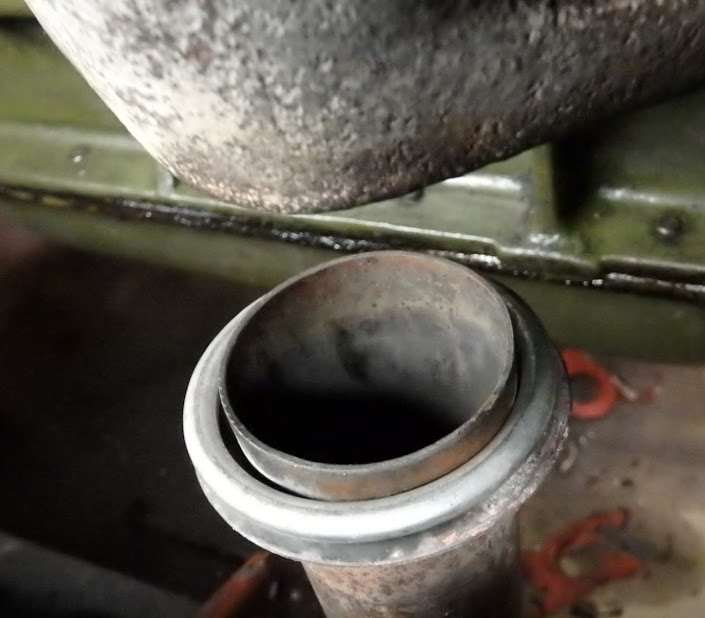
Posted on: 2017/2/16 3:27
|
|||
|
Mal
/o[]o\ ==== Bowral, Southern Highlands of NSW, Australia "Out of chaos comes order" - Nietzsche. 1938 Eight Touring Sedan - SOLD 1941 One-Twenty Club Coupe - SOLD 1948 Super Eight Limo, chassis RHD - SOLD 1950 Eight Touring Sedan - SOLD What's this? Put your Packard in the Packard Vehicle Registry! Here's how! Any questions - PM or email me at ozstatman@gmail.com |
||||
|
||||
|
Re: Wade's Workshop
|
||||
|---|---|---|---|---|
|
Forum Ambassador

|
nice to see how Packard made the header pipe so that it would hold the seal.
i didn't have that luxury when i got the exhuast we put on. the rotting corpse of a pipe we took off didn't look anything like yours and i'm pretty sure it was someone else's idea of a fix back in the day. I had them put a bulge in the pipe to form a "45" that would sandwich up in the manifold. it worked...but as you saw in my blog i had to take it all off to weld some pieces. anyways, thanks for the pic, nice to see what it looks like
Posted on: 2017/2/16 16:40
|
|||
|
1937 Packard 138-CD Deluxe Touring Limousine
Maroon/Black 1090-1021 [url=https://packardinfo.com/xoops/html/modules/registry/View.php?ID=232]1955 Packard |
||||
|
||||
|
Re: Wade's Workshop
|
||||
|---|---|---|---|---|
|
Forum Ambassador
|
Friday 17th February, 2017
Connected the accelerator linkage, mounted the automatic choke pipe, reinstalled the air cleaner, ran the starter without the ignition on, then fired the Coupe up. Seems to be running well with no fluid or exhaust leaks. Then went and filled the Coupe up at the local service station where I was approached by a guy who has a late '40's Mark IV Jaguar Drop Head Coupe. Just as I finished the fill the Jag pulled into the service bay and went up on the hoist for the undercarriage to be cleaned. Tomorrow there's a local car show at Mittagong, about 5 minutes away with about 80 cars expected including brass and teens and twenties. I'll take the Coupe for a run to look the cars over, then go for a reasonable run to get everything properly warmed up for an oil change. "Nice to see how Packard made the header pipe so that it would hold the seal.......nice to see what it looks like vs being scrutinized for my own innovative idea of a fix. dare i say...." Hank, I've included a pic of the fritzed engine pipe to hot box gasket, even with the "correct" part it too failed. As to being scrutinized, when you put things into words on the internet it almost always "invites" comments whether they are agreeable or not. Attach file: (61.63 KB)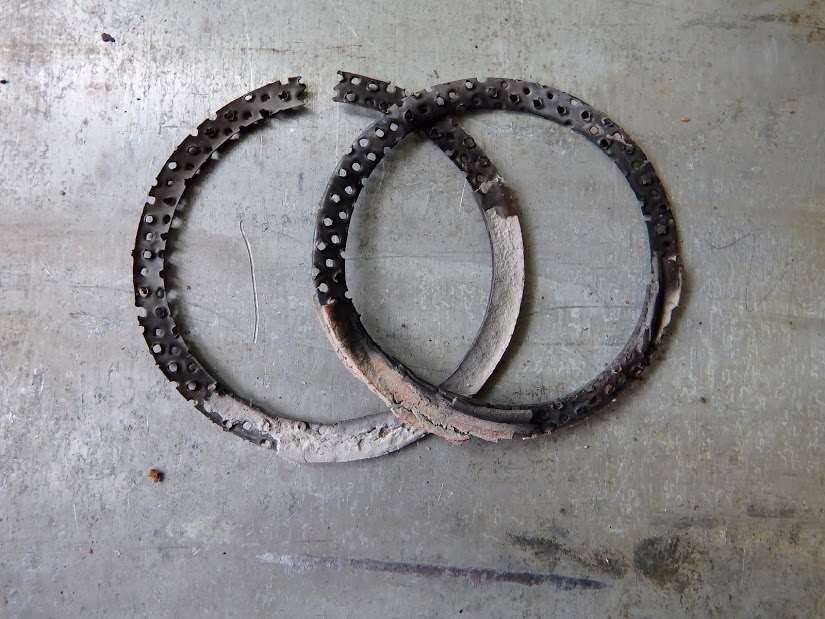 (53.94 KB) (53.94 KB)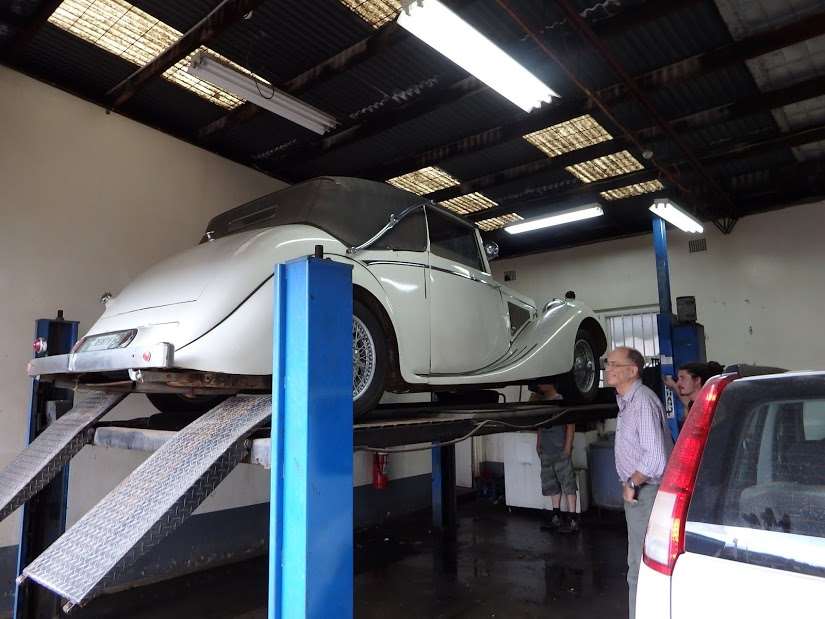
Posted on: 2017/2/16 23:57
|
|||
|
Mal
/o[]o\ ==== Bowral, Southern Highlands of NSW, Australia "Out of chaos comes order" - Nietzsche. 1938 Eight Touring Sedan - SOLD 1941 One-Twenty Club Coupe - SOLD 1948 Super Eight Limo, chassis RHD - SOLD 1950 Eight Touring Sedan - SOLD What's this? Put your Packard in the Packard Vehicle Registry! Here's how! Any questions - PM or email me at ozstatman@gmail.com |
||||
|
||||
|
Re: Wade's Workshop
|
||||
|---|---|---|---|---|
|
Forum Ambassador
|
Saturday 15th April, 2017
Haven't updated here for a while, not much having happened. Although in March had intended the drive the Coupe to our Packard Club AGM, but under pressure flooded it and it wouldn't start. Of course it started easily the next day! Have been for several local runs here in the Southern Highland then a couple of Sundays past drove to Wildwood Garden at Bilpin in the Blue Mountains for a Packard Club run, a mere 310 km round trip. Today was a 220 km round trip to West Ryde, where the Coupe revisited Wade's Workshop. John still conducts his mechanical repair business there and had agreed to replace the Upper/Outer Pin and Bushings on the Coupe along with the rubber bump stops. Reason John was doing this? I didn't think I had the equipment to do so, probably needing a spring compressor, besides he does have a hoist, two in fact. Backed the Coupe into the workshop and between the hoist uprights only needing one small shuffle sideways to get it in the middle, not bad for me. Before going up, removed the hubcaps and loosened the wheel nuts, although John then produced his rattle gun but the hard work had already been done! Rough procedure for bushing replacement, as follows: 1) Tie up/back the brake drum so it doesn't droop and stress the flexible brake line. 2) Remove the split pin and undo the nut from the bushing pin, 3) Knock out the pin(Right side required a little gentle persuasion, the left finger pushed out), At this point, having started on the right side we undid the 4 bolts holding the shock to the top of the frame. Didn't do this for the left side as it was found not to be necessary! 4) Check fit of new components, 5) Small smear of rubber grease and insert two halves of rubber bushings, 6) Insert steel bush inside rubber bushings, 7) Having identified orientation of offset fittings(terminology lapse here, sorry), insert large washers. Mea Culpa - We didn't, working on the right side, but figured it out using working marks. Took more interest on the left side and didn't need to figure anything, 8) Insert new bushing pin, new nut, tighten accordingly and fit new spiltpin. Fitting of the rubber bump stops was as follows. For the large lower bump stop: 1) Remove the circlip(Terminology again?) retaining the bump stop to the stamped bracket rivited to the side of the chassis. 2) Reverse procedure from 1) above to install the new bump stop. Note, you have to align the circlip so it can be knocked out and in. For the small upper bump stop: All Occupational Health & Safety Professionals please look away now. 1) Place a hydraulic floor jack under the front suspension member. 2) Place a length of timber on the jack going up to the front suspension member. Fortunately John had a suitable length of timber at hand, about 3' long, which was perfect for this. 3) Very, very slowly and carefully raise the jack, to raise the shock absorber arm just enough to fit the bump stop. 4) Lower the floor jack and, Hey Presto, the bump stop is pushed into place. Wish I'd known this trick/technique about 9 years back when the Coupes front suspension was gone through previously. On that occasion, besides copious amounts of rubber grease, an awful lot of cussing was required to accomplish what I now know to be a very simple task. 5) You'll also need a transmission jack centrally located under the diff housing because when raising the floor jack the whole front of the Coupe started to lift. The trans jack provided a nice counterpoint to the forces at the front of the Packard. OK - OH&S may rejoin us now. Reason for this, besides bringing the Coupe back to spec? In June there's a Packard Club run at the Sirromet Winery at Mt Cotton in Queensland, about a 2,000 km round trip and now have a good solid front suspension for the trek there and back. Did a similar trip in 2014, sans Packard, because our Queensland Packard Club members have no specific Packard events to attend. Have attached a link to the article penned for our club magazine. Another matter, had a starting problem about a week ago. Knew it wasn't fuel(or so I hoped) but checked that anyway. Spark was there but it just wouldn't start. After numerous attempts gave up and brought in a professional, an NRMA man. NRMA is our state Motorists Association who provide breakdown service, at varying levels, for your membership. Young guy, Jaiden, turned up but wasn't fazed by a car about three times his age. Did similar checks to those I'd done, then a number of futile start attempts. But.....he had one of those little jump starter packs which was 6V/12V and with the assistance of that the Coupe sprang to life. Ran it for a little while, turned off then started again(easily this time). Repeated the start and off a number of times, each time started easily. Thanked Jaiden and enquired where I could buy a jump starter similar to his. On enquiring where Jaiden had pointed me, found out they only have a straight 12v model. Pity, it would have been nice to have the 6V option. What I did find though was that my battery, an Optima, was down on charge showing 6.3V when first hooked up to my trickle charger. The following morning it was at 7.2V and since then the Coupe has started very easily every time. Checking this morning before I set out it was at 6.8V. Attach file: (43.83 KB)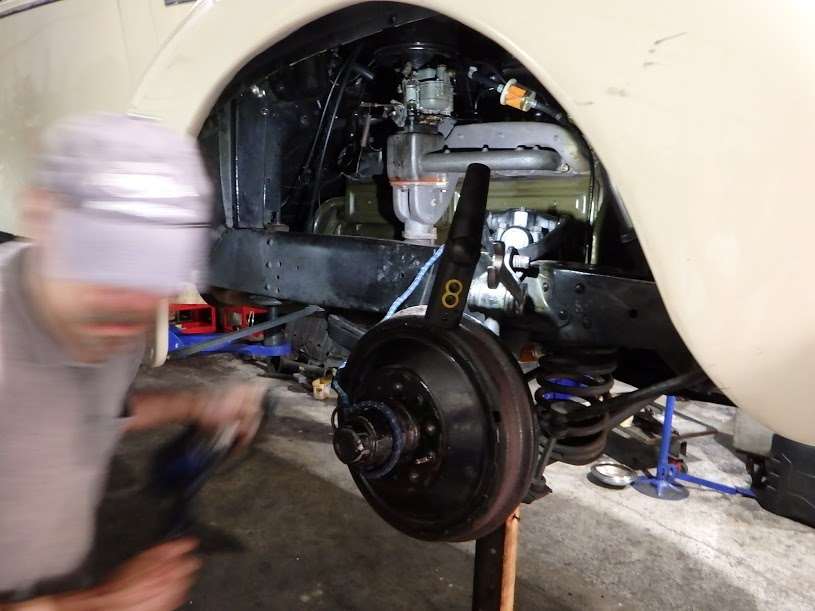 (47.95 KB) (47.95 KB)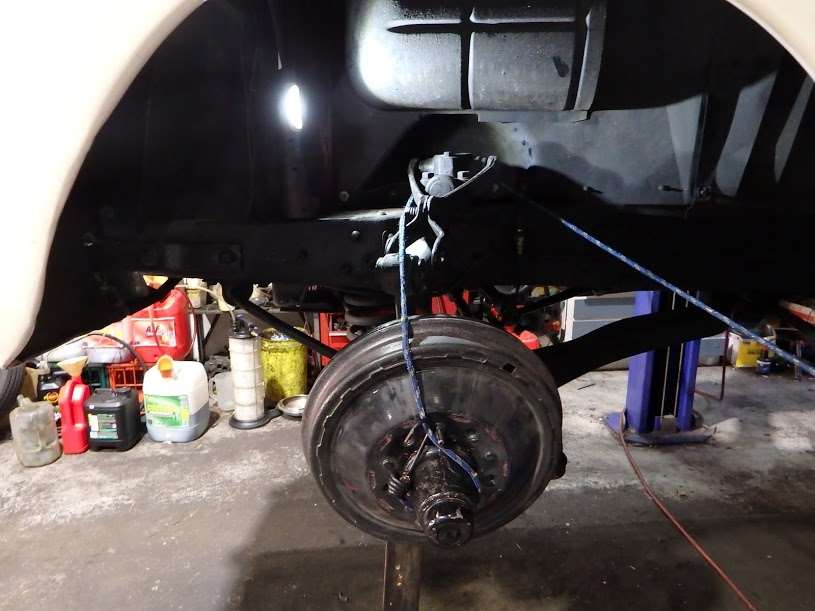 (67.86 KB) (67.86 KB)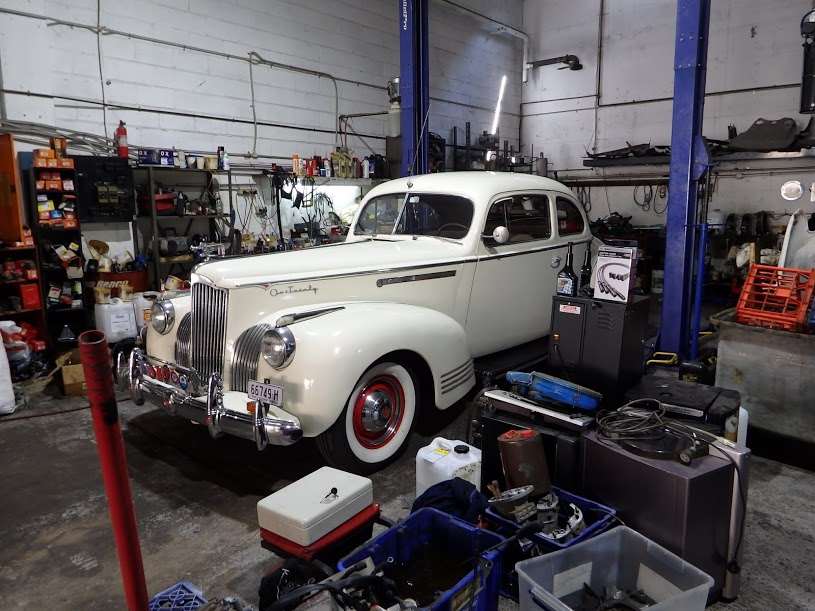 (88.90 KB) (88.90 KB)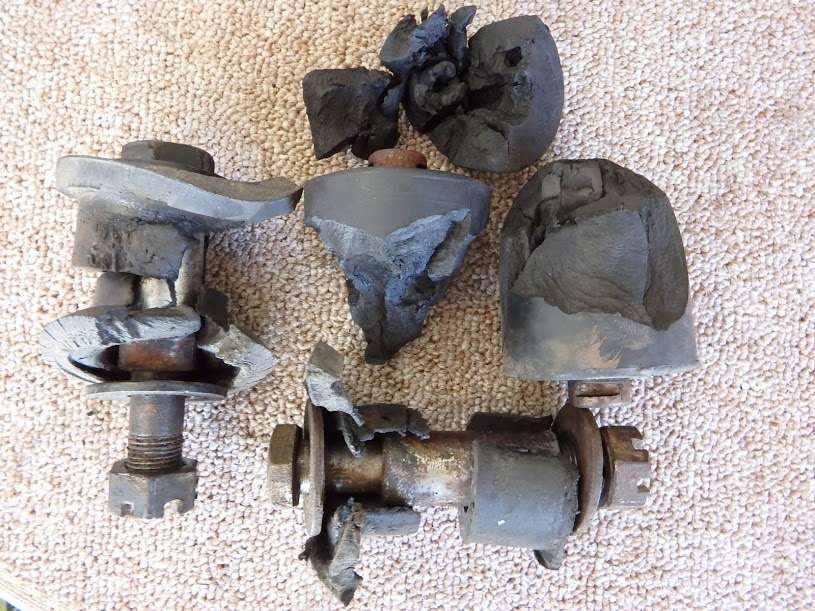 (85.41 KB) (85.41 KB)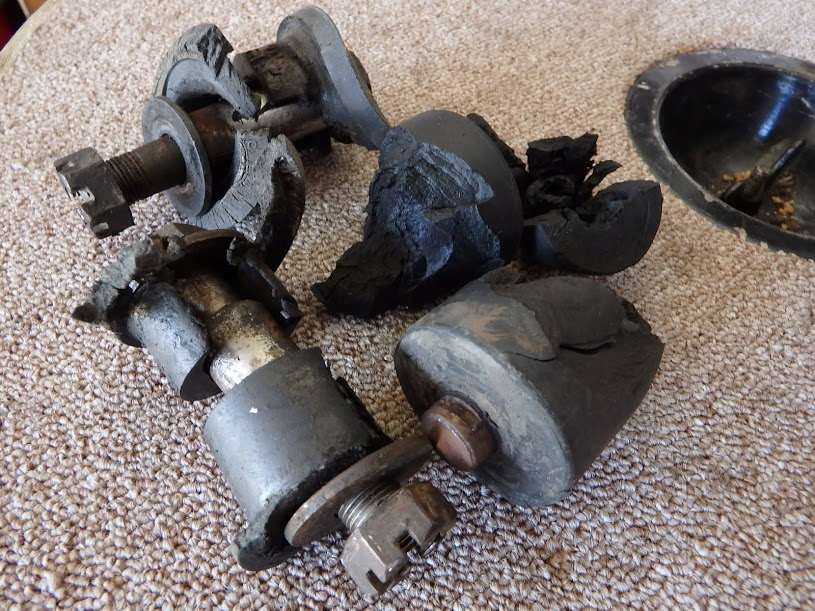  Size: 704.00 KB; Hits: 64 Size: 704.00 KB; Hits: 64
Posted on: 2017/4/15 2:31
|
|||
|
Mal
/o[]o\ ==== Bowral, Southern Highlands of NSW, Australia "Out of chaos comes order" - Nietzsche. 1938 Eight Touring Sedan - SOLD 1941 One-Twenty Club Coupe - SOLD 1948 Super Eight Limo, chassis RHD - SOLD 1950 Eight Touring Sedan - SOLD What's this? Put your Packard in the Packard Vehicle Registry! Here's how! Any questions - PM or email me at ozstatman@gmail.com |
||||
|
||||
|
Re: Wade's Workshop
|
||||
|---|---|---|---|---|
|
Home away from home
|
Good Morning Mr. Oz...Great post to wake up to...along with strong coffee, here in the desert. We often forget that our 6 volt batteries must be up to snuff or our Packards behave like grumpy women! Those front end parts looked really narley! Happy touring...Ernie
Posted on: 2017/4/15 10:11
|
|||
|
Caretaker of the 1949-288 Deluxe Touring Sedan
'Miss Prudence' and the 1931 Model A Ford Tudor 'Miss Princess' 
|
||||
|
||||
|
Re: Wade's Workshop
|
||||
|---|---|---|---|---|
|
Forum Ambassador

|
Speaking of suspension parts, I am wondering if anyone has ever tried fitting polyurethane bushings on any front suspension parts (except the stabilizer bar) on any Packard.
Wasn't there a discussion some years back that one of Kanters companies was in the poly bushing business and might be able to come up with some possibilities for crossing modern bushings to some of the Packard items. I believe the rear rubber on TL cars was part of that discussion but don't remember if the front was.
Posted on: 2017/4/15 10:35
|
|||
|
Howard
|
||||
|
||||
Register To PostTopic is Locked


