|
Re: 1938 Super 8 1605 - adventures with a newbie
|
||||
|---|---|---|---|---|
|
Home away from home
|
Dave's (Owen_Dyneto) advice is spot-on as always. As a point of reference, however, you can often find torque specifications in the third-party manuals such an Motors or Chiltons which were printed years later but if you go that route be sure that you get one that covers your specific year. I once damaged some rod bolts on my 1940 110 by following the torque specs for 1946 six which were a larger bolt so could handle a higher torque. On my smaller bolts, that same torque was right at their fatigue point where they stretched! Had I noted the bolt size which they also showed in the manual, I would have known better even though I was a teenager then.
Posted on: 2019/12/11 15:37
|
|||
|
All generalities are false.
Once I thought I was wrong but I was mistaken. Don Pierson Packard / IMPERIAL page CA DMV Licensed Vehicle VIN Verification 1951 Henney-Packard 3-Door Long Wheelbase Air Force Ambulance The 1951 Henney-Packard is For Sale! 1954 Packard Patrician 1954 Packard Patrician Parts Car 1956 Clipper Custom Sedan |
||||
|
||||
|
Re: 1938 Super 8 1605 - adventures with a newbie
|
||||
|---|---|---|---|---|
|
Home away from home

|
Dave and Don, thank you both. I was able to find the factory service manual on this site after all. Turns out I was looking in the wrong place. For anyone who has trouble finding it, look under "Packard Model Info" and pull up the year and model in question. The link to the factory service manual is there.
Here's the link to the 1938 manual: https://packardinfo.com/xoops/html/modules/article/view.article.php?420 I was unable to find any Chilton's or other manuals that had any pre-war Packard information so I ended up using general torque values based on the bolt/nut size. We finally were able to make a bit more progress yesterday. The mechanic we are working with has had a series of health issues, and we've had some problems with the upper block. Milling still isn't done on it. But we were at least able to get the crankcase mostly put together. Short video this time: <iframe width="560" height="315" src="https://www.youtube.com/embed/M7n2t9cZFuo" frameborder="0" allow="accelerometer; autoplay; encrypted-media; gyroscope; picture-in-picture" allowfullscreen></iframe> We started by cleaning all the parts that were going together. There were still a few parts with remnants of old gasket material that needed to come off. I chased all the bearing castle nuts as well. We lubed all the bearing surfaces with thick engine assembly lube. Then sealed the lower (actually upper) half of the rear main seal by applying black gasket material to the seal, then fully assembling the rear main bearing and seal to fully seat it into place. We then removed one retaining screw at a time, applied blue Loctite, and reinstalling it and tightening. Each screw was sealed with gasket material. The other half of the seal and the main bearing were removed so the crankshaft could go in. Next up was the camshaft. We installed and sealed the rear bearing and cap, then installed the clam shell (not sure if that's the correct term) bearing on the cam for the fuel pump. The bearing faces all got lube, then it was inserted into place, confirming that the fuel pump pin was able to fully seat and contact the cam. The front cover and plate came next. Finally we got to the crankshaft. We carefully lowered it into place, then put all the bearings into place. All the bearings are stamped for specific location, and the stamped end goes towards one side of the engine. Once in place, we then started putting the castle nuts on. The rear main bearing took a bit more work to make sure we had gasket material where it needed to be. But it looks like all potential leak points are fully sealed (hopefully). All the nuts went on, were torqued, and cotter pins placed and trimmed. We ran into a couple of issues that I need some help with. 1.) When putting on the castle nuts we realized that there must have been some sort of washer going on before the nut first. The engine has been disassembled for several years, so it's entirely possible that those washers were lost. Can anyone confirm that washers were supposed to go on before the castle nuts?? We ended up using grade 10 hardened washers that brought the castle nuts up to where the cotter pin holes actually lined up with the holes in the nuts. 2.) Without specific torque values to work from we used a generic table. According to that you can go up to 125 ft/lbs on the large bolts and 80ft/lbs on the small bolts. We settled on 80-90 ft/lbs for the large bolts and 60-70 for the narrow bolts. Will that work? 3.) While torquing, two of the small castle nuts totally failed...expanding and stripping. They didn't even make it to 30 ft/lbs before failing. We re-died the bolts, and used generic grade 10 nuts instead. Because they were not castle nuts we used red Loctite as an extra layer of precaution. Is this going to fly? I hate to have non-OEM nuts and bolts, but I'm thinking some modern replacement where needed is acceptable. -Kevin
Posted on: 2019/12/29 18:01
|
|||
|
||||
|
Re: 1938 Super 8 1605 - adventures with a newbie
|
||||
|---|---|---|---|---|
|
Forum Ambassador
|
Kevin,
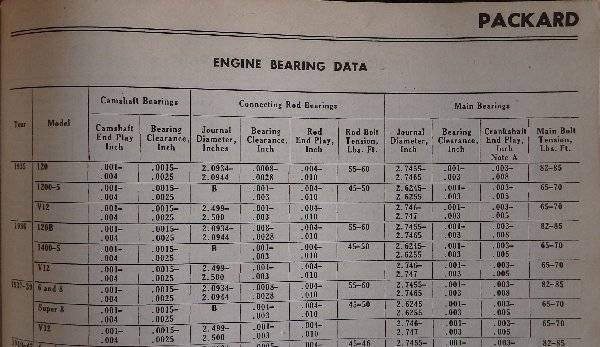
According to my old Motors Manual, spec's for '38 Super 8's are: Rod bolts - 45->50 Lbs Ft Mains - 65->70 Lbs Ft Based on the above, you might have overtightened. How freely does the crank turn after your tightening? NOTE - Click on the pic for a bigger, better image.
Posted on: 2019/12/29 18:42
|
|||
|
Mal
/o[]o\ ====  Bowral, Southern Highlands of NSW, Australia "Out of chaos comes order" - Nietzsche. 1938 Eight Touring Sedan - SOLD 1941 One-Twenty Club Coupe - SOLD 1948 Super Eight Limo, chassis RHD - SOLD 1950 Eight Touring Sedan - SOLD What's this?  Put your Packard in the Packard Vehicle Registry! Here's how! Any questions - PM or email me at ozstatman@gmail.com |
||||
|
||||
|
Re: 1938 Super 8 1605 - adventures with a newbie
|
||||
|---|---|---|---|---|
|
Forum Ambassador

|
Motor's Manuals of the era give specific recommendations for torque on rod and main bolts. Unless someone beats me to it I'll look it up later this evening and edit this post.
PS - Mal,you're fast on the trigger, beat me to it. Hope you haven't stretched or damaged the bolts.
Posted on: 2019/12/29 18:46
|
|||
|
||||
|
Re: 1938 Super 8 1605 - adventures with a newbie
|
||||
|---|---|---|---|---|
|
Home away from home

|
Mal - thanks, that's very helpful. The crank still turns freely (or what I assume is freely). I torqued pretty much all of the larger bolts to right at 80. One or two probably went above that. I can certainly back them off to 70. We'll need to take out all the cotter pins and reset them, but that's not that bad of a job.
Would 10-15 ft/lbs over spec really damage the bolts? Or would I have to be far over that? Or would it be better to just leave it as is? -Kevin
Posted on: 2019/12/29 19:08
|
|||
|
||||
|
Re: 1938 Super 8 1605 - adventures with a newbie
|
||||
|---|---|---|---|---|
|
Forum Ambassador
|
Kevin,
The vastly more experienced people here would be better to comment on your questions. I've never worked on a Super 8 engine other than hand the spanners(wrenches), sockets and other tools to my mate who was doing so.
Posted on: 2019/12/29 19:19
|
|||
|
Mal
/o[]o\ ====  Bowral, Southern Highlands of NSW, Australia "Out of chaos comes order" - Nietzsche. 1938 Eight Touring Sedan - SOLD 1941 One-Twenty Club Coupe - SOLD 1948 Super Eight Limo, chassis RHD - SOLD 1950 Eight Touring Sedan - SOLD What's this?  Put your Packard in the Packard Vehicle Registry! Here's how! Any questions - PM or email me at ozstatman@gmail.com |
||||
|
||||
|
Re: 1938 Super 8 1605 - adventures with a newbie
|
||||
|---|---|---|---|---|
|
Forum Ambassador

|
1. In addition to possible damaging stress on bolts and nuts, overtorqueing can also distort sizing and geometry. I strongly suggest you redo anything incorrectly torqued.
2. The aluminum crankcases are not overly dimensionaly stable. If properly done, when the main bearings were align-bored, the crankcase was properly fastened to the cast iron cylinder block to insure trueness. The same should apply when torqueing the main bearing bolts, bores should be attached to the crankcase first.
Posted on: 2019/12/29 21:01
|
|||
|
||||
|
Re: 1938 Super 8 1605 - adventures with a newbie
|
||||
|---|---|---|---|---|
|
Home away from home

|
Noted Dave. I'll get back in there and retorque everything to correct specs. I'm not sure if I'll have the block available to put on the other side. I'll have to check.
Posted on: 2019/12/29 21:12
|
|||
|
||||
|
Re: 1938 Super 8 1605 - adventures with a newbie
|
||||
|---|---|---|---|---|
|
Forum Ambassador

|
Kevin, if necessary just hold off on the final torqueing of the main bearing fasteners until the crankcase and block are united.
Posted on: 2019/12/29 22:42
|
|||
|
||||

 (235.32 KB)


