

|
Re: Our 1932 901
|
||||
|---|---|---|---|---|
|
Webmaster

|
Looking good!
Posted on: 2012/11/26 15:07
|
|||
|
-BigKev
1954 Packard Clipper Deluxe Touring Sedan -> Registry | Project Blog 1937 Packard 115-C Convertible Coupe -> Registry | Project Blog |
||||
|
||||
|
Re: Our 1932 901
|
||||
|---|---|---|---|---|
|
Home away from home

|
During the body that I performed the frame that had been painted by the previous owner got mess up a little. I've had the frame all ready for re-painting for about a month now, but the weather (either too cold or to windy). Today was different with a temperature in the mid 70's and only a slight breeze, I covered up the area around the car with plastic sheeting, mixed up some enamel and turned on the compressor.
It took longer to block off the garage with plastic than it took to paint the frame, but it is now done so I can start putting it together. Attach file:  (92.56 KB) (92.56 KB)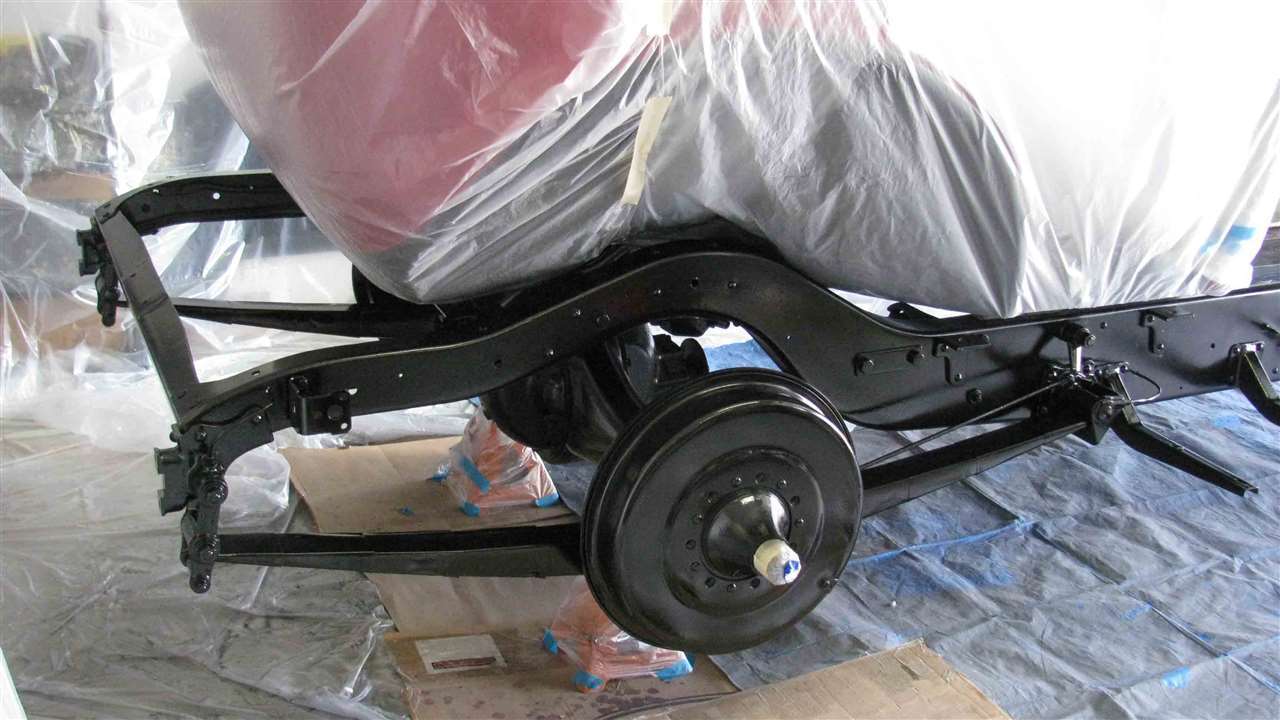 (88.01 KB) (88.01 KB)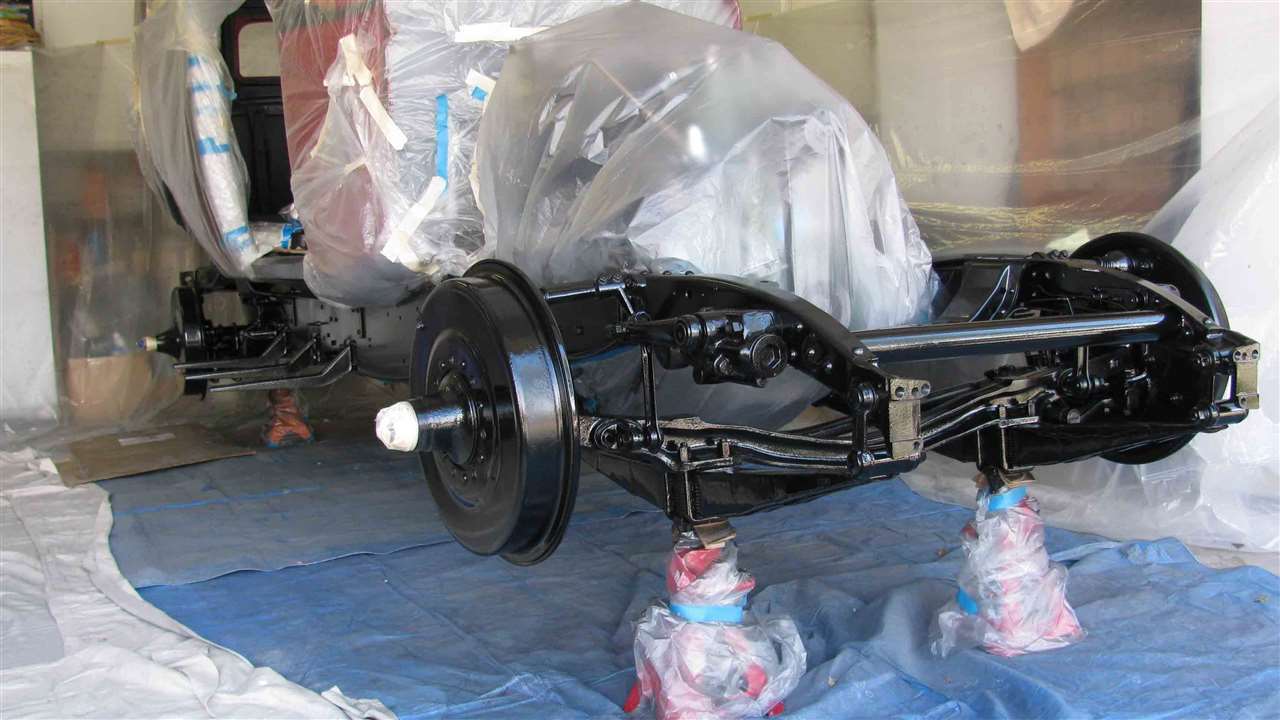 (107.95 KB) (107.95 KB)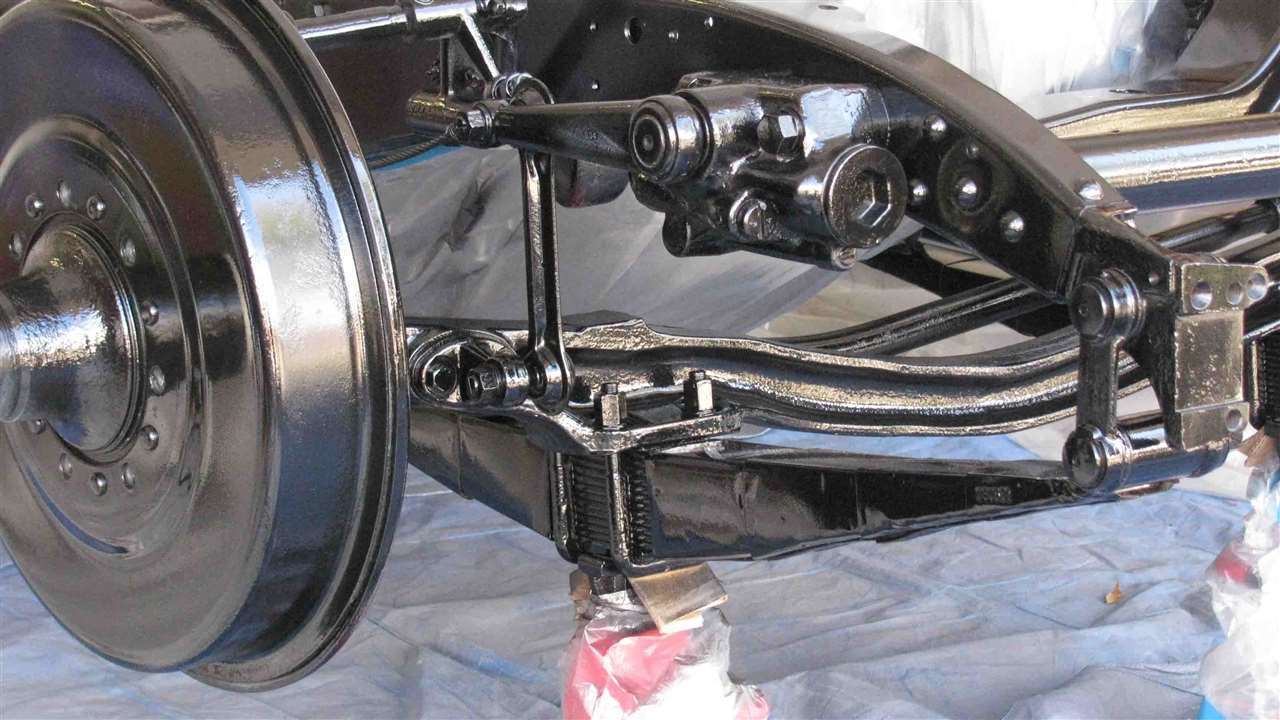
Posted on: 2013/2/16 20:30
|
|||
|
||||
|
Re: Our 1932 901
|
||||
|---|---|---|---|---|
|
Home away from home
|
I've been on the "Pre-War (1899-1942)" portion of the Forum seeking answers to assist in installing the brake and clutch pedals, parking brake, fenders, and splash aprons. Fitted with the information, I see that I'm missing or can't find some of the parts required to install the pedals and parking brake.
In the interim, I installed a new gas line from the tank to the carburetor. Used 5/16" Ezibend. The tubing that is visible in the engine compartment was sanded with Wet-Or-Dry paper going from 320 to 2000 grit. It was buffed to give that nickel plated look while the fittings were chrome plated using Caswell's Nickel Plug N' Plate (but using the dip process which is much faster). The radiator shell along with the headlight bar was sent out for chrome plating. The radiator was installed along with the Sylphon thermostat. I got an assist on the install of the thermostat from good members on the Forum. The radiator shutter and shell were installed. It should be noted that while the holes on any two individual pieces lined up good, when the three were all put together it was a big no-go. After reworking 8 holes and elongating 6 additional holes the trio is now installed on the frame. On installing the parking brake, I needed to make a bronze shim for the parking brake handle as the hole on the handle was 1.05" ID and the shaft is going to be mounted on was 0.75" OD. After digging through my various parts bins I found the sprocket bar (or whatever the thing is called) that the tooth on the handle engages to keep the lever locked. But at last the parking brake is installed. On Sunday I started installing the hood panels, working on the top two (left & right). It appears the radiator shell and probably the radiator/shutter too will required some more adjusting in order to get the hood pieces to line up better. Since it was getting late in the day I decided that a fresh look at things might be the best approach at solving my hood misfit challenge. So I opened my first beer of the day at 5:00 pm, sat in a chair to relax and watched the sun as it headed towards the western horizon.
Posted on: 2013/3/26 0:31
|
|||
|
||||
|
Re: Our 1932 901
|
||||
|---|---|---|---|---|
|
Home away from home
|
As mentioned, I had problems trying to find the clamp that holds on the brake and clutch pedals. So I decided that it would be possible to make one using aluminum bar that was .75 thick and 1.00" wide. For a discussion on the issue see the blog posted on the site under prewar Packards (Seehttps://packardinfo.com/xoops/html/modules/newbb/viewtopic.php?topic_id=11211&forum=1&post_id=116948#forumpost116948 )
I cut two pieces 2.0" long. One piece was threaded for .1/4" NC studs and the other was drilled through with a 17/64" drill bit. Then the two pieces were bolted together and a 7/8" diameter hole drilled though them between the two studs. Afterwards, a 1.00" bit was used to drill in from both sides without going all the way through. This left a small shoulder (See photo labeled Bracket, Shoulder Highlighted in Red) inside that was filed and ground to fit it in such a manner that it would clamp onto the brake/clutch shaft. When the time comes, the completed bracket will be drilled and tapped in order to install the brake switch on the side. Attach file: (83.67 KB) (105.92 KB) (105.92 KB)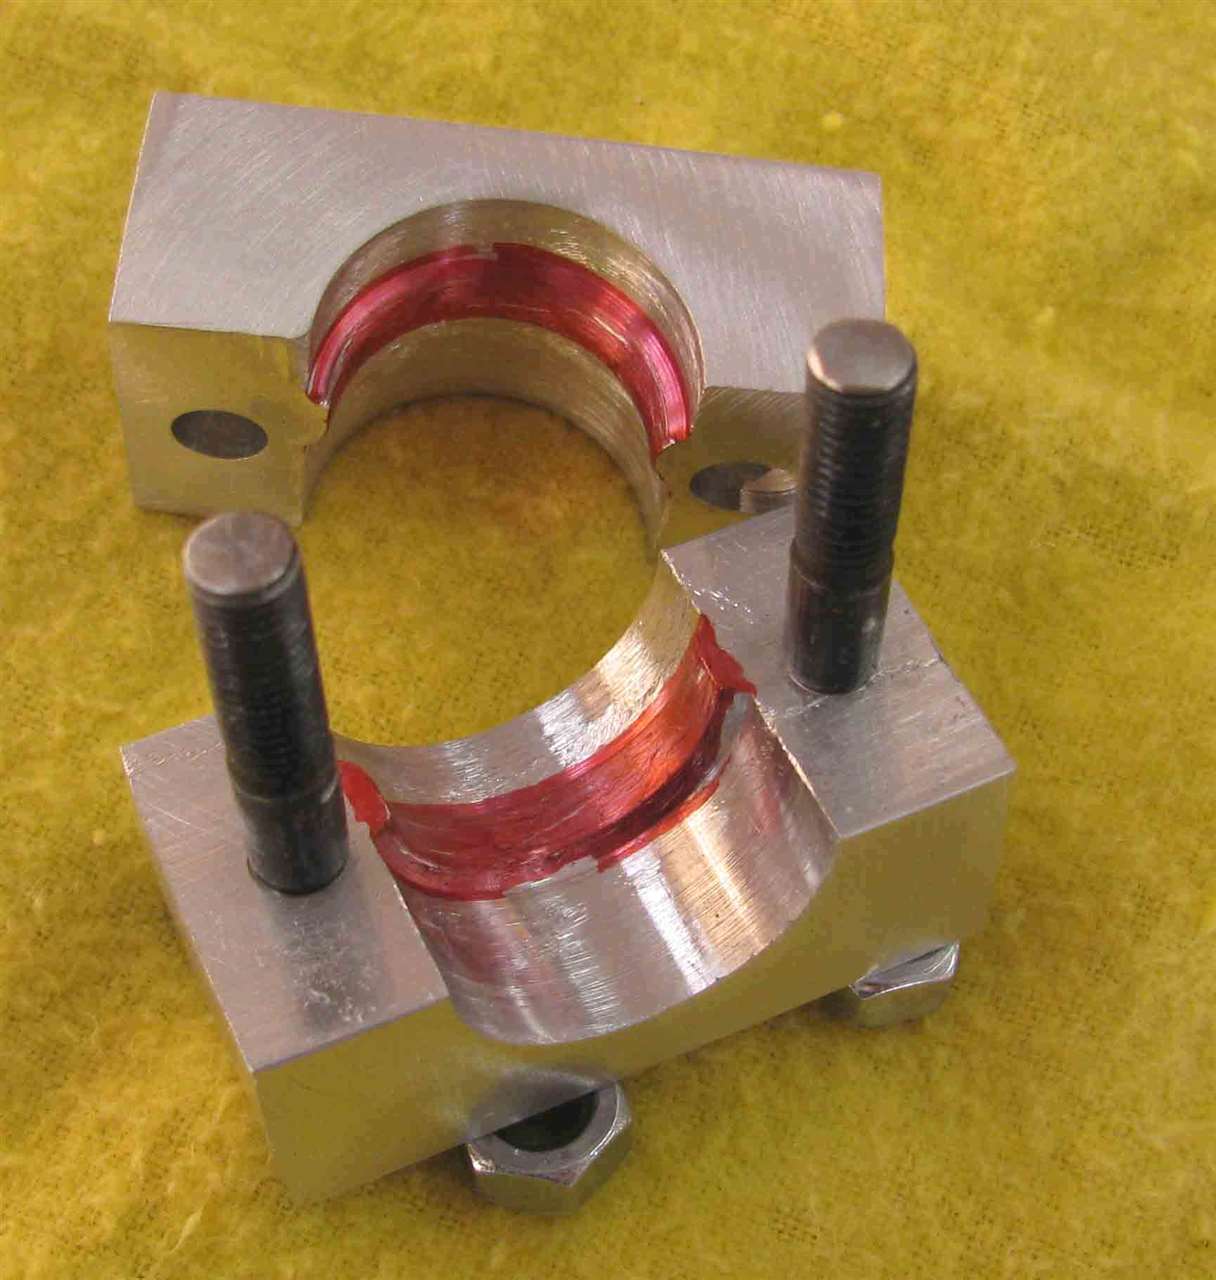 (131.49 KB) (131.49 KB)
Posted on: 2014/3/12 21:43
|
|||
|
||||
|
Re: Our 1932 901
|
||||
|---|---|---|---|---|
|
Home away from home
|
The fenders with welting were installed without any big issues occurring. The running boards (RBs) were a different matter. The trim piece that goes on the outside of the running board was in bad shape as rust from the steel piece underneath had caused the outer brass piece (both right & left sides of the RBs) to split almost its entire length into . The photo shows the rusted inner steel piece (top) and how the brass piece (bottom) was split.
The fenders with welting were installed without any big issues occurring. The running boards (RBs) were a different matter. The trim piece that goes on the outside of the running board was in bad shape as rust from the steel piece underneath had caused the outer brass piece (both right & left sides of the RBs) to split almost its entire length into . The photo shows the rusted inner steel piece (top) and how the brass piece (bottom) was split. The brass portion was soaked in "Krud Kutter", a phosphoric acid solution, for about 4 hours to remove the rust deposits. Then the split sections were silver solder together. The 4 trim pieces that go between the front and rear of the RBs were in good shape needing only to be re-chromed. However, I did not have the trim pieces that goes between the splash shield below the doors and the running board. I made these from 1/16" thick aluminum bar that was 1.5" wide. This was accomplished with an auto body hammer and rolling the aluminum over a piece of 1/8" thick steel form. It was then filed, sanded and buffed to give it a nice smooth surface. The eight pieces were chromed, installed on the running boards and then installed on the car. In place of the rusted steel that held the outer trim piece on, 5 small 'Clips' per side were made from 16 gauge steel. These were used in the correct position so the outer trim could be bolted to the fender. Attach file: (76.70 KB)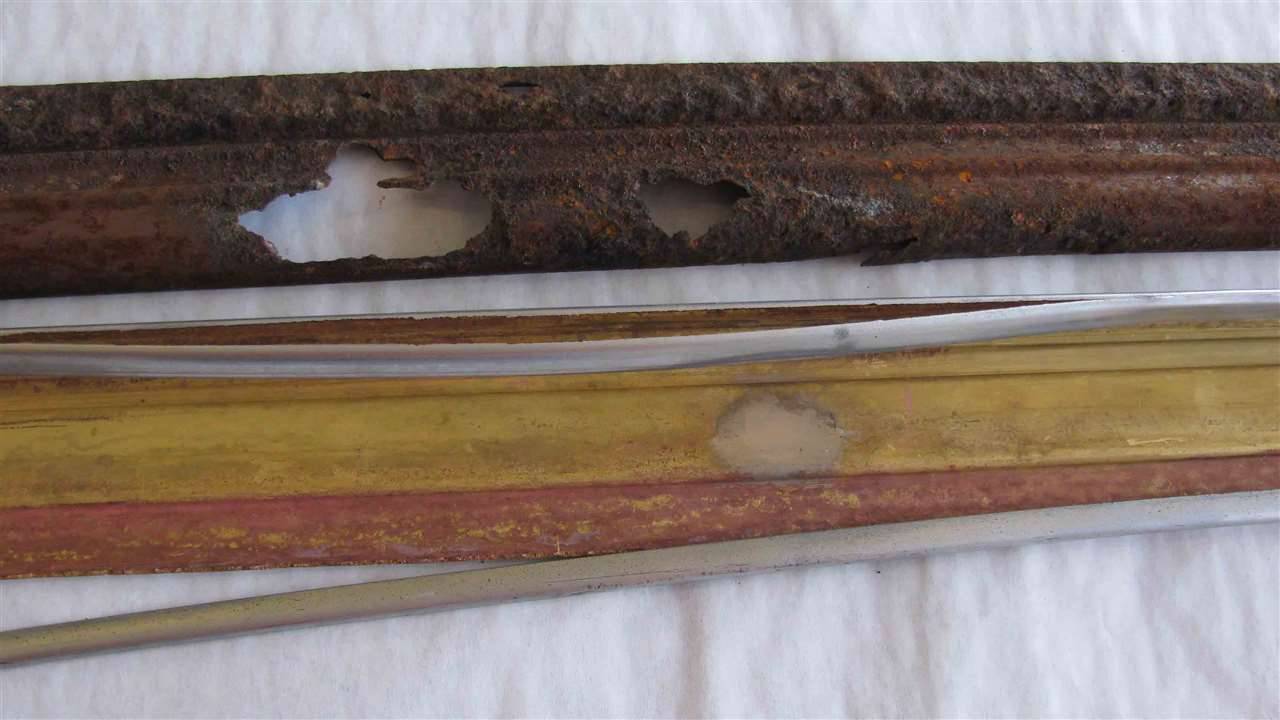 (94.96 KB) (94.96 KB)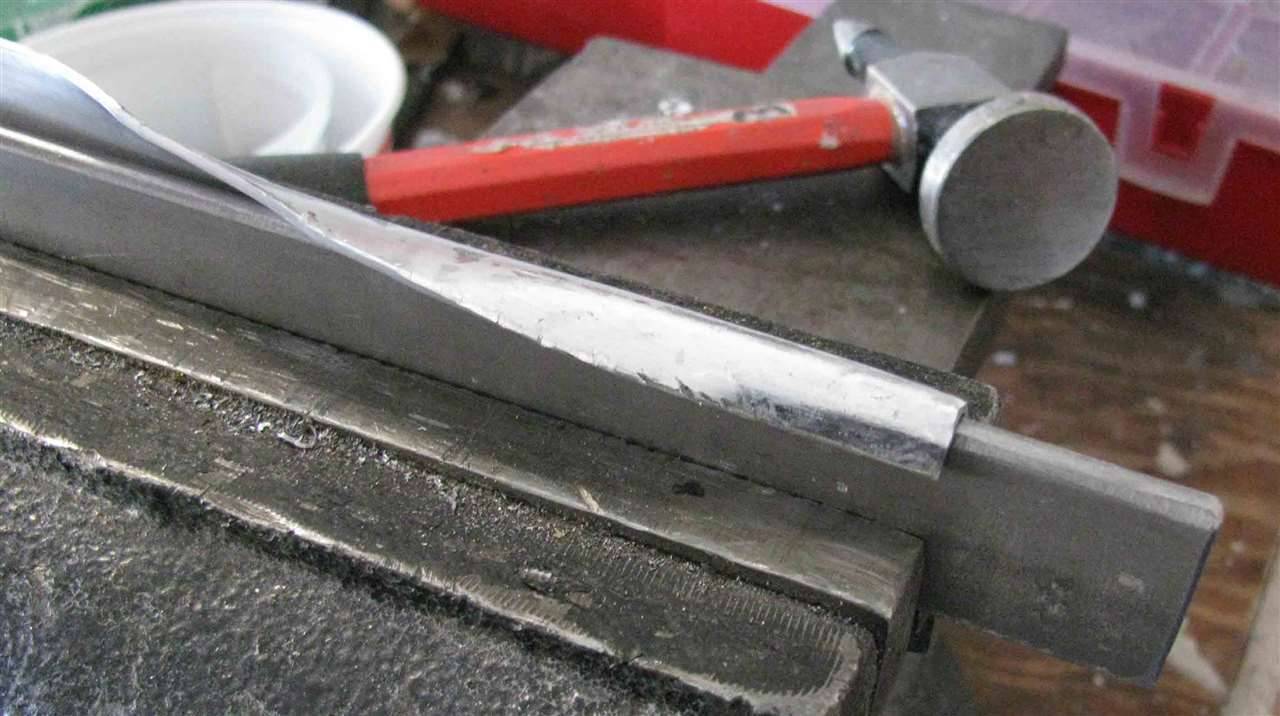 (108.43 KB) (108.43 KB)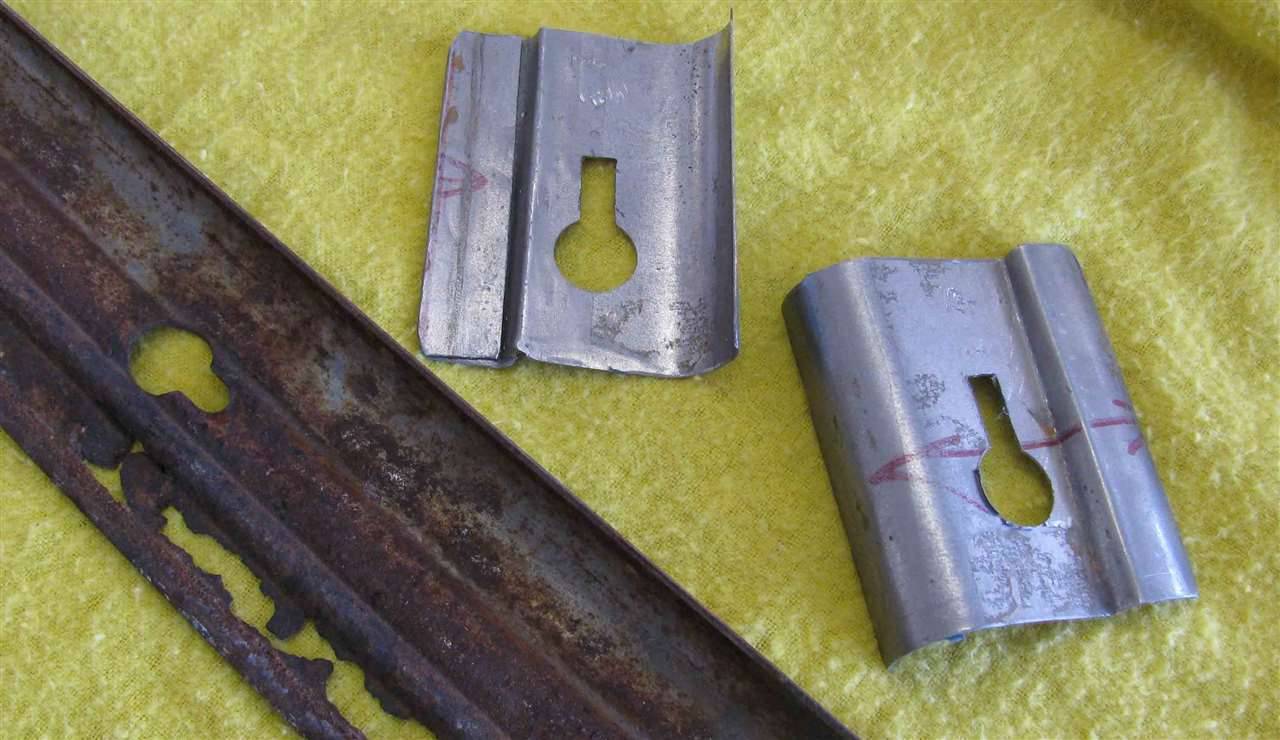 (141.90 KB) (141.90 KB)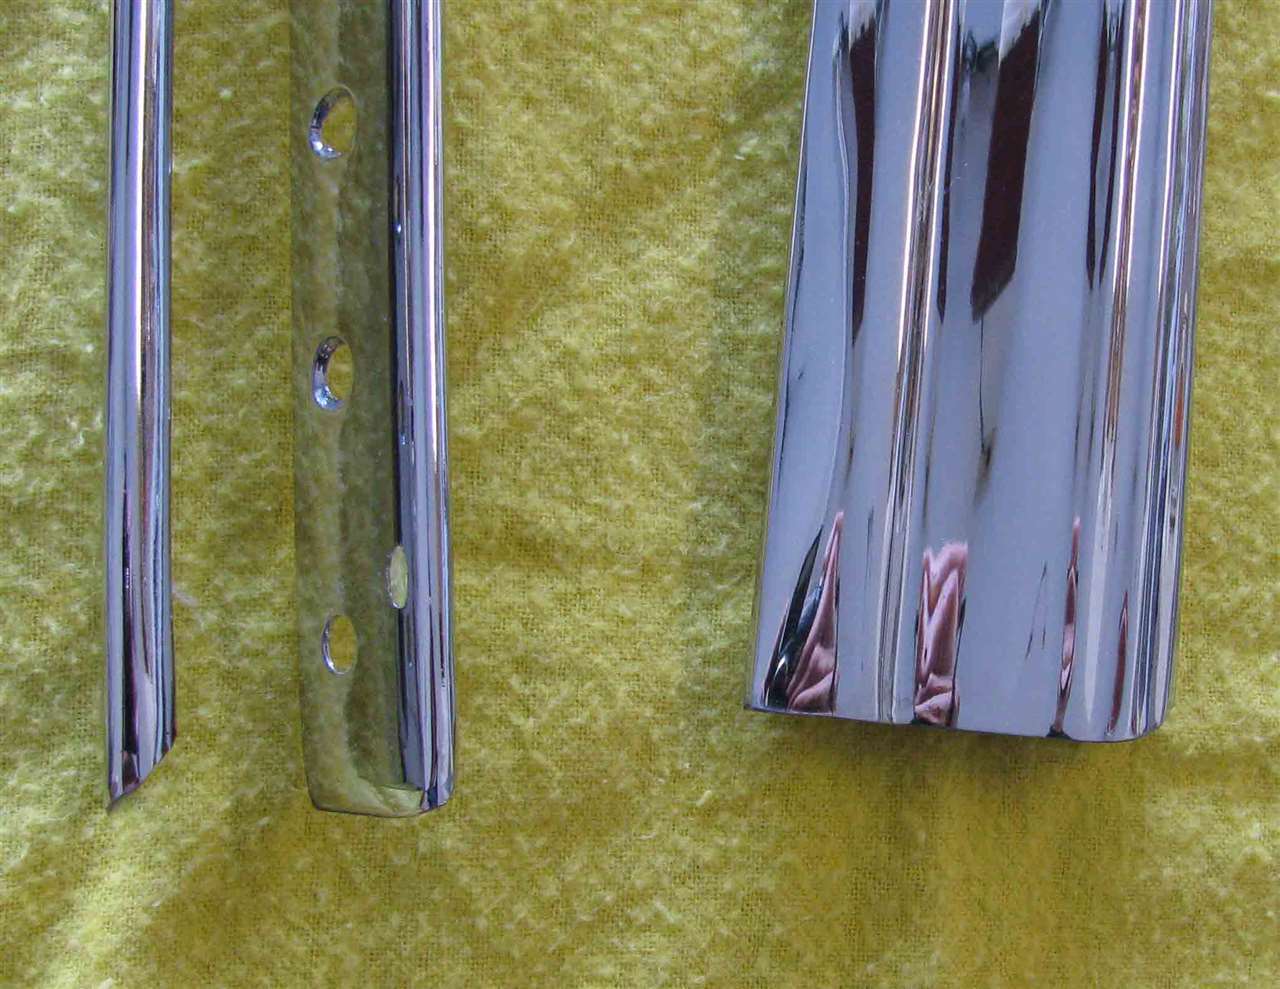
Posted on: 2014/3/14 13:49
|
|||
|
||||
|
Re: Our 1932 901
|
||||
|---|---|---|---|---|
|
Forum Ambassador

|
I really admire your skill and craftsmanship! When I did my running boards on my 34 many decades ago, I needed to fabricate the pieces that went between the fender ends and the board - you did a far better job than I did.
Posted on: 2014/3/14 14:21
|
|||
|
||||
|
Re: Our 1932 901
|
||||
|---|---|---|---|---|
|
Home away from home
|
O-D,
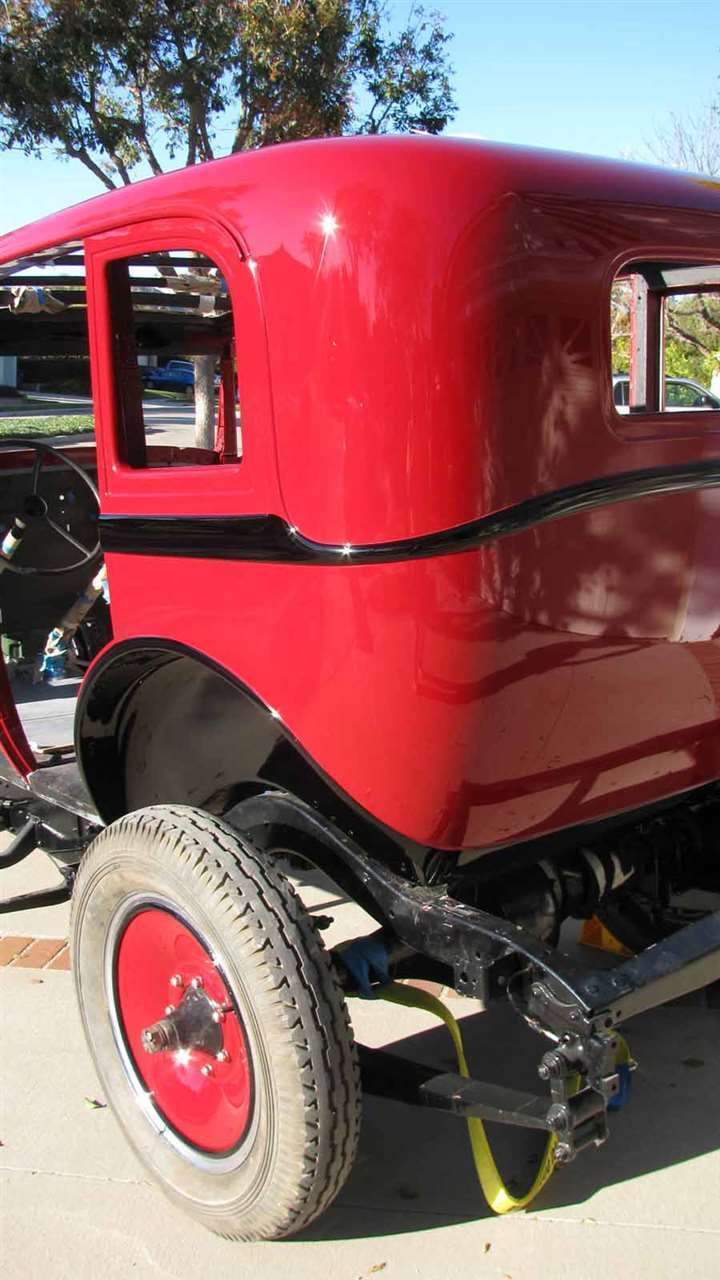
Thanks for the compliment. I was lucky the I had the two outside pieces of trim and that they were made of brass avoiding that dreaded enemy of rust. I installed the running boards this weekend. The left side looks good, but I'm not happy with the right side. Sometimes it seems that a part gets installed and when it comes to installing the next it needs to come off and either be adjusted or something else needs ot occur. In this case, the right running board went back on and all the bolts on both right fenders needed to be loosen. Oh well, having most of the "Honey Do's" under control, it's nice to be able to commit some time to the project.With the fenders, hood and running boards on the project is starting to look like a car. However. the top two hood pieces look like they are going to present a major challenge that I\'ll present to this forum to get some input who have travel the path before me. Next weekend looks to be a good one to fire up the RV and head towards California's Central Coast area A.K.A. as one of the country's wine producing regions. And yes I do drink wine.
Posted on: 2014/3/16 19:18
|
|||
|
||||
|
Re: Our 1932 901
|
||||
|---|---|---|---|---|
|
Home away from home
|
I would appreciate ideas and input on how to handle fitting the top right and left hood panels. First let m me provide some history about the car.
I took over the restoration from an individual well versed in restoring cars. He was being assisted by a person who does his own restorations and has finished second at Pebble Beach behind the Nethercutt. When I bought the car he had some of the major pieces in final paint (the 4 fenders, 4 hood pieces, and splash aprons) in the color he was restoring to (Packard Blue & Black). The body in primer (while still in need of more attention like replacing several rusted out areas, primer and block sanding) was bolted to the frame with doors on and the radiator in place. After getting the car home, I started on the rest of the body assuming that since the hood was in final paint it would fit correct (silly me) without checking the fit. Now I have had the entire car painted in the color of our choice (Carnival Red, a 1931 Desoto color and Black). I've had problems fitting the two top panels of the hood where they meet the radiator cowl. When the gap in the hood's center between the panel and cowl touches the cowl there is 3/8" gap at the outside on both right and left sides. The rear of the top panels is consistent. Right now my thought is the top two panels need to be cut along the front edge to provide a consistent gap. This would entail going from 3/8" starting inside edge of the hood and going down to 0" at the outside. At this point, the radiator and body can adjusted to provide a good fit. It would mean that the blades on the water pump will be between 3/8" and 1/2" from the radiator core. I've included a couple of pictures to show what I'm talking about. The big question I have is there something that I'm missing on the entire problem in trying to align the panels???? Attach file: (58.37 KB)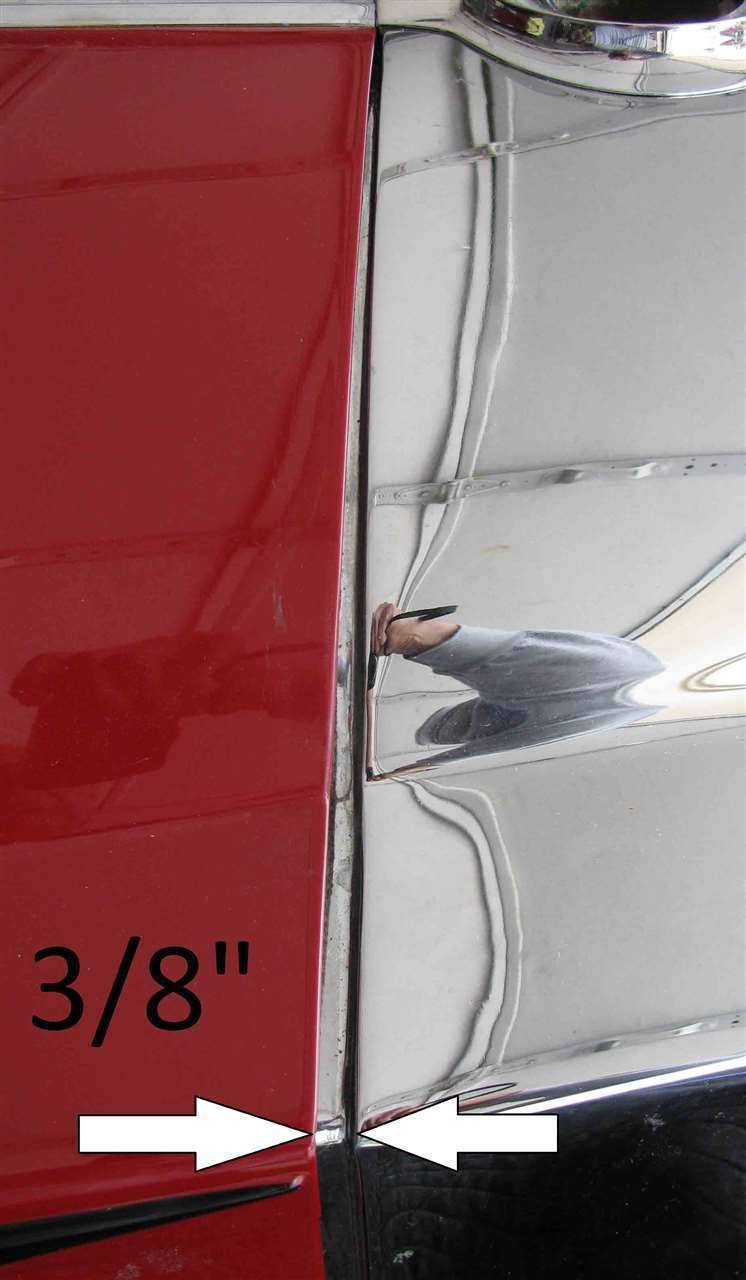 (67.43 KB) (67.43 KB)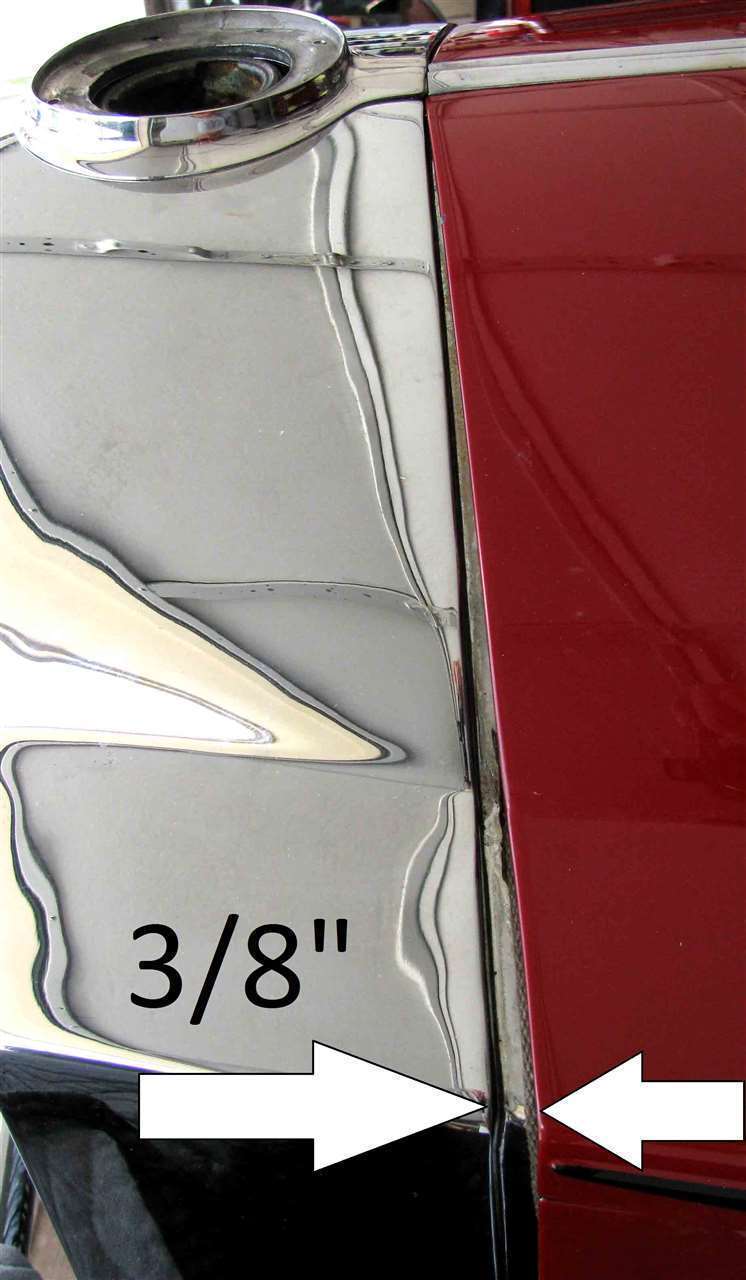
Posted on: 2014/3/23 12:29
|
|||
|
||||
|
Re: Our 1932 901
|
||||
|---|---|---|---|---|
|
Home away from home

|
Hi Martson:
That is a huge problem. I assume the cowl has an even gap so the problem is the radiator shell. Is the car an early or late 9th series. A late car has vacuum clutch, three speed trans, and can have a different shell. A very late car has a chrome center strip down the center. It may be that you have the wrong hood. Or maybe a shell that is from the 8th series conversion kit.
Posted on: 2014/3/23 18:01
|
|||
|
||||


