|
Re: Wade's Workshop
|
||||
|---|---|---|---|---|
|
Forum Ambassador

|
Gerd,
Cryptic crosswords were never my forte! I wondered what you were referring to in this post: Quote: Guscha wrote:Mal, a year more or less is very important!.... I need wonder no more! My post of 23rd December 2010 was headlined thus: Quote: Ozstatman wrote:Friday 23rd December 2009..... Too late to change it now after our esteemed Webmaster tightened the leash on editing/removing posts more than a week old. Hmmmm.....wonder why he did that? Perhaps you know? 
Posted on: 2012/1/9 0:41
|
|||
|
Mal
/o[]o\ ====  Bowral, Southern Highlands of NSW, Australia "Out of chaos comes order" - Nietzsche. 1938 Eight Touring Sedan - SOLD 1941 One-Twenty Club Coupe - SOLD 1948 Super Eight Limo, chassis RHD - SOLD 1950 Eight Touring Sedan - SOLD What's this?  Put your Packard in the Packard Vehicle Registry! Here's how! Any questions - PM or email me at ozstatman@gmail.com |
||||
|
||||
|
Re: Wade's Workshop
|
||||
|---|---|---|---|---|
|
Forum Ambassador
|
Tuesday 10th January 2012
Took the Coupe to the workshop this morning for it's annual check and service. The Coupe first returned to the road back in January 2009 and in those three years of traversing the Australian countryside I've clocked up about 10,000 miles of basically trouble free running. Saying that there have been minor matters that cropped up from time to time but nothing that caused the Coupe to "fail to proceed". First thing, after the Coupe went up on the hoist, was draining the oil. It was nice and hot, which I can attest to, when removing the sump plug I always get some on the hand! Then onto removing the tailshaft because both universal joints were being replaced with a couple of NORS ones bought off eBay near the end of last year. Getting the tailshaft out was the easy part, getting the old unis off was another matter altogether. As Wade explained, it's just a matter of knocking through the captured trunnion housings at each end of the shaft and they come apart. Thought was to retain the parts, because although a little sloppy they still worked well, and put them on the shelf just in case. Trouble was the trunnion housings didn't knock through because the cross body of the uni closed against the body of the tailshaft before the trunnion housing cleared the tailshaft. Necessitated brute force in the guise of vice grips together with a large screwdriver levering against the vice grips. While I moved the vice gripped trunnion housing back and forth Wade levered against the side of the vice grips. Slowly, ever so slowly, the trunnion housing emerged from the tailshafts grip. Once that first trunnion housing was off the other almost fell out as predicted. Both uni joints were the same so there was no respite after the first one. In turning to the NORS uni joints Wade felt they were a bit stiff and needed to be cleaned and repacked. Fine, except thats about 25 tiny rollers that have to situated in each of the eight trunnion housings. It takes a lot of time to clean each trunnion and insert the little rollers. Finally got that done, also cleaned out each cross and regreased those. Inserting the captive trunnion housings in the tailshaft was a whole lot easier. Utilised the bench vice with one trunnion housing lightly knocked in and the cross positioned in that trunnion. The tailshaft was then positioned in the jaws of the vice with the opposite captive trunnion housing positioned to enter the tailshaft retaining ...... and the vice jaws wound shut. Wouldn't push the captive trunnion housings all the way in so a socket, sized slightly smaller than the trunnion housing was used with each side completed with the retaining circlip being pushed into place. By this time a couple of hours had elapsed and Wade needed to do his parts run to pick up Ricks bearing from yesterday, also some bearings John required today, to drop off Juniors engine, drop off the 426 waterpumps and to drop in to Lee Bros for the fasteners foregone yesterday. Wade had loaded up the ute with the engine and waterpump parts yesterday and after a quick tutorial on tailshaft/universal joint fitment, meaning he watched and helped me fit the rear uni joint to the diff yoke, I was left to carry on while he ventured forth. Needless to say the mechanically challenged, MOI, hadn't finished the front uni joint by the time Wade returned about 2 hours later! Started off well by installing one of the bolt on trunnion housings to the OD yoke then rotated the tailshaft 180 degrees to mount the other. My first and, as it turned out, my biggest mistake because the cross body fell out of the trunnion housing I'd loosely bolted in! Besides picking up the trunnion housing, picked up my pride and started over. Checked the rollers in both trunnion housings were still properly in place, they were and tried again. Bolted one trunnion housing in then carefully rotated the tailshaft, while maintaining a hold on the semi-installed trunnion and uni cross. Had a lot of difficulty in getting one bolt to start on the final trunnion housing but finally did. Along the way dropped the lead light which turned off then the rechargeble hand held LED light which also turned off. When I say turned off I really mean went out and wouldn't come back on. So there I was struggling with the uni joint, in the X member behind the OD, which has very limited access, and almost in the dark to boot. Fortunately Graham came over and fixed the lead light so although it was brighter there still wasn't a eureka moment with a flash of illumination as to why it wouldn't go together. Graham also lent his muscle and, more dexterous than mine, hands to the effort but without success. Instead of carrying on, I know when I'm beaten, turned to the other unfinished task which was within my capabilities or rather the lack of them finishing the oil change. Put the sump plug back in, lowered the Coupe to the floor, rounded up a funnel and part filled a 5 litre container with 3 litres of oil. About half way up the dipstick and with 1 litre being approximately 1 US quart completed the fill with another 3 litres of oil and with the manual calling for 6 quarts, this worked out well. Coupe back in the air and returned to my futile task. Wade arrived shortly thereafter and following his own limited attempt said he probably knew what the problem was. One of the rollers becoming dislodged and settling in the base of a trunnion housing. Pulled one off, and there it was, sitting snugly across the bottom of the housing. Realigned the pin with it's brethren, reinstalled the trunnion housing and it was surprising, well it was for me, how easily it went together from there! Tightened up all the bolts on both front and rear trunnion housings and it was done, Finally! Next task was replacing the flexible line between the metal fuel line from the fuel tank to the fuel pump. Only trouble was I couldn't find the replacement I bought from Max some months ago. Fortunately Wade also had a new one from Max "on the shelf", so that was used in lieu. And when I find the fuel line I bought I'll replace the one Wade came to the rescue with that. That was the easy part. While getting the old one off isn't hard it is made more difficult if there's still enough fuel left in the tank that it runs through when you undo the flexible line from the metal line from the tank. Sorry no pic's, you'll just have to take my word for it, that I gave a great representation of the little boy who put his finger in the dike. Also complicated by the fact that the fuel pump heat shield severely restricts access to the fuel pump head of the flexible hose. Had to remove the two screws from the heat shield and bend it back in order to gain the required access to the fuel pump fitting. All back together now but untested as yet. Still a few things to attend to on the Coupe which will be done tomorrow. Note: I've used the term trunnion throughout this post, I hope it's correct!  Attach file:  (35.12 KB) (35.12 KB)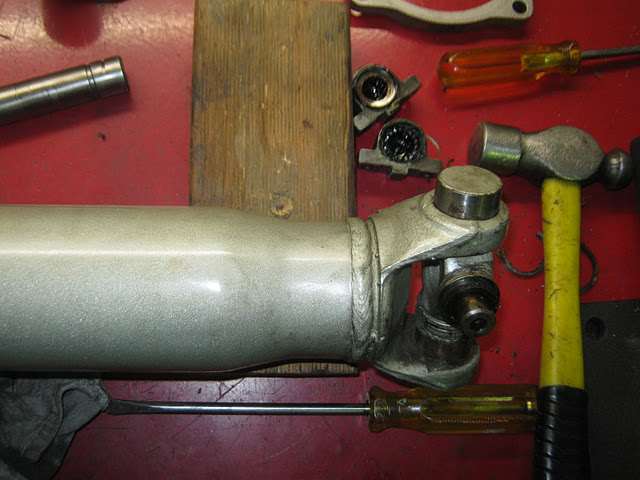 (42.58 KB) (42.58 KB)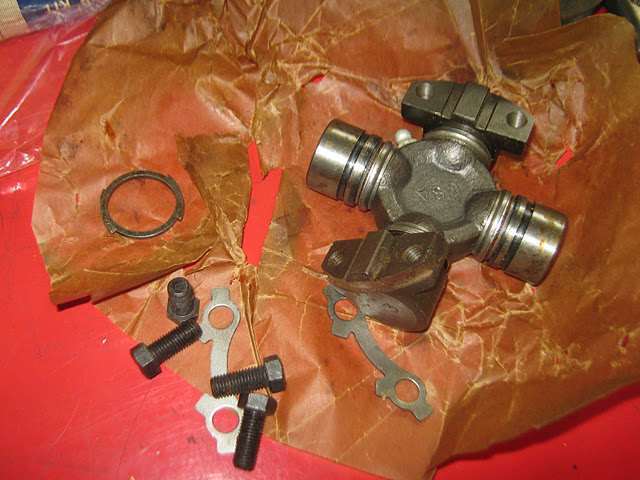 (21.55 KB) (21.55 KB)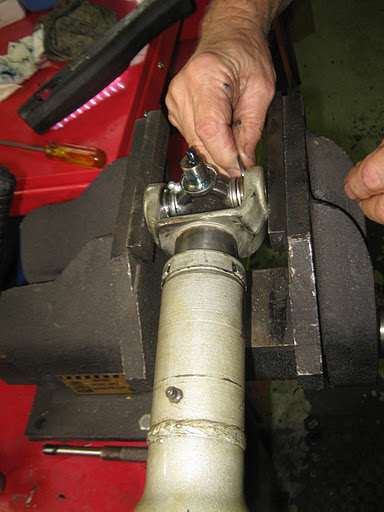 (22.19 KB) (22.19 KB)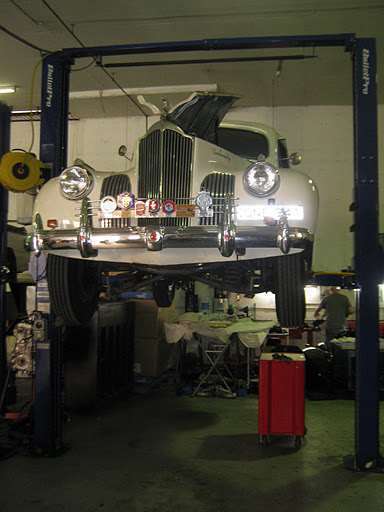 (30.56 KB) (30.56 KB)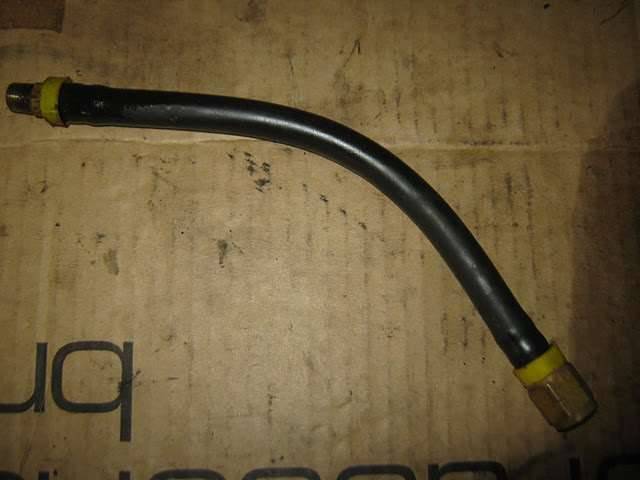
Posted on: 2012/1/10 3:33
|
|||
|
Mal
/o[]o\ ==== Bowral, Southern Highlands of NSW, Australia "Out of chaos comes order" - Nietzsche. 1938 Eight Touring Sedan - SOLD 1941 One-Twenty Club Coupe - SOLD 1948 Super Eight Limo, chassis RHD - SOLD 1950 Eight Touring Sedan - SOLD What's this? Put your Packard in the Packard Vehicle Registry! Here's how! Any questions - PM or email me at ozstatman@gmail.com |
||||
|
||||
|
Re: Wade's Workshop
|
||||
|---|---|---|---|---|
|
Forum Ambassador
|
Wednesday 11th January 2012
Yesterday I said: "....Wade needed to do his parts run ....to drop off Juniors engine, drop off the 426 waterpumps and...." but today I noticed all the waterpump parts were still on the bench so obviously they didn't go yesterday. Also learned today that the machining, fitting and balancing work on Junior's engine is expected to take about three weeks to do. First up today was greasing the Coupe, much easier doing it up on the hoist rather than lying on your back under the car. I also asked Wade about the front wheels, which seemed to have a bit of give and take in them when rocked from side to side and in and out up on the hoist. Prognosis was the wheel bearings needed tightening, after which I adjusted all the brakes. Next the Coupe was lowered to the floor and the drivers side bonnet(hood) catch was repaired because it failed to open yesterday when I arrived at the workshop, just needed a washer. Why there wasn't a washer there before, I don't know. Next was repairing the OD lockout knob. I'd bought a new one but, in my heavy handed manner, managed to pull the knob off its metal insert. A little super glue and knob and insert were re-united, hopefully never to come apart again. While I was greasing and adjusting Wade was also busying himself preparing Juniors transmission for when it's re-united with the rebuilt engine. Wade, as you know, has a great aversion to leaks which Juniors trans and OD have in spades. Amongst the parts bought in was a trans and OD gasket kit(What! MBM isn't good enough now?) together with new seals for the trans top selectors. First thing Wade found in cleaning up the trans top for the selector arm shaft seal replacement was that the top over one of the seals had been flattened resulting in a crack in the cover. Pointless to put a new seal in with a crack like that so the trans/OD unit which has contributed many parts since being donated by a PACA member about three years ago again came to the rescue. One of the selector arms from the donor trans/OD was also utilised in preference to Juniors. New seals in the the trans top, selector arms sorted, top retaining bolts and washers and the vent cap cleaned up then turned to the next task. Pulling the trans and OD apart for cleaning, reassembling with new gaskets and painting. All went well until we came to P/N 338514 the Pinion Cage Assembly in the OD. This one was a little different to the others previously worked on, or so we thought. On this one the hub for the Pinion Cage Assembly was separate to the body. Plus we couldn't get the hub off! It should just slide off without any effort. This one didn't want to budge at all! Use of levers, pullers, drifts all failed to budge it. Also used the hot spanner with the hub heated to red hot in conjunction with a heavy duty puller and a rattle gun, still wouldn't budge! Called for drastic action by employing an angle grinder to cut through the hub along the path of one of the teeth into the shaft. This action necessitated the body of the Pinion Cage Assembly being sacrificed, because it was in the cutting wheel's path. Not to worry though, the donor trans/OD appeared to have a reasonable one. Even with a slot cut almost through the collar, then employing cold chisels as wedges failed to gain any movement in the collar. By this time Rick, John and Graham were gathered around lending advice, tools and muscle but even all that failed. Next was cutting another slot about 180 degrees from the first one. Then Rick wielding a BIG hammer on a large but blunt cold chisel of his, using that as a drift gained some movement on first one piece of collar then the other. Finally with both pieces of the collar off it was apparent what the cause of the removal problem was - twisted splines on the end of the trans main shaft!!! With the collar off and the remainder of the Pinion Cage Assembly off it was apparent that the collar had separated from the body of the Pinion Cage Assembly. Further disassembly also found a broken governor pawl, I think that's what it is. Now all this is in all likelihood connected with the broken uni-joint and rotating diff housing suffered by Junior last year. But, although a static test was performed in running Junior up on the hoist and engaging and disengaging OD, there hadn't been a real road test and consequently no load on the OD so would have remained undiscovered until on the road again with the rebuilt engine. Carried on then disassmbling the remainder of the OD as well as the trans. Plan now is to use the Juniors trans case, the donor case has potential leaks from too long bolts being used on the trans mounts which have pierced the trans body, and the internals from the donor case although if worst comes to worst there could be some mixing and matching, all depends on what's found on closer examination. Attach file: (30.07 KB)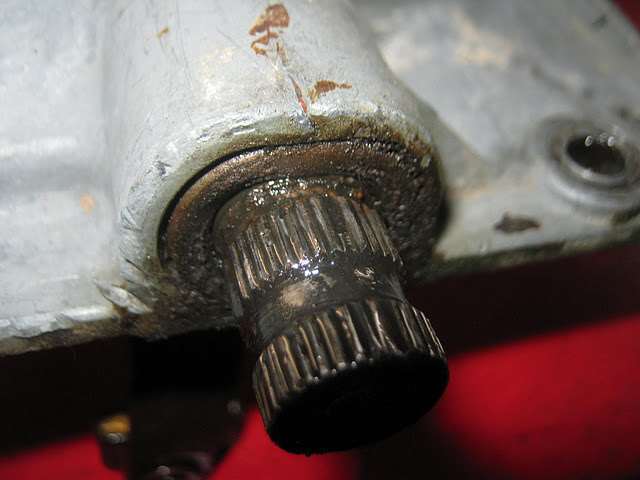 (41.84 KB) (41.84 KB) (39.21 KB) (39.21 KB) (32.66 KB) (32.66 KB)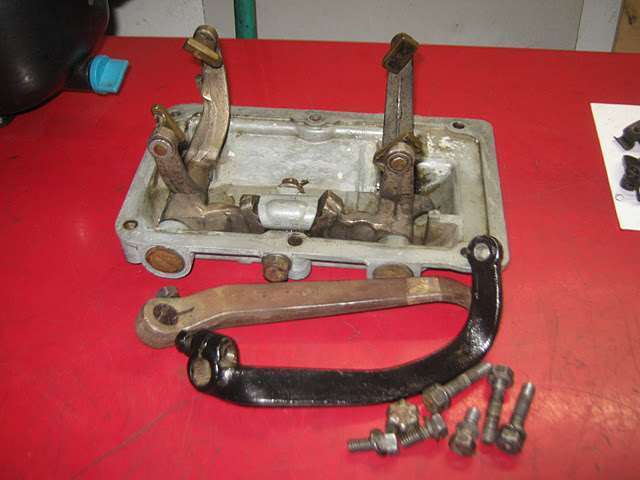 (45.43 KB) (45.43 KB) (43.80 KB) (43.80 KB) (34.97 KB) (34.97 KB)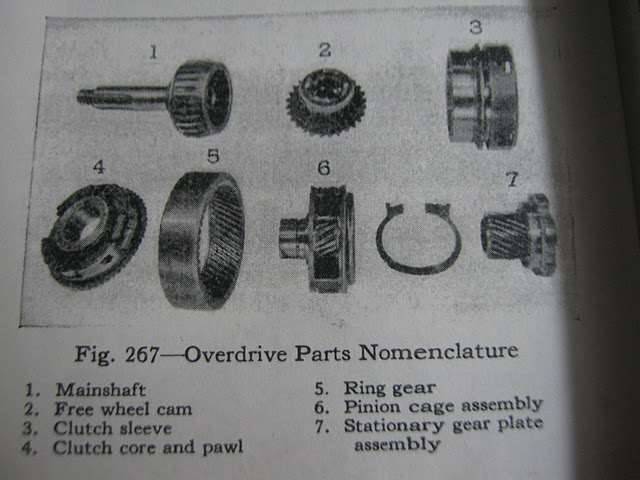 (35.54 KB) (35.54 KB) (39.15 KB) (39.15 KB)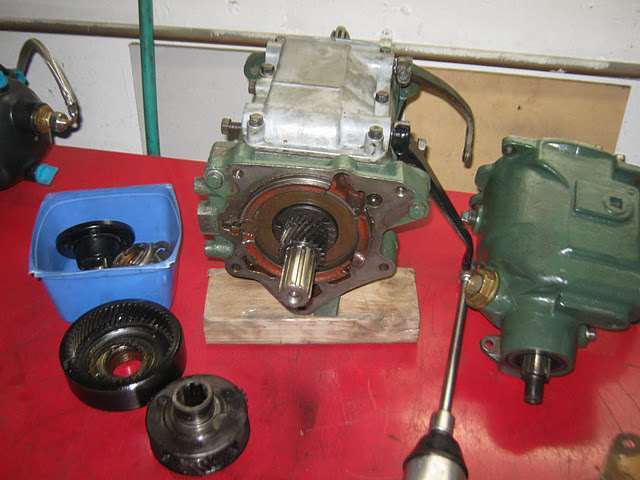 (41.15 KB) (41.15 KB)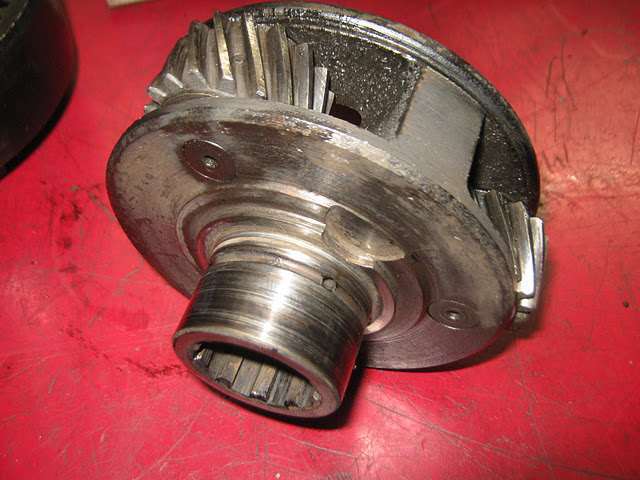 (43.34 KB) (43.34 KB) (42.62 KB) (42.62 KB)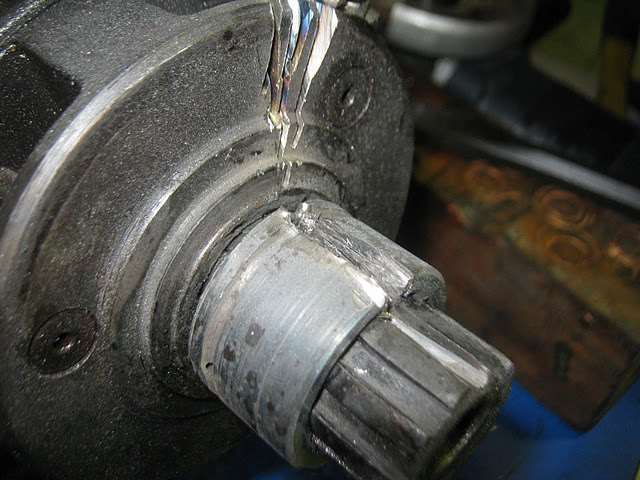 (47.13 KB) (47.13 KB)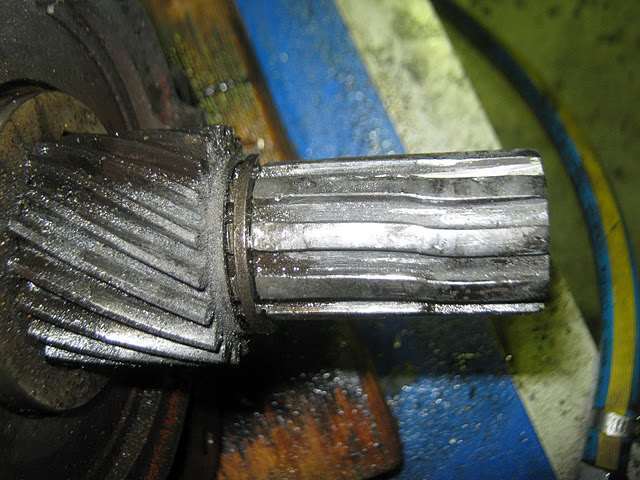 (38.80 KB) (38.80 KB)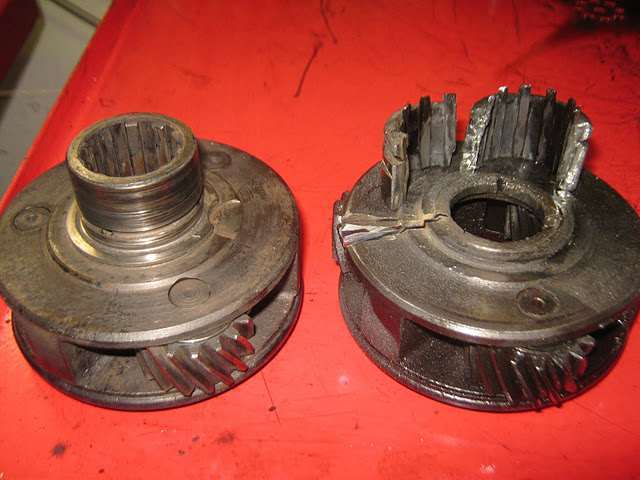 (40.48 KB) (40.48 KB)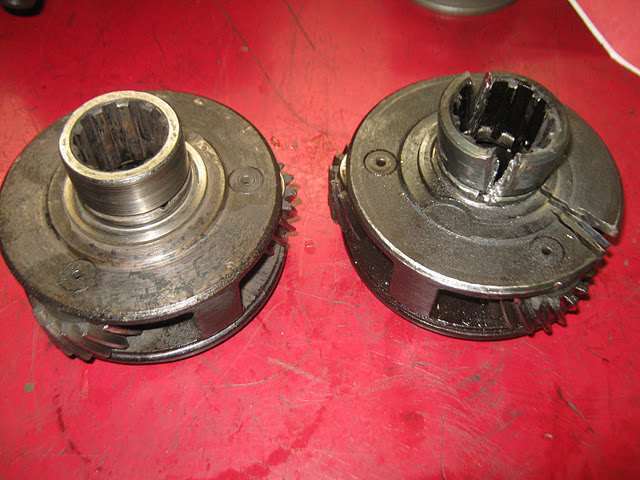 (24.58 KB) (24.58 KB)
Posted on: 2012/1/11 5:33
|
|||
|
Mal
/o[]o\ ==== Bowral, Southern Highlands of NSW, Australia "Out of chaos comes order" - Nietzsche. 1938 Eight Touring Sedan - SOLD 1941 One-Twenty Club Coupe - SOLD 1948 Super Eight Limo, chassis RHD - SOLD 1950 Eight Touring Sedan - SOLD What's this? Put your Packard in the Packard Vehicle Registry! Here's how! Any questions - PM or email me at ozstatman@gmail.com |
||||
|
||||
|
Re: Wade's Workshop
|
||||
|---|---|---|---|---|
|
Forum Ambassador
|
Thursday 12th January 2012
After a long morning spent playing with the grand-daughters, even better than playing with Packards in my opinion, arrived at the workshop to find Wade had spent his morning cleaning all the parts disassembled from Juniors trans and OD yesterday. Meant a pre-clean to remove the vast majority of dirt, oil, grease and grime before the parts that could, went into the parts washer for a sparkling finish. Wade had also called John, Juniors Dad, last night and suggested he call in today to see the damage and discuss plans and options. This John did, but unfortunately I missed his visit because of "family commitments". Wade did say that John said he'd like to find a pair of horns for Junior. Junior at present has one long trumpet type horn mounted on a home made bracket affixed to one of the radiator to body brace rods. Wade said he had a pair of horns on the shelf which although also not kosher are more in keeping with what Junior should have. Gave them a brief bench test, they work, but need some work and to be tuned. When I arrived Wade was just about to start disassembling the donor trans and the remaining parts of the OD. Came apart much easier than Juniors, the only "problems" being finicky or awkward circlips which necessitated a number of attempts to release and remove them. Apart from that everything slid off or out without any problems. But.....the mainshaft proved to be a disappointment, with the case hardening worn through on the second gear synchro surface, I think that's what is was. Please be gentle with me if it isn't. This led to Wade attempting to press off the corresponding part from Juniors main shaft but without success. Wade had to try even though he knew the mainshaft comes as an "assembly" and theoretically, right Randy, can't be separated. Of course he got nowhere but he did try. Fortunately John had given instructions to do what is reasonably necessary to return Junior to prime operating condition, not irrespective of cost but bearing cost in mind. So it looks like Wade's favourite Packard parts supplier will be receiving a query re availability and cost of a mainshaft and some other trans and OD parts. Although one part we looked at in the shop copy of the catalog is listed as "enquire". Does this mean you'll be lucky or you'll be very lucky and if you are be prepared for significant sticker shock? Attach file: (44.15 KB)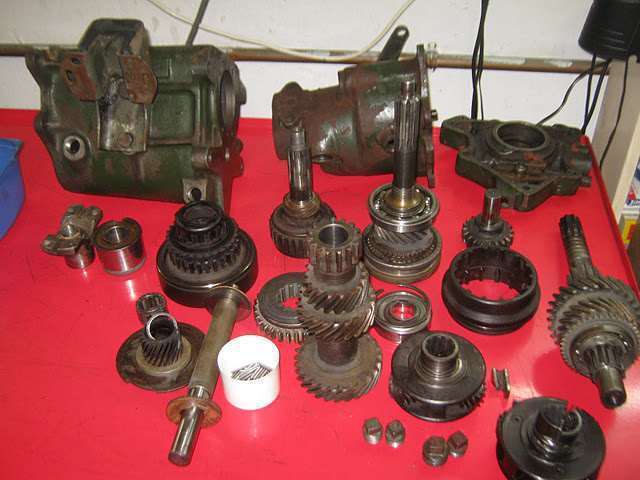 (22.34 KB) (22.34 KB)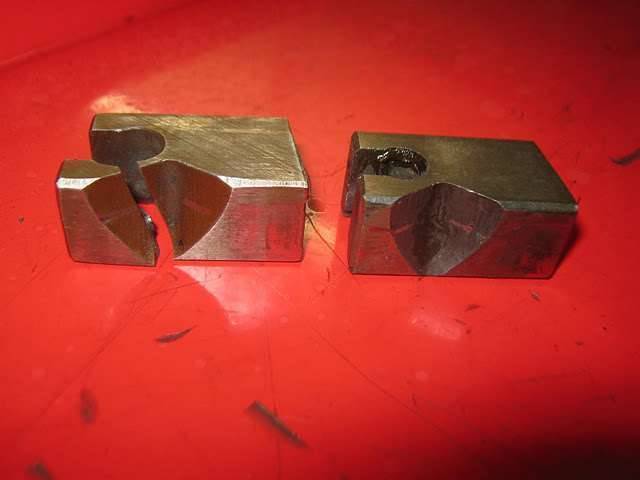 (22.93 KB) (22.93 KB) (33.02 KB) (33.02 KB)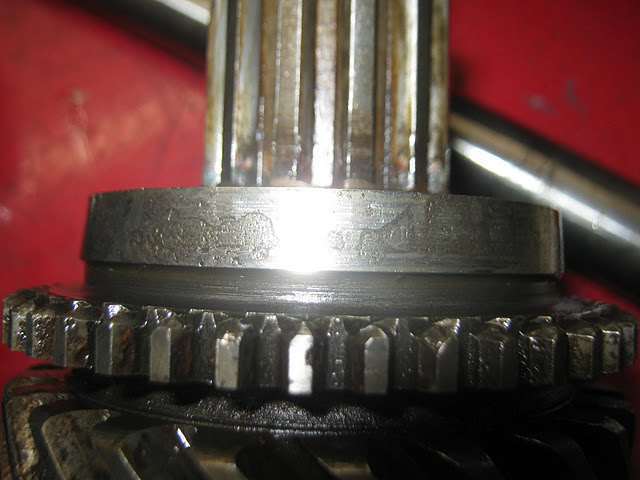 (53.96 KB) (53.96 KB)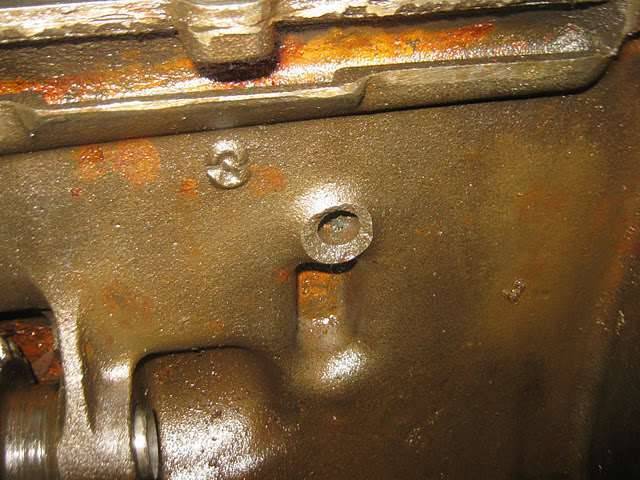 (16.83 KB) (16.83 KB) (42.77 KB) (42.77 KB)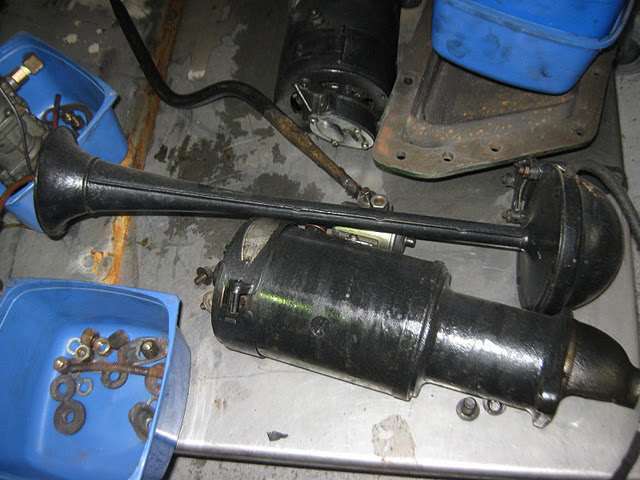 (45.23 KB) (45.23 KB)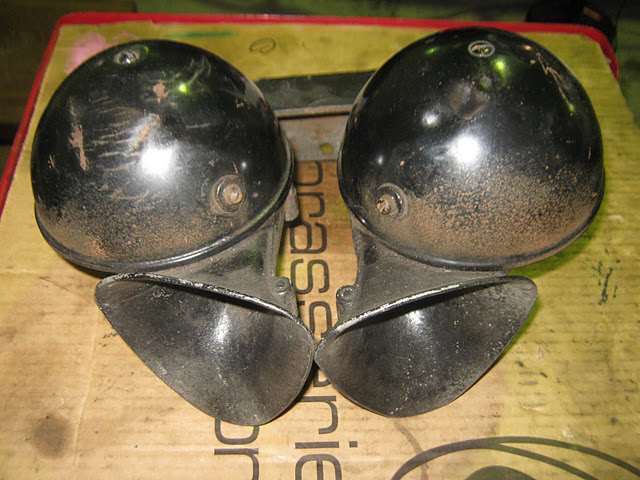
Posted on: 2012/1/12 3:29
|
|||
|
Mal
/o[]o\ ==== Bowral, Southern Highlands of NSW, Australia "Out of chaos comes order" - Nietzsche. 1938 Eight Touring Sedan - SOLD 1941 One-Twenty Club Coupe - SOLD 1948 Super Eight Limo, chassis RHD - SOLD 1950 Eight Touring Sedan - SOLD What's this? Put your Packard in the Packard Vehicle Registry! Here's how! Any questions - PM or email me at ozstatman@gmail.com |
||||
|
||||
|
Re: Wade's Workshop
|
||||
|---|---|---|---|---|
|
Forum Ambassador
|
Friday 13th January 2012
Besides giving plasma at the Blood Bank this morning learned that as well as today there are 2 more Friday the 13th's this year. Meanwhile at the workshop the elves, although I thought Christmas was over, had been at work. Or was that just one elf by the name of Wade? Whoever it was, they'd repaired a leaking oil pressure gauge fitting at the rear of the block by removing it, cleaning it and re-installing it using thread sealing tape. No more leak there now. Come to think of it Wade does have an aversion to leaks so the finger is turning in his direction. Apparently it also looks like there is a slight coolant leak from the front of the engine but neither under car or on top close inspection could pinpoint the source. Will keep a close eye on that situation in future. Then took the Coupe out for a test drive as well as filling up with 95 Unleaded and returning via George's workshop. George was able to inspect and test the Coupe for it's annual inspection certificate. The inspection approval is now done on-line so I was able, on returning home, to log on and make the required payment. The Coupe is now officially "on the road" for another year. Wade had earlier taken Juniors mainshaft around to Brookers Brake Service so the fitting at the front(see pic) cab be machined off in their lathe. Reason being, Wade had been in contact with his "favourite Packards Parts supplier" but a combination of sticker shock and other factors has led to other alternatives being examined before any order is placed. Left Wade completing the "engineering drawings" for the machining required on the 426 waterpumps. Attach file: (26.56 KB) (23.97 KB) (23.97 KB)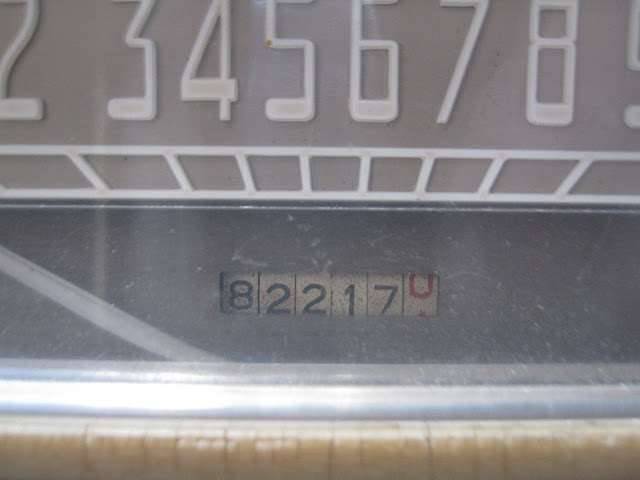 (16.15 KB) (16.15 KB)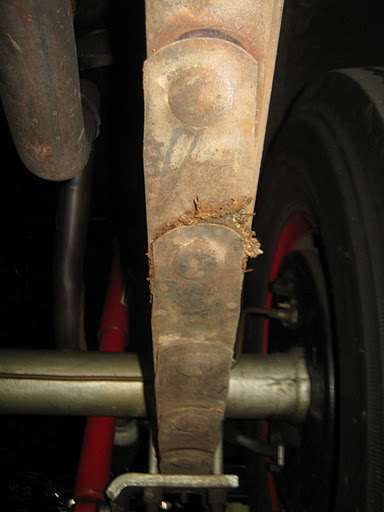 (17.63 KB) (17.63 KB)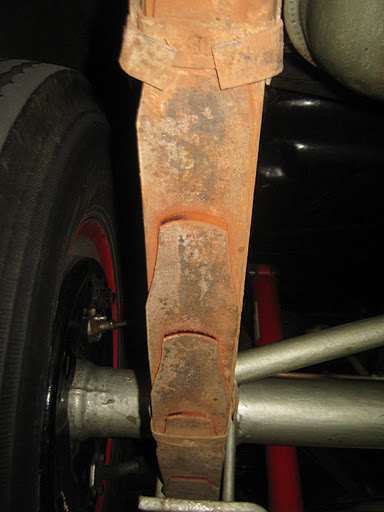 (30.82 KB) (30.82 KB)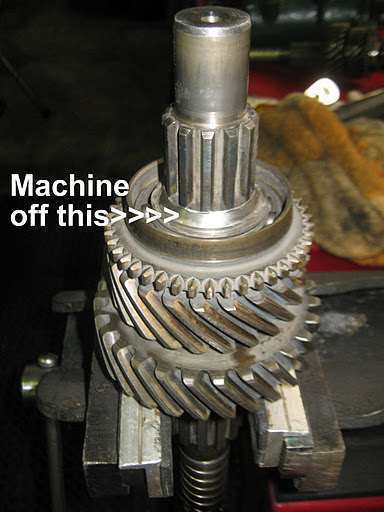
Posted on: 2012/1/13 3:26
|
|||
|
Mal
/o[]o\ ==== Bowral, Southern Highlands of NSW, Australia "Out of chaos comes order" - Nietzsche. 1938 Eight Touring Sedan - SOLD 1941 One-Twenty Club Coupe - SOLD 1948 Super Eight Limo, chassis RHD - SOLD 1950 Eight Touring Sedan - SOLD What's this? Put your Packard in the Packard Vehicle Registry! Here's how! Any questions - PM or email me at ozstatman@gmail.com |
||||
|
||||
|
Re: Wade's Workshop
|
||||
|---|---|---|---|---|
|
Forum Ambassador

|
The composition of the "buttons" differed depending on position to give the optimum frictional properties and hence ride quality. Antimony/tin/lead alloys, bronze, & rubber were all used. I think the attachment, a page from an article I authored for The Packard Cormorant some years back, will give some insight.
Attach file: (126.82 KB)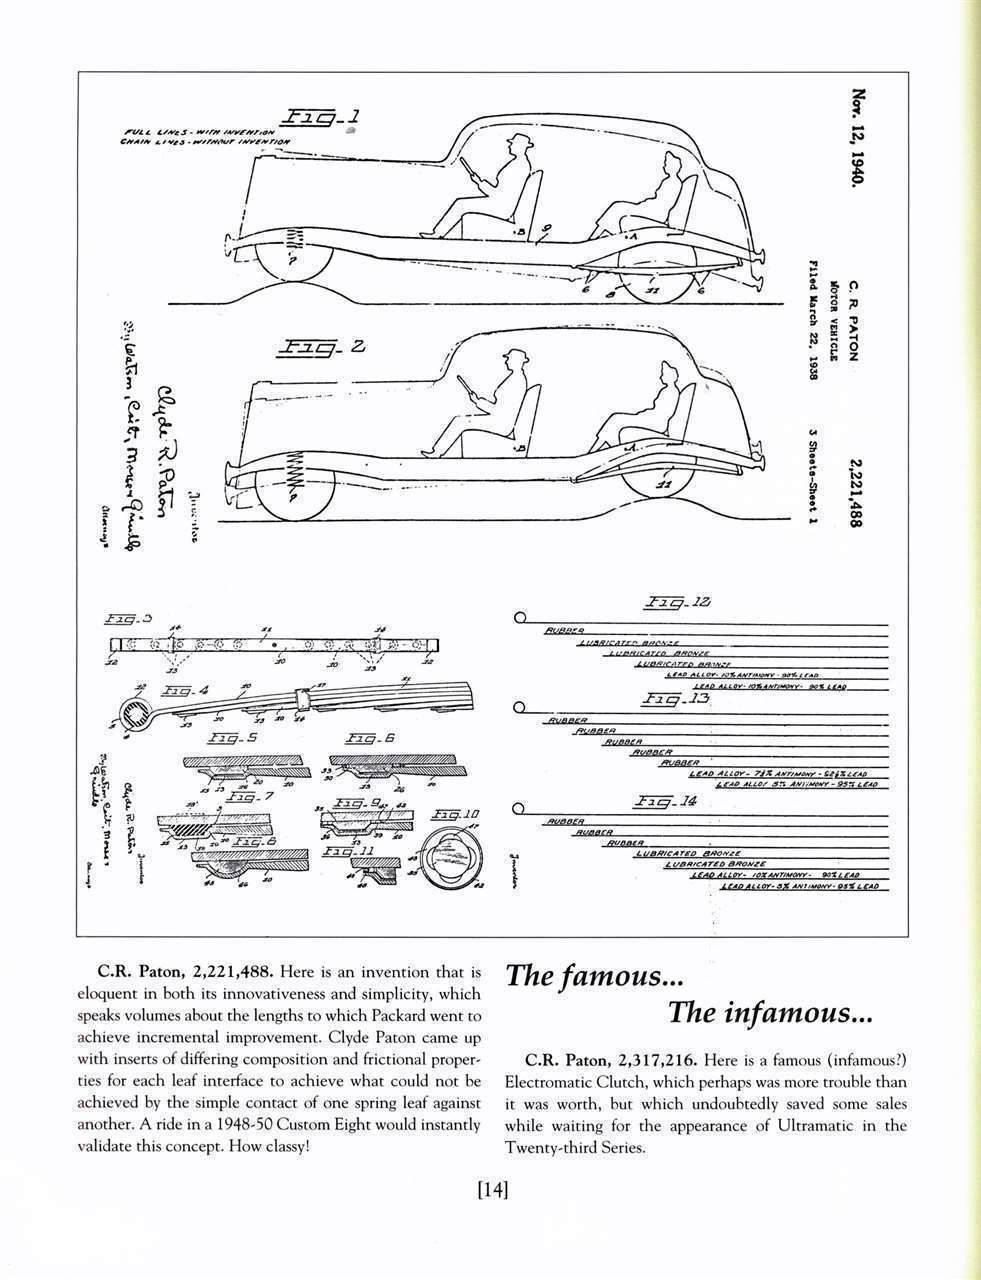
Posted on: 2012/1/13 16:09
|
|||
|
||||
|
Re: Wade's Workshop
|
||||
|---|---|---|---|---|
|
Forum Ambassador
|
 Gents for the explanation and insights, my Packard education continues...... Gents for the explanation and insights, my Packard education continues......
Posted on: 2012/1/13 16:40
|
|||
|
Mal
/o[]o\ ==== Bowral, Southern Highlands of NSW, Australia "Out of chaos comes order" - Nietzsche. 1938 Eight Touring Sedan - SOLD 1941 One-Twenty Club Coupe - SOLD 1948 Super Eight Limo, chassis RHD - SOLD 1950 Eight Touring Sedan - SOLD What's this? Put your Packard in the Packard Vehicle Registry! Here's how! Any questions - PM or email me at ozstatman@gmail.com |
||||
|
||||
|
Re: Wade's Workshop
|
||||
|---|---|---|---|---|
|
Home away from home
|
Mal, there you will find a similar question followed by explanation especially related to a 1941 110 Business Coupe.
Quote: ...Antimony/tin/lead alloys, bronze, & rubber were all used... Dave, is one of the mentioned separator materials or a compound of it called "silenite"? Attach file: (98.63 KB)
Posted on: 2012/1/13 17:06
|
|||
|
The story of ZIS-110, ZIS-115, ZIL-111 & Chaika GAZ-13 on www.guscha.de
|
||||
|
||||
|
Re: Wade's Workshop
|
||||
|---|---|---|---|---|
|
Forum Ambassador
|
Selenite is a crystalline form of gypsum (calcium sulfate) as I recall. Silenite is perhaps a trade name for some proprietary substance.
Posted on: 2012/1/13 17:25
|
|||
|
||||
Register To PostTopic is Locked


