|
Re: Mal's '41 120 Coupe
|
||||
|---|---|---|---|---|
|
Forum Ambassador

|
Quote:
Hank, Thanks for the kind words, although as I said Steele doesn't have anything to worry about. And talking of laundry lists, it's oh so true. When I sat down and made out mine it seemed to go on and on. But now that good progress is being made it's starting to shorten up noticeably. Good luck with the work on your '55, I can see you're really getting into it. 
Posted on: 2008/8/5 9:22
|
|||
|
Mal
/o[]o\ ====  Bowral, Southern Highlands of NSW, Australia "Out of chaos comes order" - Nietzsche. 1938 Eight Touring Sedan - SOLD 1941 One-Twenty Club Coupe - SOLD 1948 Super Eight Limo, chassis RHD - SOLD 1950 Eight Touring Sedan - SOLD What's this?  Put your Packard in the Packard Vehicle Registry! Here's how! Any questions - PM or email me at ozstatman@gmail.com |
||||
|
||||

|
Re: Mal's '41 120 Coupe
|
||||
|---|---|---|---|---|
|
Forum Ambassador
|
Wednesday 6th August 2008
Arrived at the workshop to find Wade had been and gone, he was making a trip to the waste depot to unload some rubbish for a friend. So I pottered around tidying up a bit and checking out how to re-mount the left side hood holding arm into the firewall. It had been pulled out of the firewall at some stage on it's journey to me and Wade had brought it back to it's required shape rather than it's former pretzel look. As I was doing this Wade arrived and we discussed the situation. I didn't want to remove the insulation from inside the top half of the firewall, as it looks and feels brittle. It was decided to cut a hole through it to locate a nut and slightly longer bolt instead of the original D shaped nut and short bolt. Another matter talked about was the dash, Wade had spoken to Harvey a couple of days ago and he said he was re-woodgraining it as it didn't look right being more like baby poo than something suitable for a Packard. Wade thought it might be ready this week, so tomorrow morning I'll call Harvey to find out how it's progressing, because putting the new wiring harness into the '41 is integral with having the dashboard available. However before doing anything also discussed new heater hoses, and again Wade came to the party saying he thought he had enough hose to do the job. Rather than start these tasks it was decided to finish the brakes. First the threads for the brake lines in both rear wheel cylinders were re-tapped using the 7/16" NPS bottom plug bought Monday. This was done using a smear of grease to catch and hold the shavings generated by this procedure followed by a through hand cleaning and liberal drenchings with brake cleaner to ensure no chips or shavings were left behind. Next we walked up to see Col, Wade's brake guy, and picked up the new brake lines he'd made, cost AU$20.00. Col also lent us a brake pipe bending tool and on the way back to the workshop saw Kablan working on the rear bumper of a Post-WW2 English Ford Anglia tourer, also saw the '28 Essex Wade restored the chassis of and an old Vauxhall waiting for restoration. Back at the workshop Wade offered me the opportunity to bend the brake lines but I declined as I didn't want to stuff it up. Maybe I should say I chickened out so fast you could swear there were feathers flying! Anyway with some help from me, minimal though it was, Wade managed to bend up both pipes such that it took only a little tweaking to get them to fit almost first up, good one Wade. They were then tightened up, and here I'll note that Col had used fittings with longer threads to try and help the situation as the old fittings were bottoming out. Then bleeding started, again with me on the pedal and Wade on the bleed nipple, but with the same result leaks at both rear wheel cylinder fittings. More tightening, more gentle bleeding, and more tightening and still even more gentler bleeding and still fluid aplenty on the outside and not on the inside where it should be. So off with the brake drums, just gently using the drum puller to break the hold of the adjusted shoes. Out with the wheel cylinders and looking in the threaded hole for the brake line fittings there was no ferrule for either side brake line to seat against. So back to see Col, as he'd re-sleeved the cylinders, and after inspection and a ferret through his stockpile of parts he found a couple of ferrules but only one was suitable being the right length. Then instead of using ferrules Col found and fitted 2 adaptors, for want of a better word. Back to the workshop refitted the wheel cylinders, brakes shoes, drums and Wade tightened up all fittings again. Onto bleeding again and this time success with no apparent leaks at the rear wheel cylinders. Then bled the fronts and this was successful too. However there was a minor scare when a pool of fluid was spotted under the master cylinder but when found to only be from splash out of the open top of the master cylinder our heartbeats returned to normal. All the above ate up the better part of the working day, and when I say working I really mean Wade, as I once again was more of a "gofer" and assistant than full hands on. Discussed what to do next and proceeded to install a fuel filter between the fuel pump and carburettor by cutting out a section of fuel line and installing a throw away, see through filter. Then re-installed the carburettor and hooked up the throttle linkage, vacuum advance tube and auto-choke heat tube. Next onto the new heater hoses, Wade had ferreted out enough heater hose, in 2 pieces, to be able to come up with the 3 lengths required, just! These I installed while Wade hovered in the background offering advice or assisting when it appeared a third hand would be helpful. Attach file:  (28.90 KB) (28.90 KB)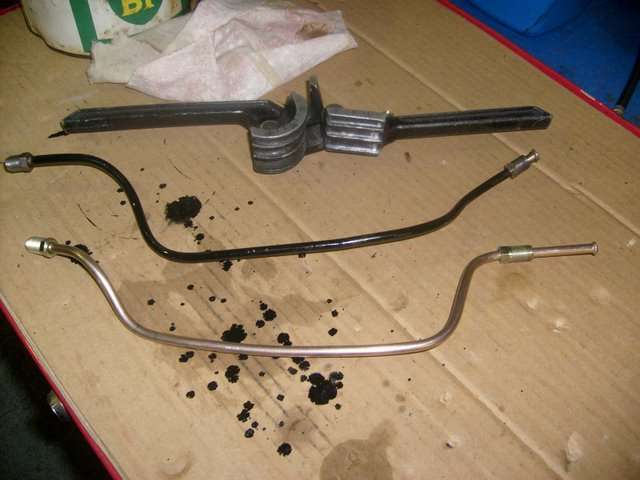 (35.61 KB) (35.61 KB) (33.49 KB) (33.49 KB)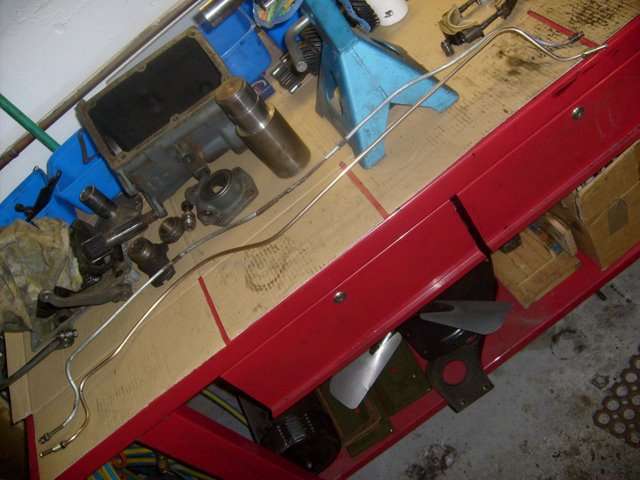 (25.20 KB) (25.20 KB)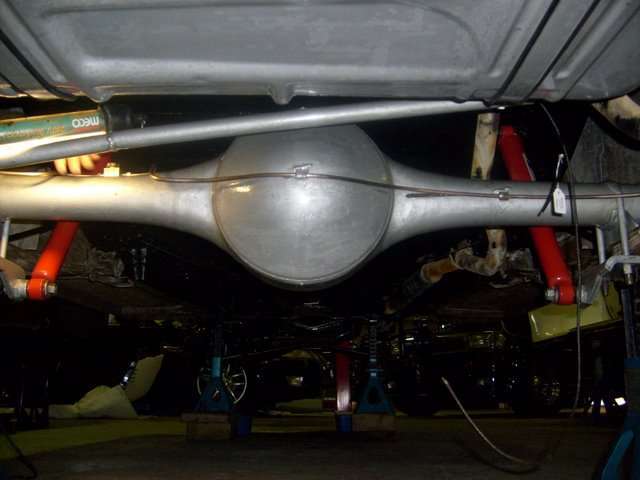 (23.60 KB) (23.60 KB)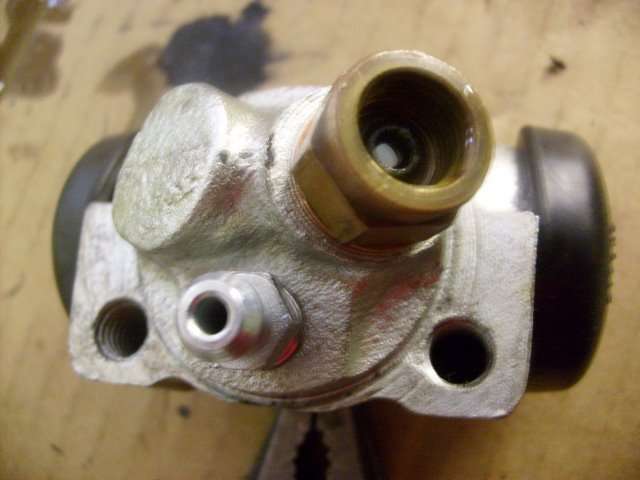 (30.76 KB) (30.76 KB)
Posted on: 2008/8/6 6:24
|
|||
|
Mal
/o[]o\ ==== Bowral, Southern Highlands of NSW, Australia "Out of chaos comes order" - Nietzsche. 1938 Eight Touring Sedan - SOLD 1941 One-Twenty Club Coupe - SOLD 1948 Super Eight Limo, chassis RHD - SOLD 1950 Eight Touring Sedan - SOLD What's this? Put your Packard in the Packard Vehicle Registry! Here's how! Any questions - PM or email me at ozstatman@gmail.com |
||||
|
||||
|
Re: Mal's '41 120 Coupe
|
||||
|---|---|---|---|---|
|
Forum Ambassador
|
Thursday 7th August 2008
Started the day by calling Harvey, who first confused me with another guy called Mal who's installing a clothesline for him. After we straightened out who I was, Harvey said he should be working on wood-graining the dash next week when he's down in Sydney. Then rang Castle Automotive Enterprises, they are in country Victoria about 450 miles south, and ordered an 1&3/4" stainless steel exhaust pipe bend to use as the lower radiator pipe, cost AU$25.00, actually they're going to send me 2 for the price of one! At the workshop started by mounting the middle of the long return heater hose to the air cleaner support with a plastic clip provided by Wade. This was to provide good clearance between the hose and the head and sparkplugs. Filled the sump with Penrite HPR30, took 6 litres to reach the full mark on the dipstick and another litre to fill the oil filter, so 7 litres in total. Then the fun part of filling the diff as yesterday Wade, with a wicked gleam in his eye, had produced a small funnel connected to a 1&1/4' length of rubber hose as the means to do this. This morning Wade also produced a plastic beaker with a small pouring lip. First I cleaned up both the drain and filler plugs for the diff of excess POR-15 and re-installed the drain plug very tightly. Then, lying on the creeper and holding the funnel with one hand filled it from the beaker using the other hand. The beaker holds about 400 to 500 mils so poured about 100/150 mils a time into the funnel. Seemed a bit slow to empty until I realised I had the hose so far through the fill hole it was probably up against the crown wheel or other internals. Eased it out and it started to empty faster, but not much faster, as it's pretty thick stuff. Got through the first beaker OK and onto the second, that's when Exxon Valdez faded into insignificance. First I filled the beaker too full, then overfilled the funnel with the result being something like Niagara Falls, well at least it seemed like that at the time. Carried on, dodging the deluge, refilling the funnel but more sedately until I was through that beaker full. A rough and quick clean up and the process was repeated again, again and again, all up about 8 to 10 times and about 3&1/2 litres or so of oil. At the end, also had to yell for Wade to pass the filler plug as I'd left it on the bench after cleaning it up. So something I thought might take 1/2 an hour ended up taking 1 hour and 20 minutes. While I was doing these tasks Wade had made another trip to the waste depot and then was trial fitting the rods and bearings for Kevin's '35 engine rebuild. Attach file: (17.65 KB)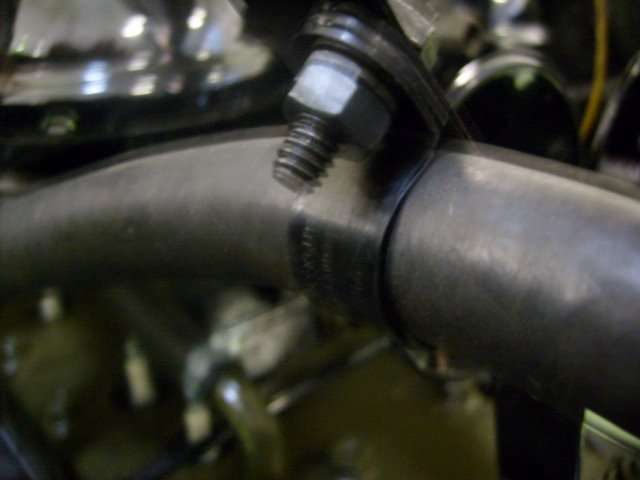 (28.22 KB) (28.22 KB)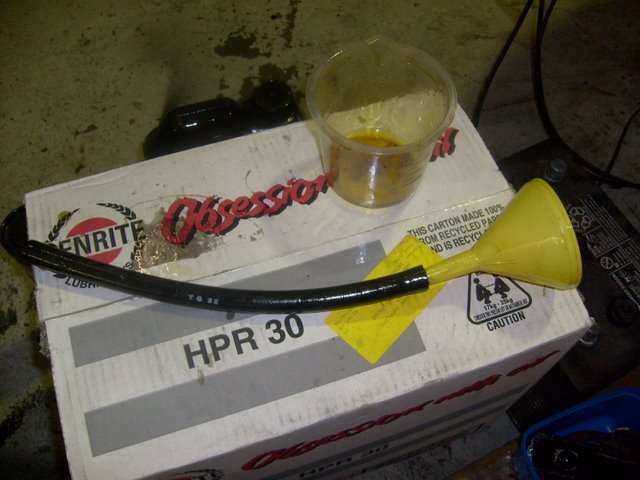
Posted on: 2008/8/7 3:37
|
|||
|
Mal
/o[]o\ ==== Bowral, Southern Highlands of NSW, Australia "Out of chaos comes order" - Nietzsche. 1938 Eight Touring Sedan - SOLD 1941 One-Twenty Club Coupe - SOLD 1948 Super Eight Limo, chassis RHD - SOLD 1950 Eight Touring Sedan - SOLD What's this? Put your Packard in the Packard Vehicle Registry! Here's how! Any questions - PM or email me at ozstatman@gmail.com |
||||
|
||||
|
Re: Mal's '41 120 Coupe
|
||||
|---|---|---|---|---|
|
Forum Ambassador
|
Friday 8th August 2008
Couple of hours only at the workshop as Wade was away and John and Rick closed the place up at midday because they're going to a trade show. John's buying a new 4 ton hoist to take the place of the 2.5 ton one he has which is somewhat old and presently unsafe. The old hoist will be repaired and returned to service once the new one is in place. He's going to pick up the new hoist at the end of the trade show on Sunday, it's on display there, otherwise he has to wait another 6 weeks before he can get one. Spent my time refixing the heater hose on the carburettor air cleaner bracket because the bolt I used was too long interfering with the air cleaner fit. Cut an 1/8" off the bolt and turned it around so the bolt head was on the air cleaner side and it fits nicely now. Then took off the paint from the air cleaner on the wire wheel and Marine Cleaned and Metal Readied it but ran out of time, and will POR-15 it next week. Also going to replace the air cleaner filter with a modern one as Wade's told me there is one that fits. When I find out what it's from I'll put the info in the Parts X-Ref which may or may not help those outside Oz. Tomorrow instead of going to the workshop as usual, Noel the guy with the '41 160 Coupe here in Sydney is hosting a lunch for one of his American Packard friends and his wife who are on holiday over here at present. Noel's friend has an interesting collection, including '52 Mayfair Sports Coupe, '56 Carribbean Hardtop, '39 120 Coupe as well as a very rare unrestored '38 Brunn bodied V12 (one of only 12 built). There are be a number of Packard Club members invited and those who are able are arriving in their Packards. I'm looking forward to meeting Noel's Packard friends and welcoming them to Australia. Attach file: (32.73 KB)
Posted on: 2008/8/7 22:23
|
|||
|
Mal
/o[]o\ ==== Bowral, Southern Highlands of NSW, Australia "Out of chaos comes order" - Nietzsche. 1938 Eight Touring Sedan - SOLD 1941 One-Twenty Club Coupe - SOLD 1948 Super Eight Limo, chassis RHD - SOLD 1950 Eight Touring Sedan - SOLD What's this? Put your Packard in the Packard Vehicle Registry! Here's how! Any questions - PM or email me at ozstatman@gmail.com |
||||
|
||||
|
Re: Mal's '41 120 Coupe
|
||||
|---|---|---|---|---|
|
Forum Ambassador
|
Tuesday 12th August 2008
Started the day by painting the air cleaner canister, lid, wing-nut and bracket bolt with POR-15. Next, as the stainless steel 1&3/4" exhaust pipe bends had arrived on my doorstep before 7:00am, started on the lower radiator to water pump radiator hose fitting. The '41 had arrived with a petrified flexible radiator hose in lieu of the metal bend and 2 pieces of hose. Had bought a radiator hose and clamp kit from Max Merritt before I realised I needed the metal tube. The s/s tube will do the job, even though it doesn't have the desired kink in it, and I had to shorten one end by 1" for fit. Fooling around with it, to get it in place with the clamps screwed up tight, took most of the morning. After a quick cholesterol hit, of hot french fries and a coke for lunch, than started on re-installation of the re-chromed rear bumper, over-riders and drop down centre over-riders and bars. Thought this would be straight forward, but like most things the preparation is the killer. Had to clean up all the stud threads although they had been protected by the chrome-plater with plastic tape. And also the nuts which I'd POR-15'd silver. So out with the tap and dies with a bit of wire wheel brushing thrown in where required and studs and nuts were all cleaned up. The front bumper stud threads and nuts were also cleaned up to save doing this later and separately. Surprising how long this took, even with time saving techniques were employed when possible, see pic's. Problem is, now I have to review the pic's I took of the dis-assembly to assist in the re-assembly process, the memory fades surprisingly quickly. Attach file: (14.55 KB)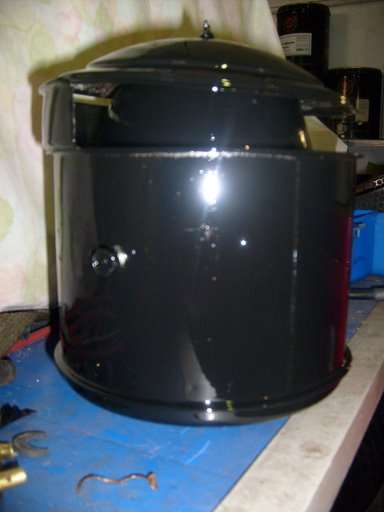 (20.40 KB) (20.40 KB)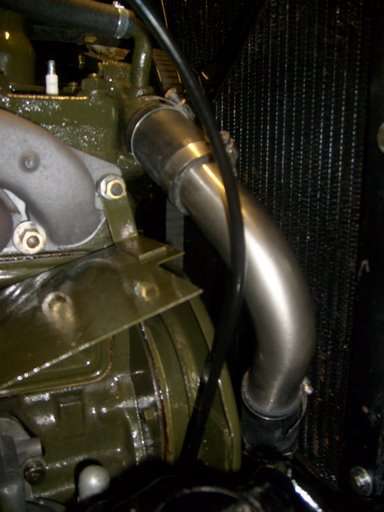 (17.08 KB) (17.08 KB)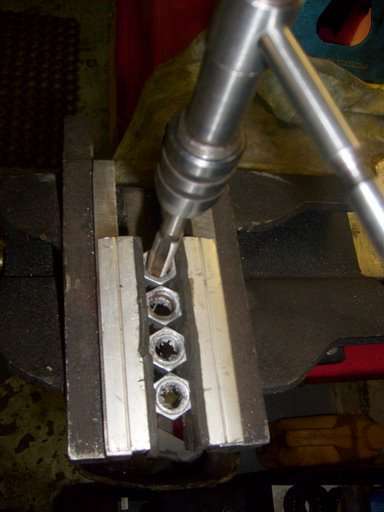 (21.56 KB) (21.56 KB)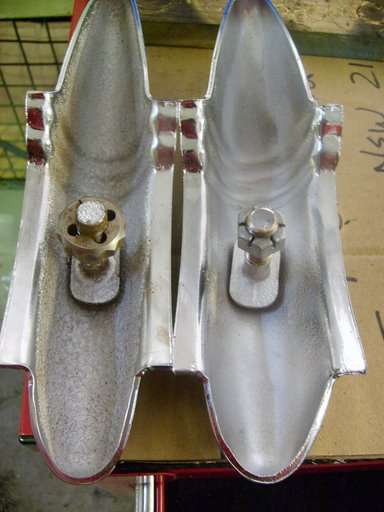
Posted on: 2008/8/12 4:08
|
|||
|
Mal
/o[]o\ ==== Bowral, Southern Highlands of NSW, Australia "Out of chaos comes order" - Nietzsche. 1938 Eight Touring Sedan - SOLD 1941 One-Twenty Club Coupe - SOLD 1948 Super Eight Limo, chassis RHD - SOLD 1950 Eight Touring Sedan - SOLD What's this? Put your Packard in the Packard Vehicle Registry! Here's how! Any questions - PM or email me at ozstatman@gmail.com |
||||
|
||||
|
Re: Mal's '41 120 Coupe
|
||||
|---|---|---|---|---|
|
Forum Ambassador
|
Wednesday 13th August 2008
Two bites of the cherry today, couple of hours in the morning then a few more in the afternoon. Started early because of my middle of the day absence and began by working on the bumper bolts proper, the four rear teardrops and the front hexagon bolts. These all needed to have the chrome cleaned out of the threads because none of these had been protected by plastic tape. Wasn't as easy as the studs and nuts because of their awkward shapes being very hard to hold firmly even in padded vice jaws so the threads could be re-cut. Took a while re-positioning and re-tightening the bolts in the vice jaws until all were done. Then using a plastic milk crate and a couple of pieces of timber for positioning mounted the bumper bar, only loosely. And just as well because no sooner than it was mounted than I had to undo the bolts and nuts on the left side. Why? Because I'd left the cable for the lead light wrapped around the bumper irons! That'll only be the first of many times I'll have to do the same until it can be tightened up completely. While all this was going on Wade had arrived and we had discussions about the radiator tube and hose I'd installed yesterday and that I needed to take off the taillights as part of the re-wiring process. Unfortunately at this point I had to leave, as shortly Wade was expecting Noel together with Gary and Doris his American friends. On my return discovered Wade had gone out so I took the taillights off. Reason being the wires leading to them need to be replaced and as we hadn't sent those sections to be re-made we'll have to do them ourselves (ourselves meaning Wade). Got both taillights off fairly easily but left the number plate light wire as is for the moment to use as a feed for the new wire under the centre skin of the trunk lid. Wade returned about this time with the rebuilt pressure plate, new clutch plate and re-surfaced flywheel for John's '39. Then started on re-installing the brackets for the rear splash shield between the bumper and body. After a minor scare, when I couldn't find half the parts I'd been holding only minutes before for this job and found them where they should be in the can holding the bumper bolts and bits, they were re-installed. But another minor hiccup along the way as I couldn't find first the nuts and then the threads on the studs I'd POR-15'd. On closer examination these weren't studs but pins with a hole for a split-pin! Once I realised the error of my ways all was well. During this Wade was inspecting the new wiring harness which we'd wanted fairly urgently 5 months ago, how time flies. He was checking to see all looked OK. And then was measuring up to see how much additional cable, all 16 gauge, and the various colours was required. On getting home I rang Vintage Wiring Harness and these will be on their way soon. Last night had a call from Harvey, he'll be having another go at the dash wood-graining next week once he gets the new paint he's ordered. And Noel had returned my temp/oil gauge which Peter Toet had taken with him to Canberra about a month ago. I'll now start chasing a few more leads to have it repaired. Attach file: (27.35 KB) (30.18 KB) (30.18 KB)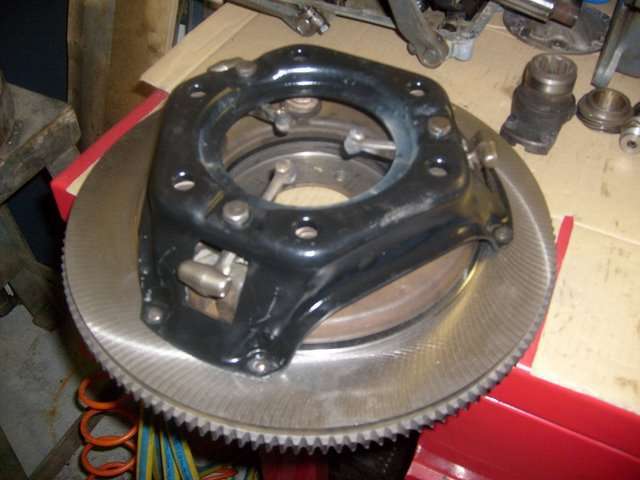
Posted on: 2008/8/13 4:59
|
|||
|
Mal
/o[]o\ ==== Bowral, Southern Highlands of NSW, Australia "Out of chaos comes order" - Nietzsche. 1938 Eight Touring Sedan - SOLD 1941 One-Twenty Club Coupe - SOLD 1948 Super Eight Limo, chassis RHD - SOLD 1950 Eight Touring Sedan - SOLD What's this? Put your Packard in the Packard Vehicle Registry! Here's how! Any questions - PM or email me at ozstatman@gmail.com |
||||
|
||||
|
Re: Mal's '41 120 Coupe
|
||||
|---|---|---|---|---|
|
Forum Ambassador
|
Thursday 14th August 2008
Morning at the workshop then it was off to see our grand daughters in the afternoon. On the way to the workshop dropped into Bunnings, our biggest hardware store chain in Australia, and bought a bolt and nut for the middle of the rear bumper to the splash shield. The bolt has a round head with a square shoulder under it where it slips into a slotted bracket at the rear centre of the bumper. Cut it down by about 1" and of course had to undo all but one of the bumper bracket bolts to swing the bumper down to slide the bolt into the slot. All went well and the bumper was bolted back on to all the bumper brackets. Next was making up brackets to mount the rear turn indicators to the bumper brackets. So after some eyeballing and judicious measuring cut a bracket out of a piece of thin aluminium plate I've been carting around for 40 years. The plate, although now small in size, had originally contributed the bulk of its area to a firewall for a Y-Block Ford powered dragster back in the 60's. Using a Bosch Jigsaw cut out a rectangular piece 4&3/4" x 1&3/4" then drilled a 1/2" hole for the bumper bolt. Using a piece of paper measured from the bolt to up behind the bumper bar then bent the piece in the jaws of the bench vice at about a 90 degree angle. Whoops, too much! Needed about a 45 degree angle so cut another piece but this one was about 5" x 1&3/4". Some judicious bending at the approximate angle and it came up and back to clear the bumper. More eyeballing and marking and another 45 degree angle bent in the vice by hand. I discovered I didn't need to use a big shifter just lean on it carefully with a 230lb Aussie and "voila" instant angle! That was the left side mostly done so turned to the right side. All went well, cut another 5" x 1&3/4" piece, drilled the 1/2" hole and the first 45 degree bend. However on mounting it on the bracket discovered this side of the splash shield is higher than the left side. Wade suggested jacking up the bumper bracket on the right side so slacked off the bolts, jacked away, did up the bolts and maybe 1/4" was gained, it all helps. Thought I get a bit creative with this bracket and put 2 more 20 to 30 degree bends instead of the single 45 one I'd done of the first bracket. Looked OK but because it was dissimilar to the left one just didn't look right. So cut still another 5" x 1&3/4" piece, drilled the 1/2" hole and the first 45 degree bend. Then another 45 degree bend but a bit further up the piece because of the splash shield discrepancy. And it worked. Next was drilling 3/8" holes in the above bumper end. Then rounding off the corners, first with the jigsaw, than some smoothing on the grinder. Will probably require a little further tweaking but the basis is now in place. And of course had a couldn't find it moment. The rubber washer for one of the turn indicators couldn't be found until I turned over the steel washer and there it was "stuck" to the other side. Turned out well, but I'm having these senior moments all the time now with nuts, bolts, washers and parts big and small! While this was going on Wade had been under John's '39 and re-installed the flywheel himself. I did offer to lend a hand to lift or hold as required but Wade went under, came out a few times, and before you knew it emerged with the job done. He'd held the flywheel up to the crankshaft flange and found it fitted on snuggly so didn't need a second pair of hands. Then Kevin, the owner of the '35 Sedan that Wade's repairing the engine of, arrived for an update and chat. Kevin also caught up with John, who's going to get his Daimler up running and ready for registration. As mentioned above the aluminium plate was used as a firewall for a Y-Block Ford powered dragster. And my brother used similar pieces of thin plate rolled to shape, by a mate in the Gladiators Hot Rod club, as the rear fenders for his Y-Block Ford powered A Bucket. I've included a few pic's of the rail and of my brothers rod. Please forgive the pictures of a Ford powered hot rod and a dragster. They are there to illustrate the use of thin aluminium plate which is also being used in the '41 and as examples of my automotive history. Attach file: (15.89 KB)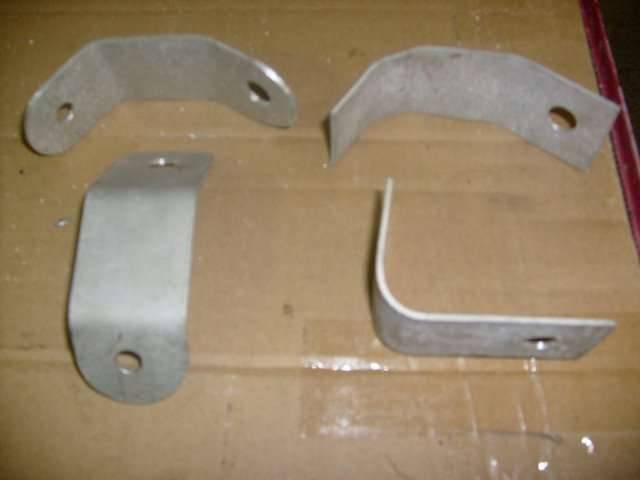 (24.29 KB) (24.29 KB)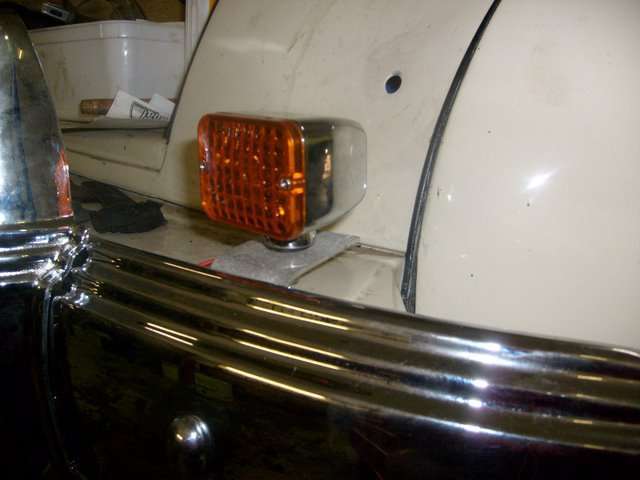 (18.41 KB) (18.41 KB)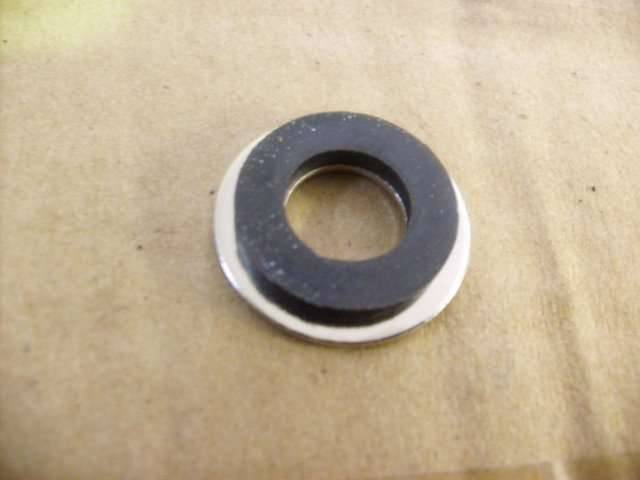 (31.52 KB) (31.52 KB) (22.80 KB) (22.80 KB)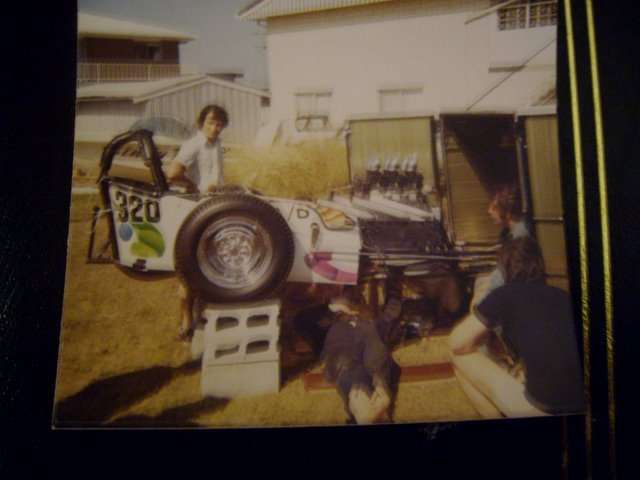 (22.00 KB) (22.00 KB)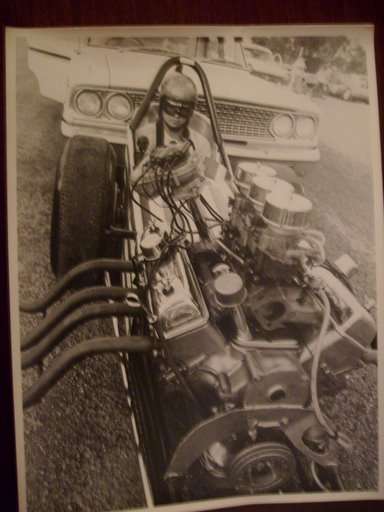 (25.71 KB) (25.71 KB)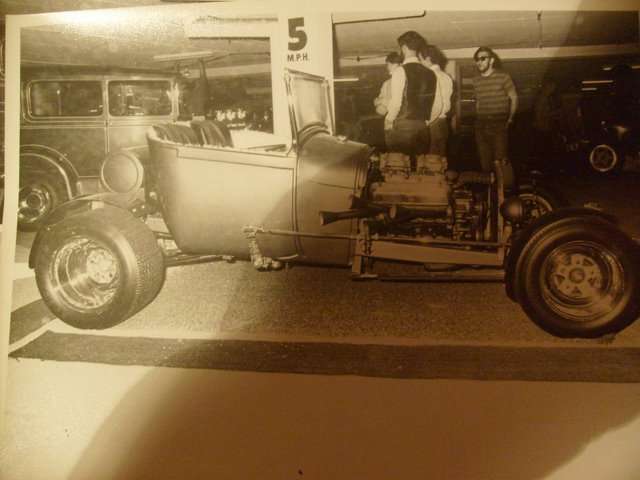 (34.16 KB) (34.16 KB)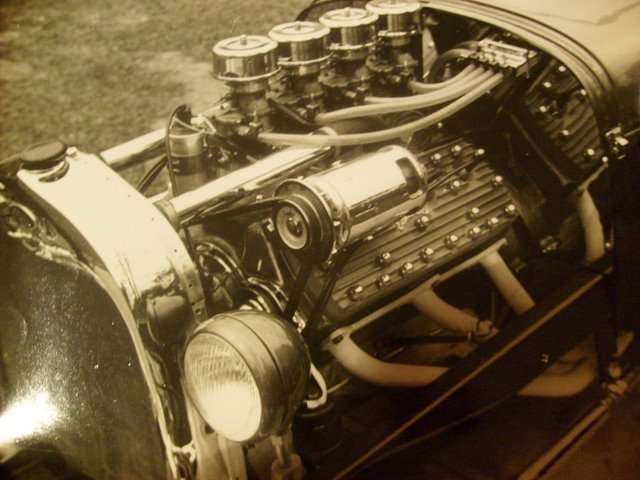 (22.42 KB) (22.42 KB)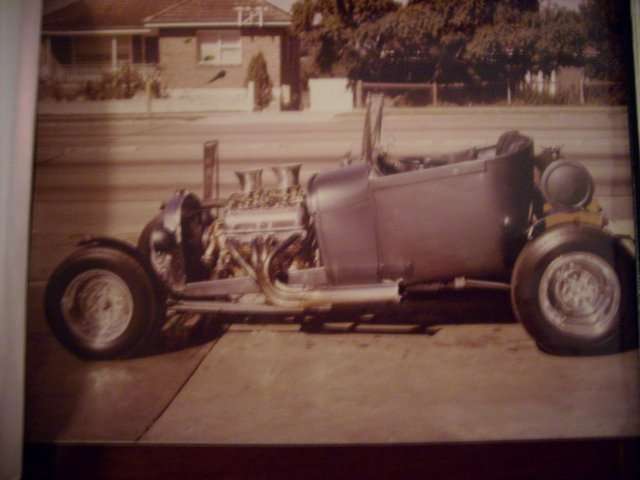
Posted on: 2008/8/14 4:39
|
|||
|
Mal
/o[]o\ ==== Bowral, Southern Highlands of NSW, Australia "Out of chaos comes order" - Nietzsche. 1938 Eight Touring Sedan - SOLD 1941 One-Twenty Club Coupe - SOLD 1948 Super Eight Limo, chassis RHD - SOLD 1950 Eight Touring Sedan - SOLD What's this? Put your Packard in the Packard Vehicle Registry! Here's how! Any questions - PM or email me at ozstatman@gmail.com |
||||
|
||||
|
Re: Mal's '41 120 Coupe
|
||||
|---|---|---|---|---|
|
Forum Ambassador
|
Friday 15th August 2008
Quiet morning at the workshop mainly installing the rear bumper drop down centre over-riders and cross bars. Wade was in but had to leave early, but while there guided, helped, advised, measured, tested, fiddled and assisted. The pic's I'd taken back in April of the dis-assembly weren't helpful so it was a combination of observation, deduction and trial and error to get the mechanism to come together and operate smoothly. This included taking it almost all apart again to swap the over-riders from the sides we originally set them up on. And by the time Wade had to leave it was back on again but needed to be properly positioned and all nuts fully tightened. After doing that then tightened up the inside bumper bracket nuts and the centre bumper splash shield nut. Then onto the front sway bar which although in place hadn't been hooked up because the links didn't appear to reach and fit. Started by jacking the right side of the front suspension up because currently the '41 is sitting on jack stands and the front suspension is "hanging". By doing this the gap between the sway bar and the mount on the front suspension was shortened but not enough. So tried the same on the left side with of course the same result but while doing this thought I may have mounted the sway bar upside down. Started undoing the mountings for the sway bar but before I was through the right side had a phone call from my wife Kath. She was calling me home because our daughter needed some urgent baby sitting, and being a dutiful husband not to mention a doting grandfather I dropped the tools and returned as summoned. Actually tidied up and then returned home but what this meant was I didn't get to go to Grippy Rubber for some more rubber grommets, or to Mobile Instrument Service about my temp gauge/ capillary problem, or do a number of other minor chores relating to the '41. But there's always next week. Attach file: (28.42 KB) (22.98 KB) (22.98 KB) (17.75 KB) (17.75 KB)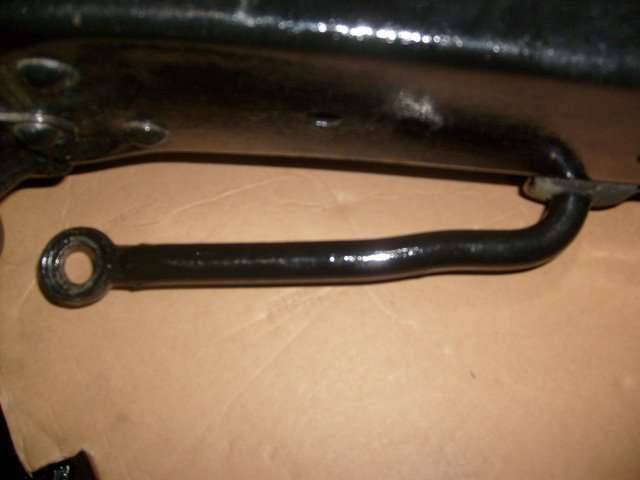
Posted on: 2008/8/15 4:06
|
|||
|
Mal
/o[]o\ ==== Bowral, Southern Highlands of NSW, Australia "Out of chaos comes order" - Nietzsche. 1938 Eight Touring Sedan - SOLD 1941 One-Twenty Club Coupe - SOLD 1948 Super Eight Limo, chassis RHD - SOLD 1950 Eight Touring Sedan - SOLD What's this? Put your Packard in the Packard Vehicle Registry! Here's how! Any questions - PM or email me at ozstatman@gmail.com |
||||
|
||||
|
Re: Mal's '41 120 Coupe
|
||||
|---|---|---|---|---|
|
Home away from home

|
Mal, you will probably want to take this with a grain of salt since the part numbers are different between the 120/180 but here's what my '41 sway bar looks like.
Attach file: (58.19 KB)
Posted on: 2008/8/15 9:28
|
|||
|
||||
Register To PostTopic is Locked


