
|
Re: Wade's Workshop
|
||||
|---|---|---|---|---|
|
Home away from home

|
The hot rod/street rod suppliers (Summit, JEGS, Speedway, etc.) and a major fastener manufacturer (can't recall the name but it is three letters) offer a locking type washer. These are not the split ring type but act on a flat on the nut/bolt. They are used to keep the fastener from moving after being tightened. Worth a look.
(o[]o) Just remembered the name of the fastener supplier: ARP.
Posted on: 2017/1/28 17:45
|
|||
|
We move toward
And make happen What occupies our mind... (W. Scherer) |
||||
|
||||
|
Re: Wade's Workshop
|
||||
|---|---|---|---|---|
|
Home away from home
|
Mal,
They are standard brass UNF nuts available from larger engineering suppliers, there is one near you at Mittagong that may have them: Southern Highlands Industrial Supplies, they in Mittagong. phone 4871 1249 Also Lee Bros in North Parramatta will have them.
Posted on: 2017/1/28 17:49
|
|||
|
||||
|
Re: Wade's Workshop
|
||||
|---|---|---|---|---|
|
Forum Ambassador

|
 Gents for your thoughts and advice. Gents for your thoughts and advice. David, I thought of Lee Bros but, before trying them, tomorrow I'll visit Southern Highlands Industrial Supplies as they are only 5 minutes from me.
Posted on: 2017/1/28 20:52
|
|||
|
Mal
/o[]o\ ====  Bowral, Southern Highlands of NSW, Australia "Out of chaos comes order" - Nietzsche. 1938 Eight Touring Sedan - SOLD 1941 One-Twenty Club Coupe - SOLD 1948 Super Eight Limo, chassis RHD - SOLD 1950 Eight Touring Sedan - SOLD What's this?  Put your Packard in the Packard Vehicle Registry! Here's how! Any questions - PM or email me at ozstatman@gmail.com |
||||
|
||||
|
Re: Wade's Workshop
|
||||
|---|---|---|---|---|
|
Forum Ambassador
|
Monday 30th January, 2017
After the one step forward of "Southern Highlands Industrial Supplies.....are only 5 minutes from me" it was two steps back. Visited their address at Mittagong and they are no longer there! Calls to their phone number went unanswered, so presume they are no longer in business. Also investigated other local purveyors of engineers supplies, all three of whom don't carry UNF brass nuts. Then rang Lee Bros who have the nuts but the tyranny of distance, about 100kms, means a trip I'd rather not have to do. However will do it on Wednesday and, seeing I'll be in the vicinity, I'm taking the opportunity to call in and see DavidM!
Posted on: 2017/1/29 18:56
|
|||
|
Mal
/o[]o\ ==== Bowral, Southern Highlands of NSW, Australia "Out of chaos comes order" - Nietzsche. 1938 Eight Touring Sedan - SOLD 1941 One-Twenty Club Coupe - SOLD 1948 Super Eight Limo, chassis RHD - SOLD 1950 Eight Touring Sedan - SOLD What's this? Put your Packard in the Packard Vehicle Registry! Here's how! Any questions - PM or email me at ozstatman@gmail.com |
||||
|
||||
|
Re: Wade's Workshop
|
||||
|---|---|---|---|---|
|
Home away from home
|
Mal, good luck on the nut gathering.
Back to the locks for the nuts. Would it work to get a large (fender type) washer and bend one side so it fits over the manifold flange and then bend another side over one of the flats on the nut once it is tightened? A little arm chair quarterbaking. (o[]o)
Posted on: 2017/1/30 11:13
|
|||
|
We move toward
And make happen What occupies our mind... (W. Scherer) |
||||
|
||||
|
Re: Wade's Workshop
|
||||
|---|---|---|---|---|
|
Forum Ambassador

|
i used grade 8 extra thick washers and stainless nuts on my new studs. seems to be working fine, course i should check them again since i just found out my head stud nuts came loose.
i got them from lowes.
Posted on: 2017/1/30 15:32
|
|||
|
1937 Packard 138-CD Deluxe Touring Limousine
Maroon/Black 1090-1021 [url=https://packardinfo.com/xoops/html/modules/registry/View.php?ID=232]1955 Packard |
||||
|
||||
|
Re: David's Workshop
|
||||
|---|---|---|---|---|
|
Forum Ambassador
|
Wednesday 1st February, 2017
NOTE - Thread renamed for today - David's Workshop! Of course Lee Bros had the brass nuts, and you know what? They are called "manifold nuts", fancy that, and a lot of guys buy them for their old cars! Saving David a trip to Lee Bros I was also to pick up 6 x 3/16 BSF(British Standard Fine) x 5/8" long, steel or brass, slotted or phillips headed screws. Instead I came away with 6 x 10/32 UNF x 5/8" long stainless steel phillips headed screws. The old guy, about my age, behind the counter told me 3/16" BSF and 10/32 UNF are the same thread, learn something new every day. These screws are to be used in a project David's working on for a mate, a 1950 Daimler Special Sports, one of 500 made 1950-52. David is doing all the work on the aluminium(aluminum) body, replacing any rotten wood then painting it. Once it's ready the body will go on David's body dolly and the chassis will go elsewhere for mechanical refurbishment. And to prove that 10/32 UNF IS the same as 3/16" BSF David fitted a screw to the Daimlers door! Then came the real David's Workshop experience when I mentioned now that I have the brass nuts the only other thing remaining was repair or replacement of the tailpipe exhaust hanger bracket(Group 6.002). The bracket, at the top where it mounts to the chassis, has a thick canvas like strip which had separated at one end. David, like Wade, dived into his shelves full of parts and materials and came up with a loooong roll of thick canvas like material, only this was rubberised on one side. Almost a perfect match. David then proceeded to cut me 2 strips using his bandsaw. Then, in the drillpress, drilled out the 3 holes required and then round filed them to fit because pieces of canvas still remained in the holes drilled. Just goes to show the benefits of a well equipped workshop. However I stopped him from de-riveting the old material and re-riveting the new material to the hanger itself. Rosie the Riveter can rest easy as I'm going to drill out the old rivet and replace with a nut, bolt and lockwasher, my workshop is not well equipped and I'm not as talented. And, when I arrived David was getting ready his 1912 Maxwell for a weekend rally down my way. I might just see him around. Attach file:  (57.43 KB) (57.43 KB)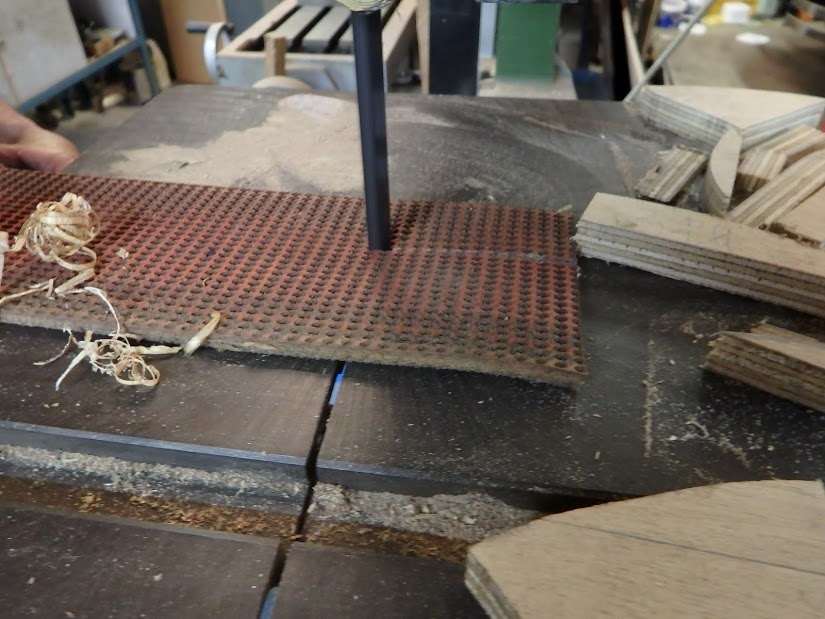 (51.01 KB) (51.01 KB)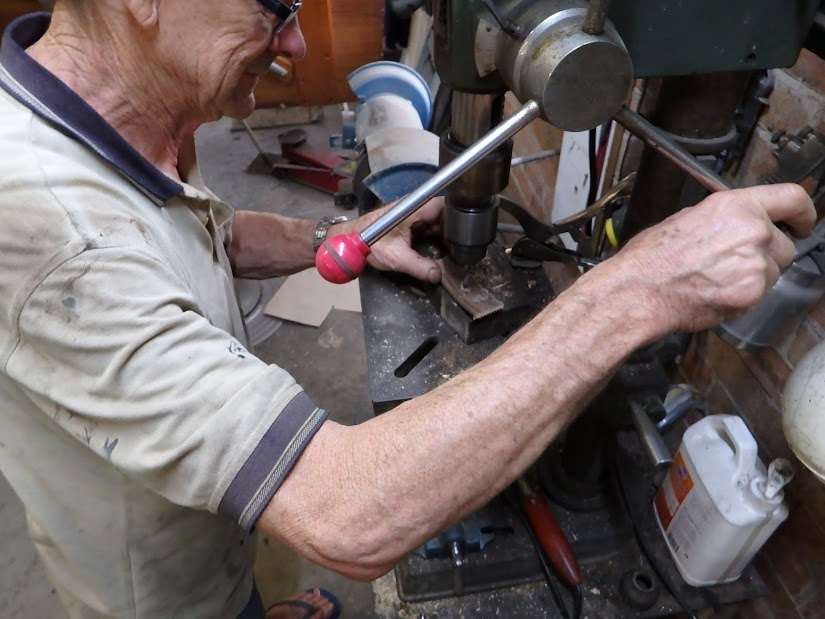 (66.92 KB) (66.92 KB) (58.25 KB) (58.25 KB) (62.86 KB) (62.86 KB)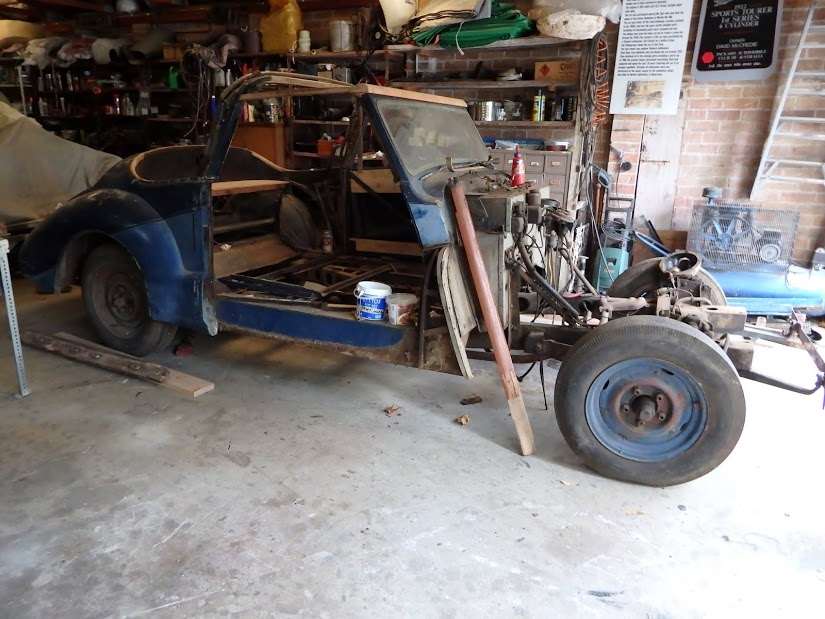 (55.32 KB) (55.32 KB) (79.48 KB) (79.48 KB) (17.10 KB) (17.10 KB)
Posted on: 2017/2/1 1:01
|
|||
|
Mal
/o[]o\ ==== Bowral, Southern Highlands of NSW, Australia "Out of chaos comes order" - Nietzsche. 1938 Eight Touring Sedan - SOLD 1941 One-Twenty Club Coupe - SOLD 1948 Super Eight Limo, chassis RHD - SOLD 1950 Eight Touring Sedan - SOLD What's this? Put your Packard in the Packard Vehicle Registry! Here's how! Any questions - PM or email me at ozstatman@gmail.com |
||||
|
||||
|
Re: David's Workshop
|
||||
|---|---|---|---|---|
|
Forum Ambassador
|
Thursday 1st February, 2017
Drilled out the rivet, refiled the holes in the canvas/rubber strapping then reassembled the hanger using a nut, bolt and spring washer. That was the easy part, getting the hanger back on to the frame is another matter altogether. Although it was awkward to remove, now realise it would have been impossible if hadn't been broken in the first place. Only reason I could get it off before was BECAUSE it was broken. With it broken I could access one nut and bolt and once that and the hanger was off the other nut and bolt became accessible. With the hanger now a complete unit I can get one nut and bolt on but not the other. Either my hands are much too large or hands and arms won't bend enough or a combination of the two is conspiring against me. Remember now the hanger was out 9 years ago but at that time so was the fuel tank! Thinking my next step might be to either drop the fuel tank(again!) or drop/wrestle the exhaust pipe out of the way. Because of that impasse, left the hanger for another day and turned to reinstalling the manifold assembly. Dropped the chain block hook down, connected the roped manifold assembly to the hook and hoisted it to clear the bonnet(hood) edge line. Pushed the Coupe under the manifold assembly and lowered away. It was almost perfect for a rough "eye" job, only needing to push the Coupe back a couple of inches. Harder when further lowering as there needed to be various push and shoves to enable the manifold assembly to clear the heater hoses, oil pressure line, vacuum line, fuel line, etc. Once past those obstacles a little readjusting of the centre of gravity together with very gentle use of the chain to incrementally lower/raise the manifold assembly and it slipped on like it was made for it! Oh, it was made for it was it? That explains it. Want to formally thank the chain block, without it I would never have been able to this. It was just too heavy to lift, carry, reach over a Packard mudguard(fender) and wriggle it into place. Anyway, that was the easy part, the hard part was kneeling under the mudguard(fender) putting the thick washers on(easy) and the new brass manifold nuts(from easy to near impossible). As said earlier: "Either my hands are much too large or hands and arms won't bend enough or a combination of the two is conspiring against me." Took about an hour just to get the nuts on finger tight! Left it at that for the day because the grandkids were coming over. And I'm sure Peter won't mind "too much" if I share this edited email advice from a few days back: "Sorry about the "naughty rabbit" thing. It relates to a cartoon about a rabbit which was very active on Noah's Ark. ......The graphite side is usually opposite the stamping side of the gasket. Most gaskets have metal innards and have a curl to the cut. You would assemble the curl to the block. There are a few different stamping methods so go with your gut feeling. Remember that there is a specific foot lbs rating for the attachment nuts(25?)." Putting aside the naughty rabbit thing, now that I understand it it's quite funny at my expense of course, and studied Peters advice regarding the gaskets. Closer examination couldn't determine either the graphite side or the curl to the cut. Besides the 2 end gaskets look the same with one having to be installed reversed from the other so graphite side or curl MUST be wrong for one of them(I think)! Instead went with my gut feeling and hopefully, because I have a very big gut, that'll hold me in good stead. Time will tell. Unlikely to get back to the Coupe tomorrow because my daughter has roped me in to pick up some furniture for her. However I intend to catch up with David and his Veteran(Pre 1919) car club at Berrima on Saturday morning. Attach file: (17.93 KB)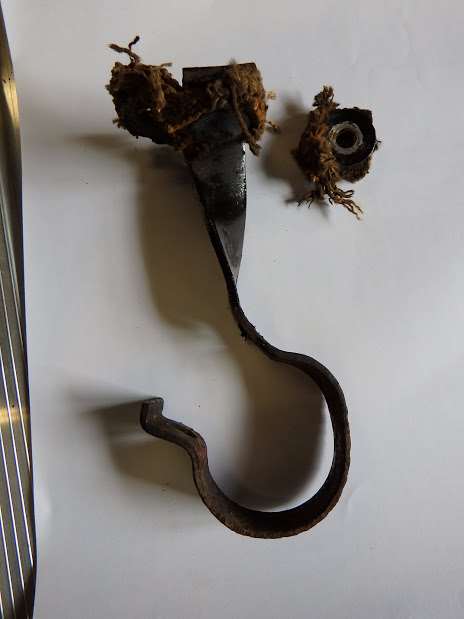 (15.31 KB) (15.31 KB)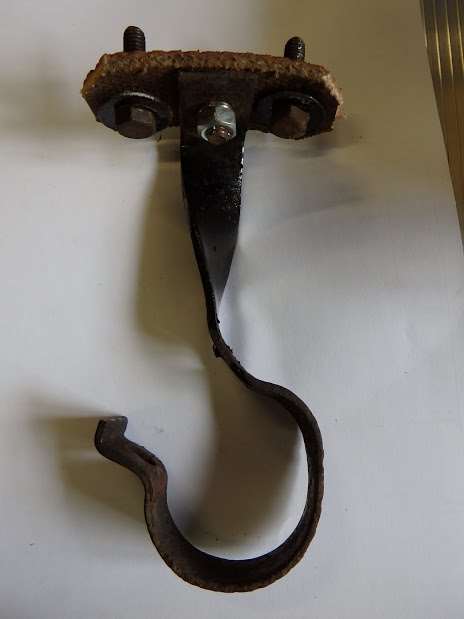 (37.23 KB) (37.23 KB) (41.41 KB) (41.41 KB)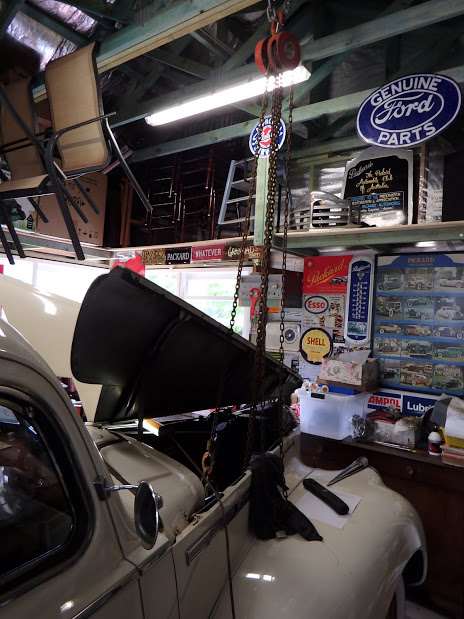
Posted on: 2017/2/2 2:39
|
|||
|
Mal
/o[]o\ ==== Bowral, Southern Highlands of NSW, Australia "Out of chaos comes order" - Nietzsche. 1938 Eight Touring Sedan - SOLD 1941 One-Twenty Club Coupe - SOLD 1948 Super Eight Limo, chassis RHD - SOLD 1950 Eight Touring Sedan - SOLD What's this? Put your Packard in the Packard Vehicle Registry! Here's how! Any questions - PM or email me at ozstatman@gmail.com |
||||
|
||||
|
Re: Wade's Workshop
|
||||
|---|---|---|---|---|
|
Home away from home
|
Mal, If you welded the two bolts to a light steel flat could you then fit that into the chassis (frame) before attempting to attach the flexible strap? If so, then you could fit the nuts and tighten them without the need to hold the bolts.
If that works measure the distance between the holes and call in next time you are down this way and we will weld two bolts to a flat steel strip. See rough sketch attached David Attach file:  Size: 36.07 KB; Hits: 72 Size: 36.07 KB; Hits: 72
Posted on: 2017/2/2 4:11
|
|||
|
||||
Register To PostTopic is Locked


