|
Re: Larry's 1951 Club Sedan Project
|
||||
|---|---|---|---|---|
|
Forum Ambassador

|
Lee,
Great pictures of the Bathurst weekend, sorry I couldn't be there.
Posted on: 2015/10/7 18:35
|
|||
|
Mal
/o[]o\ ====  Bowral, Southern Highlands of NSW, Australia "Out of chaos comes order" - Nietzsche. 1938 Eight Touring Sedan - SOLD 1941 One-Twenty Club Coupe - SOLD 1948 Super Eight Limo, chassis RHD - SOLD 1950 Eight Touring Sedan - SOLD What's this?  Put your Packard in the Packard Vehicle Registry! Here's how! Any questions - PM or email me at ozstatman@gmail.com |
||||
|
||||
|
Re: Larry's 1951 Club Sedan Project
|
||||
|---|---|---|---|---|
|
Home away from home

|
We certainly missed you Mal. It was a very nice weekend, all went to plan with no hiccups although Barry didn't make it in his Twelve . . minor mechanical problem of a noisy hydraulic lifter. He came along in a modern.
Posted on: 2015/10/8 2:58
|
|||
|
1951 Packard Club Sedan | [url=ht
|
||||
|
||||

|
Re: Larry's 1951 Club Sedan Project
|
||||
|---|---|---|---|---|
|
Home away from home
|
Thanks for the correction re: the '54 Don, and for your kind comments. Doing the resto has been a very rewarding and enjoyable time for me. I haven't been online here for a while, so apologies for my delayed reply.
Posted on: 2016/2/26 5:32
|
|||
|
1951 Packard Club Sedan | [url=ht
|
||||
|
||||
|
Re: Larry's 1951 Club Sedan Project
|
||||
|---|---|---|---|---|
|
Home away from home
|
Here we go with another one of life's adventures - overhauling an Ultramatic for the Club Sedan. I'm looking forward to it. Have had a lengthy break from doing anything major on the '51 so now I'm all 'energized' and ready to have a crack at it. Noticed that BigKev has also had a burst of enthusiasm about the same time and is working on his Ultramatic as well.
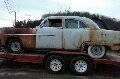
He has a much bigger challenge though - swapping in a '56. That could be a bit tricky, so best of luck BigKev! First a bit of background which will provide an update on what's been happening since restoration of the car was "completed". (Well - everyone knows a restoration is never fully completed.) The '51 has been going really well, and done almost 2,000 miles since its first outing. We have done a few quite long trips in her, to the Packard Rally last year being obne of them. There have been a few minor hiccups and despite the unlikelihood of having the same thing happen three times, all three issues have related to faulty distributor condensers. New condensers fixed the problem, but the NOS from Kanter, then the cheap ebay ones I bought failed (twice). Now I have settled on a decent Bosch condenser. The Bosch one went in after I totally destroyed my new muffler with an after-fire that was heard all the way from Burrumbuttock through Bumbaldry and on to Birdsville. Scared the life out of the missus. . . . . The Ultramatic I used was the only part of the coupe that I didn't recondition. I had a complete spare Ultramatic available, so it seemed reasonable to just use one of them without going through the lengthy and expensive process of overhauling it. 'If it ain't broke then don't fix it'. So, I picked it up off the garage floor and after a clean-up and a good paint job in it went. It was totally satisfying when the Ultra worked very well. No noises, no slippage, quick crisp changes, direct drive lockup worked - all very good. There was the minor issue of it not coming out of DD and into converter mode soon enough. It would do so at around 5mph, instead of maybe 15 to 10mph. And kick-down doesn't work. But I was OK with these issues. I knew I'd need to take it out eventually due to the minor oil leaks it has. It leaks a few drops of ATF a day onto the drip tray. So now is the time to prepare the 'spare' Ultra I have and swap it into the car. I started a week ago by getting all the Service Counsellors / STB's etc together that relate and having a good read of them plus the 51-54 Service Manual and also the Technicians Training Manual. Had read these before (briefly) but after a second reading it became very clear that anyone doing up an Ultra really needs to have a good knowledge of these service-type documents before even commencing the rebuild. There were quite a lot of changes made over the years. Prior to this (- actually it was before Christmas -) I had received the rebuild kit from Max Merritt and also a new direct drive friction plate, plus had the brake bands re-lined locally. Finding a shop that does relining wasn't easy but I saved a fortune because I didn't have to send my old ones over to the US and have the re-lined ones sent back. Shipping to/from the US is a very big expense even for small items, and especially for things like exchange bands, clutch plates etc. Quite a few quid's worth of parts from Max Merritt  Merritt has become my chosen supplier - excellent service and quick shipping!!  New Direct Drive clutch plate from the US  Found a local place that re-lines bands  So before I had started work I had spent a lot of dollars on the kit plus other parts . . . . And I wasn't even sure if I will need some of them. The reason I say that is because the spare Ultramatic I am about to overhaul is labelled: "O/HAULED 11/4/75". So what I am about to work on has already been "overhauled" 40 years ago. "Overhauled" . . . 41 years ago!!  I don't know who would have done the work back then, or whether they were good and qualified, or might have been 'backyard mechanics'. Time will tell.
Posted on: 2016/2/26 5:48
|
|||
|
1951 Packard Club Sedan | [url=ht
|
||||
|
||||
|
Re: Larry's 1951 Club Sedan Project
|
||||
|---|---|---|---|---|
|
Home away from home
|
I'll be following along on this Larry, so plenty of pictures.
John
Posted on: 2016/2/26 8:56
|
|||
|
||||
|
Re: Larry's 1951 Club Sedan Project
|
||||
|---|---|---|---|---|
|
Webmaster

|
'tis the season for Ultramatic work!
Posted on: 2016/2/26 9:58
|
|||
|
-BigKev
1954 Packard Clipper Deluxe Touring Sedan -> Registry | Project Blog 1937 Packard 115-C Convertible Coupe -> Registry | Project Blog |
||||
|
||||
|
Re: Larry's 1951 Club Sedan Project
|
||||
|---|---|---|---|---|
|
Home away from home
|
Yes John, I'll get quite a few pics uploaded as I get on with the project. Much of what I will post will be stuff that others have blogged on over the years, but what the heck! Those blogs have been tremendously helpful to me, and you never know when you might mention something that has been somehow overlooked.
Just finding a photo that shows how thick the lining should be on an Ultramatic brake band was helpful when I was researching! I always wish I had more time to read loads more on this site than I get to.
Posted on: 2016/2/26 19:23
|
|||
|
1951 Packard Club Sedan | [url=ht
|
||||
|
||||
|
Re: Larry's 1951 Club Sedan Project
|
||||
|---|---|---|---|---|
|
Home away from home
|
Yes - I'm hoping it will also be the time to be jolly while we're doing them!
Posted on: 2016/2/26 19:28
|
|||
|
1951 Packard Club Sedan | [url=ht
|
||||
|
||||
|
Re: Larry's 1951 Club Sedan Project
|
||||
|---|---|---|---|---|
|
Home away from home
|
Torque Converter Overhaul
Started this some weeks ago, so I'm doing the catch-up blog thing for a few posts. Because I suspect some of the tranny leaks I have are from the torque converter, the first stage will be to recon a spare one complete with spare bell housing that was attached to it. Both are very dirty condition and I've already noticed one of the drain plugs is snapped off flush with the housing. Will need to remove that and find a new plug. Good brass plug [img width=350]<a href="http://s829.photobucket.com/user/Larry51_2009/media/Packard%20Project/Ultramatic%20Overhaul/P1000776_zpse82ut08r.jpg.html" target="_blank"><img src="http://i829.photobucket.com/albums/zz218/Larry51_2009/Packard%20Project/Ultramatic%20Overhaul/P1000776_zpse82ut08r.jpg" border="0" alt="776 photo P1000776_zpse82ut08r.jpg"/></a>[/img] The broken one - damn! Wasn't all that easy to get it out cleanly, took a few hours [img width=350]<a href="http://s829.photobucket.com/user/Larry51_2009/media/Packard%20Project/Ultramatic%20Overhaul/P1000777_zpsnkeqtv7p.jpg.html" target="_blank"><img src="http://i829.photobucket.com/albums/zz218/Larry51_2009/Packard%20Project/Ultramatic%20Overhaul/P1000777_zpsnkeqtv7p.jpg" border="0" alt="777 photo P1000777_zpsnkeqtv7p.jpg"/></a>[/img] No idea what condition the guts of the converter will be like but I have new seal and bushing for it. Reading the manual I need to check the converter shaft backlash so adapted a dial indicator to a small tool holder which worked OK. Normally you might use the special micrometer the Manual recommends IF you can find one! (Someone on packardinfo has one of these). I'll settle for the alternative method. Dial Indicator method can replace the Packard special tool [img width=350]<a href="http://s829.photobucket.com/user/Larry51_2009/media/Packard%20Project/Ultramatic%20Overhaul/P1000799_zpsepwturep.jpg.html" target="_blank"><img src="http://i829.photobucket.com/albums/zz218/Larry51_2009/Packard%20Project/Ultramatic%20Overhaul/P1000799_zpsepwturep.jpg" border="0" alt="779 photo P1000799_zpsepwturep.jpg"/></a>[/img] [img align=left width=350]<a href="http://s829.photobucket.com/user/Larry51_2009/media/Packard%20Project/Ultramatic%20Overhaul/P1000765_zpsktpmurvu.jpg.html" target="_blank"><img src="http://i829.photobucket.com/albums/zz218/Larry51_2009/Packard%20Project/Ultramatic%20Overhaul/P1000765_zpsktpmurvu.jpg" border="0" alt="765 photo P1000765_zpsktpmurvu.jpg"/></a>[/img] The backlash was just within limits. I don't have any thrust spacers other than the one fitted so that was fortunate. I've been wondering what conditions can alter the backlash reading - whether it might change with wear, or is a manufacturing issue, or if swapping certain parts in the converter would alter it?? Maybe someone knows the answer, as I couldn't easily figure that out, and it would be very handy to know the answer! Next, undid the converter pump cap bolts after noting that there were two punch marks adjacent for alignment. Existing punch marks  The interior of the converter looks clean, with red ATF (- not much black ATF anywhere) and no debris present. Inspected everything for cracks, scoring etc and was OK. EDIT: Well, I'm having no luck adding my images today . . . . the blog goes off to 'never-never land' when I add one. Maybe the images are too large?? (No - 640x480, around 150KB) So I'll try again later when the Server has had it's afternoon nap. Apologies for the partial blog. Have asked BigKev for help with this problem which won't go away. P781 5 6 Noted the thrust washer orientation P7999 P801 Marked relative position of clutch plate to housing, as advised by Manual. These units are balanced at the factory so it's important to do these markings. P806 Inspected the bell housing bushing and oil seal. Some wear and markings on the bushing so it will be replaced as will the seal. P811 Measured the piston ring gaps as per the Manual and found they were both worn beyond spec so will replace them. P812 Drilled out the broken brass drain plug from the converter clutch housing with a drill bit a tad smaller than the plug. Fingers crossed this will work. Scratched the remains of the brass thread out as much as possible with some riffler files. I re-tapped the 1/8 inch NPT (tapered) thread as closely as possible and a new NPT Allen (hex key) plug fitted OK. Swapped the other side brass plug for a similar Allen plug to keep the balance the same. I will use thread tape on these as a precaution. P851, 869
Posted on: 2016/2/27 19:09
|
|||
|
1951 Packard Club Sedan | [url=ht
|
||||
|
||||


