|
Re: Howdy
|
||||
|---|---|---|---|---|
|
Home away from home

|
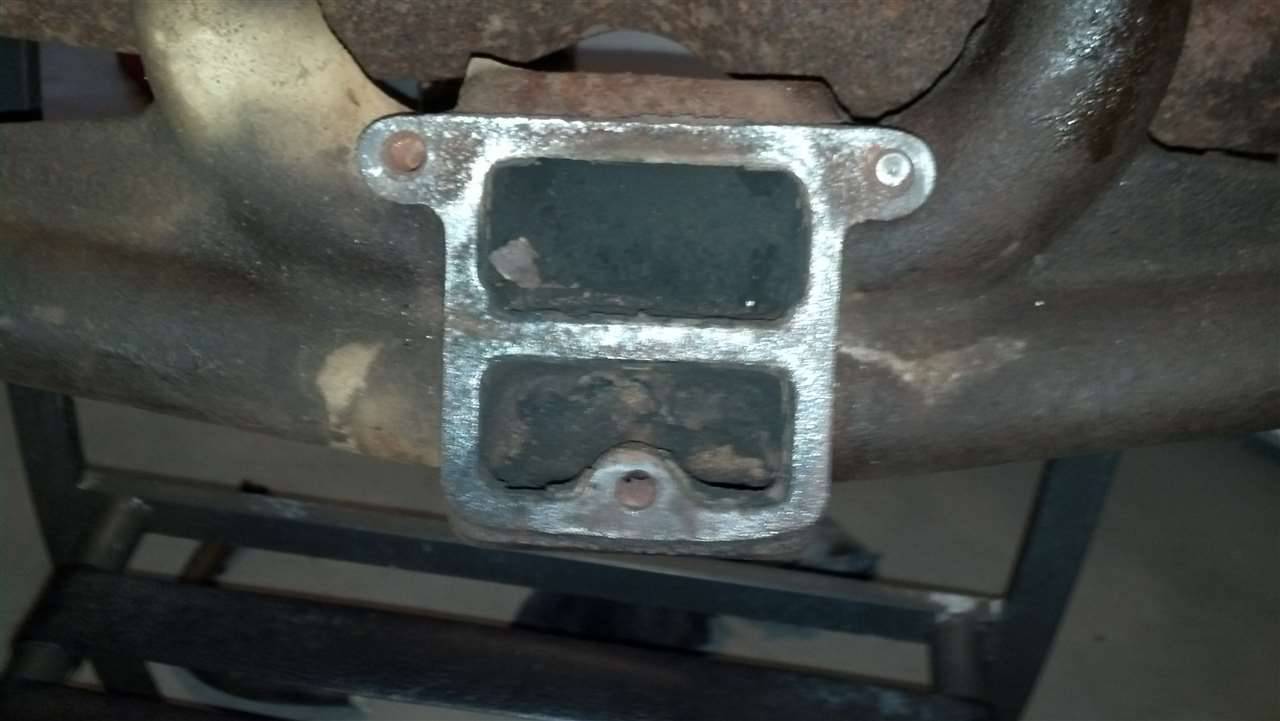
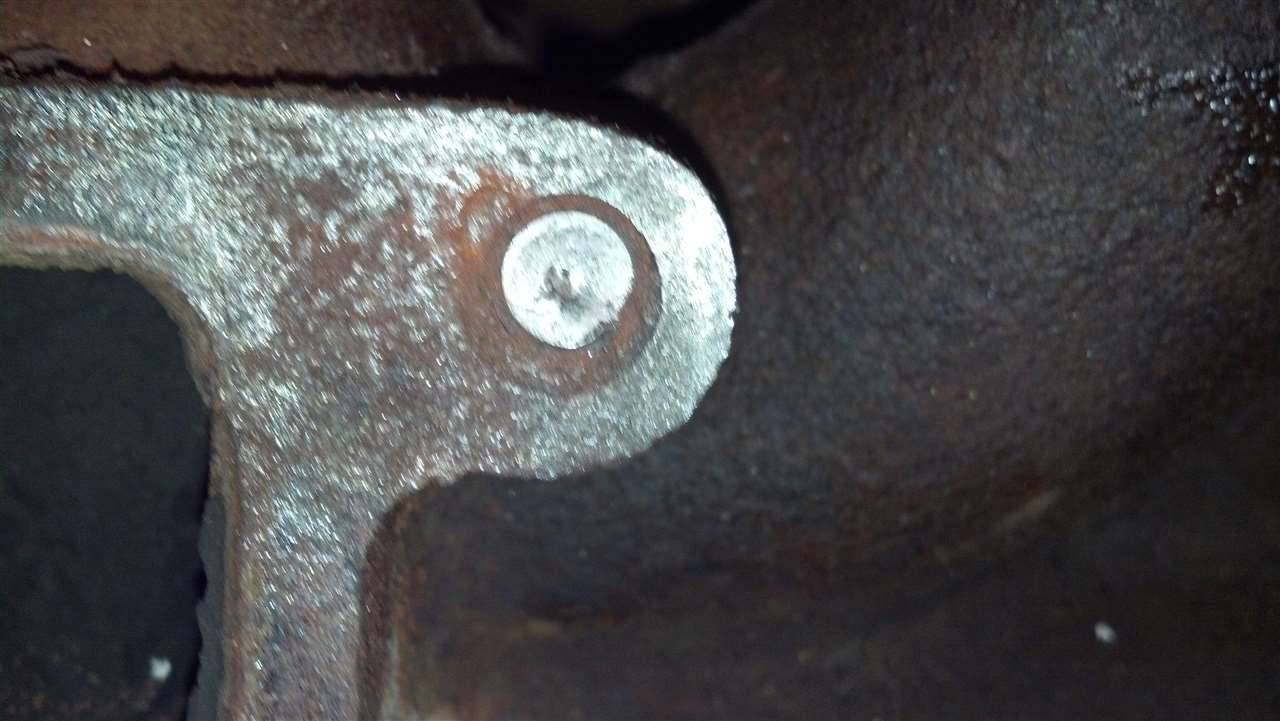
Well I drilled the center of the broken bolt out (and broke three drill bits in the process).
Then I tried the extractor bit. Broke the end off. Welded a nut on the end of it. Snapped that off - three times. Then used the next size extractor bit. I got the bolt out..at the expense of the manifold - see pic below. As I read it, the manual calls for 25-30 lbs here. Repair suggestions? Weld? Threaded insert? Take a chance it will hold? JB weld a stud in, and use a nut instead? Right now I am leaning toward the stud . On another note, the pin for the oil pump drive gear arrived today. The service manual is specific about the drift mark being on top during installation. I can not figure out why this matters. I ask because now I need to put the drive gear on the oil pump shaft, and I can put it on two ways, 180 degrees out from either position. How do I know which way is correct, or does it matter? Attach file:  (73.85 KB) (73.85 KB) (74.93 KB) (74.93 KB)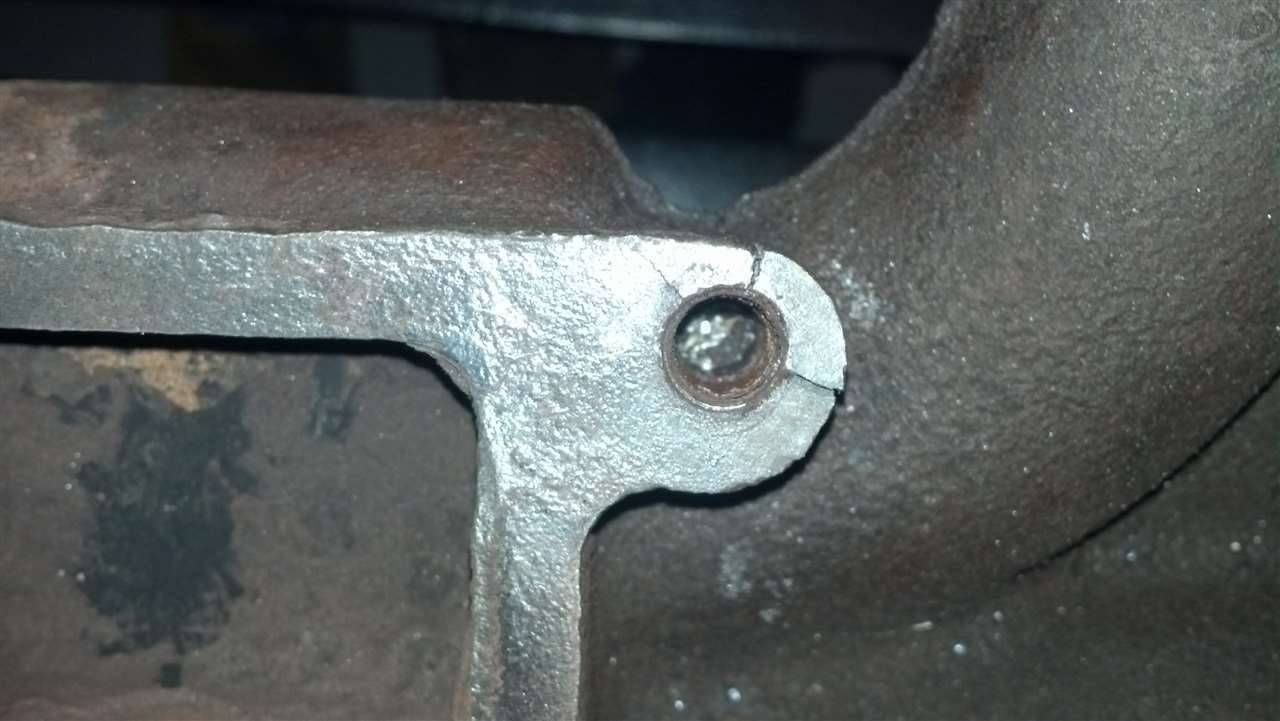
Posted on: 2014/1/3 15:31
|
|||
|
||||
|
Re: Howdy
|
||||
|---|---|---|---|---|
|
Home away from home

|
Have it welded by a professioal that does cast iron. I had my 356 manifold done by an expert, cost $50 and took 5 months because he was wintering in Arizona. He was highly recommended and did an excellent job. Good luck.
Posted on: 2014/1/3 15:40
|
|||
|
||||
|
Re: Howdy
|
||||
|---|---|---|---|---|
|
Home away from home
|
You are lucky, I have a rule to never use easy-out's to get broken bolts out.
Usually it breaks off flush and now you have a hardened bit uou can't drill broken off. I have my best success getting as close to the center as I can with an automatic punch and then slowly drill it until you get close to the threads. Usually a tap for the original thread size will then clean it out at that point without damage. I have a broken bolt I am sweating on my late model Harley Davidson motorcycle exhaust bracket. Harley doesn't offer support even though they have already hashed this repair twice in less than 6000 miles. The first broken bolt experience was a head stud on a Model A Ford and I ended up towing the car to a guy who got it out with a torch with the Ox turned up and burned it out without damaging the threads. I also use a little hand-held air impact to unscrew stuck hardware and I haven't broken many bolts this way. Jim
Posted on: 2014/1/3 18:11
|
|||
|
||||
|
Re: Howdy
|
||||
|---|---|---|---|---|
|
Home away from home
|
Thanks Dallas. I just heard back from a welder - he said he'd charge $35 to fill it with high-nickel rod, and then I'd have to drill and tap it. I don't have a press and don't trust myself to drill and tap it perfectly plumb with a hand-held drill - which means it would have to go to a machine shop.
Jim - unfortunate to hear about the late model Harley; I've heard enough stories of this kind of issue that I'll be content with my little Honda! I've never heard of melting out a broken bolt, that is incredible! He must have been pretty confident - if he would have burned out the threads, that job would have gotten a whole lot bigger! I love hearing/learning about new methods of repair! Incidentally, I was using my cordless impact when I broke the bolt...go figure. Anyone else care to chime in? Any insight on the oil pump drive gear issue? Thanks!
Posted on: 2014/1/3 20:20
|
|||
|
||||
|
Re: Howdy
|
||||
|---|---|---|---|---|
|
Home away from home

|
I always just find as close to exact centre of a broken stud / bolt, and then drill out carefully until to the start of the thread. Then pry out the thread remnants with a riffler file ot scriber. Had too many failures with easy-outs etc . . . they always snap and leave you worse off. Drilling out works fine every time for me.
Regarding the mark on the oil pump - when I fitted mine into the '51 288 engine I asked myself the same question and the only answer I personally could come up with is that having the mark visible / upwards as you insert the pump into the engine block assists you getting the pump tang (in the pump shaft) aligned correctly into the distributor slotted shaft. That ensures the correct union of oil pump and distributor. Of course your timing could be 180 degrees out if you have removed the distributor sometime - which would necessitate re-timing the engine. But as far as the oil pump marking is concerned, perhaps someone on this forum has some additional reason for the instruction in the Manual. Sometimes you wish Packard had given a better description or reason in their Manual for why something was to be done a certain way.
Posted on: 2014/1/7 8:09
|
|||
|
1951 Packard Club Sedan | [url=ht
|
||||
|
||||
|
Re: Howdy
|
||||
|---|---|---|---|---|
|
Forum Ambassador

|
Regarding the mark on the oil pump - when I fitted mine into the '51 288 engine I asked myself the same question and the only answer I personally could come up with is that having the mark visible / upwards as you insert the pump into the engine block assists you getting the pump tang (in the pump shaft) aligned correctly into the distributor slotted shaft. That ensures the correct union of oil pump and distributor. Of course your timing could be 180 degrees out if you have removed the distributor sometime - which would necessitate re-timing the engine. But as far as the oil pump marking is concerned, perhaps someone on this forum has some additional reason for the instruction in the Manual.
As long as you're willing to put the #1 piston on UDC on the compression stroke and note the position of the rotor and then walk the high tension wires around the distributor cap, it really makes no difference what drive gear position the oil pump is installed at, and which of the two possible distributor positions are selected. Just go back to basics and re-establish the wire positions.
Posted on: 2014/1/7 9:21
|
|||
|
||||
|
Re: Howdy
|
||||
|---|---|---|---|---|
|
Home away from home
|
"I've never heard of melting out a broken bolt, that is incredible! He must have been pretty confident - if he would have burned out the threads, that job would have gotten a whole lot bigger! I love hearing/learning about new methods of repair!"
When I worked in a muffler shop I did this hundreds of times. Exhaust pipe studs break off all the time when you go to replace a rusted out pipe. There is a knack to it.You need a steady hand and good timing to blow out the broken stud before the manifold gets hot enough to melt.If you do it right it does not affect the threads at all. Next time you have a problem like this, try a muffler shop.
Posted on: 2014/1/7 11:08
|
|||
|
||||
|
Re: Howdy
|
||||
|---|---|---|---|---|
|
Home away from home

|
There's another old trick for broken exhaust studs but not applicable in all cases, like internal threads. Through drill the hole and replace with a bolt. Might have to grind head, etc. to fit but if the right length bolt is used, there's no threads exposed at the junction to rust, cause the breakage.
There's always a chance when welding cast, that the repair won't hold or things will get worse. Make sure he's done this many times successfully. There's alot of technical reasons I don't like putting heat on old cast. There's a common misconception the nickel will work for all casts that probably got started when they first came out because they were so much better than brazing. If the weld goes good, be careful in the drill/tap and reassembly. Keep work cool and don't over tighten, it could snap off. JB weld won't withstand manifold temperatures. There are some industrial materials/techniques that might work but aren't available to consumers and are very costly.
Posted on: 2014/1/7 11:38
|
|||
|
||||
|
Re: Howdy
|
||||
|---|---|---|---|---|
|
Home away from home
|
I have a lot of experience with drilling broken bolts out, but the torch bit is beyond my experience. I couldn't imagine trying that on a Packard.
Anyway, the only extractors worth anything are from Snap On. The set comes with drills that must be used with Tap Magic to prolong life. The best method for those manifolds is to take them to a shop that has a mill. The machinist will use a centering bit and punch out the exact center. Then using left hand bits the remnants will likely come out, but if they don't running a tap into the hole will run them out. Extractors are limited use tools, but when they work they prevent damage to existing threads. And of course left hand drill bits and a torch are an big benefit.
Posted on: 2014/1/7 19:00
|
|||
|
||||


